It’s a big day here at Autodesk! We’re excited to announce the launch of AutoCAD 2017 for Mac and AutoCAD LT 2017 for Mac. The AutoCAD team has spent the past year making many improvements and enhancements to the software. The enhancements in this release were designed to match your familiar workflows, making this the ultimate Mac-native AutoCAD release. From modern, customizable tool sets, to importing PDFs and running multiple AutoCAD sessions side-by-side, we’ve added many sought-after features, allowing you to focus on designing.
Below are some of the key enhancements we’ve made to AutoCAD 2017 for Mac and AutoCAD LT 2017 for Mac. See for yourself by downloading a free trial today.
The User Interface Becomes More Organized and Intuitive
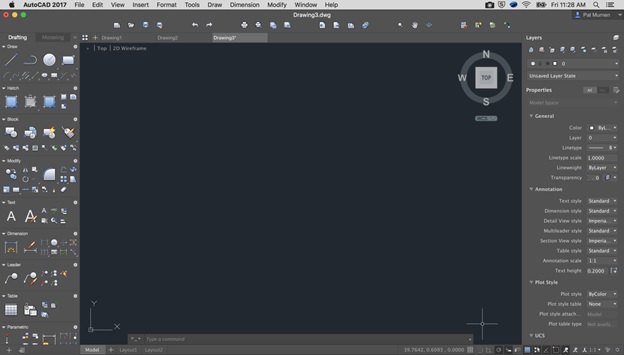
One of the first things you’ll notice are significant changes have been made to the user interface that we hope you’ll love. We redesigned the tool sets to provide you access to more tools in a more organized fashion, and added file tabs to provide an easy way for you to access all the open drawings with just a single click. Model and Layout tabs were added, the Status Bar has been updated, and the command line is anchored at the bottom of the drawing area.
 Tool Sets More Efficient, Customizable
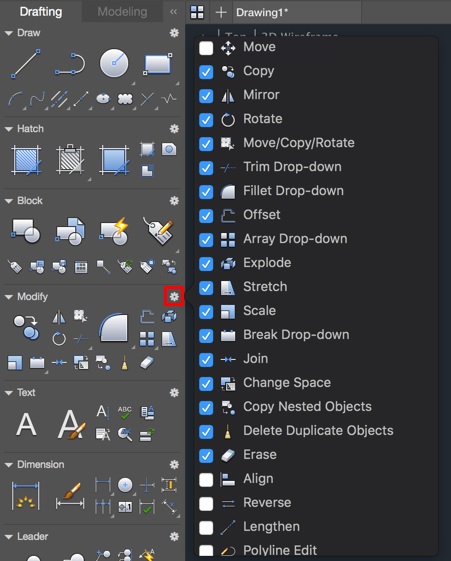
We divided the tool sets into two tabs: Drafting and Modeling. Not only have we provided you with easy access to tools and commands, but you can also customize these panels to suit your needs and change them as often as you want. Each tab contains predefined standard panels, grouping related commands together. Click on any standard panel to select which commands to show or hide from that set. For more efficiency, you can collapse, move, reorder, and resize panels, all in real time.
For example, you can choose to have your frequently used commands be displayed in the tool sets and get rid of the ones you never use.
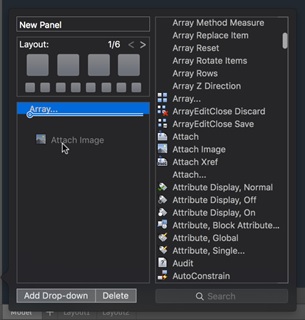
 Create your own panels, easily adding commands by dragging from the complete command list.
 File Tabs Offer Easy Access to Open Drawings
File tabs provide a simple way for you to access all of your open drawings. To create a drawing, click on the plus sign (+). You can also navigate through the file tabs using Control+TAB and access the shortcut menus to open, close, or save drawings by right-clicking on the file tabs.
 Gain More Control Importing PDFs
PDF files are a common way of publishing and sharing design data for review and markup. AutoCAD currently supports the creation of PDF files as a publishing output for drawings. PDF files can be attached to drawings, which can be used as references when collaborating on projects. In AutoCAD 2017 for Mac, you can import the geometry, TrueType text, and raster images from a specified page in a PDF file or from all or part of an attached PDF underlay.
IMPORT Command
The Import tool, available from the Toolbar and File Menu, enables you to import geometry from a PDF page into the current drawing as AutoCAD objects. In the “Import File” dialog, you’ll see that PDF has been added to the list of supported file formats. After a PDF file type is selected, the “Import PDF” dialog is displayed and allows you to:
- Choose which page from the selected PDF file to import
- Specify the Scale, Rotation, and Insertion point of the imported geometry
- Control what type of data is imported from the PDF (Geometry, Solid fills, Text, and Raster objects)
- Control how layers are assigned to imported objects
- Set different post processing options for imported geometry
 PDFIMPORT/-PDFIMPORT Command
The new PDFIMPORT command (–PDFIMPORT via command line access) offers an alternate way for you to import PDF geometry into the current drawing. The initial options provide a choice either to select an attached PDF underlay, or to specify a PDF file.
![]() If the file option is chosen, the Import PDF dialog is displayed just as when you use the IMPORT command. If you select an attached PDF underlay, you can specify a rectangular or polygonal boundary around the objects you want to import, or you can import everything.
If the file option is chosen, the Import PDF dialog is displayed just as when you use the IMPORT command. If you select an attached PDF underlay, you can specify a rectangular or polygonal boundary around the objects you want to import, or you can import everything.
You can also choose to keep, detach, or unload the PDF underlay after the objects are imported. The Settings option in the PDFIMPORT command displays a dialog that provides the same settings as those in the Import PDF dialog.
Autodesk Account Settings Accessible
We’ve made it easier than ever to sign in and access your Autodesk account from within AutoCAD. In the upper right corner of the application window, you can click “Sign In” to get access to your license management and purchase options, view your account details, and launch the A360 Desktop App to sync your files to the cloud.
Multiple AutoCAD Sessions Welcome
Ever wanted to have more than one AutoCAD session open at once so that you can compare two drawings side by side on one screen? Now you can. And there are a couple of ways to do so. If you have more than one drawing open, right-click on the file tab of the drawing you want to open in another session and click “Move to New Session.”
 Alternatively, you can also right-click on the AutoCAD launch icon and select “New AutoCAD Session.” You can then arrange the sessions to see the drawings side by side.
Full Screen Mode Enhances Precision
AutoCAD 2017 for Mac now supports OSX native Full Screen mode. You can switch to and from Full Screen through:
- Cmd+0 or Cmd+Ctrl+F
- The “Full Screen” button in the top left of the drawing window
To use the split view with AutoCAD, hold the “Full Screen” button and drag AutoCAD 2017 for Mac to the right or left side of the screen.
 For more details about these and other additional new features (including associative centerlines and center marks, text editor visor, parametric menu, and the license manager among others), please check out the complete Preview Guide.
We look forward to hearing your thoughts in the comments section below and on the AutoCAD for Mac forums.


