In my previous tip, I described the basics of 3D Gizmos but there are additional options and controls to help you make the most of Gizmos.
When you select objects (with a 3D visual style active), a 3D Gizmo is placed at the center of the selection set. If you select just one object, for example, the Gizmo is at the center of that object. If you select multiple objects, the Gizmo is at the center of the entire selection set.

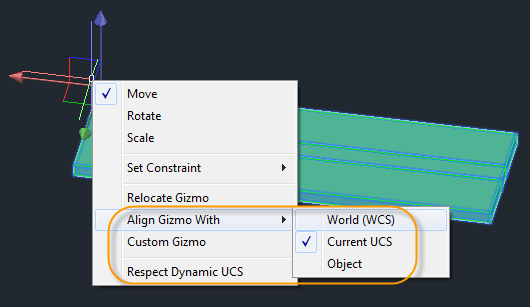
The location of the Gizmo acts as a base point for moving, rotating, or scaling. It’s likely that you’ll want to specify a different basepoint. Simply right-click on the Gizmo and choose the option to Relocate Gizmo. Then you can use your standard object snaps to place the Gizmo wherever you want the basepoint of the operation.

For example, if I relocate the Gizmo to the top edge of this shelf (instead of the middle), I can move the shelf up along the Zaxis, constraining it as I snap to an endpoint on the top edge of the shelf on the other side.

I can do nearly all of my Gizmo editing by simply relocating it and choosing the appropriate operation (move, rotate, or scale) because the Gizmo automatically aligns with the current UCS (user coordinate system) by default. However, on those rare occasions where aligning the Gizmo axis with the current UCS isn’t appropriate, you can choose to align it with the WCS (World Coordinate System), the selected object, or you can even choose Custom Gizmo and specify exactly how to align it. There’s even an option to have it honor the Dynamic UCS!

I hope you found these tips on the 3D Gizmos helpful. Once you try them, you’ll wonder how you ever lived without them!
More Tuesday Tips
Come back next week for hints on how to get perfect blends every time, and don’t forget to check out the full Tuesday Tips series in the meantime. Want more? LynnAllen’sAutoCAD2018Tips &Tricks and TheBestofLynnAllen’sTips & Tricks are available for download now!


