In looking at the first step in basic AutoCAD customization, creating custom shortcuts can simplify your daily setup process by combining multiple steps into a single operation that you are already accustom to performing. By using custom shortcuts, not only can you start the application in a state that you can begin working right away, but you also eliminate any potential human error out of the process.
From my experience, many companies tend to find themselves creating one shortcut per client or discipline to reduce setup time and potential errors. While every company is different and has exceptions to the rules, customizing your desktop shortcuts can be a simple way to increase basic productivity.
Shortcuts are the most common way to start an AutoCAD-based or AutoCAD LT product, whether from the Windows Desktop or Start Menu/Screen. In addition to starting an application, a shortcut can be used to open a:
- Folder location in the file system
- Document or file in its associated application
- Uniform Resource Location (URL) in the system default web browser
By default, when the application shortcut is created, the shortcut is assigned not only the name and location of the application to start but is also assigned some additional properties. Figure 1 shows the default property values of the AutoCAD 2018 – English shortcut.
 Figure 1. Default properties of the AutoCAD 2018 – English shortcut
Why Customize the AutoCAD or AutoCAD LT Application Shortcut
The default AutoCAD and AutoCAD LT shortcuts work great, right? So why consider changing something that appears to be working just fine; after all, when the default shortcuts are used the application starts and it loads with the stated language. While true, the shortcuts used to start AutoCAD and AutoCAD LT work as expected, they could be doing more for you and your company. Shortcuts can be used to manage standards used for a specific project, client, or even general industry/discipline (see Figure 2). If you work in a small or large company, chances are you maintain different symbol libraries and standards for various projects or clients along with different groups in the company that might work on different discipline specific parts of a project.
 Figure 2. Example of multiple custom shortcuts
Right now, you might start AutoCAD, switch user profiles, browse to a specific drawing template file when a new drawing needs to be created, and browse through a number of folders each time you need to insert a block. If any of this feels familiar to you, customizing the existing or creating a new shortcut could simplify your current startup process.
Instead of the previous described process, you could start AutoCAD, create a default drawing based on a specific drawing template, and set a user profile and workspace current that allows you to access your files (blocks, custom programs, etc.) and tools faster. Those situations and more can be streamlined with the help of shortcuts and some other moderate customization. Shortcuts can be customized to use what are known as command line switches. A command line switch is an instruction that is sent to the AutoCAD or AutoCAD LT application during startup.
You might use a command line switch to specify which
- User profile to set current that is defined in the product; AutoCAD only
- Drawing template to use for the default drawing
- Sheet set (DST) file to load into the Sheet Set Manager
- Workspace that controls the display of your tools to set current
Command line switches are application specific; AutoCAD-based products support 15+ different command line switches; and AutoCAD LT supports more than 5 different command line switches. You can find out more about all the command line switches available by going to “Command Line Switch Reference” topic in the AutoCAD Online Help system or “Command Line Switch Reference” in the AutoCAD LT Online Help system.
Configuring an Application Shortcut
A shortcut is defined by a number of properties, but the primary property is known as the Target. The Target property specifies the name and location of the application to be started by a shortcut, in addition to any command line switches that should be passed to the application for use at startup.
The following is the default value of the Target property for the AutoCAD 2018 – English shortcut:
“C:Program FilesAutodeskAutoCAD 2018acad.exe” /product ACAD /language “en-US”
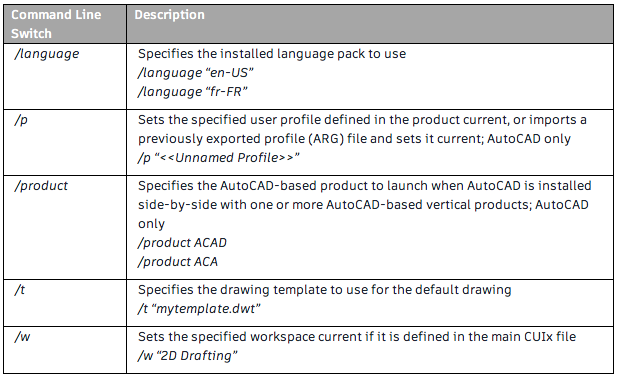
The first part of the value is the name and location of the AutoCAD executable, while the second part defines the command line switches and their values that have been specified. Command line switches are completely optional, even those shown in the previous example. The following table lists some of the most frequently used command line switches available for use with the AutoCAD and AutoCAD LT executables.

Multiple command line switches can be provided simply by adding a space before each command line switch and its associated value; some command line switches do not require a value. The following example shows the use of multiple command line switches:Note: When specifying a folderfile location or value that contains spaces, you must surround the value with double quotation marks in the Target property. If the double quotation marks are not provided, the application will interpret each space as the start of a new parameter. For example, C:My CustomizationC-Size.dwt must be specified as “C:My CustomizationC-Size.dwt”.
“C:Program FilesAutodeskAutoCAD 2018acad.exe” /product ACAD /language “en-US” /t “C:My CustomizationC-size.dwt” /w “Our Environment”
- /product ACAD specifies that the AutoCAD program should be started when one or more AutoCAD-based products is installed
- /language “en-US” specifies the use of the English language pack
- /t “C:My CustomizationC-size.dwt” specifies that the C-size.dwt drawing template should be used for the initial drawing that is created upon startup
- /w “Our Environment” specifies that the workspace named Our Environment should be set current
Along with the Target property, these additional properties can be modified to affect the behavior of an application when it starts:
- Start In Location – Specifies the working directory for the application
- Compatibility – Controls the settings that affect the way the application runs; these settings are typically used for applications developed for earlier versions of the Windows OS
- Run As – Controls whether the associated application is executed as an Administrator who often has elevated privileges
- Icon – Determines which ICO resource/file should be displayed for the shortcut
Creating a Desktop Shortcut
These steps explain how to create a custom desktop shortcut to launch AutoCAD or AutoCAD LT with a default drawing based on a specific drawing template file and to set the “Drafting & Annotation” workspace current.
(Note: For a handy printout of these steps, click here for a PDF.)
- Minimize all open applications until you see the Windows Desktop.
Tip: If you have a keyboard with a Windows key, press ![]() +M to minimize all open applications and windows.
+M to minimize all open applications and windows.
- On the Windows Desktop, right-click in an empty area and click New > Shortcut (see Figure 3).
 Figure 3. Windows Desktop shortcut menu
- In the Create Shortcut dialog box, click in the Type the Location of the Item text box and type C:. Click Browse.
- In the Browse for Files or Folders dialog box, navigate to C:Program FilesAutodeskAutoCAD 2018 (or AutoCAD LT 2018) and select exe (or acadlt.exe). Click OK.
- In the Create Shortcut dialog box, click in the Type the Location of the Item text box and press the End key.
- Press the Spacebar key once and type the following:
/t “.Tutorial-iArch.dwt” /w “Drafting & Annotation”
The text string in the Type the Location of the Item text box should look similar to that in Figure 4.
 Figure 4. Target property value for the new shortcut
- Click Next.
- Click in the Type a Name for this Shortcut text box and type My AutoCAD Icon (or My AutoCAD LT Icon if you are using AutoCAD LT).
- Click Finish to create the new shortcut (see Figure 5).
 Figure 5. New shortcut created
If a message box is displayed informing you that the shortcut already exists, click Yes to replace the existing shortcut with the same name or No to not replace the existing shortcut.
These steps explain how to configure AutoCAD or AutoCAD LT to not display the New Tab page at startup, and test the new shortcut with the specified command line switches.
- Double-click the new My AutoCAD Icon shortcut to start the AutoCAD or AutoCAD LT application.
After the new shortcut is double-clicked, the application starts and the Drafting & Annotation workspace should be set current based on the use of the /w command line switch but a new drawing isn’t automatically created based on the Tutorial-iArch.dwt drawing template file. The new drawing isn’t created because of the default value for the STARTUP system variable.
- In the AutoCAD or AutoCAD LT application, create a new drawing.
- At the Command prompt, enter startup.
- At the Enter new value for STARTUP <3>: prompt, enter 0.
- If you are using AutoCAD or an AutoCAD-based product, on the status bar, click Workspace Switching > 3D Basics to set the 3D Basic workspace current.
- Close the AutoCAD or AutoCAD LT application and discard any changes to the new drawing.
- Double-click the new My AutoCAD Icon shortcut to start the application again.
After the new shortcut is double-clicked, the application starts and the Drafting & Annotation workspace should be set current based on the use of the /w command line switch along with a default drawing being created based on the Tutorial-iArch.dwt drawing template file specified by the /t command line switch (see Figure 6).
 Figure 6. AutoCAD environment after using the /w and .t command line switches
Modifying a Desktop Shortcut
Once a shortcut has been created, you can modify its properties if you want to change or add additional command line switches. The following steps explain how to modify an existing shortcut.
- Right-click over the shortcut you want to modify and choose Properties.
- In the Properties dialog box, click the Shortcut tab.
- In the Target property text box, modify the name and location of the application along with the command line switches to use as needed.
The value in the Target property text box is the same as the text you had entered in the Type the Location of the Item text box during the creation of the shortcut (see Figure 7).
 Figure 7. Shows the addition of the /p command line switch to the Target property
- Optionally, make any additional property changes to the shortcut.
- Click OK to save the changes made.
This is just the first in a new series on basic AutoCAD customization. Tune in next time to learn about the Quick Access Toolbar. For more from Lee, follow him on Twitter.


