In part one of this two-part series, I showed you how to find areas of closed objects by using the LIST command, the Properties palette, and the AREA command.
I even ended with a trivial oddity of the AREA command. Spoiler alert: I’ll do another oddity at the end of this post.
I also mentioned that I would be talking about my favorite method and arguably the best. So, without further ado, I give you…
Quick Measure
I absolutely loved the new Quick option of the MEASUREGEOM tool when it was introduced in 2020. My love grew even deeper when it was improved to include areas in the next release. It’s not only quicker but easier—a true win-win. The following year, it was enhanced even more with the addition of the area feature.
If you haven’t tried Quick Measure yet, you really should. Just move your mouse cursor around and dimensional info magically pops up for you. But the topic of this blog series is querying for areas in AutoCAD. With the Quick Measure tool, it couldn’t be easier.
While your Quick Measure cursor is within a closed object, you can now have it display the area. Let me go through the complex sequence of steps you’ll need to use to make this happen: left click. Yep, that’s how easy it is. When you left click within a closed space, the bounding area will display as the familiar green solid with the area and perimeter (and the cursor’s coordinates) shown in a dynamic input box.
Moving your mouse will turn it all off, so be careful. But even if you do, all you have to do is click again and remember to be more careful next time. Also, if you’re not a user of Dynamic Input, be warned that using the Quick option will turn it on. Sorry, but it’s just how it works.
If there are islands within your closed object, they will automatically be subtracted, which is nice. But what if that’s not what you need? You’ll love how easy it is to add or subtract islands or even other closed objects to your area. Before moving your mouse, press the Shift key on your keyboard. Not only will this keep you in the cool green area mode, but now you can click on your islands or other objects to toggle them between being added or subtracted from your calculation.
If this were rooms in a floor plan, just keep your shift key down and click in each room. It takes almost no time at all to get your total area.
And, like the other methods, don’t add the effort of jotting down the area calculation on a notepad. You can use F2 to display the TextScreen and copy it from there. As you can see, using the Quick Measure tool is really a leap forward in querying for areas.
MASSPROP Command
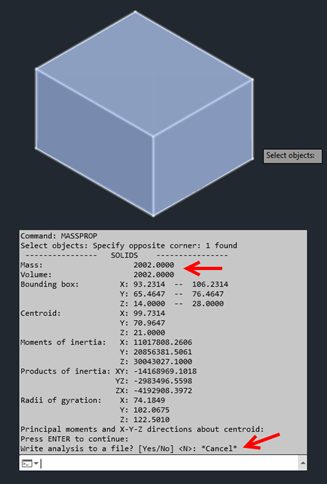
There’s one more way to get an area in AutoCAD. It’s called MASSPROP, short for Mass Properties. Typically, it’s used on 3D solids, where it reports not only mass and volume but the bounding box (The diagonally opposite corners of a 3D box that encloses the solid), solid centroid, moments of inertia, etc.—all kinds of useful engineering data. I know, I know… volume isn’t the same as area, but grant me a little leeway on this one.

In fact, it does report an object’s area as long as that object is a 2D Region. You’ll also get the perimeter, bounding box, and centroid. Selecting a Region or querying it with the LIST command will also return its area, either in the TextScreen for LIST or the Properties palette when selected.

That’s not the case for a 3D solid. The only way to get its volume calculation is through the MASSPROP command. Here’s an interesting tidbit. Unlike all the other methods I’ve described in this series, the MASSPROP command gives you the option to write the results to a text file, which will use an MPR extension.
Summary
OK, I assume most of you scrolled to the bottom right away to see what the area oddity is. I can’t blame you.
If you run AREA > Object and select a 3D Solid, AutoCAD will return a value, but it will be different than if you use MASSPROP to get the volume. With a simple box as my example, the volume returned will be per the old L x W x H formula. But with AREA, you’ll get a different number because it takes the area of each face of the box, then adds them up for you.
So, if you ever need to make sure you have enough wrapping paper to cover a box, I guess you could draw the box as a 3D solid, then run AREA on it and compare the results to how much paper you have. Might come in handy during the holidays! See you next time.


