
It seems to have become a 3D world out there—model this, BIM that—but make no mistake, there’s still a need for old fashioned 2D drafting too. And, of course, the end goal of whichever method you use is to accurately convey your design and creation content.
What is an Isometric Drawing?
A 2D isometric drawing, which may be created from an isometric projection, is a flat representation of a 3D isometric projection. This method of drawing provides a fast way to create an isometric view of a simple design. Distances measured along an isometric axis are correct to scale. But because you are drawing in 2D, you cannot expect to extract other 3D distances and areas, display objects from different viewpoints, or remove hidden lines automatically.
Before the advent of CAD, we created isometric drawings with our T-square (or drafting arm) and our trusty 30-60-90 triangle. But you can accomplish the same thing in AutoCAD—if you know how.
How to Turn on Isodraft Mode in AutoCAD
There are a couple of ways to turn on Isodraft to allow for isometric drawings. The first is typical of AutoCAD—type it into the Command Line! When you do, you’ll see four options appear (or if you have Dynamic Input turned on, they’ll appear in the menu near your cursor). Choose any of the Isoplane options to change from orthographic drafting to isometric.

The other method is probably the most common. Just click on the Isodraft icon on the Status Bar to toggle it on or off. Click the small down arrow just to its right to choose your isoplane mode.
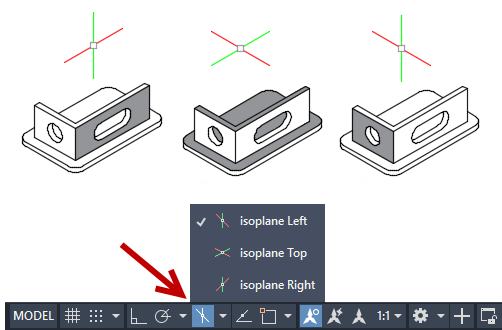
Whatever method you prefer, a few things will happen when enabled. First, your cursor will change from orthographic to the chosen isoplane. You can set it to left (30 and 150 degree axes), right (30 and 90 degree axes), or top (30 and 150 degree axes). Also, if you have your grid turned on, it will change as well, based on which isoplane is active. Finally, you’ll notice that Orthomode also switches to match your current isoplane.
Here are a couple of usage tips that you may want to use. Snaps will work in Isodraft, so don’t be afraid to enable them if they can help. Many users prefer to see the crosshairs in full screen mode; it can help with lining up edges. If that’s you, just change CURSORSIZE to 100 (default is 5, so remember that if you want to go back).
Finally, the best time saving tip of all is that once you’re in Isodraft mode, you can quickly toggle the isoplane by pressing Ctrl-E, or F5 on the keyboard. Note that if you’re in Orthographic mode, Ctrl-E or F5 appear not to do anything. (Actually, it does set the default mode for the next time you enable Isodraft.)
How to Draw Isometric in AutoCAD
Now that you’ve learned how to enable Isodraft, change drafting planes, and set it up to your liking, it’s time to start your isometric drafting. But before you get started, there are a couple of tricks and caveats you’ll want to know about.
In orthographic drafting, you’ve probably gotten used to using the Rectangle command instead of drawing four Lines or Polyline segments. It makes sense to think that in Isodraft mode, the Rectangle command would shift into Isometric and draw in the current isoplane. It doesn’t. It will still draw the rectangle as if you were still in Orthographic mode, so you probably don’t want to use that.
You’ll also need to abandon the Circle and Arc commands. If you need them in your Isometric drawing, you need to use the Ellipse command. But here’s the catch…you’ll need to type it into the command line because the option that you’ll access does not appear if you activate Ellipse from the Ribbon (or Menu Bar for that matter).
When in Isodraft mode, accessing Ellipse from the command line will give you the extra option of Isocircle. Make sure to select it from either the command line or Dynamic Input drop-down to force it into a true isometric ellipse, according to the current isoplane.
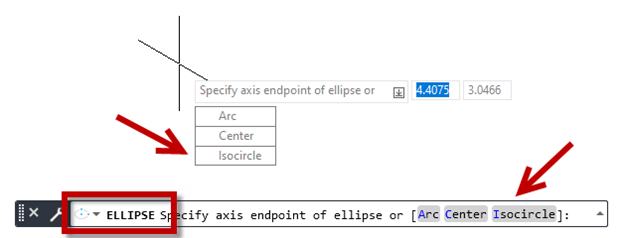
Once you’ve specified Isocircle, you’ll be prompted to specify the center point, then a radius or diameter. You’ll note these prompts differ from the orthographic version of Ellipse.
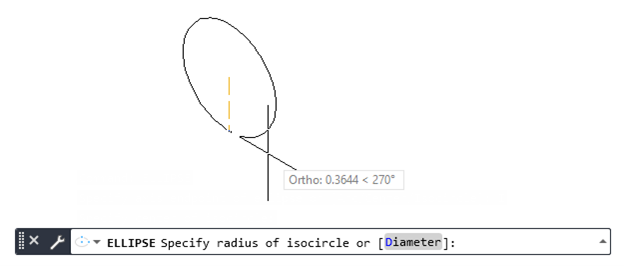
Now that we know how to make Isometric circles, I bet you’re assuming that Arcs work the same way. That is, while in Isodraft, type Arc in the command line, and you’ll get an Isoarc option. You’d be wrong. Sorry.
The best way to create an arc is to make the full circle (ellipse), then draw construction lines (or use existing geometry if applicable), and use the Trim command to cut the full circle down to the arc you need.
Now that you know some of the tricks needed to successfully draft in Isometric mode, give it a try sometime. You never know when you might be called upon to do it.
How to Apply Isometric Drafting for Piping
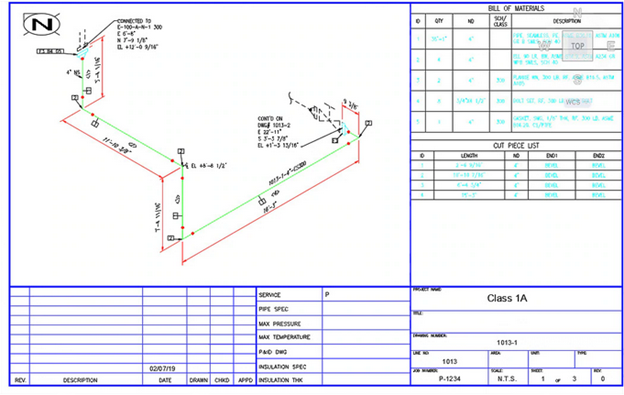
Up till now, we’ve talked about drafting a 2D representation of a 3D object, but there are other times isometric is used—most typically in the process piping industry. Back in the old days, these isometrics had to be created manually, much like we’ve already described, however now with isometric drafting software the process is more streamlined.
There would be specialized block libraries with various orientations of things like valves and fittings. Also, custom text and dimension styles would be developed to reflect the correct angle and plane of the annotation. It was a lot of work to set up correctly.
Fortunately, most modern piping programs—such as the Plant 3D toolset—automatically generate an isometric drawing based on the 3D model. The output is typically outstanding, but there are times the designer might need to make edits to the isometric drawing, so most “pipers” are fluent at using the Isodraft features in AutoCAD as well. You can learn more about how to save time with piping isometrics in “The Benefits of Using the Plant 3D Toolset in AutoCAD” productivity study.
How to Get An Isometric View in AutoCAD
Up till now, we’ve mainly discussed 2D isometric drafting in AutoCAD. But there’s another group of AutoCAD users who think of something totally different when isometric is mentioned. To a 3D designer, it’s one of several preset views to display their geometry.
One way to access these is from the Model Space Viewport Controls in the upper left corner of the editor. Clicking on the middle item—the View Controls—will display a drop-down menu of the preset views. Within this are choices for the four different Isometric views.
Also, you can choose to display your model in either parallel or perspective views. Below are three different representations of the same box. First, in a custom parallel view, a SW Isometric view, and finally, the same SW Iso shown in Perspective.

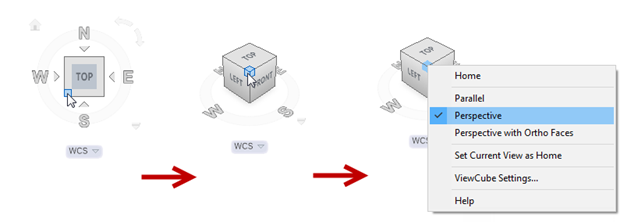
Another common way to access the preset views and parallel/perspective is by using the ViewCube (in the upper right corner). Using it, you can simply select any of the “faces” or on one of the corners, which represent each of the four Isometric views. Just right-click anywhere on the ViewCube to display the tools dialog.
So there you have it. The world of isometric drawings in AutoCAD is pretty easy once you know whether you’re talking 2D or 3D. One is simply a method of viewing your 3D models, and the other refers to the tools, commands, and even tricks used to produce a 2D representation of a 3D object.
Give isometric drafting a spin sometime. It’s really a fun way to draft and a great skill to have. And, as much as I enjoyed flipping triangles around on a drafting board, I think it’s even better in AutoCAD.


