In the previous post of our series on customization of AutoCAD LT, I mentioned the nuances of customizing the Quick Access Toolbar. In particular, how it works in relation to workspaces. We’ll get to that, but first, some handy information on the different ways you can customize the Quick Access Toolbar in AutoCAD LT.
The easiest method is to use the pull-down menu on the right side of the QAT. It’s small, and you may not have ever noticed it before.
Click the little down arrow, and you’ll get a list of everything available. Just select (or de-select) whatever you want. You can even choose to show the QAT below the Ribbon if that’s your thing.
However, that method limits you to the seven commands not shown and the nine that are. What if you want to add something that’s not listed? No problem, you have two options.
You can select the More Commands option to get a “collapsed” version of the CUI editor. It basically just shows the Commands window. Scroll to find desired command or use the handy search bar. When you find it, just drag it into whatever position you want in the QAT.
The second method may be more common. Just right-click on your command from the Ribbon and select Add to Quick Access Toolbar. Your command will appear appended onto the right side of the QAT. Note that you can’t specify the location like you can from the previous method.
If you need to remove the added tools (or even any of the defaults), from the QAT, simply right click on it, and select Remove from Quick Access Toolbar.
How to Add the Quick Access Toolbar to a Workspace
If you read our last post on working with workspaces, you no doubt are thinking that you can add the QAT to the list of things that can be saved in a custom workspace. You can, but this is where the nuance comes in.
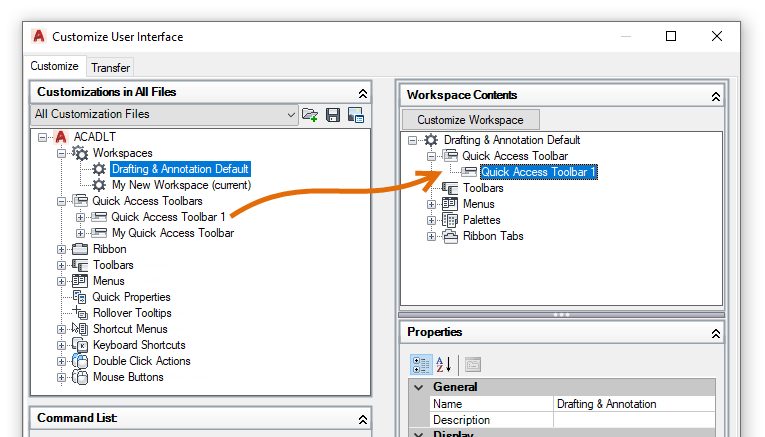
You see, the QAT is its own object within the CUI. The default one we’ve been customizing is called “Quick Access Toolbar 1.” Any change you make is saved within it. And it’s this toolbar object that is saved in the workspace, not its elements. In short, what that means is that if you customize the QAT, your changes will still appear in all workspaces—which is counter-intuitive to say the least.
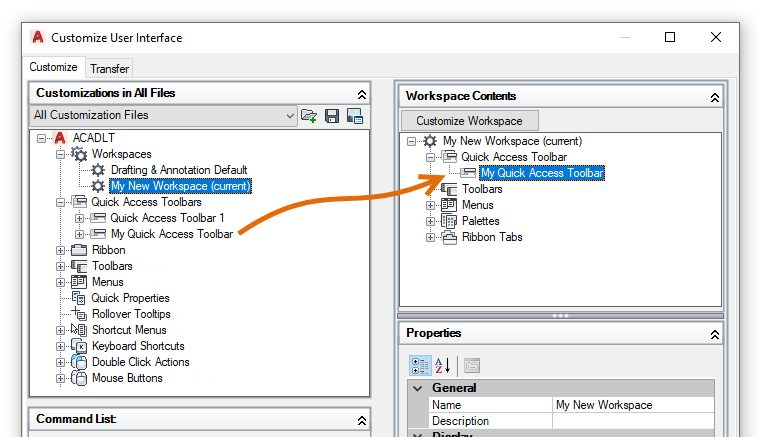
But have no fear, there’s a simple workaround, and like customizing the QAT, it’s pretty easy too. All you need to do is create a new QAT that will reside in your custom workspace.
You might use the CUI editor, right-click on the Quick Access Toolbars section, and select New Quick Access Toolbar—naming it however you like.
But this method will populate the new QAT with an abbreviated list of commands. You get six instead of nine. Please don’t ask me why.
A better method is to duplicate the existing QAT. Again…it’s easy.
Now you have two QATs that are the same. It’s not a bad idea to go ahead and add or remove tools from them here. Just right-click on a command and select Remove if you need to.
The final step to adding a customized QAT to a Workspace is also easy. Just drag the appropriate QAT into the Quick Access Toolbar section of the desired Workspace. Apply your changes and exit the CUI editor, and you should now see the different QATs when you change to and from your custom Workspace.


It sounds like there’s a lot to it, but it’s really not. Just remember that if you want the contents of the QAT to be part of your workspace, you’ll have to create a separate QAT object from the CUI editor, assign it to the workspace, then populate it as you wish.
But hey! The main thing to remember is that you can customize AutoCAD LT in many of the same ways that you can the full product. In fact, everything we’ve described in this series applies to AutoCAD too. Go ahead and make LT yours by setting up the interface that makes you the most productive


