In AutoCAD, you can adjust the transparency value of any type of object including text, lines, images and hatching. Transparency is controlled in the properties of selected objects and can also be set to a default value for new objects. Transparency effects can be used to enhance your drawings in a variety of ways, for example, by making a hatch transparent you are able to show objects that may otherwise be hidden below the hatch. Transparency can also be used to de-emphasize linework and objects that are meant for reference, removal, or simply less important to the visual goal of your drawing.

Here are a few ways you can use Transparency effects in your AutoCAD drawings.
Hatches
You can set the transparency value of a hatch directly from the Hatch Creation Ribbon tab. By using the slider or entering a specific value in the hatch field you can adjust exactly how transparent your hatch will be, allowing you to control how much or how little objects below the hatch will be visible. Existing hatch transparency can be adjusted by selecting the hatch to automatically bring up the contextual Hatch Editor Ribbon tab and then setting the transparency value as desired.
In the example below, the Hatch Editor is being used to add transparency to an existing hatch in order to highlight different areas while still showing the objects underneath.

Layers
One of the easiest ways to use transparency in your drawings is to apply a transparency value to an entire layer or layers. Once set, all of the objects on the layer will maintain the same transparency value unless manually changed in the properties tab. This will allow you to create layers that are less visible to indicate they are intended for reference or less important visually to the drawing.

In the image below, the interior walls and furniture have been placed on the reference layer with a transparency value set to 50.

Selected Objects
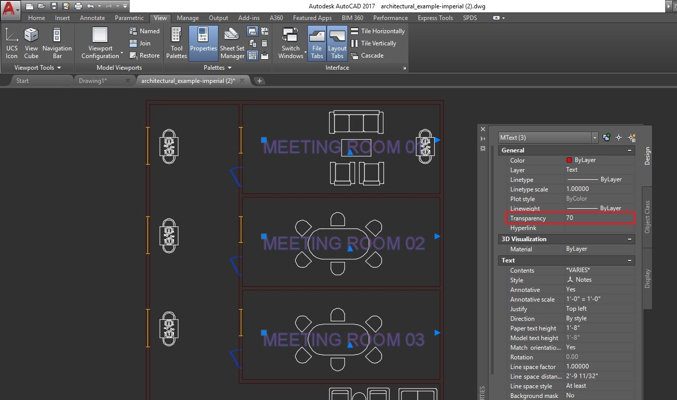
If you would like to set the transparency of an individual or group of selected objects, you can do so by right-clicking and choosing properties. Once the properties palette is open you can enter a number in the Transparency box from 0 to 90 percent to set the value for all of the selected objects. In this example the three Mtext labels have a transparency value of 70.

Set the Default Transparency for New Objects
You can set a default transparency value for all new objects and hatches that are created. To do so, with no objects selected, go to the View Ribbon tab, and on the Palettes panel click Properties to open the Properties palette. Here you can enter a number in the Transparency box from 0 to 90 percent. Now, any new objects will automatically have this default transparency value.

Display and Plotting
If transparency is not displaying in your drawings, then the TransparencyDisplay variable might be turned off. Be sure to set it to 1 to turn it on.
Important: For performance reasons, transparency when plotting is disabled by default. To plot transparent objects, simply click the Plot Transparency option in either the Plot dialog box or Page Setup dialog box.

More on Transparency
About Making Objects Transparent
To Set the Transparency for All New Objects
Add Transparency to Your AutoCAD Drawings
How to Use Transparent Hatches
Keep Exploring
Want to learn more? Check out all the benefits of AutoCAD on our Features page; troubleshoot and get the details on previous software versions over on the Autodesk Knowledge Network; or take a look at all entries in our series, ExploringtheFeaturesandBenefitsofAutoCAD.


