We’re getting close to the finish line in our extended series of articles designed to set you up for success with sheet sets! In this installment, we take a look at how to automate callout data in AutoCAD.
Most sheet sets contain information that is interrelated. For example, a view on one sheet might refer to a view on a different sheet. Using traditional methods, you can manually maintain the text references between sheets, but that process can be tedious and error-prone. You can dramatically improve your productivity and minimize errors by updating your existing blocks to include fields. In addition to automatically updating textual data as changes occur, hyperlinks enable you to quickly open the sheet that is referenced by the callout and zoom to the appropriate view.
The process for automating callout data is very similar to automating block label data. However, unlike view label blocks, you can assign multiple callout blocks to your sheet set. You will need to update the default value of the attributes to include fields. If you have multiple callout block definitions, you will need to repeat this process for each one. If you combined your callout blocks into a single dynamic block, then you will only have to add fields to that one dynamic block definition.
1. Open the drawing that contains the callout block from your source library. The callout block might be its own little DWG file or it might be a block definition within another drawing, such as a template.
You will need to edit the Default for each of the attribute definitions. A typical callout block would include attribute definitions for the view number and sheet number. Your block might include additional information as well, but these two are the most common. The method you use to update the attribute definition depends on whether the block is stored as its own drawing or as a block definition within a drawing. You can use any method (BATTMAN, etc.) that you want. However, you want to ensure that you are editing the attribute definition NOT just the attribute value in the block instance. How do you know the difference? The attribute definition says “Default,” whereas the attribute value says “Value.” NEVER insert a field in an attribute “Value.” It may appear to work properly, but if the instance was updated to include a field and the definition wasn’t, the next time someone erases the block instance and reinserts it, the field data will no longer be there.

2. If your callout block is stored as its own drawing, skip ahead to step 3. If, however, your callout block is stored as a block definition within your drawing, insert and explode the callout block. (Alternate methods include BATTMAN or the Block Editor. If you are editing a dynamic block, you should use an alternate method because exploding will lose the dynamic block parameters and actions). When you explode a block with attributes, the attribute values are replaced with the attribute definitions.

3. Double-click on the attribute definition representing the view number.
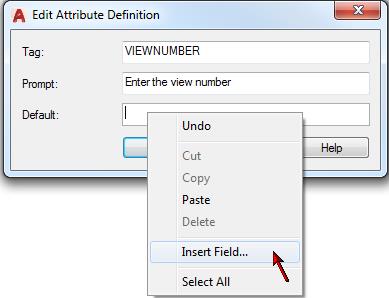
4. In the Edit Attribute Definition dialog box, right-click in Default and select Insert Field.

5. In the Field dialog box, select the SheetSet Field category, the SheetSetPlaceholder Field name, the ViewNumber Placeholder type, specify an appropriate format, select Associate hyperlink, and then choose OK. Using the SheetSetPlaceholder field in your callout block enables you to define block attributes for fields that are not associated with any particular sheet or sheet set. Associating a hyperlink will enable you to click on the inserted callout block to open the associated sheet and zoom into that particular view number.

6. Select the same attribute definition that you just edited, right-click, and choose Properties.
7. In the Properties window, set the Preset property to Yes. Since AutoCAD will enter the attribute value for you (via field data), you do not want to prompt the user to enter the information as you would have done using traditional attribute definitions. Setting the Preset property to Yes will prevent AutoCAD from asking for a value when the block is inserted.

8. Repeat steps 3-7 to add a field to the attribute definition for the sheet number using the SheetNumber placeholder type.
9. Redefine the callout block using the Block command (not necessary if you use BATTMAN or the Block Editor) and save the drawing.
That is all it takes to make your old callout block(s) smarter! Now you need to assign your callout block(s) to the Callout blocks property in your sheet set.
1. In the Sheet Set Manager, right-click on the sheet set title and choose Properties.
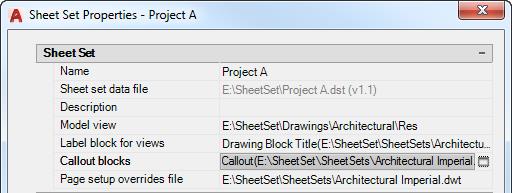
2. In the Sheet Set Properties dialog box, select Callout Block and choose the button to access the Select Block dialog box.

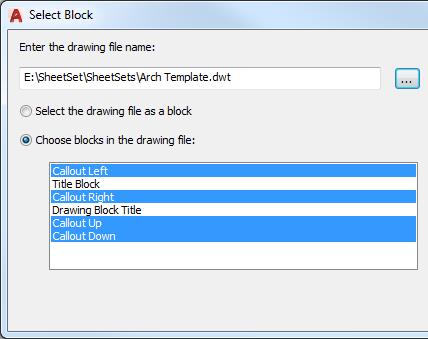
3. In the Select Block dialog box, navigate to file that contains your updated callout blocks. As mentioned previously, your callout blocks might be defined in their own drawing (DWG) or template (DWT) files or they might exist as block definitions within a larger drawing or template file.
4. If your callout blocks are individual drawings, select the option: Select the drawing file as a block.
-Or-
If your callout blocks are definitions within a drawing or template, select the option: Choose blocks in the drawing file and then select the appropriate block definitions.
You can assign any number of callout blocks to a sheet set.

5. Choose OK to close each of the dialog boxes and accept the changes.
Now you’re ready to test it out!
1. In the Sheet Set Manager, select the Sheet List tab.
2. Open a sheet to which you want to add a callout.
3. Select the Sheet Views tab. This tab displays all of the sheet/layout views created by the Sheet Set Manager.
4. Right-click on the view that you want to reference in your callout and choose Place Callout Block. The first time you do this, the Place Callout Block cascading menu option may display the option to Select Blocks. You can choose the Select Blocks option and then select all the callout blocks that you want to be available from the Sheet Set Manager. Subsequent access to the Place Callout Block cascading menu will display all the blocks that you selected.


5. Select the callout block you want to insert and place it on the sheet. The view and sheet numbers should automatically display in the callout.
6. Hover the cursor over the callout block and press Ctrl as you select the view or sheet number. If you select the sheet number, AutoCAD will open the appropriate drawing sheet. If you select the view number, AutoCAD will open the drawing as well as zoom into the appropriate view.
Now that your drawing is using field data, it is CRUCIAL that you do NOT edit those attribute values using traditional methods. For example, if you want to change the view number or sheet number on the callout, it might be very tempting to double-click on the callout block and enter the number for the Value of that block instance. If you do that, the intelligence you gained from fields is gone.
Unfortunately there is no way to prevent users from making this mistake, so it can only be avoided through education! If you see a field in a drawing (text with a grey background), never edit it! That data is being read from somewhere else and you need to edit the source, not the attribute value! In most cases that source data should be edited in the Sheet Set Manager. Since a callout is reading the view and sheet numbers from an existing view/sheet, you need to change the view or sheet number on the View List (Sheet Views) or Sheet List tab. Do not forget to REGEN your drawing to ensure it displays the most current field data.
By the way, if you are familiar with sheet set view categories, you may wish to use different callout blocks for different types of views. For example, you might have a view category called Elevations that points to one set of callout blocks and a view category called Sections that points to a different set of callout blocks. You can use the Sheet Views tab to assign callout blocks to different view categories.
What’s Next?
Next time, we’ll take a look back at how far we’ve come in mastering AutoCAD sheet sets. Remember, you can always catch up on the entire Mastering AutoCAD Sheet Sets series!


