Autodesk has long been a leader in civil infrastructure and site design. With the addition of our comprehensive water portfolio in the last several years and our suite of construction tools, every aspect of civil planning, design, modeling, building, and operations can be done within the same cohesive and integrated ecosystem. While this is fantastic, it might also lead you to ask, “What’s the ideal workflow for a given design process?”
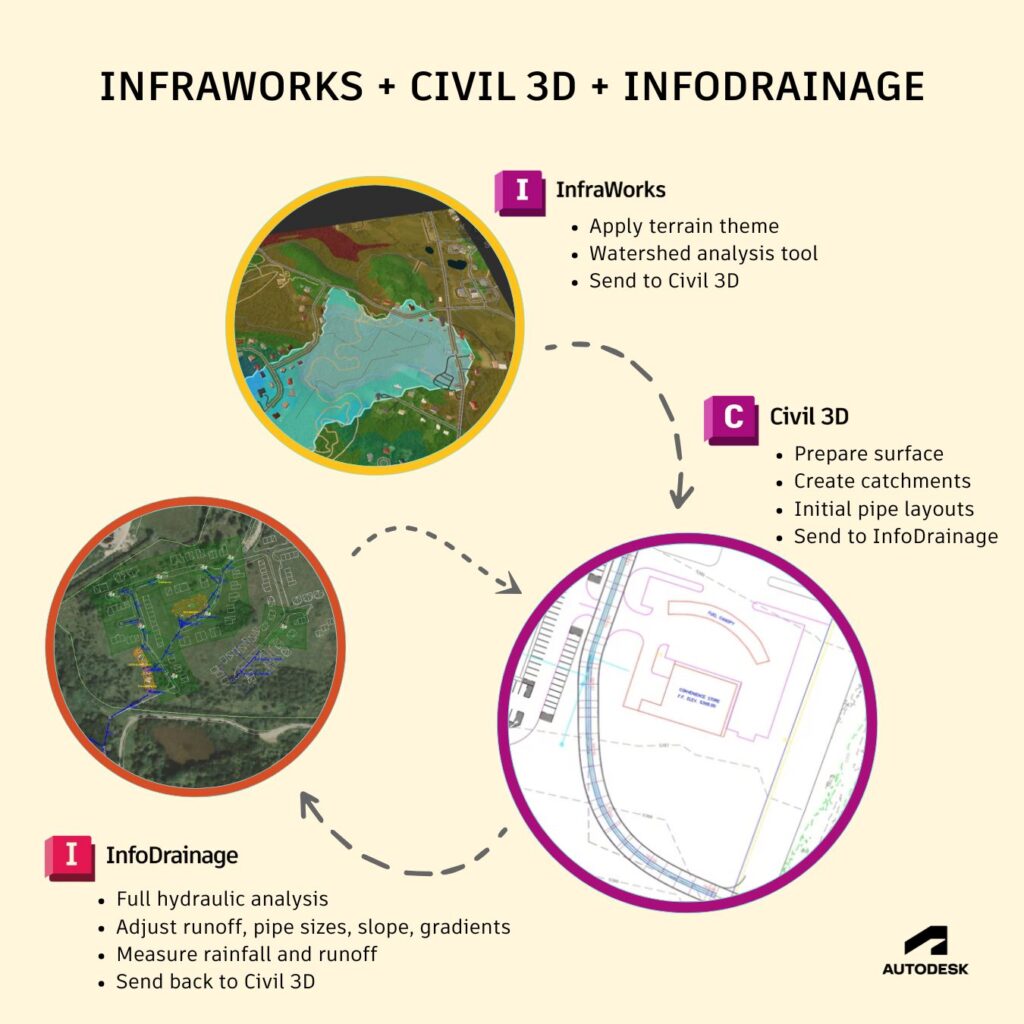
While we can’t outline the best workflow for every design process in this blog, we are going to walk through an optimal site drainage design process utilizing InfraWorks, Civil 3D, and InfoDrainage and what that can look like for you. If you have access to the AEC collection, you’ll already have Civil 3D and InfraWorks, but InfoDrainage is not included in the collection, so you’ll need to have that downloaded as well. (We offer a 30-day free trial.)
The workflows discussed in this blog will stay high level. For a more detailed tutorial-like flow of the same workflows, you can also watch the AU class Navigating Drainage Design: A Flood of Solutions with InfraWorks, Civil 3D, and InfoDrainage.
Thinking about drainage at the start
Drainage design is inherently a necessary part of any site development project and has significant connections to final permitting for construction. Many times though, it’s a process that’s left to the very end of the site design process when budgets are already tight and timelines are constrained. This often necessitates that the drainage design process be as efficient and optimal as possible. To help provide some guidance on what the team of experts at Autodesk believe is one of the most efficient workflows for site drainage design, we’re going to walk through a workflow that starts in InfraWorks, moves to Civil 3D, and incorporates InfoDrainage for drainage design and analysis.
To start, let’s look at getting started in InfraWorks.
InfraWorks for preliminary design
InfraWorks is infrastructure design software that aggregates data to generate context models for representing your project’s build and natural environment.
InfraWorks supports a lot, like roadway design, traffic simulation, and conceptual design – it’s especially helpful in this regard. It also happens to support preliminary drainage design, which is what we’ll be utilizing the software for in this workflow. Specifically, we’re going to use Infraworks for two main capabilities: terrain theming and watershed analysis.
Terrain Themes
With Terrain Themes, you can identify high and low points on your site and the surrounding areas, which are crucial to your understanding of necessary subsequent drainage design.
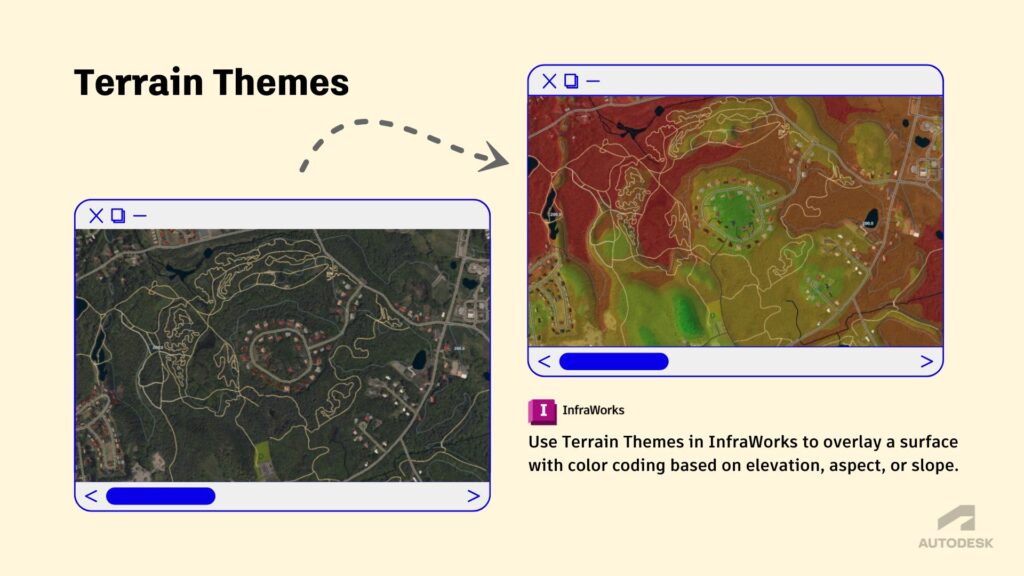
This can help you match your drainage design to natural water ways and help see how much outside flow your site may capture, allowing for some preliminary sizing. The Terrain Themes functionality inside of InfraWorks allows you to overlay a surface with color coding based on elevation, aspect, or slope, quickly letting you visualize your high and low points on site.
Watershed Analysis tool
Understanding at-a-glance where these high and low points sit is important as a first step, but we also need to get a preliminary understanding of the extents, area, and amount of flow over your site. With the Watershed Analysis tool inside of InfraWorks, you can quickly identify and analyze all watersheds intersecting a component road or watershed from a single point on the terrain. This is relevant for drainage designs as it aids in calculating the flow that will run on or off your site.

Having this information will allow you to calculate the flow that will be required to be conveyed under roadways through culverts, into inlets, or through pipes. Ultimately, these two tools inside of InfraWorks will help you quickly delineate your site watershed and cut down on having to manually check where breaks in your surface occur, setting you up with necessary knowledge to proceed confidently into the drainage design process.
Remember, it’s all about efficiency, so having this extra level of confidence from the preliminary design process can be a huge help when it comes to finalizing stormwater control placement and pipe sizing. With preliminary design in InfraWorks out of the way, let’s get that data over to Civil 3D and start designing some drainage.
Moving to Civil 3D for initial drainage design
Thanks to the cohesiveness of the Autodesk ecosystem, you have a variety of tools to get your InfraWorks data over to Civil 3D. You can export the 3D model, export IMX, export, FGDB, or publish to ArcGIS from InfraWorks, allowing you to open Civil 3D and bring this data in. You can additionally reference a local InfraWorks model to open the data in Civil 3D.
A large chunk of the data we’ve already built and generated inside of InfraWorks during preliminary design can be brought into Civil 3D, including:
- Terrain surfaces
- Planning utilities
- Planning and design roads
- Component roads and corridor component roads
- Intersections
- Drainage networks
- Coverages
- Water areas
- Bridges
- Roundabouts
- Tunnels
- Generic objects
The sheer breadth of data types you can ingest into Civil 3D from InfraWorks is one of the main reasons we recommend it for preliminary design in this workflow. While you’re working on a site survey, a designer could leverage the site’s open source data and preliminary layouts in InfraWorks to then push to Civil 3D when more details are ready.
There is some overlap between all of the tools mentioned here. One of those areas is drainage design. Civil 3D will have basic catchment and drainage design tools, but it’s not a full design and analysis solution. For that, we’ll eventually need to move on to InfoDrainage. Keeping this in mind, let’s look at getting started with drainage design inside of Civil 3D.
The most important factor in recreating your drainage area digitally in Civil 3D is having a high-quality surface model for your site. This boils down to having a regularly triangulated, continuous surface with properly defined break lines. If you create a surface from contours or a digital elevation model (DEM), your model might have step-like flat areas that form, making the automatic flow path delineation process more difficult and inaccurate.
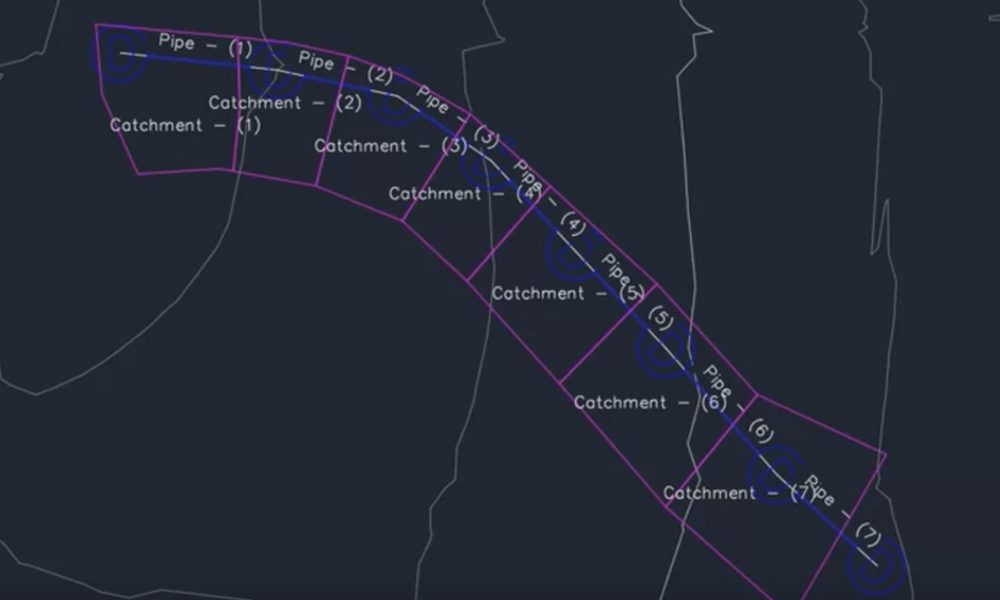
In Civil 3D, we want to focus on creating catchments and preliminary pipe layouts that we can export to InfoDrainage for further analysis. This means that your Civil 3D drainage design process will look like this:
- Develop a high-quality surface model in Civil 3D from laser scans or traditional survey work where possible
- Create an initial layout of the drainage pipe network
- Delineate catchments from the surface (if quality is high enough) or from a closed polyline
- Set catchment properties like runoff method, time of concentration, additional flow paths, and connect to drainage structure
Once you’ve done all the above, you’ll be ready to export your Civil 3D model into InfoDrainage. For this process, your setup will be key in getting the most value out of this integration. You’ll want to ensure you have your structures, pipes, and parts all appropriately mapped from Civil 3D to InfoDrainage. The process is generally straightforward, but if you haven’t done it before, this free on-demand tutorial can walk you through it.
Exporting to InfoDrainage
When you’re confident in your model setup and mapping, you can easily export from Civil 3D to InfoDrainage. You simply click on the dedicated toolbar inside Civil 3D, click export to InfoDrainage, save the file to a shared location, verify part matching, and click next – then you’re set! The IDDX file this creates is sorted, and the drainage design and hydrology team can take it from here for final design.

InfoDrainage for comprehensive drainage design
InfoDrainage is Autodesk’s advanced full design and analysis solution for drainage systems. The integrations with Civil 3D, flexible reporting tools, and support for FHWA culverts make it a highly compelling tool for civil site drainage design. With InfoDrainage, you get (among many other features):
- True-to-site view of ponds, swales, and other stormwater control elements
- Built-in design calculators and wizards to automate the design process
- Coupled 1D and 2D analysis for accurate overland flow mapping
- Customizable reporting and auditing tools to speed up the submittal and review process
While Civil 3D does have some basic drainage design tools like SSA or Drainage Analysis, InfoDrainage is the robust and complete solution for drainage design. If you’re a water engineer or drainage designer, or if you have a water modeling team, InfoDrainage is the solution to use if you’re doing site design in Civil 3D. (See our comparison chart.)

One of the great things about the integration between Civil 3D and InfoDrainage is the fact that as your catchments are refined and networks updated, you can make these changes in InfoDrainage or Civil 3D, and move back and forth with updates, as needed.
Easily refine catchments in InfoDrainage with flow arrows
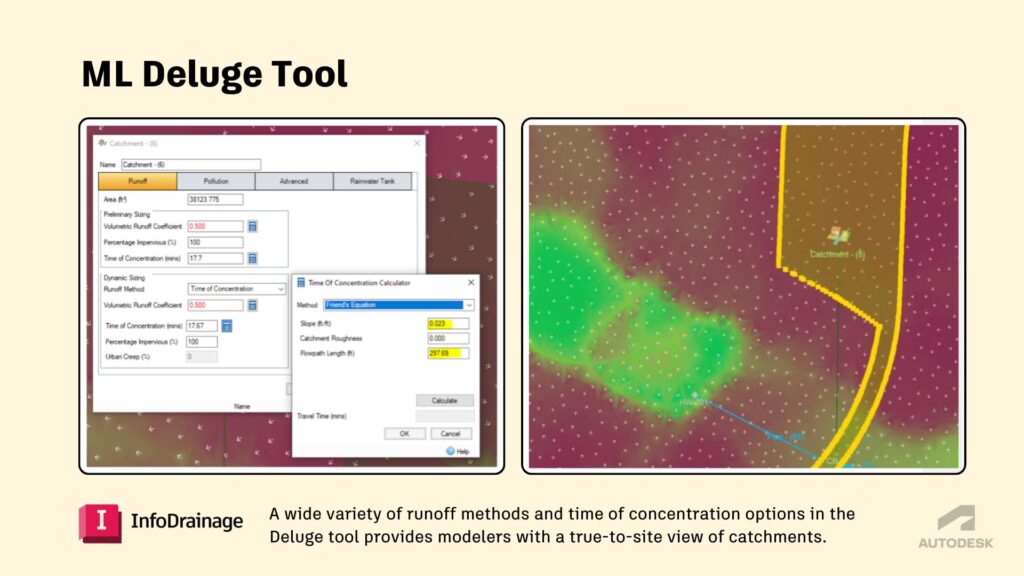
The Machine Learning Deluge tool inside of InfoDrainage allows the site to be assessed by applying rainfall to the site surface and establish channeling and ponding. This can help you, or the drainage designer, determine the best placement for SWCs and delineate sub-catchments in the model.
InfoDrainage also just released an industry-first tool for land-use and soil-type to be captured in catchment data, allowing you to automatically calculate SCS Composite Curve Number, runoff coefficients, Percentage Impervious area, and Laurenson Method Degree of Urbanization. Remember – we want this process to be as efficient as possible, and this is a massive efficiency savings over comparative drainage design solutions.
Finally, inside of InfoDrainage, the sub-catchments are true-to-site, meaning that as you change the sub-catchment shape, the area is automatically recalculated, updating Time of Concentration and other sub-catchment data.
When the drainage design process is complete and you need to get regulatory approval, InfoDrainage’s flexible reporting tools make that incredibly easy. Additionally, once you’re done with your drainage design in InfoDrainage, you can move the updated networks and catchments back into Civil 3D. Let’s look at how to do that now.
Getting data back to Civil 3D
Once all of the necessary changes have been made to your InfoDrainage file, you can send this back to the original Civil 3D file through the convenient InfoDrainage/Civil 3D ribbon. In Civil 3D, you’ll want to select Import from InfoDrainage, which will be almost identical, but work in reverse, to the export process. If you’ve tried this import/export functionality in the past, you might be surprised at just how much data is now available to be transported in the process today.
At current, you can carry over data between models such as:
- Hydraulic results, EGL, HGL, flow rates, and velocity connected to pipe properties
- Hydrologic parameters in the sub-catchment properties
- Extended data
- Updated pipe networks (rather than duplicated) with references to the pipe network maintained
We’re constantly updating both InfoDrainage and Civil 3D, so that functionality is only growing.
Go deeper into the workflow
And there you have it: the ideal workflow to take you from preliminary site design to drainage network approvals and on to construction. If you want to explore this workflow even further, watch the AU 2024 class from the Autodesk team which will walk you through this process in even greater detail.
Or, check out this Water Drop workflow video, in which Midori Patterson walks you through the process, along with extra details about how to use extended property sets to make your workflow as automated as possible.