00:06
The model checker automatically checks Revit models
00:09
and assist with verifying compliance to the BIM requirements and or the BIM Execution Plan.
00:16
The add in is designed to quickly identify possible conflicts or areas of noncompliance in a model
00:21
by running several standard checks which can be viewed or exported for analytical review.
00:28
The model checker can be found on the BIM Interoperability Tools tab of the ribbon.
00:34
Here, within the Model Checker panel, we'll do a three step process, will simply Set it up.
00:41
We'll Run it and we'll Review the report.
00:45
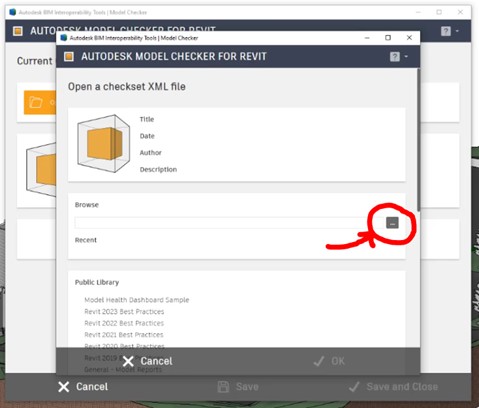
So let's select Setup.
00:48
Here, it's as simple as selecting which configured check set you want to use for this model.
00:55
We can browse to one,
00:56
we can access our Recently used one or we can grab them from the Public Library.
01:02
Let's go ahead and browse to an xml.
01:04
Select the one that we setup here. I'm gonna hit Open.
01:10
I'm just gonna Save it and Close it,
01:16
We've identified the checkset that we want to use in the model checker.
01:20
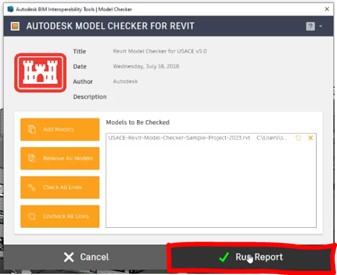
Next step is to run, so we'll select the Run here.
01:26
This is gonna run the models check right now.
01:29
It is the current model that we have open but we can Add Models to it, so we can add this to a list of processed files.
01:36
We can check all the links. We can uncheck the links,
01:39
we can remove all models. I'm gonna leave it as is.
01:43
I'm select Run Report.
01:47
We're gonna give it a moment.
01:48
It's gonna go through all of those checks that were created within that check set
01:51
and it's gonna give us a final result here in a moment.
01:59
Okay and up pops the report. This is the summary here.
02:02
So we've got the Check Summary, it ran 13 Checks,
02:15
Down here gives us a little bit more information.
02:19
I can drill down into the Sections here to get a little bit more.
02:24
I can copy this information.
02:26
I can view an html or I can export this out to Excel.
02:33
If I export that out to Excel, it's just gonna go to the location, I've got it here.
02:39
It says it's been exported successfully, do you want to open it?
02:42
Let's go ahead and take a look at it.
02:45
There's the Excel, there's the Files, there's the Checks that were ran and there's the Elements and the report.
02:54
Okay, while we're here within this summary, I'm gonna also choose HTML to show you that option.
02:59
Let's just throw that on our Desktop and very similar to what we see, here.
03:05
This is the HTML. It's gonna tell us about that checkset a lot more information.
03:12
I'm gonna Close this down.
03:15
Okay if I'm out of that and I want to view that report again, I'm just gonna select View Report and right back into it.
03:22
So even if you close that, when you first run that report,
03:26
you can always go back view the report, re-export it, close it down.
03:30
Re-run it if you need to run it against another checkset. Very simple.
03:36
So once configured we can set it up, we can run it.
03:39
We can review and export out those reports.