Create publish sets for Revit models

00:02

If your team intends to share a model

00:05

with other team members or external stakeholders,

00:08

you will want to create published sets,

00:10

which allows users to package specific views needed to

00:14

communicate design intent, rather than publishing all model views.

00:19

This helps stakeholders review the model quickly and

00:22

make decisions before linking your model into theirs.

00:27

To create a published set within Revit, go to the collaborate tab > manage models

00:33

panel, and select published settings.

00:36

The published settings dialog box has two areas: the select sets area

00:42

and the edit set area.

00:44

In the select sets area,

00:46

you can select an existing set to edit the included views or

00:51

use the icons in the upper right corner of the dialogue box.

00:54

You can click new set to create a set with no views selected

00:58

or duplicate set to create a new set with specific views already selected

01:04

and additional views can be added as needed.

01:07

You can also rename or delete a set in this area.

01:12

To create a new set, click new set.

01:15

In the new set dialog box, enter a name for the set.

01:20

To edit which views are included in the selected set, verify that the check box

01:25

next to the set name is checked.

01:28

In the edit set area,

01:30

you can select an option in the show in list drop down.

01:34

To show specific view types or use search to search for particular views by name,

01:39

you can click select all which selects all the views in

01:42

the list below, or select none to deselect any checked views.

01:48

Click the check box next to the view name you want to include in the set.

01:53

You can expand preview

01:55

and select the view name from the list to see the view in the preview pane.

01:60

You can then use the navigation bar to zoom into the view if needed.

02:05

When you are finished, click save and close.

02:08

Now to save the changes, you need to synchronize with central.

02:12

Next, you will need to publish the model to the cloud,

02:16

navigate to the home page, and select Autodesk Docs,

02:21

then click on the ellipses next to the file to view the publish options.

02:26

Choose Publish latest and click publish in the publish to the cloud dialog box.

02:33

Alternatively,

02:34

you can go to the Autodesk Construction Cloud website

02:37

and select design collaboration products from the upper left corner.

02:42

From the home tab, click publish latest.

02:46

To make certain that the model within your team space stays up to date,

02:51

you can click schedule publish

02:53

to create a weekly published schedule in Autodesk Construction Cloud.

Video transcript

00:02

If your team intends to share a model

00:05

with other team members or external stakeholders,

00:08

you will want to create published sets,

00:10

which allows users to package specific views needed to

00:14

communicate design intent, rather than publishing all model views.

00:19

This helps stakeholders review the model quickly and

00:22

make decisions before linking your model into theirs.

00:27

To create a published set within Revit, go to the collaborate tab > manage models

00:33

panel, and select published settings.

00:36

The published settings dialog box has two areas: the select sets area

00:42

and the edit set area.

00:44

In the select sets area,

00:46

you can select an existing set to edit the included views or

00:51

use the icons in the upper right corner of the dialogue box.

00:54

You can click new set to create a set with no views selected

00:58

or duplicate set to create a new set with specific views already selected

01:04

and additional views can be added as needed.

01:07

You can also rename or delete a set in this area.

01:12

To create a new set, click new set.

01:15

In the new set dialog box, enter a name for the set.

01:20

To edit which views are included in the selected set, verify that the check box

01:25

next to the set name is checked.

01:28

In the edit set area,

01:30

you can select an option in the show in list drop down.

01:34

To show specific view types or use search to search for particular views by name,

01:39

you can click select all which selects all the views in

01:42

the list below, or select none to deselect any checked views.

01:48

Click the check box next to the view name you want to include in the set.

01:53

You can expand preview

01:55

and select the view name from the list to see the view in the preview pane.

01:60

You can then use the navigation bar to zoom into the view if needed.

02:05

When you are finished, click save and close.

02:08

Now to save the changes, you need to synchronize with central.

02:12

Next, you will need to publish the model to the cloud,

02:16

navigate to the home page, and select Autodesk Docs,

02:21

then click on the ellipses next to the file to view the publish options.

02:26

Choose Publish latest and click publish in the publish to the cloud dialog box.

02:33

Alternatively,

02:34

you can go to the Autodesk Construction Cloud website

02:37

and select design collaboration products from the upper left corner.

02:42

From the home tab, click publish latest.

02:46

To make certain that the model within your team space stays up to date,

02:51

you can click schedule publish

02:53

to create a weekly published schedule in Autodesk Construction Cloud.

Create publish sets for Revit models - Exercise

The Revit Publish Settings tool allows users to select specific views, sheets, and 3D models to be included in a publish set, determining which parts of the project will be visible or shared. Once publish settings are established, users can publish from the Autodesk Docs home page in Revit or from Autodesk Construction Cloud. They can also create a publishing schedule to update models within the team on a weekly basis.

To access the Publish Settings dialog box, you first need to open a Revit workshared model in Revit, then select Publish Settings in the Collaborate tab>Manage Models panel.

In the Publish Settings dialog box, there are two areas: Select Sets and Edit Set.

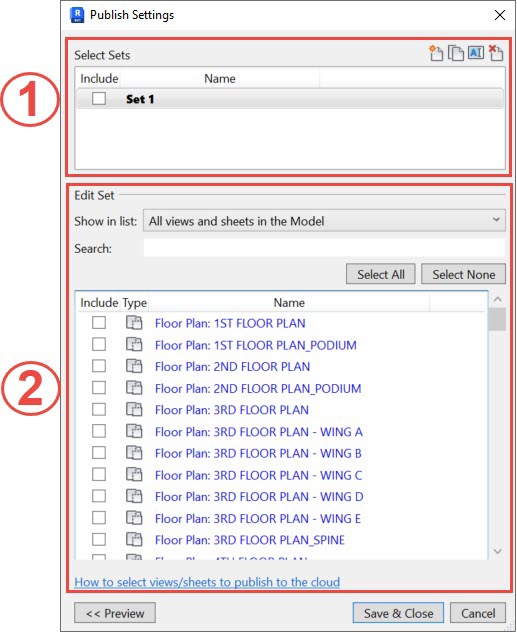
The Select Sets area is where you can do the following:

  • To modify an existing set, select the set name so it is bold and modify the included views in the Edit Set area, as detailed below.
  • Click (New Set) to create a new set with no views selected. In the New Set dialog box, enter a name and click OK.
  • Click (Duplicate Set) to create a copy of an existing set. In the Duplicate Set dialog box, enter a name and click OK.
  • Click (Rename Set) to change a set's name. In the Rename Set dialog box, enter a name and click OK.
  • Click (Delete Set) to remove a selected set. In the Delete Set dialog box, verify it is the set you want to delete and either click Yes or Cancel.

The Edit Sets area is where you can do the following:

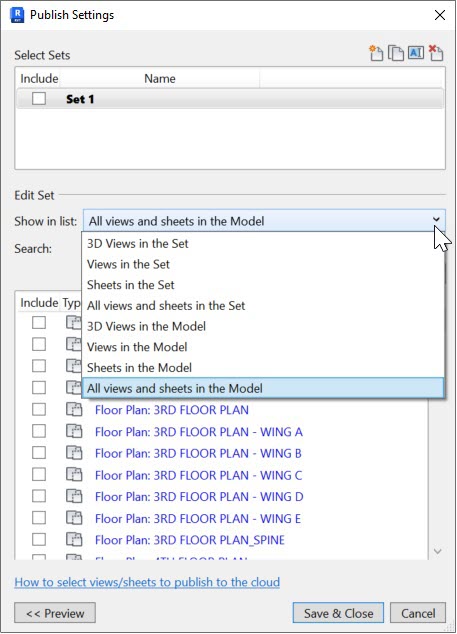
  • Expand the Show in list drop-down list to sort what is displayed by view type or display all views and sheets.


  • Type a name in the Search box to search for a specific view.
  • Click Select All to quickly select all views.
  • Click Select None to quickly deselect selected views.
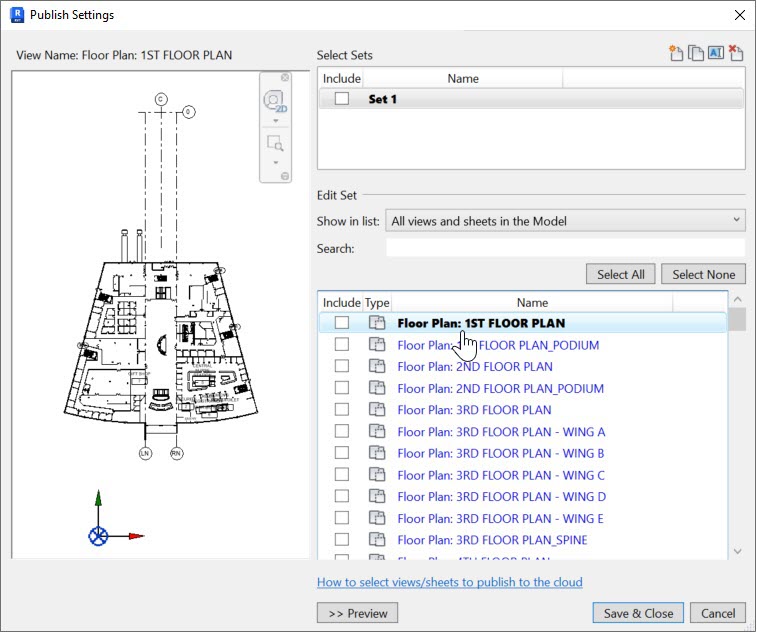
  • Click << Preview and select a view to display in the preview pane to verify a selected view visually.

How to publish a set

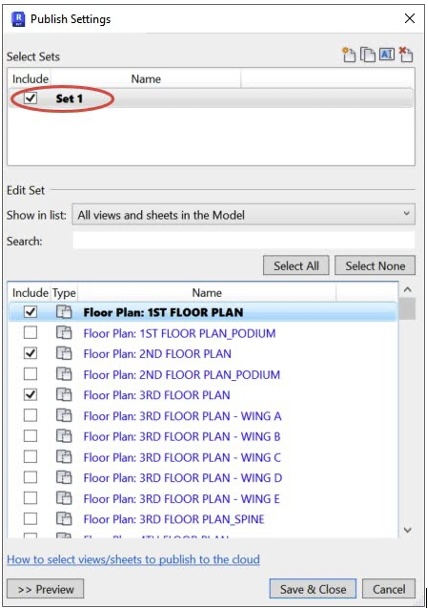
  1. To create the set, in the Select Sets area, verify that the checkbox next to the set name is checked, then click the checkboxes next to the view names you want to include in the set. When finished, click Save & Close.


  2. In the Collaborate tab>Synchronize panel, click Synchronize with Central or Synchronize Now, then close the model.
  3. On the Revit Home page, select Autodesk Docs. Navigate to the project and to the correct Project Files folder.
  4. Click on the ellipsis next to the model’s name to expand more options and click Publish Latest.


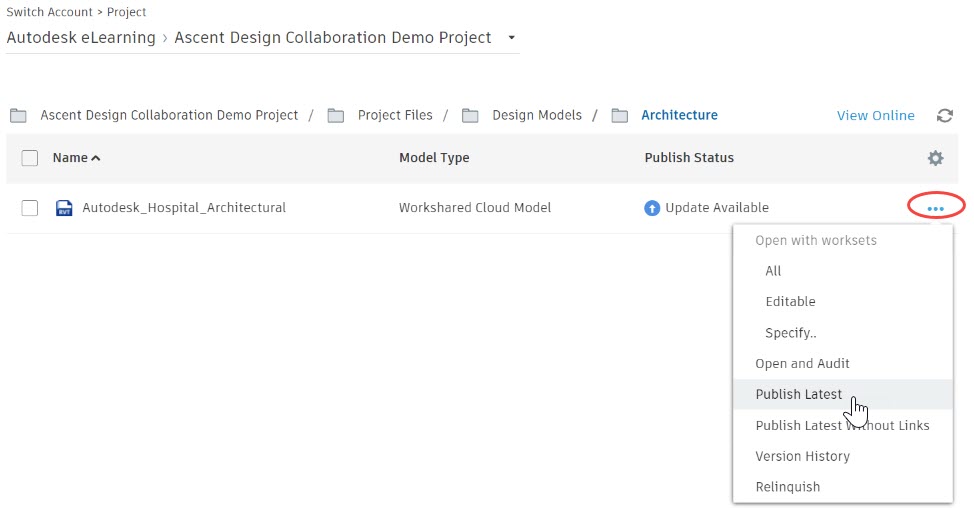
  5. In the Publish to the Cloud dialog box, click Publish.
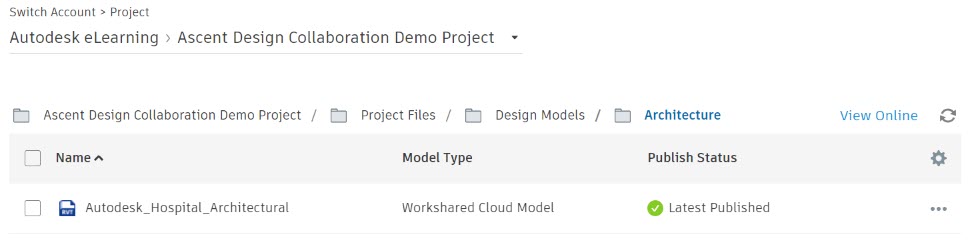
  6. The Publish Status will display as Latest Published when the model has finished publishing.

How to create a publishing schedule

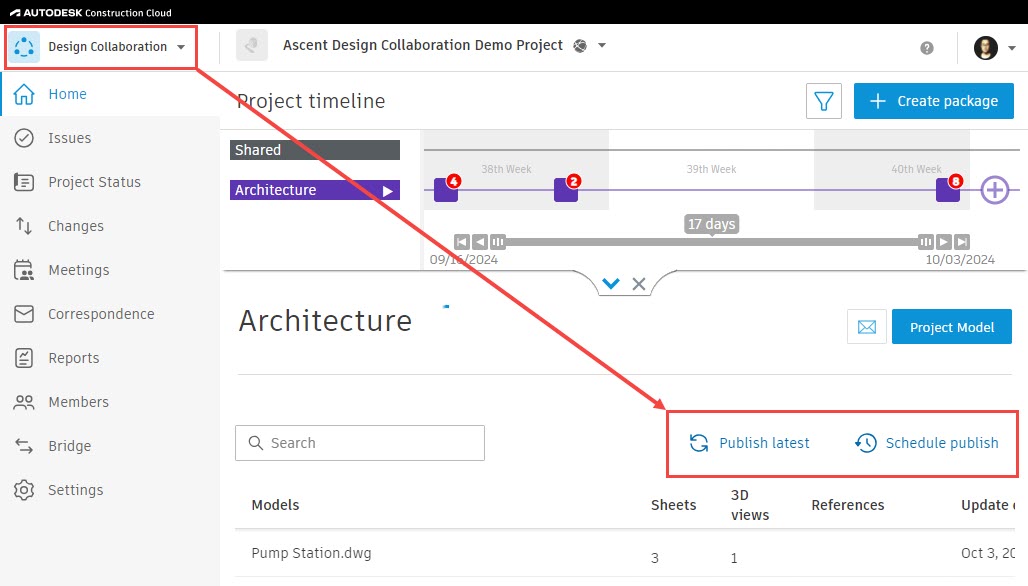
  1. In Autodesk Construction Cloud, navigate to your team's workspace in the Design Collaboration product.
  2. On the Home tab, click Publish Latest.
    Note: You cannot view the models in your team space while the latest version of the model is being published.
  3. Click Schedule publish from your team space to create a publishing schedule.


  4. In the Schedule publish settings dialog box, click in the Day field and select a day of the week, then click in the Time field select the time of day that you want for the regular publishing of the models in your team space.
  5. Once your schedule is defined, toggle on the Schedule publishing of your team’s latest content from Revit option.


  6. Click Close.
Was this information helpful?