00:02
I really like massing in Revit, when it works, that is.
00:07
Just like anything else, you need to know its nuances and its quirks.
00:12
Sometimes, something that seems quite simple, Revit will struggle with.
00:17
Other times, Revit can do amazing things in massing.
00:21
The objective of this video is to do something in between the simple and amazing.
00:26
By using the reference planes, we can now sketch the basic form of our mask.
00:33
which will become a roof.
00:35
So let's jump into Revit. To open the model, I could browse out through the open dialog box.
00:45
Or, since it's been recently used, it is here in my recent files.
00:50
I click on the recent files.
00:53
This is a central model. And it needs to create a local copy of it, which is fine.
00:60
And I want to override my existing local copy to ensure that I have all the latest information from the central model.
01:11
I double click on my garden floor plan to make it active.
01:17
And this section that we generated last session actually has a pretty bad name, Section 1.
01:27
I double click it to activate it. And in my properties, I can rename it to a much more descriptive name.
01:36
I will call it Garden Roof Section.
01:41
Now what I want to do is I want to create a few more reference planes to complete the grid.
01:47
This previous reference plane that I generated is a little bit too short.
01:53
So I'm just going to click on it and drag it out with the grip like I'd done earlier.
01:59
And now I want to create another reference plane like that. So in my Quick Access bar I can click on Create Similar.
02:07
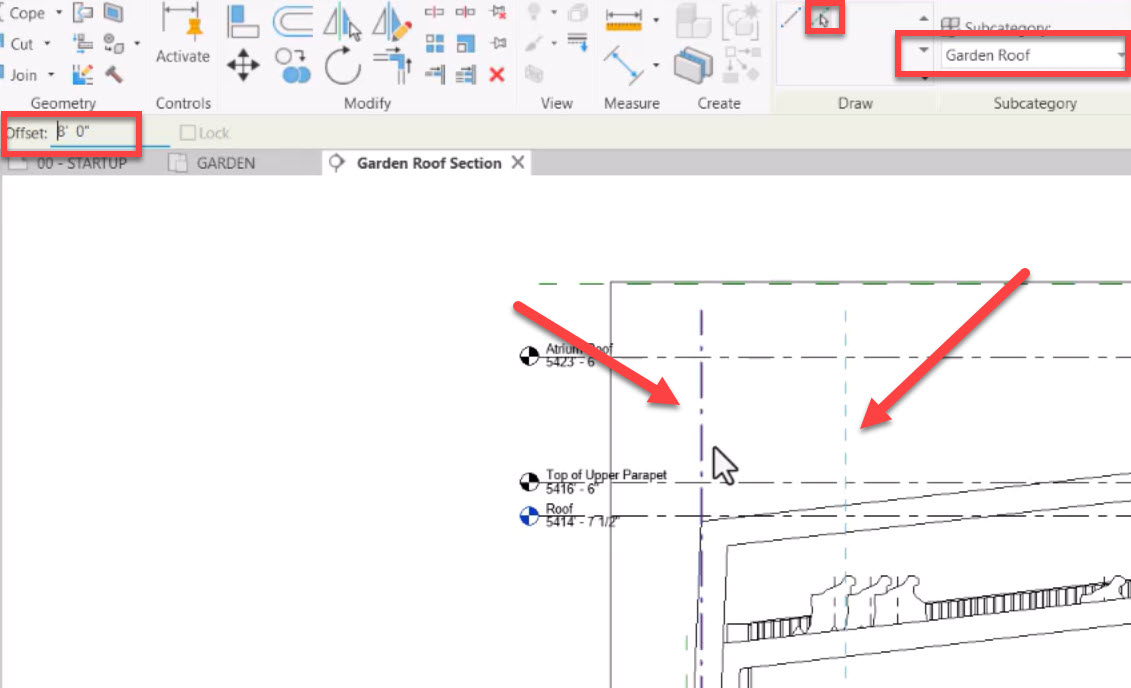
I don't want to draw another reference plane.
02:10
I want to pick an existing reference plane and offset it.
02:14
So I click on Pick Lines.
02:16
Set my offset value to 8 feet.
02:21
And as I hover over the reference plane, you'll see this blue dashed line as to which side is going to be offset from.
02:28
I'm going to offset it on the inside, and come over to the other reference plane that I generated, and offset that on the inside as well.
02:40
I click Modify to finish my command. And in my measure panel, I click Align Dimensions, which is also available in my Quick Access bar.
02:51
I want to generate a dimension line from these four reference planes.
02:55
So I just go and touch the four reference planes.
02:58
And then I tell it where I want the dimension to be located.
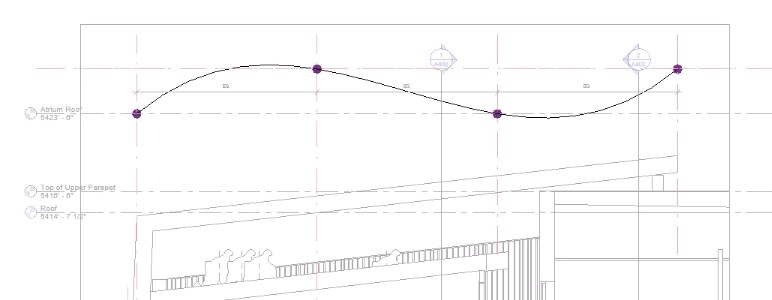
03:03
So I just click above the atrium roof.
03:07
And now you notice that I have this EQ with a line through it.
03:12
I click on the EQ, which will make these dimensions all equal, so the reference planes are equally spaced apart.
03:24
I click on Modify, and we're just about ready to start creating our mass.
03:31
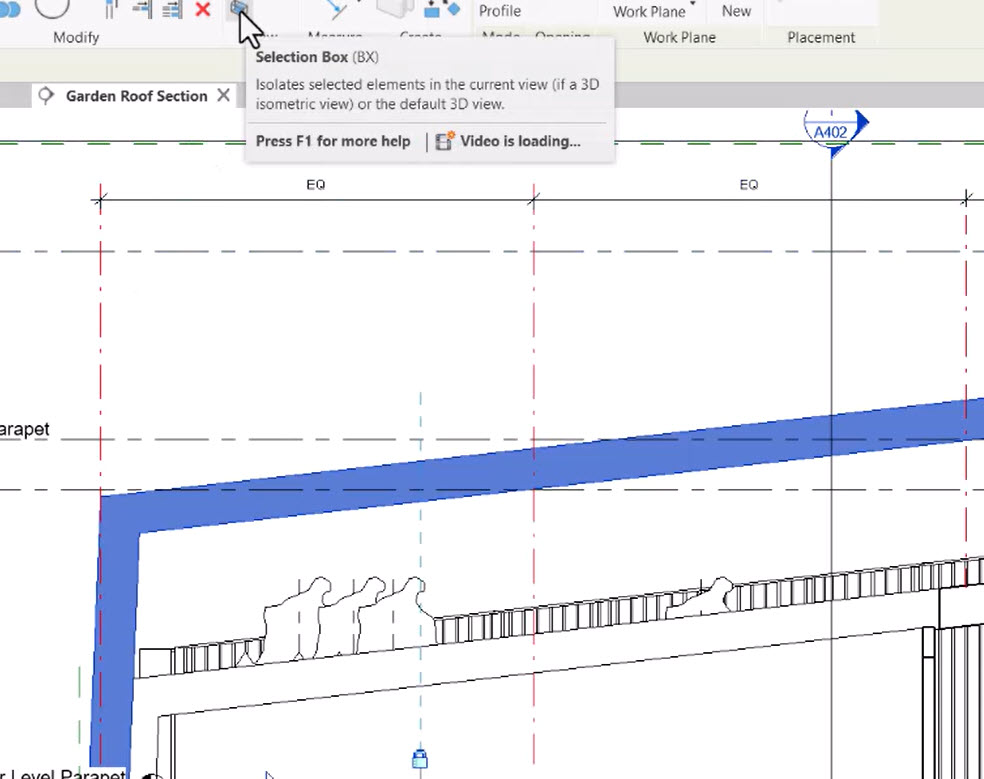
However, before I do that, I want to generate a customized 3D view.
03:36
So I click on this existing roof.
03:40
And I can go to my section box in my Quick Access bar.
03:44
I hit Escape and ZE for zoom extents. Now I want to increase the size of this section box.
03:53
So I click on the section box.
03:55
And you notice along all four sides there are some controls that allow me to enlarge it or shrink it.
04:06
So I'm going to enlarge the four sides. This one's a bit hard to see.
04:12
And there's also one on top, so I'm going to increase the height of my section box.
04:19
Click on Modify, or hit Escape a couple times.
04:23
And now, as I did previously with the section, I want to rename this to a more informative name.
04:31
Now I don't need these other views open, so I'm just going to hover over Startup, and click on Close, hover Garden Floor Plan,
04:40
and close that, and WT will tile our windows, and ZA, or Z A,
04:50
will do a zoom all of all the windows.
04:53
So, great, we're set now.
04:55
So I have a nice grid over here, and I can see what's going on in my 3D view.
05:04
We actually need one more reference plane.
05:06
In the Garden Roof section, zoom in to the Atrium Roof level.
05:14
RP is for creating reference planes.
05:18
The subcategory is already set to Garden Roof.
05:22
So I'm going to pick an existing line and offset it 4 feet.
05:30
And I'm going to select the atrium roof line and ensure that it goes above the atrium roof line.
05:39
Pretty close to my crop box. It's a modify key.
05:44
Select the crop region and extend it up a bit.
05:52
Now let's click on these four existing reference planes that we generated earlier.
05:58
And just elongate them so that they intersect the newly created reference plane so we have some nice intersections to work with.
06:10
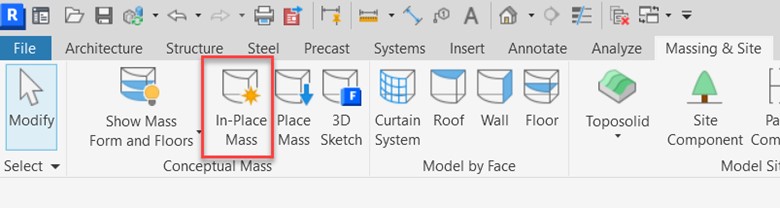
Okay, now it's time to generate our roof mass. Click Modify to deselect everything.
06:18
And on the massing site, click on In-place Mass.
06:25
We are informed that Revit has enabled the Show Mass mode so that the newly created mass will be visible.
06:33
What this means is that Revit has temporarily overridden the visibility graphics by enabling the Mass mode.
06:44
I accept that by clicking Close. And we call the mass Garden Roof.
06:52
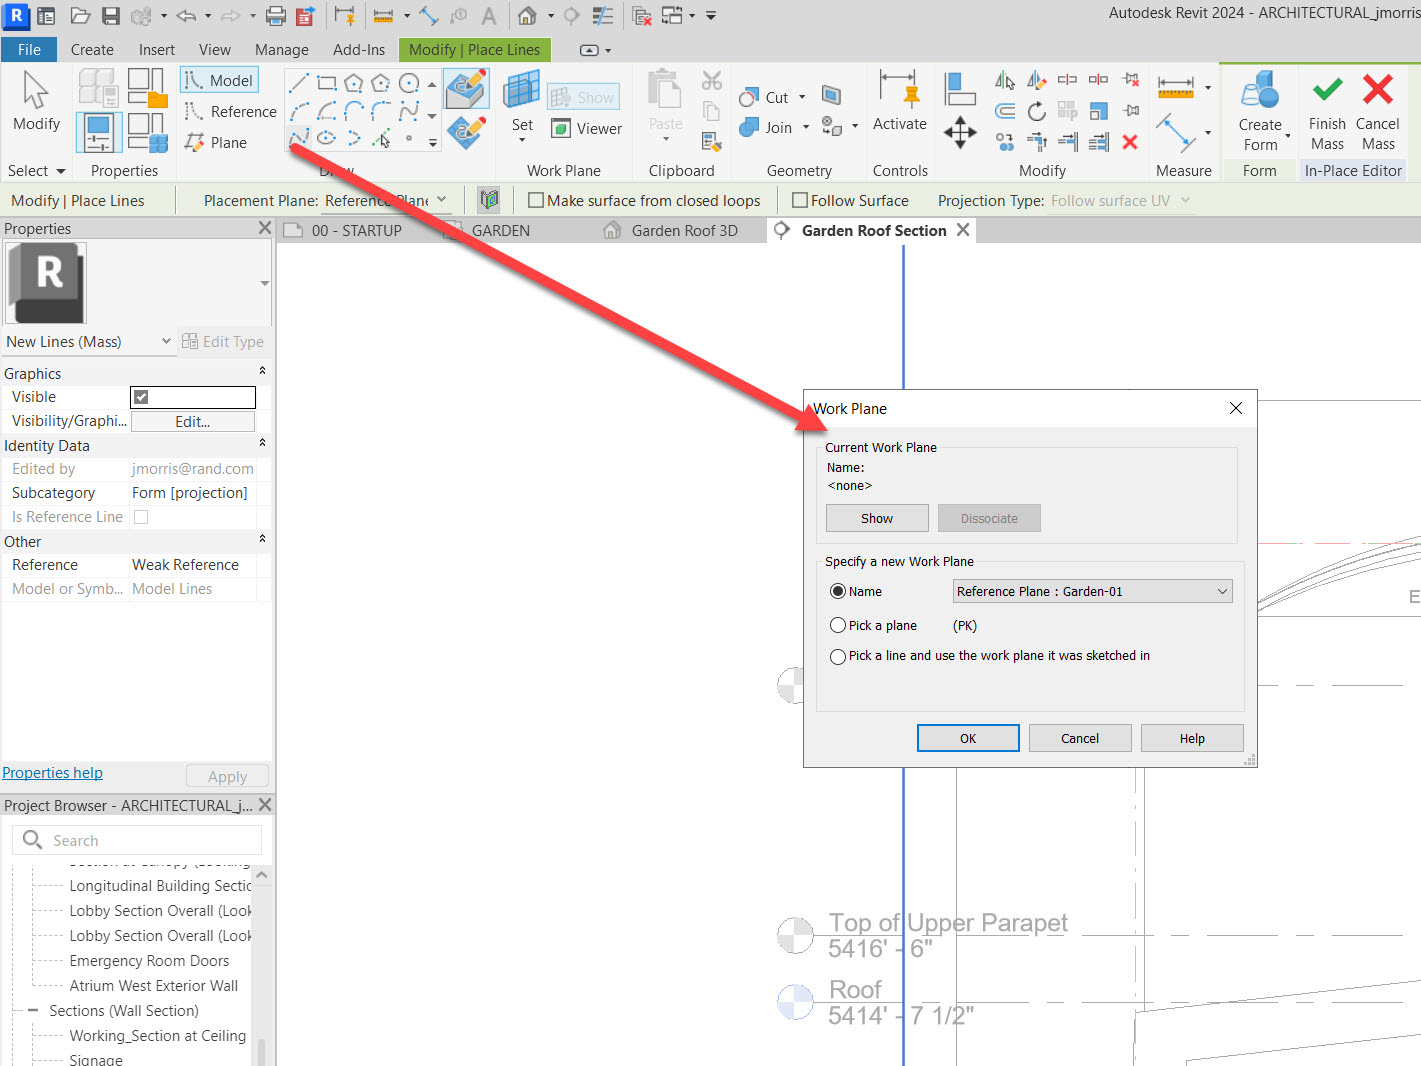
On the Create tab, under the Draw panel,
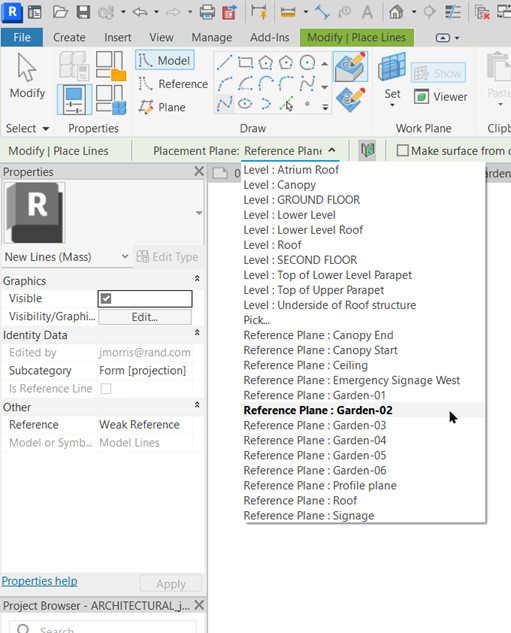
06:55
click on SP blind through points we need to tell Revit which work plane to work on.
07:03
So we click on the name and on the dropdown list we see the six reference planes that we generated earlier.
07:11
Garden-01 to,to Garden-06.
07:15
We're gonna start off with Garden-01 and work our way back.
07:19
So I select Garden-01, click OK.
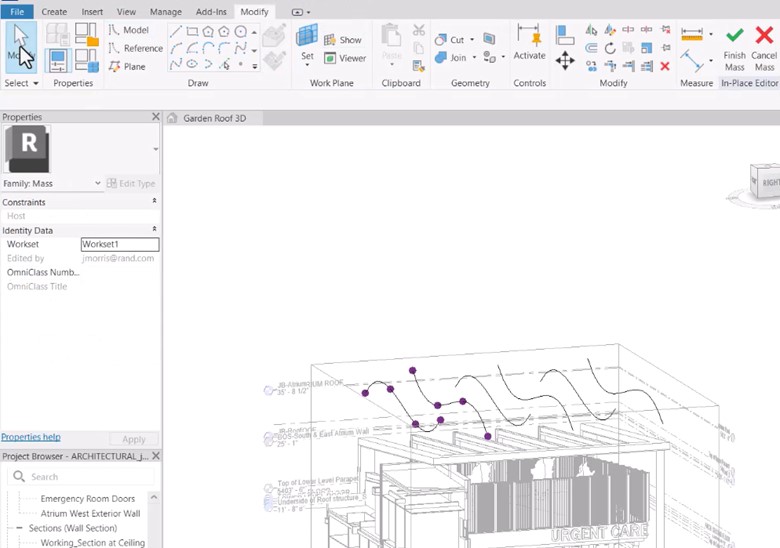
07:23
And now for the spline, for the odd ones, 1,
07:34
So I just select these four intersections that we generated.
07:49
We want to generate another spline, but we want to tell Revit that we are working in another plane.
07:56
So in my drop down list, I select Garden02.
08:00
And now I go the opposite direction, so from the top down.
08:11
Hit Escape a couple times.
08:14
And you can see in the 3D view how it's being generated.
08:22
I can hold the shift key down and orbit around.
08:25
And we see that, indeed, they are in different planes.
08:32
Going back to my Garden Roof Section view.
08:36
Now, rather than generating more splines like this, I can simply pick lines.
08:42
So I select pick lines.
08:48
And select the first one going from the bottom up. Now we see it in our 3D view.
08:55
It doesn't have the control points like the other splines do, but we don't really need them.
09:03
Go back to Pick Lines.
09:06
Select my Garden-04.
09:10
Select from the top down. It appears in my view.
09:15
Go back to Pick Lines. Garden-05. We're just about there.
09:22
Select from bottom up.
09:26
Lastly, pick lines, Garden-06, and select from the top down.
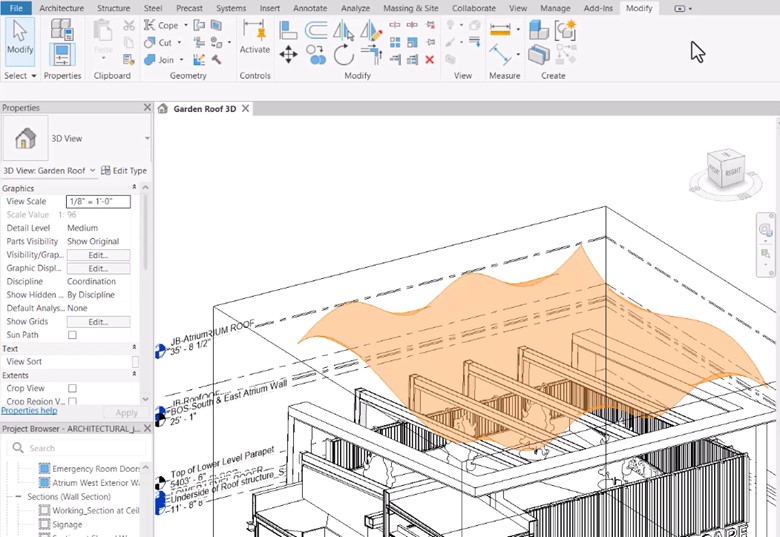
09:37
Okay, now we have our four, our six lines.
09:42
Now what we need to do is to hit Modify to deselect everything.
09:51
I'm going to select the six lines that I just generated.
09:56
Holding the control key down, I'll select them in the sequence they were drawn in.
10:09
And in my contextual ribbon, I can create a form.
10:15
Look at that. So I can pan around.
10:25
And I click on the green check mark in my contextual ribbon to finish my mass.
10:32
I am warned that the mass is only mesh geometry and can't be used to compute mass floors,
10:39
volumes, or surface areas.
10:42
But later on we will show you how to convert this to a object that can be used within Green Building Studios.
10:53
For now let's save the file.