Link Non-Workshared Revit Models – Practice Exercise
Task 1: Install Desktop Connector
- If Desktop Connector is not already installed on your machine, click here to download and install it.
- Once installed, log in using your ACC credentials.
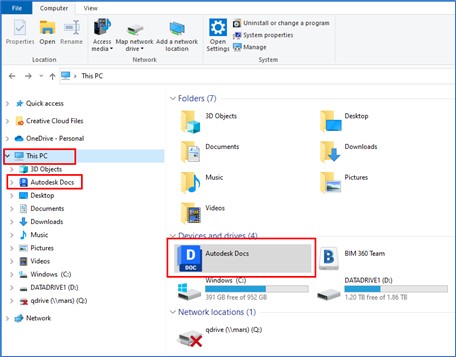
- Start a File Explorer window.
- Make sure you can see Autodesk Docs in the list, as shown below.
Task 2: Make Sure You Have Access to the Folder
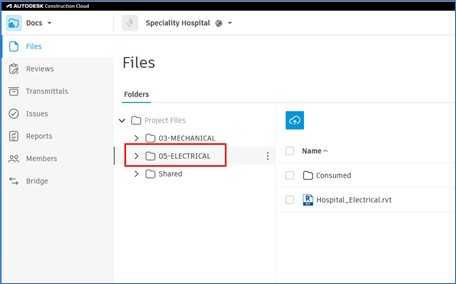
- Log on to the ACC project using your Web browser.
- Make sure you can see the folder of the team that has dumped their model on Docs, as shown below.
Task 3: Linking Non-Workshared Revit Model
- Start Revit.
- From the Home Screen, click Autodesk Docs and then navigate to your ACC project.
- Open your team’s WIP model.
- From the Manage ribbon tab > Manage Project ribbon panel, click Manage Links.
- In the Manage Links dialog box, click Add from the bottom right; the Import/Link RVT dialog box is displayed. This dialog box takes you straight to your ACC project.
Notice that although you can see the folder of the team that dumped their model on Docs when you go to that folder, you cannot see their model.
- From the Look-In drop-down list, click This PC; you can see Autodesk Docs in the list now, as shown below.
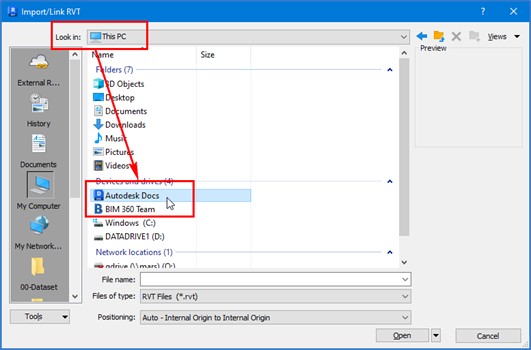
- Double-click on Autodesk Docs.
- Navigate to your ACC Account > ACC Project > Team Folder to link from. In this case, it is the Electrical team folder.
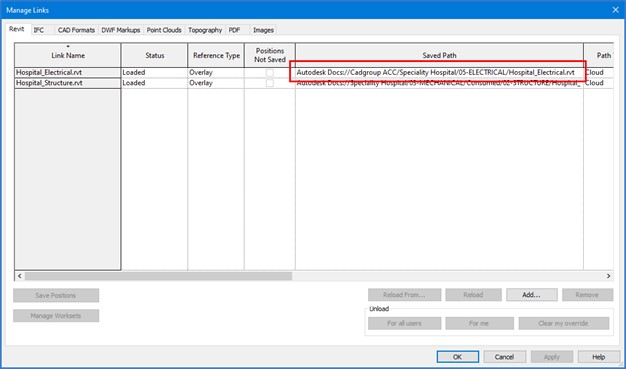
- Double-click on the Revit model of that team; the latest version of that model starts to download to your local drive. Once the model is linked, the Saved Path column shows the link to their Team folder, along with the name of your ACC account, as shown below.
Task 4: Create a 3D View with Links Turned On
It is always recommended to have a 3D view with the links turned off that will be used for automated clash detection using Model Coordination. Additionally, there should be another 3D view with links turned on for the visibility of the federated model on Docs.
- In the current 3D view, type VV to display the Visibility/Graphics Overrides dialog box.
- From the Revit Links tab, turn off the visibility of the linked Revit model.
- Close the dialog box.
- Create another 3D view and call it XXX Share with Links where XXX represents the discipline of your model. Alternatively, you can use the specifications mentioned in your BIM Execution Plan.
- In the new view, make sure the visibility of links is turned on using the Visibility/Graphics Overrides dialog box.
Task 5: Including 3D Views with Links in the Publish Set
- From the Collaborate ribbon tab > Manage Models ribbon panel, click Publish Settings; the Publish Settings dialog box is displayed.
- In the active publish set you used for publishing your Revit model previously, make sure the view with the links is also selected.
- Click Save & Close to close the dialog box.
Task 6: Syncing and Publishing the Updated Revit Model
- From the Quick Access Toolbar, click Synchronize and Modify Settings button; the Synchronize with Central dialog box is displayed.
- In the Comments field, enter a comment stating you have live-linked the other team’s model, as shown below.
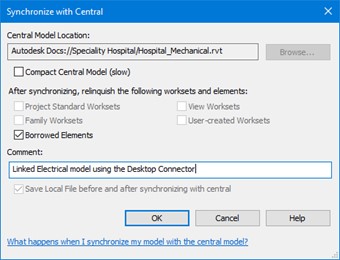
- Click OK to sync with the cloud central.
- After the sync is completed, close the Revit model.
- Refresh the Home screen.
- Publish the latest model.


