00:09
I'm creating a brand new project from scratch.
00:12
More than likely, this is not an activity
00:15
you will have to do very often.
00:17
But we need to do it to be able to see
00:19
all of the pieces and parts that go into creating a project.
00:23
Once you have a good solid project,
00:25
you will use that as a template and copy
00:28
that into all downstream projects you create.
00:31
So let's get started on creating a brand
00:33
new project from scratch.
00:35
More than likely you won't do that very often.
00:38
So this is just to get us going to speak
00:40
about the different factors that go into building a project.
00:44
Once we have a good solid project,
00:46
the rest is going to come together.
00:48
Because you'll be copying probably
00:50
projects down the line as template projects
00:53
and you won't need to do this from scratch any further.
00:56
Still important to know all of the factors that
00:58
go into building a project.
01:01
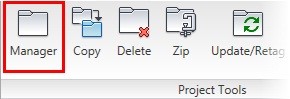
So if I were to create a brand new project from scratch,
01:04
I would utilize the small little toolbar
01:07
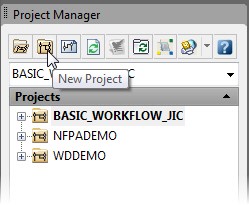
at the top of my project manager here.
01:10
And this button is our new project button.
01:15
So I'm going to click on that and it
01:18
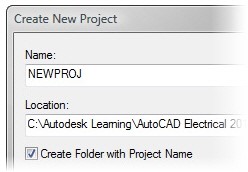
will open up this Create New Project dialog box.
01:21
Now, you can give it whatever name you want.
01:28
And you can see that the default location for this to go to
01:31
is built by where you install AutoCAD Electrical.
01:35
This is a very, very important topic
01:37
to discuss at the beginning of this training.
01:40
How you install AutoCAD Electrical
01:42
is crucial to your success with it.
01:45
If all you did was install it by clicking into the installer,
01:49
just accepting OK, and having it install the software.
01:53
You probably need to pause this training right now
01:56
and go back and do a repair or an update on your software.
02:01
The reason for that is, if you actually
02:04
open up the configuration dialog box within the installer.
02:09
It allows you to then choose the manufacturers
02:12
that you want, the symbol libraries that you want,
02:15
and the locations where you want those located.
02:19
My install setup is with all manufacturers and all symbol
02:25
I also have everything set to the default of going to my C
02:29
drive, but that means that I am working independently
02:34
In most cases, we would want to see sharing symbol libraries
02:39
and catalog databases across all of your users.
02:42
So that everybody has access to the same symbols
02:46
and the same catalog information.
02:48
And that way updates from anybody within the team
02:52
are then seen by all of the other team members.
02:55
This step is Absolutely crucial to your success
02:58
with AutoCAD Electrical.
02:60
If you are in a vaulted environment.
03:02
If you have AutoCAD or Inventor or any other package
03:06
that Autodesk has and you're utilizing vault.
03:10
This is a great tool with AutoCAD Electrical,
03:13
but that's for a different class.
03:14
So just keep that in mind as you go to install your AutoCAD
03:18
Electrical and if you haven't in your thinking,
03:21
"I need to fix this right now."
03:22
It can easily be done by going back into your installation
03:26
and re-choosing all of those configurations
03:28
and then you can jump right back into this training.
03:31
OK, so with where this is located on my computer
03:34
right now, I'm going to leave it there.
03:35
I'm not worried about moving it.
03:37
You probably going to be managing it though
03:38
into different project folders in areas
03:40
so that you can do that to manage it with whatever
03:43
your file systems are.
03:45
Now, one of the key things for me
03:46
is I'm going to create a folder with the project name.
03:49
Because my project and all of my drawings
03:51
are still going to live together in the same spot.
03:55
So a project file and I'll show it to you in just a second,
03:58
is a WDP file, a unique file to AutoCAD Electrical
04:03
and it lives as a text document.
04:06
So when we open it we're just going to see it in Notepad.
04:09
The beauty of this is you can easily edit it,
04:11
you can easily see what it's tracking.
04:13
But it carries all of the information
04:15
of all of the connected drawings and settings
04:18
that you want to keep across all of the drawings
04:21
within that whole project.
04:23
So your drawings are still individual DWGs.
04:26
Very important, if you're sharing this
04:28
with people who don't have Electrical
04:30
that's absolutely fine.
04:31
But this project is what's going to manage
04:34
all of those drawings that are within it.
04:36
Your project could have two drawings in it,
04:38
it could have 200 drawings in it, there's no limit.
04:42
It's meant to manage however you want.
04:44
We'll talk a little more about strategy of what a project
04:47
file does in a little bit.
04:49
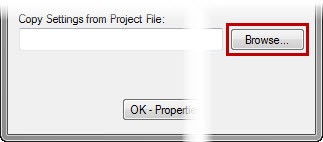
So when I create this new project,
04:50
I'm not going to browse to change any of these things.
04:53
I can copy an existing project which right now it's
04:55
utilizing the project I have as my active project.
04:59
And I can have it copy all of the existing settings in that.
05:03
I'll take you through that in a minute.
05:05
We don't have to worry about that right now.
05:07
So I'm going to hit OK.
05:10
And it's going to put my brand new project as my top project
05:13
in my project manager.
05:15
That means it is my active project.
05:18
So it's bolded, it's the only one that's bolded
05:21
and that's how you know that that is the active project.
05:24
You always want to work in your active project
05:28
very, very important.
05:30
In there I have no other drawings under it.
05:32
Notice that there are no plus signs next to this.
05:35
I don't have drawings in this project yet,
05:37
it is just a project.
05:38
But let's talk about what this project can already
05:41
start to develop for me.
05:42
I'm going to right click on it and you'll
05:44
see that the right click menu is unique to an active project
05:48
versus an inactive project.
05:50
Just to show that, this is everything
05:52
I can do in an active project and this is what I
05:56
can do in an inactive project.
05:58
Again, reinforcing how important it is to actually make sure
06:03
your project is active at all times
06:06
that you're working in it.
06:07
Now you can have as many projects in that project list.
06:11
The key to this is actually having
06:13
that be the active project whenever
06:15
you're working on specific drawings within that project.
06:20
Let's just talk about everything crucial to what we're doing.
06:23
So we're going to go all the way to the bottom
06:25
and go to the project properties.
06:27
This is what makes a project so powerful.
06:30
So this project I can now define what symbol libraries
06:34
I want to utilize for it.
06:36
Now, AutoCAD Electrical comes with many different symbol
06:39
libraries, you can see I am currently using NFPA.
06:43
It has NFPA, the old legacy JIC for anybody
06:47
who needs that from older drawings, so these of the US
06:52
As well as I 3-ply for the US standard in metric form.
06:56
It has IEC standards in both the older standards and the latest
06:60
standards for international code,
07:02
and it has Japanese, Chinese and Australian standards.
07:06
This is another thing that is very important
07:08
to make sure you install during the configuration
07:13
So that you can have access to all of those libraries.
07:16
If you don't, you will only get one.
07:19
So there's no extra cost, there's no extra thing to it,
07:21
you just have to make sure you add those to your install.
07:26
Now, I am currently using NFPA but the beauty
07:29
of defining this in the project properties
07:31
lets me switch and toggle.
07:33
Maybe I'm going to do a job for somebody overseas
07:36
and I need to be able to use the International standard.
07:39
Because I know that that's the code that's
07:41
going to be looked for in that project set.
07:43
Very important that you level set that in the beginning.
07:46
So these are all of my libraries that are pre-setup.
07:50
We'll talk about icon menus but your library
07:52
should match your icon menu, so NFPA to NFPA.
07:56
And then our panel footprint libraries and you
07:58
have two options with these you have the standard panel
08:01
library or the panel library in metrick form.
08:05
So again, based off of scaling in size
08:08
that's the key to those different libraries.
08:10
Now, the other things and we'll break into these deeper later
08:13
but this is just really important for you to see here.
08:16
The component tags, this allows us to do any automatic tagging,
08:21
same thing's going to happen in wire numbers,
08:23
in cross references.
08:24
All the different tabs across this properties dialog box
08:28
is going to allow us to define a standard tagging format.
08:33
If you don't, you end up back in a manual mode,
08:37
which is the whole goal of electrical to remove
08:41
these manual efforts.
08:43
So right now the default code for this is %F, %N,
08:49
that means family code plus the line reference number.
08:53
So if I insert a control relay like I did in the last module,
08:57
then it's going to come in with a CR for control relay
09:00
and whatever the line number is that I inserted it on.
09:04
In my case, it was 416, so that became CR416.
09:08
You can make this whatever you need it to be.
09:11
If you go to Help inside of AutoCAD Electrical,
09:14
you can search replaceable parameters.
09:16
And that will give you all of the list of those percent
09:20
codes, those replaceable parameters
09:22
for how you can make your tags what you need
09:25
them to be but still automated.
09:27
You can also put text constants in there.
09:29
So if you're utilizing line references
09:32
it's really important that you then set up your suffixes.
09:35
If we go in there that will tell us then,
09:38
is my control relay, if I put a second one on that same wire
09:42
is it going to get an A and then a B and then a C?
09:44
Is it a dash one, a dash two, a dash three?
09:46
You define that but this is all for setting that
09:49
up so that the software can automatically
09:51
run those tags for you.
09:54
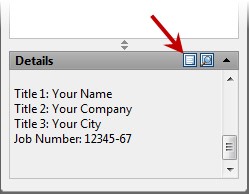
Now, any time in these project properties you see this icon.
09:59
This icon means that it can be changed at the drawing level.
10:03
So you can have unique settings for all
10:06
of these things per each drawing.
10:08
We'll talk about that when we build our first drawing
10:10
but I want you to see the difference.
10:12
The folders here mean that this can only be
10:15
changed at the project level.
10:18
So that's the difference between the two icons.
10:20
You will not find the settings for this area
10:23
in each individual drawing, you have to do it here
10:26
at the project level.
10:28
So this is component tagging, wire numbers,
10:31
you can see how you want to set up all your wire numbers,
10:34
they can even be based on different wire layer types.
10:38
Your cross referencing information
10:39
and what that looks like, how your arrows look,
10:43
there's lots of different options in here.
10:45
How your PLCs look, what does your wire
10:48
do when it crosses another wire, how does it
10:51
tee off of another wire.
10:52
All of those different settings are in here
10:54
so that you can standardize across all of your user base.
10:58
To make sure that everybody's designing
10:60
and having your drawing packages look the same way.
11:02
And the final tab is the drawing format.
11:04
Everything here can be changed at a drawing level,
11:07
you typically would want to standardize this though
11:10
across your whole project.
11:11
And again, this is where you can define
11:13
the width of your ladders if you are doing ladder design.
11:17
It's where you can set your spacing of each rung
11:19
and all of the other information that you see here.
11:22
OK, so these are our project properties.
11:24
We are set up now in this project.
11:26
Now, I want you to take a moment to go out to your exercises
11:29
and do the exercise called Create a New Project.