00:08
Our final step in looking at our panel tools
00:11
is to actually look at the panel reports.
00:14
These are going to look very similar
00:15
to the schematic reports we have already reviewed.
00:18
But this time, we're going to see where the full project
00:21
bomb can be created from.
00:22
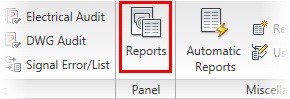
So we're going to go back to the reports tab of the ribbon,
00:25
and click on panel reports.
00:28
Here, you will see a very similar dialog box
00:31
to what we looked at in the schematic reports section,
00:34
but slightly different options inside the report names.
00:38
These are specific to panels.
00:40
The most important thing to see here is under bill of material
00:44
is the option for the full.
00:47
The full bill of material includes
00:49
all schematic components not referenced in the panel layout
00:52
and obviously everything that's in the panel layout that
00:55
is not in the schematic.
00:56
This is the complete project bomb and the particular bomb
00:60
that you should be using for any purchasing,
01:02
same set up for everything else though applies.
01:05
You have the same display options, the same installation
01:08
code and location codes you could extract from,
01:11
and the only update is you do have the ability
01:13
to now include nameplates and those cable connectors
01:17
The one thing before we go out to actually look
01:19
at this bill of material is to take a look
01:21
at some of the other reports that are in here, things
01:24
like the nameplate report.
01:26
That nameplate report is just like we
01:28
saw the wire label reports in the earlier
01:30
section on schematics.
01:32
That this allows us to create that report that can then
01:34
be extracted and sent to whatever machine
01:38
it is that you have stamping, nameplates, or creating
01:41
labels for nameplates.
01:43
I'm going to click OK.
01:50
Now this is the full complete project bomb.
01:55
If I put it on the drawing this time,
01:57
it's going to be brand new even though there's
01:59
one at the bottom of my screen because this
02:01
is for the whole project.
02:03
I will show you what it looks like if we want
02:05
to update just the one here.
02:07
This one, if I go back to the panel reports
02:11
and I choose active drawing only, and then click OK,
02:17
it will now update when I click put
02:19
on drawing this existing table.
02:21
Notice it flip to update existing.
02:25
When I click OK on that, the whole thing updates.
02:28
Now in this case, it got much larger
02:29
so it needs to be adjusted a bit to fit back into my screen
02:32
because I had quite a few new components added on it
02:35
since that last insert of it.
02:38
But that is the difference between updating an existing
02:41
report or inserting a brand new one.
02:44
Please do the exercise on panel reports.