00:08
Now let's talk about how to edit
00:10
custom data that is associated with our title block
00:14
This is one of my favorite commands inside
00:16
of AutoCAD Electrical.
00:18
It is very easy to map your title block information
00:22
to key fields within AutoCAD Electrical properties
00:26
so that you can do automatic title block updating
00:29
and not ever have to manually update a title block again.
00:33
I'm going to switch over to paper space
00:37
so that I can see my title block.
00:38
I'm going to Zoom up on it.
00:41
And we're going to map it for the very first time to all
00:45
of the attributes and entries that I
00:47
want to be able to utilize in the data
00:50
that AutoCAD Electrical provides.
00:52
I only have to do this one time.
00:54
Once you do it for your template,
00:56
you don't have to do it again, unless your template changes.
01:00
You can even do it for multiple templates.
01:03
In the case that you may have different sizes and shapes,
01:06
things for A size, B size, C size
01:09
and so on, as long as the attributes
01:12
themselves are labeled exactly the same, then this same title
01:16
block mapping file will work across all
01:19
of those title blocks.
01:20
It is not about location or size,
01:23
it is about the name of the attributes.
01:26
So if you need to set up your AutoCAD Electrical templates,
01:30
make sure that you help yourself by making
01:33
all of those templates have the same attributes in them
01:36
so that the same mapping file can be used across all.
01:40
If you don't do this, you will need a separate mapping file
01:43
for each type of template.
01:45
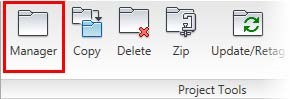
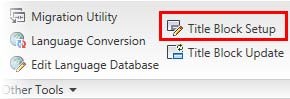
When I want to do this for the very first time,
01:48
I come up to my project tab of the ribbon
01:51
and I click on title block setup.
01:54
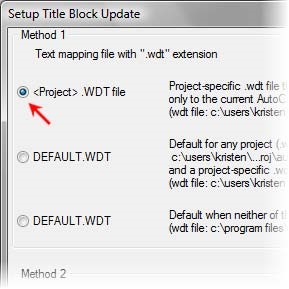
It will then ask me how I want to set this title block up.
01:58
Do I want to do it with an external file
02:00
or do I want to do it with an embedded attribute?
02:04
Both have their pros and cons, but I truly
02:07
like the external option, the best.
02:10
It's easier to edit.
02:12
You can manually edit it in a Notepad file.
02:16
And you can also copy and paste it across different tools
02:19
or have changes for different ones
02:21
as opposed to needing to change the embedded attribute
02:26
Now the next question if you do the external file is how do you
02:31
want to define that external file?
02:34
Now this is true for all custom files for AutoCAD Electrical.
02:39
You have three ways that you can define them.
02:42
The first way and the first thing
02:44
that the software scans for is something
02:46
with the name of the exact same name as your project file
02:51
dot whatever the extension of that related file is.
02:55
In this case, these are WDT files for the templates.
03:01
These files then would say, in this case,
03:03
custom data nfpa.wdt, and they would
03:08
be located in the exact same folder as the project file.
03:13
The second option would be to have that exact same setup
03:17
but without the project name and just the word default
03:21
but still located in the Project file.
03:25
The final scan that the software will do to find this file
03:28
is if it doesn't find either of those two,
03:30
the next step is to find a default.wdt out
03:34
in your support directories.
03:37
Again, there are many reasons and ways
03:39
you could implement this.
03:40
You could have that one super file be out in the report
03:44
directories, but then when there are certain specialty title
03:48
blocks that you have, you use an override
03:50
with just the project specific file in the folder
03:55
That will supersede your support files.
03:59
However, I like every project file
04:01
to be its own island, where everything
04:04
that project needs is together inside the folder
04:08
with the project, meaning the project, the drawings, and all
04:11
of the related support files that go with that project.
04:15
That way, I am not relying on a support file that
04:18
may get updated over months and years for something
04:21
that I may want to pull forward a couple of years from now
04:25
and be able to use again, but none of those files
04:29
So in my personal opinion, I enjoy
04:31
being able to keep everything specialized
04:34
to that single project file.
04:36
It does mean duplication of all of these support files,
04:39
but they're very tiny, easy notepad files
04:44
In this case, I will choose the top option here.
04:54
And then, it obviously sees that I already
04:56
have one for this training project,
04:59
but I am going to say that I want to override it,
05:01
which would be me creating new.
05:03
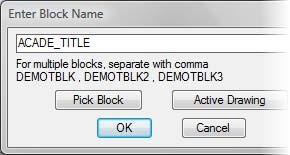
Now, if you know your block name, you can type it in here.
05:07
And this is also the case that if you have multiple title
05:10
blocks, remember those A, B, C, and so on,
05:12
that I suggested that this is an opportunity
05:15
to put all of the names of those blocks
05:18
into this field with just commas separating them
05:21
so that it works on all of them.
05:23
But in my case, because I'm going
05:25
to use the same block I have on the drawing,
05:27
I'm just going to click pick block.
05:29
I'll choose this title block.
05:32
Hit Enter, and it comes in with that block name.
05:35
Once I click OK, it then opens up my dialog box for me
05:41
Here is where we go back and look at the project
05:45
descriptions, and we can start mapping those
05:48
to our attributes in our title block.
05:52
So, in this case, I have named all of my project descriptions
05:57
the same names as what I have attributes
05:59
for in my title block.
06:01
This is a very important part of implementation
06:04
of AutoCAD Electrical.
06:05
You can edit that dialog box, which I will show you right
06:08
after I leave this one with that information that's already
06:14
Once that's done, then these things
06:16
can map to all of those attributes.
06:18
So this list that gets populated by me selecting that block
06:23
is every attribute already built into my title block.
06:27
Now, I just map them.
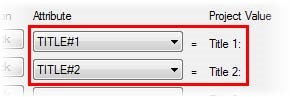
06:28
So title one will go to title one, title two to title two,
06:34
title three, and so on.
06:36
It is very important when you look at your attributes
06:39
and which ones you want to see get
06:41
mapped to project-wide fields versus individual drawing
06:53
I'll just keep mapping these.
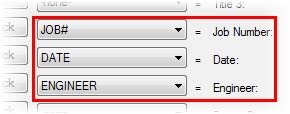
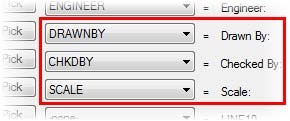
07:06
Everything you see me fill out here
07:08
can be set up so that every single drawing has
07:10
this information, same project titles, same job
07:13
number, same date, same engineer, same drawn
07:16
by and checked by, and scale.
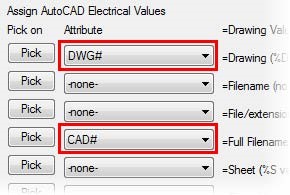
07:19
But when I move over to my drawing values,
07:21
these are the things that get populated by the drawing
07:24
properties, and they are the things that
07:27
are unique to each drawing.
07:29
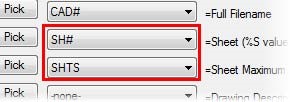
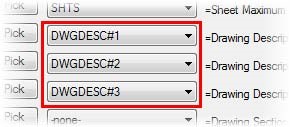
So, in this case, the individual drawing numbers,
07:35
the file name if you want to put it in there, the drawing
07:38
descriptions, and even the sheet numbers
07:48
if you wanted to say what sheet is this and then
07:51
what is the maximum sheet.
07:54
So if you want to say
07:57
seeing on the screen here, that needs
07:59
to be two separate attributes, one for the existing sheet
08:02
number and one for the sheet maximum.
08:05
And notice, I am not filling every one of these out.
08:08
I don't have attributes in my title block
08:11
for every one of the options listed in this dialog box.
08:14
So this is also an opportunity for you
08:16
to take a look at your type of block
08:18
and see if there are additional things that you would like
08:21
added to it so that you can map them automatically
08:24
from the software into the title block.
08:27
The final option is to go to this user-defined area
08:31
where you can either put a user constant on here
08:35
where you choose the attribute in the same text
08:37
constant or auto LISP routine can drive the information that
08:42
comes into that attribute whenever we run the title block
08:47
Once we're done, we click OK, and our mapping
08:54
And just to remind you where all of those mapping pieces
08:56
came from, the attribute list is what's inside the title
09:00
block itself, standard AutoCAD title block
09:03
information with attributes.
09:05
The project properties that we map
09:07
to things like the title of the project,
09:10
the project number, drawn by, checked by, all of those
09:14
is located by right-clicking on the project coming down
09:18
to the descriptions, and then looking at the descriptions
09:23
Notice that these have been changed to read the same as the
09:27
attributes themselves.
09:29
By default, these would just say line 1, line 2, line 3, and so
09:34
And you have a never-ending list of attribute fields
09:38
that you can map to.
09:40
However, it will make it so much easier when you're
09:43
filling these pieces of information
09:45
out to actually change that file from saying
09:50
line 1 to actually equaling your attribute information.
09:56
To be able to do that, we create a file called a wdl file.
10:02
You do have to manually create it.
10:04
As a Notepad file, it's just simply a text file.
10:08
This is what the file will look like when you create one.
10:10
You will call it default_wdtitle.wdl.
10:17
Make sure that you have file extensions turned on in Windows
10:21
Explorer so that you don't have this end with a .txt.
10:25
You need to override that text file extension with the wdl.
10:31
That's how AutoCAD Electrical will find it,
10:33
and all you're doing is then mapping that particular dialog
10:37
box from saying line
10:41
whatever it is that you want it to match to your title blocks
10:45
It's a very simple thing to do.
10:46
And again, you only have to do it one time.
10:50
And then that will make this dialog box read how it is.
10:55
Then we can fill out the information in here,
11:00
and it will be engineered by me, drawn by me, and checked by me.
11:07
And my setup is a one to two.
11:13
Now, once I click those descriptions in there,
11:16
I can then take a look at where the properties that
11:18
are drawing specific come from.
11:21
If I re-click on my individual drawing
11:23
and go to drawing properties, this
11:25
is where you'll see the drawing descriptions, the sheet number,
11:29
the drawing number, and any other information
11:31
that you want to map to your title block.
11:33
This is where you would fill that information out.
11:36
If you remember when we created our very first drawing
11:38
from scratch, you get this dialog box right out
11:41
of the gate and that is to ensure that you fill out
11:44
this information so that it can be used in the title block
11:48
when you're ready to do an update.
11:50
So assuming we have done all of that
11:52
and we have our mapping file, which we do now,
11:54
all we have to do is an update.
11:57
The title block update can be started
11:59
from here, in the Project tab of the ribbon,
12:02
or by right-clicking on the project
12:04
and coming down to title block update.
12:07
You can then choose what you want
12:09
it to update by selecting all.
12:11
The blanks don't do anything, so you're
12:13
welcome to do that instead of having to individually
12:15
check and mark everything.
12:16
You can also come down and choose
12:18
what you want to have update from the drawing
12:20
information, which I will include sheets and sheet
12:26
If you skip sheet numbers in between,
12:29
the software will also analyze what the previous sheet is
12:32
and what the next sheet is if they
12:33
don't follow a numerical order.
12:37
Once I'm done, I can say, OK project-wide,
12:40
and it will then go through every single one of my drawings
12:44
and quickly update the title block as you see here.
12:50
If I double click on a different drawing
12:52
and take a look at that title block,
12:57
it has been updated as well.
12:59
That's how fast and easy it is to use
13:02
the title block updating.
13:03
Please take a moment to do the exercise on title block