00:04
After allocating system demands,
00:06
you can use the meter assignment tool to
00:07
view and assign meters to pipes and junctions.
00:11
This tool allows you to find out which
00:13
meters are currently assigned to which pipes and junctions
00:19
You review how meters were assigned to junctions in
00:21
a pressure zone and make edits to the assignments
00:24
to begin. Double click the desired project dot EPR X file to open Argi
00:31
Once the project starts,
00:32
click the info water pro tab to open the info water pro ribbon
00:37
in the project panel, click initialize
00:40
start by adding the meter sales data to the Argi
00:43
Pro contents panel if needed
00:47
Agis ribbon on the map tab in the layer panel. Click add data,
00:52
navigate to and double click the dot GDB file for this exercise,
00:58
select the meter sales shape file and then click OK to add it to the table of contents.
01:06
If you do not want it visible in the map,
01:08
then you can turn off the meter sales layer in the contents panel.
01:13
You can set up a query for the junctions in zone one that you want to view and reassign
01:19
in the model explorer on the operation tab, right, click DB query and select new,
01:26
assign a DB query ID of zone one junctions in PZ one and then click OK.
01:33
In the DB query window, make sure that the element type is set to junction
01:38
and then click the query builder icon
01:42
in the query builder. Click the junction tab,
01:47
select junction zone as the data field
01:51
in the operator section select equals
01:55
enter one in the field.
02:00
your query appears in the query statement box.
02:04
Click validate to ensure you have created a proper query and then click OK,
02:08
three times to exit the query builder and DB query windows completely.
02:15
You can now add this query to the domain
02:18
on the info water pro ribbon
02:20
in the domain panel. Click domain manager,
02:24
click clear to clear the domain of any previous selections
02:29
from the element source section,
02:31
select DB query and then expand the drop down and select
02:35
the zone one junctions in PZ one query you just created
02:40
click add to add all of the zone one junctions to the domain.
02:44
Click close to exit the domain manager
02:47
in the map, you can see the junctions in zone one highlighted in red
02:52
zoom into this area of the map.
02:55
You may need to temporarily turn off the meter sales layer in the argi
02:58
pro contents panel to help you find the highlighted junctions.
03:02
Once you have found them,
03:03
make sure that you turn the meter sales layer back on in the contents panel.
03:08
Now you can view and edit the meter assignments for the junctions in this zone.
03:14
GS pro contents panel select and highlight the meter sales layer
03:18
on the info water pro ribbon.
03:20
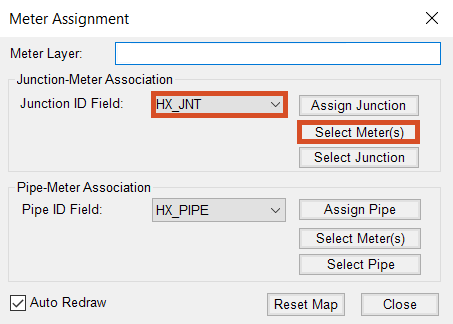
In the allocator panel, click assign meters to open the meter assignment window
03:26
in the junction meter association group, expand the junction id field dropdown,
03:32
and select H X J N T
03:36
click select meters and in the map use your mouse
03:39
to graphically select several meters within the pressure zone,
03:43
you do not need to select all the meters,
03:45
just a small handful within the designated area.
03:49
Right? Click the map and select enter.
03:51
You can review the red links that appear
03:53
displaying the junctions that meters are assigned to.
03:57
You can also do the reverse by choosing select junction
04:00
highlighting a few junctions from the map and right clicking
04:03
enter to see which meters were assigned to specific junctions.
04:08
You can also practice changing associated junction ids,
04:12
move the meter assignment window to the side and select
04:15
a location in the map that you would like to reassign
04:18
in the meter assignment window, click assign junction first select the junction.
04:23
You would like to reassign meters to
04:28
then click and drag. To select the meters you would like to have reassigned.
04:32
If you don't remember the selection order,
04:34
look to the message board which directs you what to do,
04:39
right. Click on the map and select enter.
04:42
You can see that the red lines displaying the assignment are updated.
04:46
You can repeat these steps to reassign any meter to any other junction or pipe.
04:51
New lines will be drawn to show the new meter allocation.
04:56
Click close to exit the meter assignment window
04:60
in the confirmation window. Click yes to reset the map and clear the red links.
05:06
If you made any changes,
05:07
you would need to rerun the allocator using the meter junction
05:10
allocation method to reallocate the demands to the newly assigned pipes.
05:15
It is important to understand that whichever closest method you use,
05:19
you would then use the corresponding meter pipe or junction allocation method.
05:25
if you had made changes to the meter assignment after running closest pipe,
05:29
then you would use meter pipe allocation instead.