& Construction

Integrated BIM tools, including Revit, AutoCAD, and Civil 3D
& Manufacturing

Professional CAD/CAM tools built on Inventor and AutoCAD

Integrated BIM tools, including Revit, AutoCAD, and Civil 3D

Professional CAD/CAM tools built on Inventor and AutoCAD
Transcript
00:04
With info works.
00:05
WS pro you can create background layers using raster
00:08
images such as aerial images or digital elevation maps.
00:13
Supported formats include Geo
00:15
tiff and dot
00:16
sid files
00:18
with session two bridge net geo plan open,
00:21
right, click in the GEO plan
00:22
and from the shortcut menu select layer control
00:25
to open the GIS layer control dialogue.
00:29
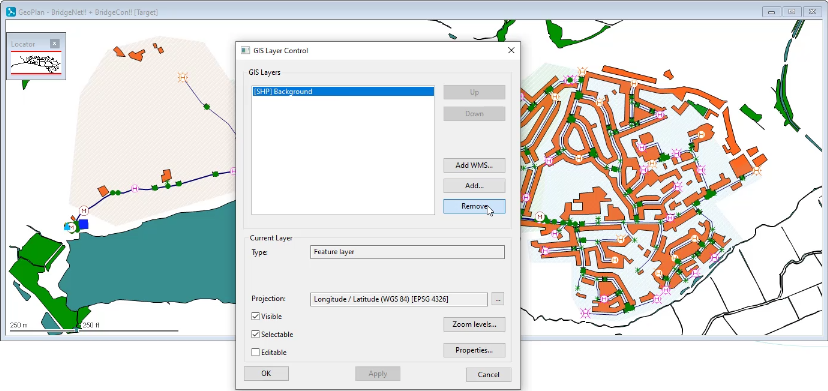
If you have a background layer already applied, you can remove it,
00:33
select the background from the list and then click remove
00:37
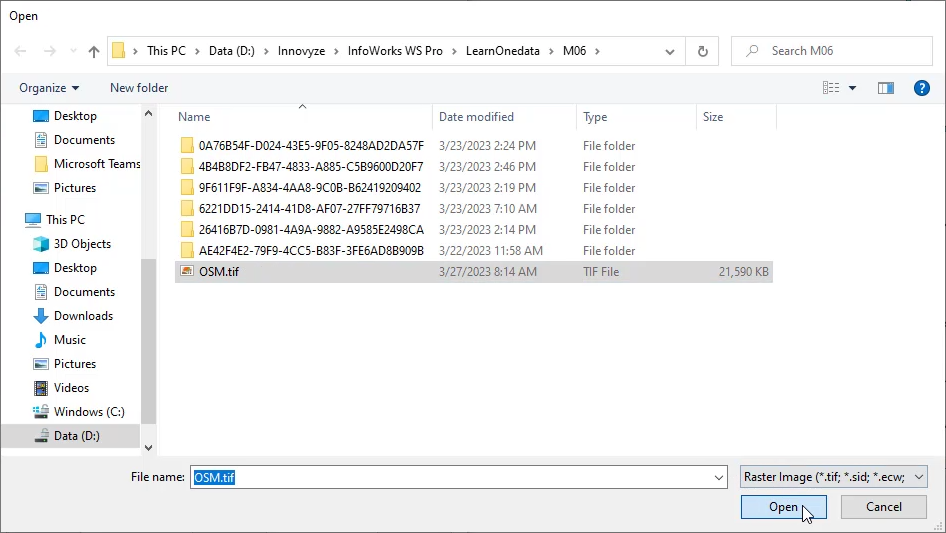
to add a new background layer. Click add to open your file browser,
00:42
expand the file type dropdown and select raster image
00:46
then
00:47
navigate to the file
00:48
osm dot Tiff.
00:51
Select the file and then click open
00:55
back in the GIS
00:56
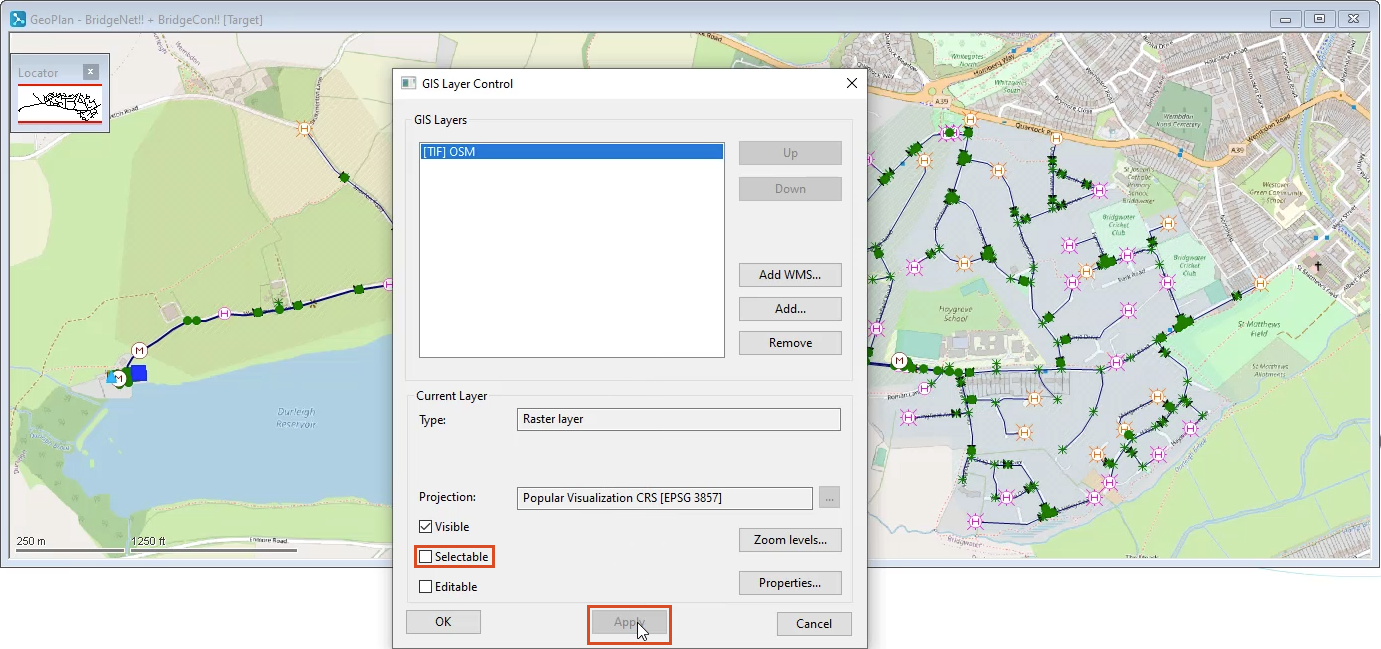
layer control dialogue. In the gi layers list
00:59
the raster image file displays
01:02
under current layer, ensure selectable remains deselected
01:07
and then click apply
01:10
click OK. To confirm the changes
01:13
in the GEO plan. The background raster image displays
01:17
creating a background layer using a raster image can greatly
01:21
increase the level of detail displayed in your model.
Video transcript
00:04
With info works.
00:05
WS pro you can create background layers using raster
00:08
images such as aerial images or digital elevation maps.
00:13
Supported formats include Geo
00:15
tiff and dot
00:16
sid files
00:18
with session two bridge net geo plan open,
00:21
right, click in the GEO plan
00:22
and from the shortcut menu select layer control
00:25
to open the GIS layer control dialogue.
00:29
If you have a background layer already applied, you can remove it,
00:33
select the background from the list and then click remove
00:37
to add a new background layer. Click add to open your file browser,
00:42
expand the file type dropdown and select raster image
00:46
then
00:47
navigate to the file
00:48
osm dot Tiff.
00:51
Select the file and then click open
00:55
back in the GIS
00:56
layer control dialogue. In the gi layers list
00:59
the raster image file displays
01:02
under current layer, ensure selectable remains deselected
01:07
and then click apply
01:10
click OK. To confirm the changes
01:13
in the GEO plan. The background raster image displays
01:17
creating a background layer using a raster image can greatly
01:21
increase the level of detail displayed in your model.
With InfoWorks WS Pro, you can create background layers using raster images, such as aerial images or digital elevation maps.
To remove a background layer that is already applied:

To add a new background layer using a raster image:

In the GIS Layer Control dialog box, in the GIS Layers list, the raster image file appears.

In the GeoPlan, the background raster image displays.
How to buy
Privacy | Do not sell or share my personal information | Cookie preferences | Report noncompliance | Terms of use | Legal | © 2025 Autodesk Inc. All rights reserved
Sign in to start learning
Sign in for unlimited free access to all learning content.Save your progress
Take assessments
Receive personalized recommendations
May we collect and use your data?
Learn more about the Third Party Services we use and our Privacy Statement.May we collect and use your data to tailor your experience?
Explore the benefits of a customized experience by managing your privacy settings for this site or visit our Privacy Statement to learn more about your options.