Editing sub-themes

00:04

In info

00:04

works.

00:04

WS pro customizable themes,

00:07

enhance the visibility of results and other model data displayed on a GEO plan.

00:13

Themes can be set as a default appearance for network

00:15

models when they are saved to the network properly.

00:18

In this example,

00:19

you will edit a theme so that only pipes display

00:22

in a model and then you will save the changes

00:25

to begin open session. Two bridge net GEO plan,

00:29

right? Click the GEO plan and from the shortcut menu, select properties and themes

00:35

from the GEO plan, properties and themes, dialogue layers and themes tab,

00:39

turn off the display of nodes and hydrants and

00:42

then click apply to preview the simplified display.

00:47

Now you can edit the pipe's theme,

00:49

return to the properties and themes, dialogue

00:52

and next to pipe under the theme column. Select edit

00:57

this displays the pipe, the

00:58

dialogue.

00:59

Notice that the manager pa

01:01

contains a list of the sub themes that are applied to the pipe.

01:05

In this instance, the sub themes include configurations for pipe breaks,

01:09

flow direction, closed pipes,

01:12

live data and pipe size

01:14

from the list. Select base theme

01:17

from here. You can review the rules applied to the pipes.

01:20

Base theme such as the display color of the pipes.

01:24

Next open pipe size

01:27

under ranged themes.

01:28

Notice that the line width is assigned based on the value of the pipe size,

01:33

you can review the variation of the pipe size ranges in the draws style preview.

01:39

Next open pipe closed

01:41

again in the draws style preview values are gathered

01:44

based on a boolean operation from the assigned field.

01:47

And if a pipe is closed, an X displays

01:52

open flow direction and review the draws style preview for flow values.

01:58

Open pipe break

02:00

and review the draws style preview for pipe breaks.

02:04

Now that you have explored the existing sub themes,

02:07

add a new sub theme for pipe materials

02:10

from the manager Payne toolbar. Select add new

02:14

in the name field, enter a descriptive name such as pipe materials,

02:19

then expand the field drop down and select material.

02:23

Here you can apply an individual range that

02:26

displays objects differently based on individual discrete values

02:30

or you could choose a flag range where the discrete value displays as a data flag.

02:36

You could also choose a continuous range that displays objects

02:39

differently based on a series of ranges or continually variable values

02:44

from the drop down. Select individual.

02:48

Once the range is set,

02:50

the ranged themes list prepopulate with materials in the current model.

02:55

Click OK.

02:57

Back in the GEO plan, the theme updates

03:00

now different pipe materials display as different

03:03

colors according to the new sub theme,

03:06

sub themes can also be used in other ways.

03:08

For instance,

03:09

by changing the width of pipes made of a certain material such as ferris pipes,

03:14

return to the pipe layer theme editor and under properties. Select line width,

03:20

then under ranged themes from the line color drop down,

03:23

expand both cast iron and ductile iron,

03:27

assign them the same hot pink line color.

03:31

Then from the line width column,

03:33

assign both the cast iron and ductile iron materials align with the three

03:39

next set.

03:40

The other material line colors to a different color such as a pale

03:43

blue and leave the line widths for these materials set to one.

03:48

Once you assign these values to one material,

03:50

you can use copy and paste to assign the rest

03:54

select both the line color and line width cells while holding the

03:58

shift key and then press control C to copy the values,

04:02

then select the next material line color and press

04:05

control V to paste them to that material.

04:09

Continue until all the other materials are pale blue.

04:13

Click apply

04:15

the GEO plan updates and the Ferris pipes display in the model

04:19

as hot pink lines that are wider than the other pipes.

04:23

Sub themes are dependent on the order in which they appear in the manager pane.

04:28

So the line widths assigned within the pipe material sub theme now

04:31

take precedence over those assigned within the pipe size sub theme.

04:36

The rules within the pipes size sub theme are ignored.

04:40

However, you can disable and enable sub themes as you wish

04:45

to disable the pipe materials. Sub theme from the manager pa

04:49

select pipe materials

04:51

then from the toolbar select enable slash disable

04:55

click, apply to preview the changes,

04:59

the GEO plan updates and the pipe material colors and line widths no longer display.

05:04

This is because the rules applied to the pipe size sub theme are in effect

05:09

enable the pipe material sub theme again,

05:13

creating and editing the sub themes for object layers provides you with

05:16

the capability to create robust custom visualizations of the model data.

Video transcript

00:04

In info

00:04

works.

00:04

WS pro customizable themes,

00:07

enhance the visibility of results and other model data displayed on a GEO plan.

00:13

Themes can be set as a default appearance for network

00:15

models when they are saved to the network properly.

00:18

In this example,

00:19

you will edit a theme so that only pipes display

00:22

in a model and then you will save the changes

00:25

to begin open session. Two bridge net GEO plan,

00:29

right? Click the GEO plan and from the shortcut menu, select properties and themes

00:35

from the GEO plan, properties and themes, dialogue layers and themes tab,

00:39

turn off the display of nodes and hydrants and

00:42

then click apply to preview the simplified display.

00:47

Now you can edit the pipe's theme,

00:49

return to the properties and themes, dialogue

00:52

and next to pipe under the theme column. Select edit

00:57

this displays the pipe, the

00:58

dialogue.

00:59

Notice that the manager pa

01:01

contains a list of the sub themes that are applied to the pipe.

01:05

In this instance, the sub themes include configurations for pipe breaks,

01:09

flow direction, closed pipes,

01:12

live data and pipe size

01:14

from the list. Select base theme

01:17

from here. You can review the rules applied to the pipes.

01:20

Base theme such as the display color of the pipes.

01:24

Next open pipe size

01:27

under ranged themes.

01:28

Notice that the line width is assigned based on the value of the pipe size,

01:33

you can review the variation of the pipe size ranges in the draws style preview.

01:39

Next open pipe closed

01:41

again in the draws style preview values are gathered

01:44

based on a boolean operation from the assigned field.

01:47

And if a pipe is closed, an X displays

01:52

open flow direction and review the draws style preview for flow values.

01:58

Open pipe break

02:00

and review the draws style preview for pipe breaks.

02:04

Now that you have explored the existing sub themes,

02:07

add a new sub theme for pipe materials

02:10

from the manager Payne toolbar. Select add new

02:14

in the name field, enter a descriptive name such as pipe materials,

02:19

then expand the field drop down and select material.

02:23

Here you can apply an individual range that

02:26

displays objects differently based on individual discrete values

02:30

or you could choose a flag range where the discrete value displays as a data flag.

02:36

You could also choose a continuous range that displays objects

02:39

differently based on a series of ranges or continually variable values

02:44

from the drop down. Select individual.

02:48

Once the range is set,

02:50

the ranged themes list prepopulate with materials in the current model.

02:55

Click OK.

02:57

Back in the GEO plan, the theme updates

03:00

now different pipe materials display as different

03:03

colors according to the new sub theme,

03:06

sub themes can also be used in other ways.

03:08

For instance,

03:09

by changing the width of pipes made of a certain material such as ferris pipes,

03:14

return to the pipe layer theme editor and under properties. Select line width,

03:20

then under ranged themes from the line color drop down,

03:23

expand both cast iron and ductile iron,

03:27

assign them the same hot pink line color.

03:31

Then from the line width column,

03:33

assign both the cast iron and ductile iron materials align with the three

03:39

next set.

03:40

The other material line colors to a different color such as a pale

03:43

blue and leave the line widths for these materials set to one.

03:48

Once you assign these values to one material,

03:50

you can use copy and paste to assign the rest

03:54

select both the line color and line width cells while holding the

03:58

shift key and then press control C to copy the values,

04:02

then select the next material line color and press

04:05

control V to paste them to that material.

04:09

Continue until all the other materials are pale blue.

04:13

Click apply

04:15

the GEO plan updates and the Ferris pipes display in the model

04:19

as hot pink lines that are wider than the other pipes.

04:23

Sub themes are dependent on the order in which they appear in the manager pane.

04:28

So the line widths assigned within the pipe material sub theme now

04:31

take precedence over those assigned within the pipe size sub theme.

04:36

The rules within the pipes size sub theme are ignored.

04:40

However, you can disable and enable sub themes as you wish

04:45

to disable the pipe materials. Sub theme from the manager pa

04:49

select pipe materials

04:51

then from the toolbar select enable slash disable

04:55

click, apply to preview the changes,

04:59

the GEO plan updates and the pipe material colors and line widths no longer display.

05:04

This is because the rules applied to the pipe size sub theme are in effect

05:09

enable the pipe material sub theme again,

05:13

creating and editing the sub themes for object layers provides you with

05:16

the capability to create robust custom visualizations of the model data.

Video quiz

Regarding the editing of object layer sub-themes, which of the following statements is TRUE?

(Select one)
Select an answer

1/1 questions left unanswered

Step-by-step Guide

In InfoWorks WS Pro, customizable themes enhance the visibility of results and other model data displayed on a GeoPlan. Themes can be set as a default appearance for network models when they are saved to the network properly.

This example edits a theme so that only pipes display in a model, and then the changes are saved.

  1. From the Model Group, drag BridgeNet and drop it into the workspace to open the GeoPlan.
  2. Right-click the GeoPlan and select Properties & Themes.
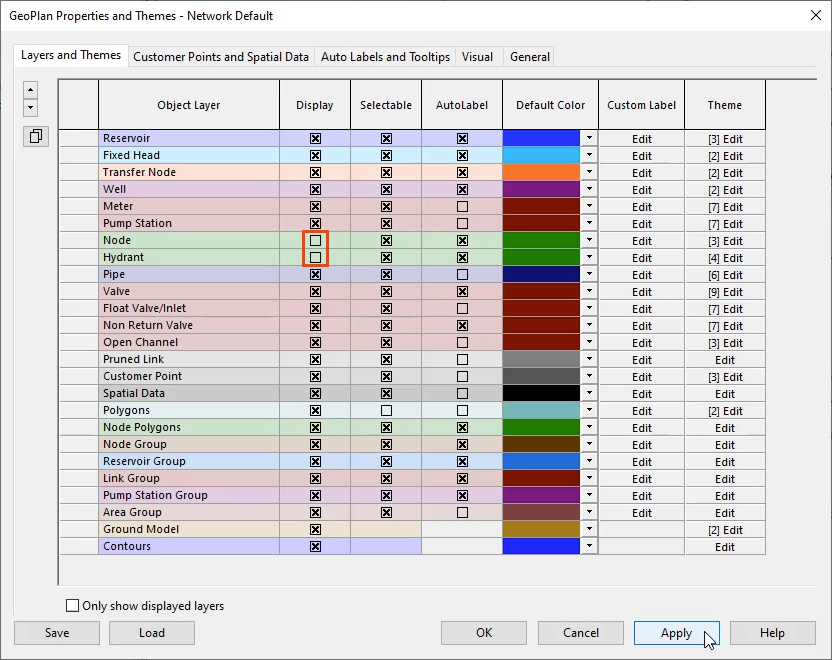
  3. From the GeoPlan Properties and Themes dialog box, Layers and Themes tab, in the Nodes row, deselect the Display checkbox.
  4. In the Hydrants row, deselect the Display checkbox.
  5. Click Apply.

To edit the Pipe theme:

  1. In the Properties and Themes dialog box, in the Pipe row, Theme column, select Edit.

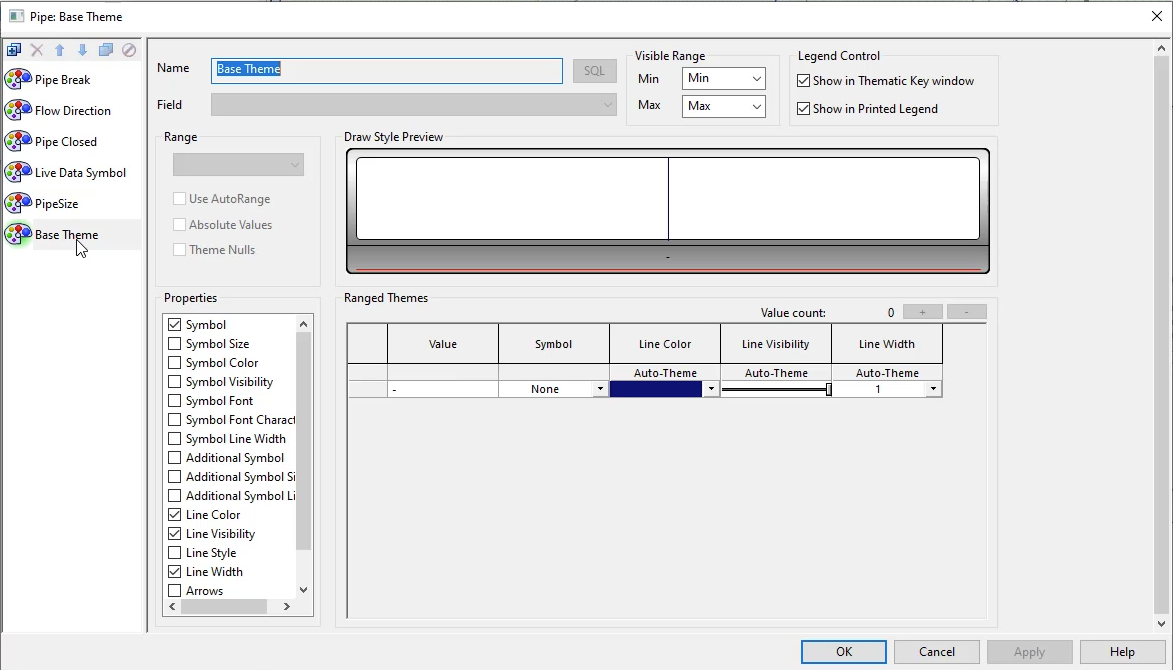
In the Pipe theme dialog box, the manager pane on the left contains a list of sub-themes applied to the pipe.

  1. Select Base Theme and review the rules applied to this theme, such as Line Color.

  1. Open the PipeSize sub-theme.

Under Ranged Themes, notice that the Line Width assigned is based on the Value of the pipe size. In the Draw Style Preview, review the pipe size ranges.

  1. Open Pipe Closed.

In the Draw Style Preview, values are gathered based on a Boolean operation from the assigned field. If a pipe is closed, an X displays.

  1. Open Flow Direction and review the Draw Style Preview for flow values.
  2. Open Pipe Break and review the Draw Style Preview for pipe breaks.

To add a new sub-theme for pipe materials:

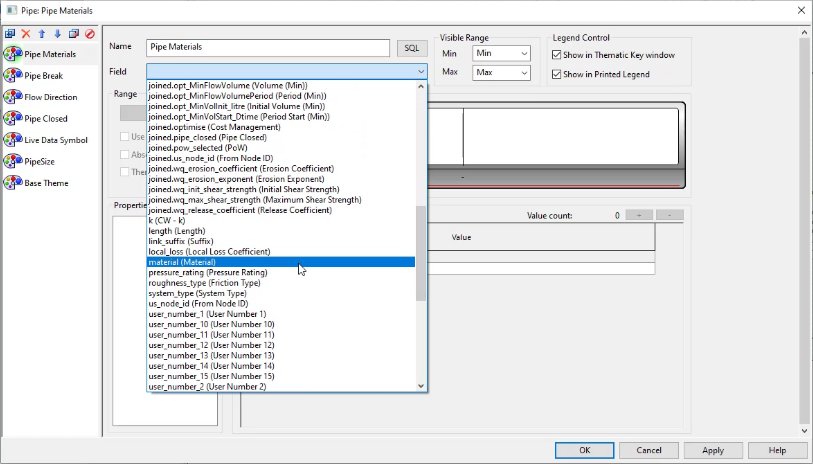
  1. From the manager pane toolbar, select Add New.
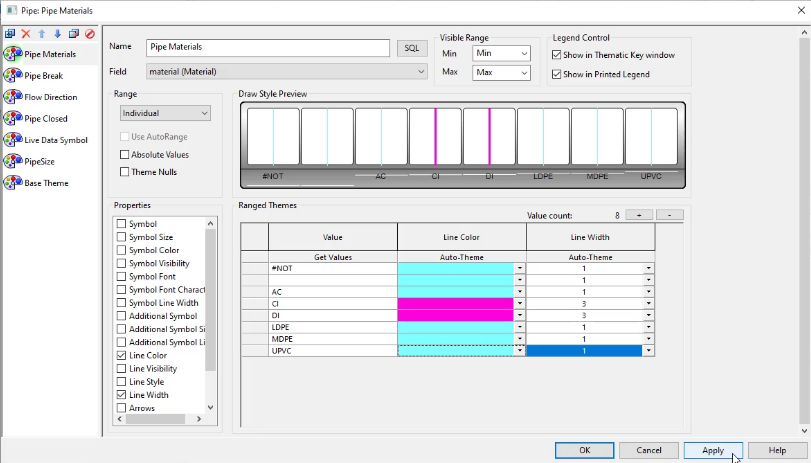
  2. In the Name field, enter the name “Pipe Materials”.

  1. Expand the Field drop-down and select Material.

  1. Expand the Range drop-down and select Individual.
  • An individual range displays objects differently based on individual, discrete values.
  • A flag range displays the discrete value as a data flag.
  • A continuous range displays objects differently based on a series of ranges or continually variable values.

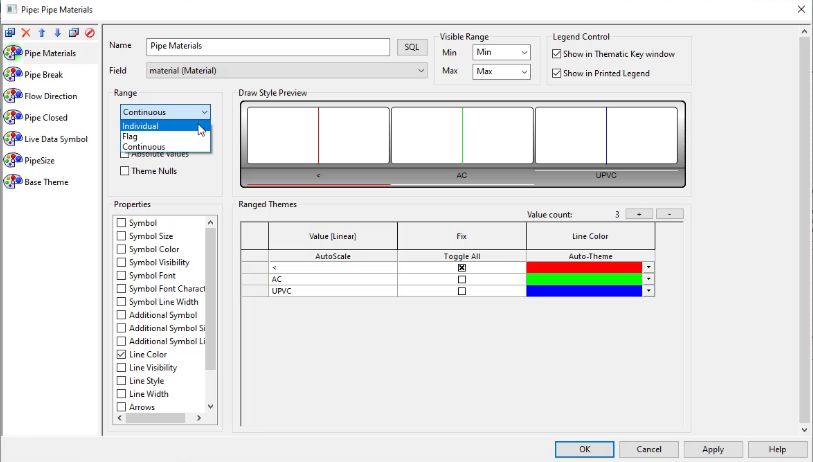
The Ranged Themes list prepopulates with materials in the current model.

  1. Click OK.

In the GeoPlan, the theme updates and pipe materials display as different colors according to the new sub-theme.

Sub-themes can be used in other ways, such as changing the width of pipes of a certain material, such as ferrous pipes:

  1. Reopen the Pipe theme dialog box.
  2. Under Properties, select Line Width.
  3. Under Ranged Themes, in the Line Color column, expand the Cast Iron (CI) drop-down and select a hot pink color.
  4. Expand the Ductile Iron (DI) drop-down and select the same hot pink color.
  5. In the Line Width column, assign Cast Iron (CI) a line width of 3.
  6. Assign Ductile Iron (DI) a line width of 3.
  7. In the Line Color column for any other material, expand the drop-down and select a different color, such as pale blue.
  8. Leave the Line Width for this material set to 1.

To copy and paste this pale blue color and width to the remaining materials:

  1. On your keyboard, press and hold SHIFT as you select the line color and line width cells.
  2. Press CTRL+C.
  3. Select the line color of another material.
  4. On your keyboard, press CTRL+V.
  5. Repeat Steps 27 and 28 for each remaining material.
  6. Click Apply.

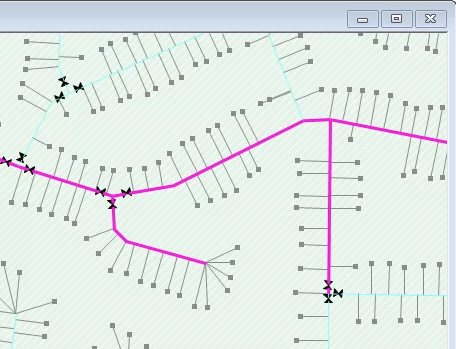
In the GeoPlan, the ferrous pipes display as hot pink lines that are wider than the other pipes, now blue.

IMPORTANT: Sub-themes are dependent on the order in which they appear in the manager pane. So, the line widths assigned within the Pipe Materials sub-theme now take precedence over those assigned within the PipeSize sub-theme.

To disable the Pipe Materials sub-theme:

  1. In the manager pane, select Pipe Materials.
  2. From the toolbar, select Enable/Disable.
  3. Click Apply.

In the GeoPlan, the Pipe Materials colors and line widths no longer display, because the rules applied to the PipeSize sub-theme are back in effect.

Was this information helpful?