00:02
The next step in the workflow involves creating a new workspace from scratch and cloning a workspace to create a new one.
00:11
Each workspace provides a key set of features that can be configured to suit specific needs.
00:17
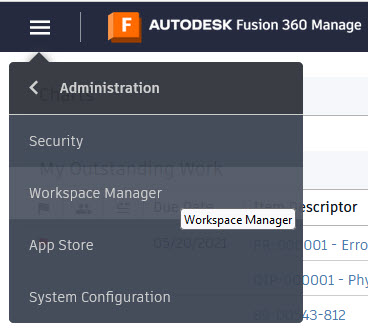
To create a new workspace from scratch, select Administration from the navigation menu and select Workspace Manager.
00:24
Then click the New Workspace button.
00:29
Enter a workspace name and if you like a description,
00:33
the workspace ID will be filled in automatically based on the name.
00:37
The workspace type is selected next and you'll see the various types.
00:42
These determine the functionality available in the workspace as noted.
00:46
The basic workspace with workflow is the default to accommodate workflow functionality.
00:51
As you can see in the image, there are descriptions and tips and italics font on the right regarding the fields and options,
00:59
click Save when the fields and options have been defined.
01:04
A new workspace is not functional until certain "To Do" tasks are complete.
01:09
These include configuring form sections and fields for workspace item details,
01:15
choosing the fields to make up the workspace descriptor,
01:18
creating one or more permission roles for the workspace to define its functionality.
01:23
Cloning workspace essentially is copying a workspace.
01:27
You can use the Clone icon to quickly create a new workspace with settings and configuration copied from another workspace.
01:35
Then you can edit the new workspaces details and layout that you want to be different.
01:41
Cloning does not copy user permissions or main menu settings from the original workspace.
01:48
The steps to clone a workspace start with navigating to the workspace manager,
01:52
then expanding the workspace you would like to clone and then clicking Clone.
01:58
Now you can enter the new workspace name and make any changes to this workspace that you'd like.
02:04
In this example, it shows that we're cloning the Design Reviews workspace to create a Design Reviews - Supplier workspace.
02:11
We're cloning all the fields for item details, grid, linked,
02:19
But those check marks could be removed if you like. Click Save when you are finished.
02:25
As you're configuring the workspace is something that you might consider configuring is an out-of-the-box workspace template.
02:34
For example, two out-of-the-box templates are the Project Templates workspace and the Checklist Templates workspace
02:42
Project Templates are used to define the overall structure of a new project.
02:47
The template will define the default set of tasks per project phase,
02:52
including the default duration and assignees for each task.
02:56
Checklists are created by using Checklist Templates.
02:60
These templates define the checks that are required for a given product lifecycle status in the Checks tab.
03:06
The out-of-the-box items for these workspace templates can be found and configured under the reference folder under workspaces.
03:17
In this demonstration we will create a workspace from scratch and then clone a workspace.
03:22
First we click New Workspace to create a new workspace and enter the workspace name and its description.
03:29
The ID is filled in automatically and will leave the default workspace type of basic workspace with workflow.
03:36
After saving the new workspace, you'll see To Do is to create sections and fields in item Details,
03:42
and the overall workspace To Do is include choosing a descriptor,
03:46
creating roles and assigning them to groups and uploading a workflow.
03:51
When we click Item Details Tab, you can see the button here for adding a field,
03:56
adding a matrix and adding a section.
03:59
We'll take a look at a couple of them briefly to get a feel for what is involved.
04:04
Here You see how fields are defined,
04:09
and here how sections are defined.
04:14
You can see it would take some time to set up a new workspace from scratch.
04:20
Let's delete this workspace now by clicking the Delete icon and look at how to clone
04:25
a workspace when you know that a new workspace is similar to an existing one.
04:32
To clone a workspace and in this case the Design Reviews workspace, first expand it and click Clone.
04:40
Enter the name and description of the new workspace,
04:43
and in this case, leave all the other settings like the original,
04:49
and then once finished, click Save.