& Construction
Integrated BIM tools, including Revit, AutoCAD, and Civil 3D
& Manufacturing
Professional CAD/CAM tools built on Inventor and AutoCAD
Integrated BIM tools, including Revit, AutoCAD, and Civil 3D
Professional CAD/CAM tools built on Inventor and AutoCAD
Apply a fillet to two adjacent wall segments. Set a fillet radius during and prior to construction.
Type:
Tutorial
Length:
6 min.
Tutorial resources
These downloadable resources will be used to complete this tutorial:
Transcript
00:04
We'll begin by opening up an existing project from within the recent files page
00:09
and we'll position our cursor over the bottom corner of this layout
00:14
and using the wheel on the mouse, we'll roll it to zoom in.
00:20
It is our intention to apply a curve or a file between two adjacent walls.
00:28
It's essential to remember at this point
00:30
that the fili command is in fact not a modified tool.
00:34
If we were to go up to the modify tab on the ribbon and click on the modify tab
00:40
and look within the modify panel,
00:42
we will not find anywhere within this panel or anywhere else within this tab,
00:48
the file command.
00:50
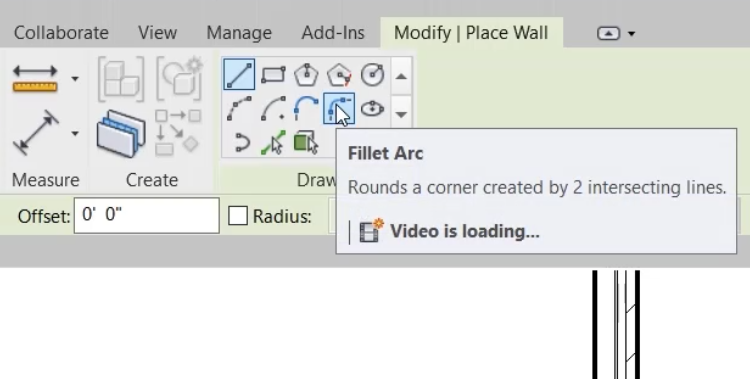
Instead, it's a draw tool and can only be found within the draw panel up on the ribbon.
00:56
Whilst within the wall tool in this instant,
00:58
a useful procedure that we are going to incorporate
01:02
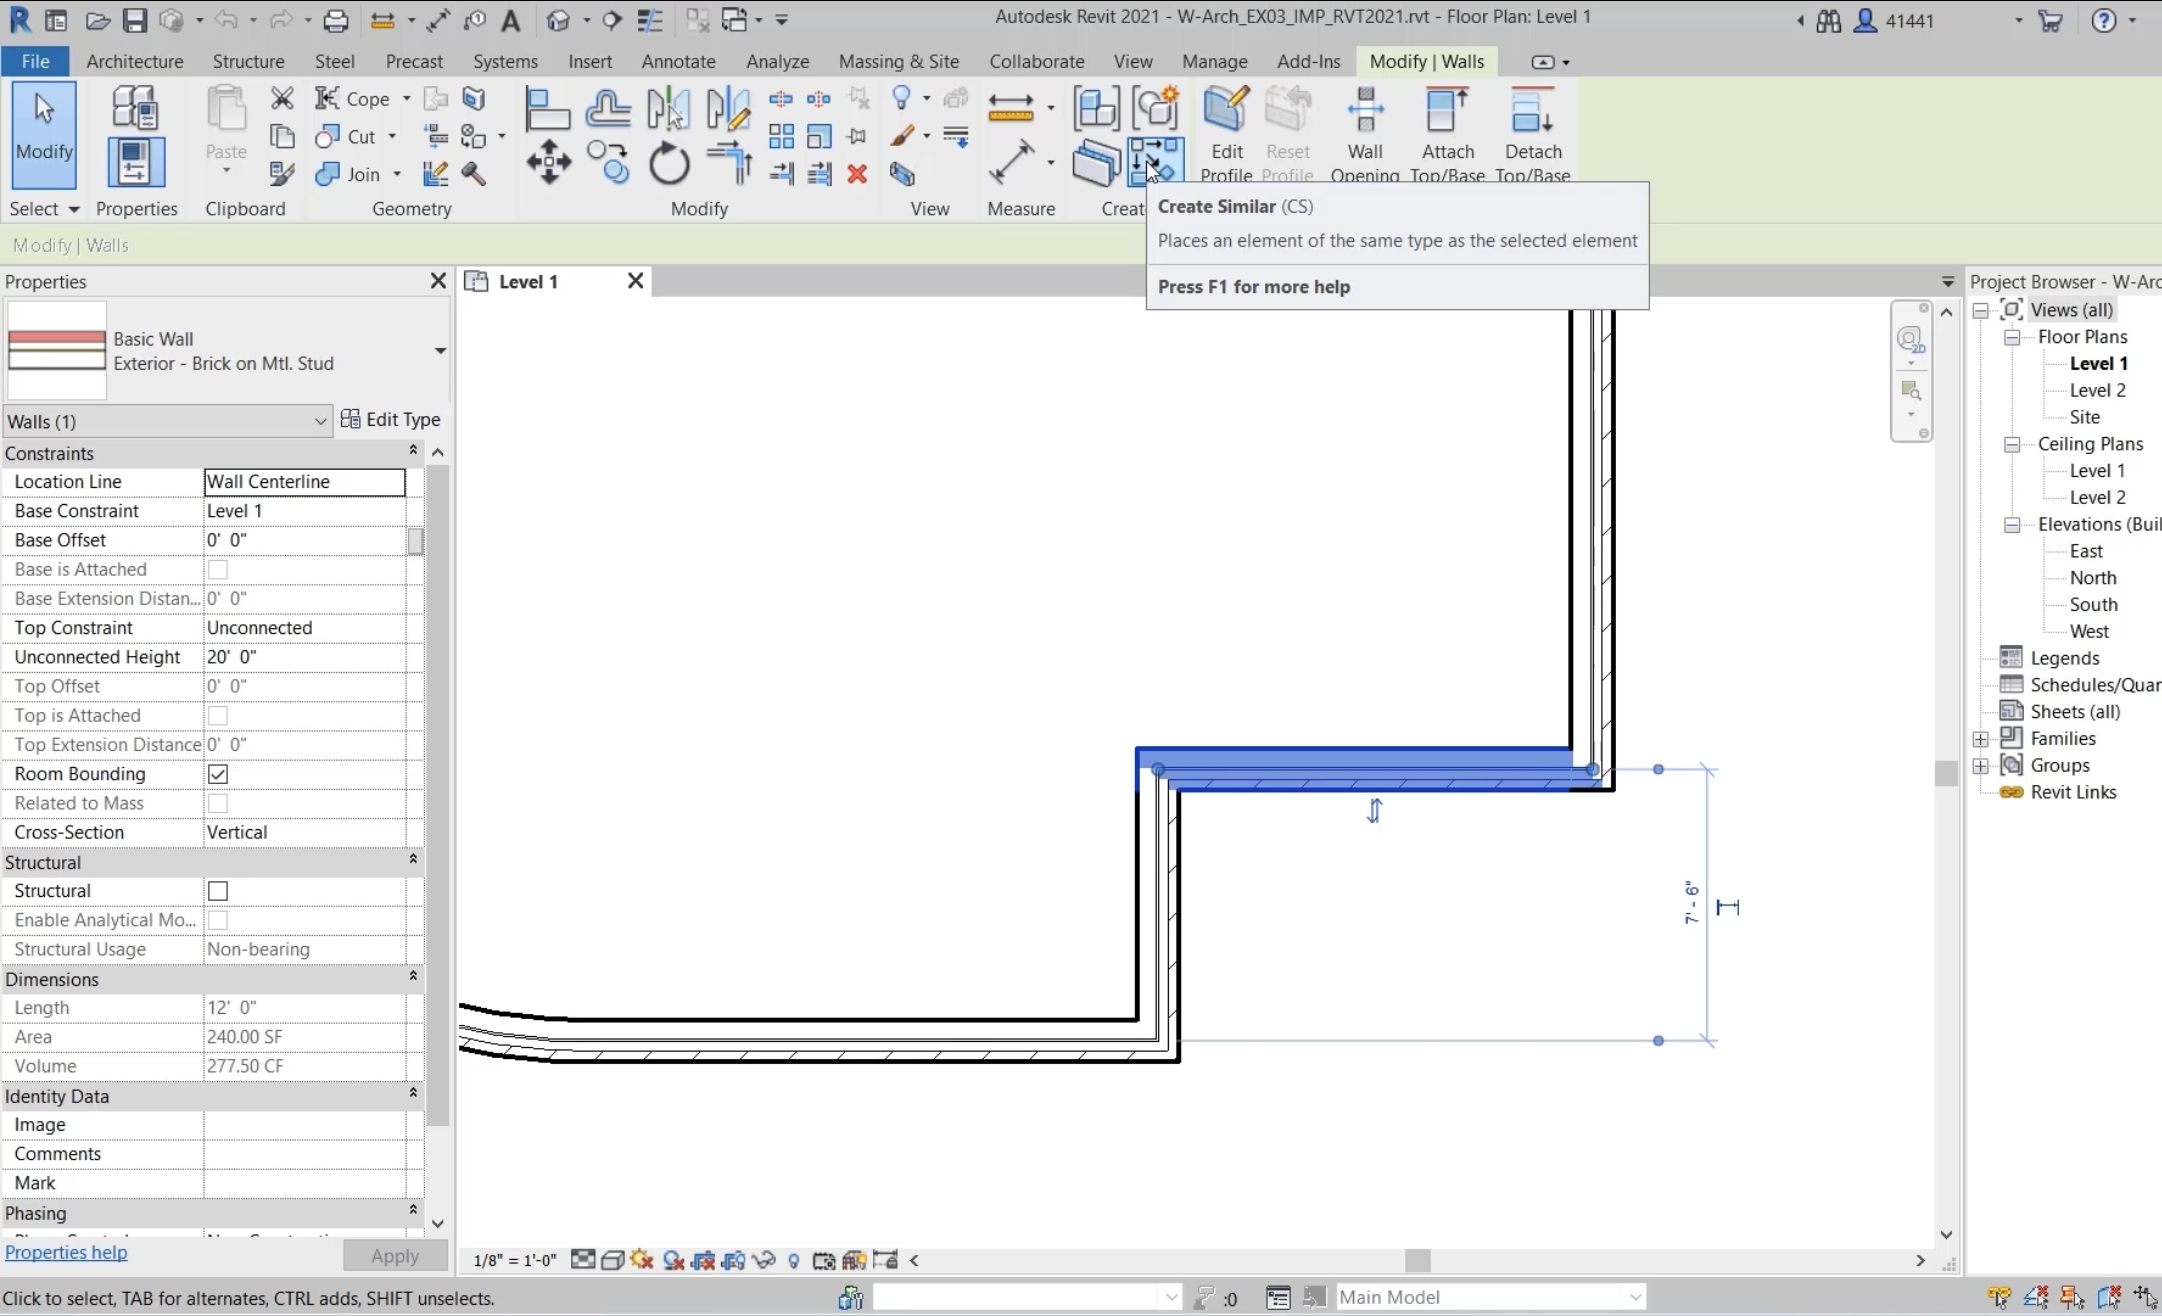
is by using the create similar tool
01:05
which can be activated whilst selecting an existing element.
01:10
So if we click on this wall element
01:12
up on the contextual ribbon, now within the modify walls tab
01:18
within the create panel, we have access to create similar
01:23
by using this tool. This will ensure two things.
01:27
One, the contextual tab and draw panel containing the fill it,
01:32
a tool will automatically be available.
01:35
And number two, the curve we are about to add
01:39
will be the same wall type
01:41
as the existing walls will proceed.
01:44
And from the draw panel, select the file arc tool.
01:49
And we'll begin by clicking the right wall,
01:53
the vertical wall first
01:56
and the lower horizontal wall second.
01:60
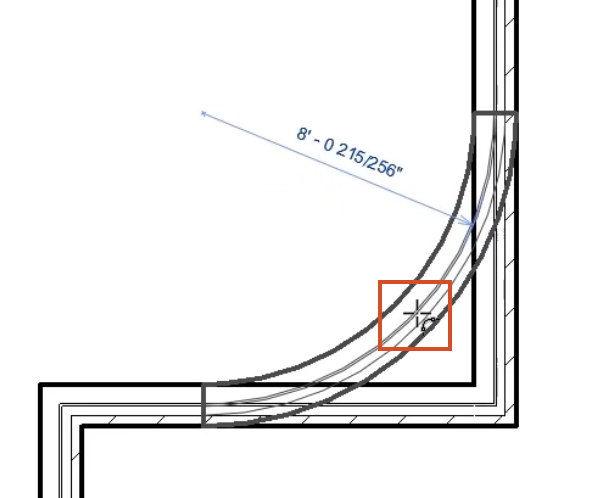
And as we move our cursor,
02:02
we can see that we're applying
02:05
a curve, a filet
02:07
arc between the two adjacent walls.
02:11
So if we now click,
02:14
we can see the flip control arrows are on
02:16
the outside of the building indicating the external face.
02:20
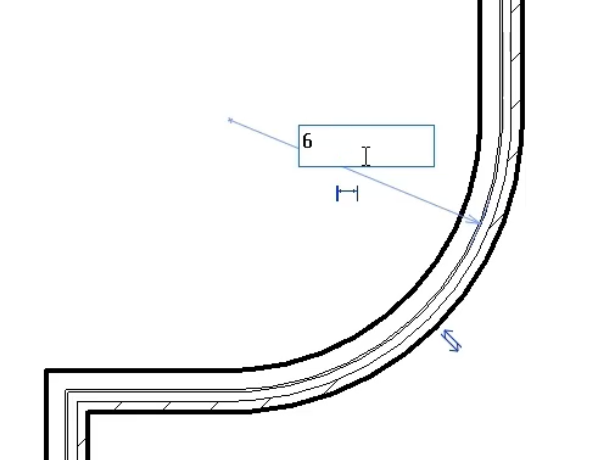
And we can also click on the temporary dimension
02:24
to change that to a radius of our choice.
02:27
So if we type in six for six ft,
02:31
that will now automatically change,
02:34
we could however
02:36
have, having chosen the Philip a
02:38
tour,
02:40
we could have set the radius prior to selecting the two walls,
02:44
the two adjacent walls.
02:46
And we do that by enabling the Raus
02:49
check box on the options bar
02:52
within the radius field type in the desired radius.
02:57
So on this occasion,
02:59
we'll type in two for two ft
03:02
and we'll pick once again, two adjacent walls.
03:07
Notice I'm picking the vertical wall on the right
03:10
and then picking the horizontal wall on the left
03:14
and that radius that we added is immediately applied.
03:18
And again, note the flip control is indicating the external face of the wall
03:24
had we have selected these walls in the opposite direction.
03:29
Unfortunately,
03:30
this flip control arrow would have been on the inside face, not the outside face.
03:38
OK.
03:39
To exit the command,
03:41
we choose, modify
03:42
up on the ribbon
03:45
to zoom to fit.
03:47
We're going to right click
03:49
and from the shortcut, right click menu,
03:52
we'll choose zoom to fit.
Video transcript
00:04
We'll begin by opening up an existing project from within the recent files page
00:09
and we'll position our cursor over the bottom corner of this layout
00:14
and using the wheel on the mouse, we'll roll it to zoom in.
00:20
It is our intention to apply a curve or a file between two adjacent walls.
00:28
It's essential to remember at this point
00:30
that the fili command is in fact not a modified tool.
00:34
If we were to go up to the modify tab on the ribbon and click on the modify tab
00:40
and look within the modify panel,
00:42
we will not find anywhere within this panel or anywhere else within this tab,
00:48
the file command.
00:50
Instead, it's a draw tool and can only be found within the draw panel up on the ribbon.
00:56
Whilst within the wall tool in this instant,
00:58
a useful procedure that we are going to incorporate
01:02
is by using the create similar tool
01:05
which can be activated whilst selecting an existing element.
01:10
So if we click on this wall element
01:12
up on the contextual ribbon, now within the modify walls tab
01:18
within the create panel, we have access to create similar
01:23
by using this tool. This will ensure two things.
01:27
One, the contextual tab and draw panel containing the fill it,
01:32
a tool will automatically be available.
01:35
And number two, the curve we are about to add
01:39
will be the same wall type
01:41
as the existing walls will proceed.
01:44
And from the draw panel, select the file arc tool.
01:49
And we'll begin by clicking the right wall,
01:53
the vertical wall first
01:56
and the lower horizontal wall second.
01:60
And as we move our cursor,
02:02
we can see that we're applying
02:05
a curve, a filet
02:07
arc between the two adjacent walls.
02:11
So if we now click,
02:14
we can see the flip control arrows are on
02:16
the outside of the building indicating the external face.
02:20
And we can also click on the temporary dimension
02:24
to change that to a radius of our choice.
02:27
So if we type in six for six ft,
02:31
that will now automatically change,
02:34
we could however
02:36
have, having chosen the Philip a
02:38
tour,
02:40
we could have set the radius prior to selecting the two walls,
02:44
the two adjacent walls.
02:46
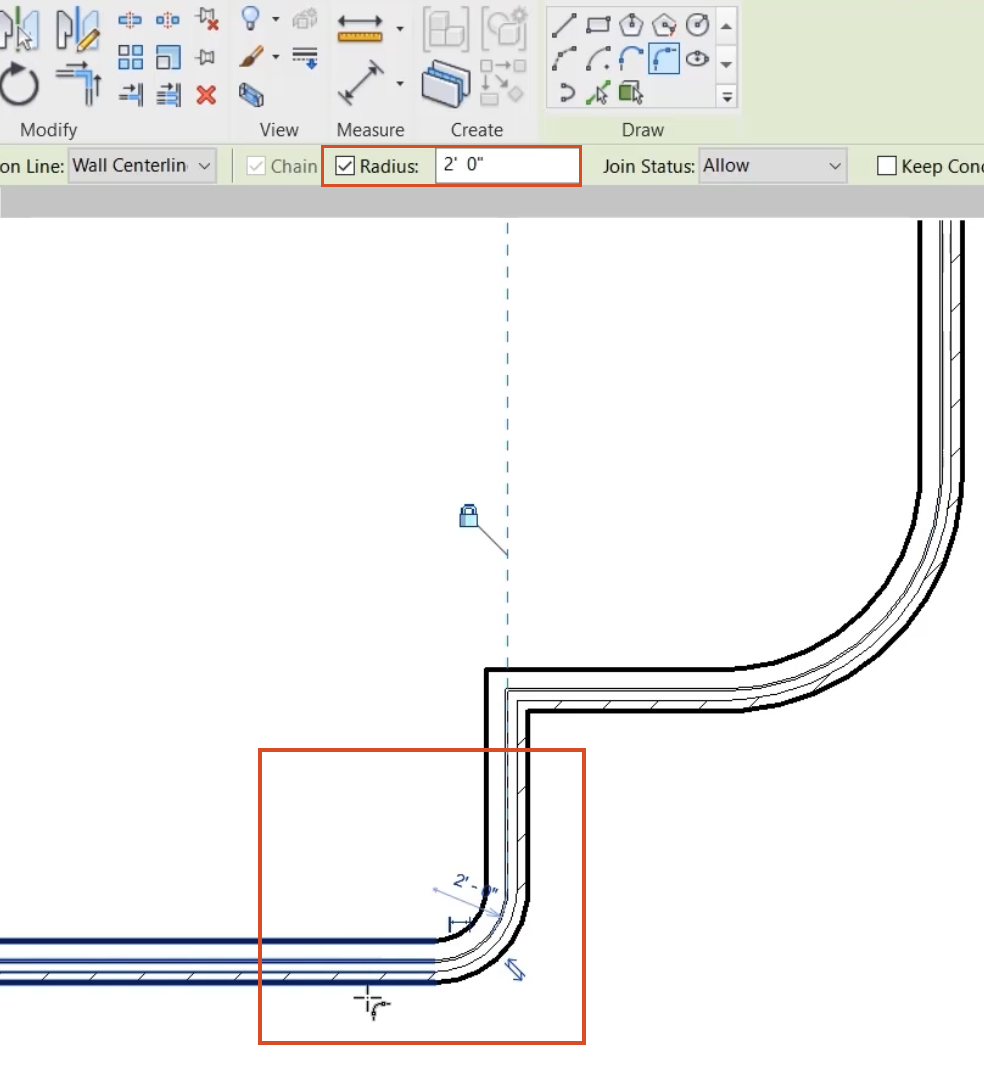
And we do that by enabling the Raus
02:49
check box on the options bar
02:52
within the radius field type in the desired radius.
02:57
So on this occasion,
02:59
we'll type in two for two ft
03:02
and we'll pick once again, two adjacent walls.
03:07
Notice I'm picking the vertical wall on the right
03:10
and then picking the horizontal wall on the left
03:14
and that radius that we added is immediately applied.
03:18
And again, note the flip control is indicating the external face of the wall
03:24
had we have selected these walls in the opposite direction.
03:29
Unfortunately,
03:30
this flip control arrow would have been on the inside face, not the outside face.
03:38
OK.
03:39
To exit the command,
03:41
we choose, modify
03:42
up on the ribbon
03:45
to zoom to fit.
03:47
We're going to right click
03:49
and from the shortcut, right click menu,
03:52
we'll choose zoom to fit.
Apply a fillet to two adjacent wall segments, and set a fillet radius during and prior to construction.
To set the radius before construction:
How to buy
Privacy | Do not sell or share my personal information | Cookie preferences | Report noncompliance | Terms of use | Legal | © 2025 Autodesk Inc. All rights reserved
Sign in for the best experience
Save your progress
Get access to courses
Receive personalized recommendations
May we collect and use your data?
Learn more about the Third Party Services we use and our Privacy Statement.May we collect and use your data to tailor your experience?
Explore the benefits of a customized experience by managing your privacy settings for this site or visit our Privacy Statement to learn more about your options.