Setup Model and Paths

00:03

MICHAEL KILKELLY: Welcome to set up

00:04

your model and paths of travel.

00:08

Here we are in the space planning for new health

00:11

guidelines learning path.

00:14

And this is the second lesson in this workflow.

00:19

In this lesson, we're going to set up

00:21

our model, then create some preliminary movement paths.

00:25

We'll start by placing one way indicators

00:27

to mark the direction of movement in our model.

00:30

Next, we'll create paths of travel

00:32

that show the movement paths from the medical center

00:35

entrance to an exam room.

00:37

Ready to get started?

00:38

All right, let's go.

00:42

So to start, I'm going to open Revit 2021,

00:46

and I'm going to click Open to load the medical center sample

00:49

file provided with this lesson.

00:54

So here I am in the medical center model.

00:58

I'm going to click on the Working Ground Floor view

01:01

here in the project browser.

01:05

So here is my ground floor view.

01:07

Next, I'm going to click the Analyze Revit.

01:12

And the people flow toolkit is located right here next

01:16

to the path of travel tools.

01:18

So I'm going to zoom in a little bit.

01:21

And here's the main entrance to the building.

01:25

I have some exits located here.

01:28

What I want to do now is specify my entrance and exits

01:32

using the one way tool.

01:34

So let's zoom in on the main entrance.

01:38

Here we are.

01:39

Next, I'm going to click the one way indicator tool up here.

01:45

The one way indicator is a generic model family

01:48

that the path of travel tool uses

01:50

to determine movement paths.

01:52

I'm going to place the instance right

01:55

here on the vestibule door just like that,

01:60

and I'll add another one on the other vestibule door.

02:04

Now, if I zoom in and select the indicator,

02:08

I can see that I can control the left and right extensive it.

02:13

And if I click here, I can flip the indicator as well.

02:18

And I'll just click it again to flip it back.

02:23

So now my indicators are pointing directly

02:25

into the building.

02:29

So if I click on the indicator above,

02:31

I can see that it's not fully touching the door

02:33

on the right hand side.

02:36

I want to make sure that my indicators touch geometry

02:39

in the model.

02:40

So I'm going to drag the indicator over to the right

02:43

so that it touches the wall.

02:46

OK, that looks better.

02:48

Now, let's zoom back out.

02:51

And I know I want to control the flow through these two doors

02:56

on the inside of the model.

02:58

So they should be going one way into the exam area.

03:02

So let's set their direction right now.

03:05

So I zoom in on the two doors.

03:08

Then I click One Way Indicator tool to place the family.

03:13

And I click on the door to place the first indicator.

03:16

Now I'm going to place the second indicator.

03:19

I need to rotate it 90 degrees counterclockwise.

03:23

To do this, I can simply press the spacebar to cycle

03:26

through all the rotation options.

03:30

There, that's better.

03:31

Now I can position it over the second door into the exam area.

03:36

So let's zoom in a little bit to place it better.

03:40

That looks good.

03:41

Now I can adjust the ends of the family instance

03:44

to fit the door opening.

03:47

OK, looking good.

03:50

So these doors are all set.

03:51

Let's zoom out and add indicators to all of our exits.

03:57

I need to indicate all the exits, which are located here

04:01

in the building.

04:02

Let's do them one at a time, and we'll start with this exit

04:05

first.

04:06

So I'm going to zoom in on it here.

04:10

And now, I select the One Way Indicator tool again,

04:15

and I want to place the indicator

04:17

right over the door like this.

04:23

Next, I click on the endpoints to adjust the indicator

04:27

to match the door opening.

04:30

So now the indicator is correctly

04:32

sized to the door opening.

04:34

Let's zoom out and work on the other exit.

04:38

We'll zoom in right over here, and then again I'll

04:43

click on the One Way Indicator tool.

04:47

So to place the indicator on the door, I need to rotate it.

04:50

So I press the space bar and then

04:53

I press it again to rotate another 90 degrees.

04:57

OK, that looks good.

04:58

So I'm going to place it over the door

05:02

and then click to insert it.

05:05

Now, I need to adjust the endpoints again

05:07

to match the door opening, so I drag the controls in

05:11

to fit the opening.

05:13

And that looks much better.

05:15

OK, so now I'll zoom back out.

05:18

So now I have a first pass at controlling

05:20

the flow of movement into the building then back out.

05:24

Let's go ahead and create some movement paths.

05:27

We're going to use the multiple paths tool right here.

05:30

So I click the tool and I'll keep the path separation value

05:35

at six feet since we want a six feet of social distance.

05:38

I click OK.

05:40

Then I click a point right here by the front entrance.

05:45

That's my start point.

05:47

Next, I'll click a point here inside the exam room.

05:51

In the tool, we'll go through and calculate the paths.

05:55

And it tells me that it generated two paths

05:58

to this point.

05:60

You'll notice one of the paths is outside the building

06:02

while the other is inside.

06:05

So having patients go outside the building

06:07

to get to the exam room may not be the best approach.

06:10

But now I know that I have two options to get patients

06:13

from the front entrance to the exam room in a way that's

06:16

socially distanced.

06:18

If I click on one of the path lines,

06:20

I can see that the distance required to travel along

06:23

the path is 117 feet, and for the second paths it's 319 feet.

06:30

So personally, I like the first path.

06:32

What do you think?

06:33

It's a little bit shorter.

06:34

All right.

06:35

Take a look at the activity in the next section

06:38

and give this a try yourself.

Video transcript

00:03

MICHAEL KILKELLY: Welcome to set up

00:04

your model and paths of travel.

00:08

Here we are in the space planning for new health

00:11

guidelines learning path.

00:14

And this is the second lesson in this workflow.

00:19

In this lesson, we're going to set up

00:21

our model, then create some preliminary movement paths.

00:25

We'll start by placing one way indicators

00:27

to mark the direction of movement in our model.

00:30

Next, we'll create paths of travel

00:32

that show the movement paths from the medical center

00:35

entrance to an exam room.

00:37

Ready to get started?

00:38

All right, let's go.

00:42

So to start, I'm going to open Revit 2021,

00:46

and I'm going to click Open to load the medical center sample

00:49

file provided with this lesson.

00:54

So here I am in the medical center model.

00:58

I'm going to click on the Working Ground Floor view

01:01

here in the project browser.

01:05

So here is my ground floor view.

01:07

Next, I'm going to click the Analyze Revit.

01:12

And the people flow toolkit is located right here next

01:16

to the path of travel tools.

01:18

So I'm going to zoom in a little bit.

01:21

And here's the main entrance to the building.

01:25

I have some exits located here.

01:28

What I want to do now is specify my entrance and exits

01:32

using the one way tool.

01:34

So let's zoom in on the main entrance.

01:38

Here we are.

01:39

Next, I'm going to click the one way indicator tool up here.

01:45

The one way indicator is a generic model family

01:48

that the path of travel tool uses

01:50

to determine movement paths.

01:52

I'm going to place the instance right

01:55

here on the vestibule door just like that,

01:60

and I'll add another one on the other vestibule door.

02:04

Now, if I zoom in and select the indicator,

02:08

I can see that I can control the left and right extensive it.

02:13

And if I click here, I can flip the indicator as well.

02:18

And I'll just click it again to flip it back.

02:23

So now my indicators are pointing directly

02:25

into the building.

02:29

So if I click on the indicator above,

02:31

I can see that it's not fully touching the door

02:33

on the right hand side.

02:36

I want to make sure that my indicators touch geometry

02:39

in the model.

02:40

So I'm going to drag the indicator over to the right

02:43

so that it touches the wall.

02:46

OK, that looks better.

02:48

Now, let's zoom back out.

02:51

And I know I want to control the flow through these two doors

02:56

on the inside of the model.

02:58

So they should be going one way into the exam area.

03:02

So let's set their direction right now.

03:05

So I zoom in on the two doors.

03:08

Then I click One Way Indicator tool to place the family.

03:13

And I click on the door to place the first indicator.

03:16

Now I'm going to place the second indicator.

03:19

I need to rotate it 90 degrees counterclockwise.

03:23

To do this, I can simply press the spacebar to cycle

03:26

through all the rotation options.

03:30

There, that's better.

03:31

Now I can position it over the second door into the exam area.

03:36

So let's zoom in a little bit to place it better.

03:40

That looks good.

03:41

Now I can adjust the ends of the family instance

03:44

to fit the door opening.

03:47

OK, looking good.

03:50

So these doors are all set.

03:51

Let's zoom out and add indicators to all of our exits.

03:57

I need to indicate all the exits, which are located here

04:01

in the building.

04:02

Let's do them one at a time, and we'll start with this exit

04:05

first.

04:06

So I'm going to zoom in on it here.

04:10

And now, I select the One Way Indicator tool again,

04:15

and I want to place the indicator

04:17

right over the door like this.

04:23

Next, I click on the endpoints to adjust the indicator

04:27

to match the door opening.

04:30

So now the indicator is correctly

04:32

sized to the door opening.

04:34

Let's zoom out and work on the other exit.

04:38

We'll zoom in right over here, and then again I'll

04:43

click on the One Way Indicator tool.

04:47

So to place the indicator on the door, I need to rotate it.

04:50

So I press the space bar and then

04:53

I press it again to rotate another 90 degrees.

04:57

OK, that looks good.

04:58

So I'm going to place it over the door

05:02

and then click to insert it.

05:05

Now, I need to adjust the endpoints again

05:07

to match the door opening, so I drag the controls in

05:11

to fit the opening.

05:13

And that looks much better.

05:15

OK, so now I'll zoom back out.

05:18

So now I have a first pass at controlling

05:20

the flow of movement into the building then back out.

05:24

Let's go ahead and create some movement paths.

05:27

We're going to use the multiple paths tool right here.

05:30

So I click the tool and I'll keep the path separation value

05:35

at six feet since we want a six feet of social distance.

05:38

I click OK.

05:40

Then I click a point right here by the front entrance.

05:45

That's my start point.

05:47

Next, I'll click a point here inside the exam room.

05:51

In the tool, we'll go through and calculate the paths.

05:55

And it tells me that it generated two paths

05:58

to this point.

05:60

You'll notice one of the paths is outside the building

06:02

while the other is inside.

06:05

So having patients go outside the building

06:07

to get to the exam room may not be the best approach.

06:10

But now I know that I have two options to get patients

06:13

from the front entrance to the exam room in a way that's

06:16

socially distanced.

06:18

If I click on one of the path lines,

06:20

I can see that the distance required to travel along

06:23

the path is 117 feet, and for the second paths it's 319 feet.

06:30

So personally, I like the first path.

06:32

What do you think?

06:33

It's a little bit shorter.

06:34

All right.

06:35

Take a look at the activity in the next section

06:38

and give this a try yourself.

People Flow Toolkit Integration for Movement Simulation

2-Setup Model and Paths of Travel

Activity

  1. Launch Revit 2020 or 2021 and open the medical center sample RVT file provided with this course.
  2. Navigate to the “Working Ground Floor” floor plan view.
  3. Click the “Analyze” ribbon then click the “One Way Indicator” tool.
  4. Place indicators over the doors at the following locations:
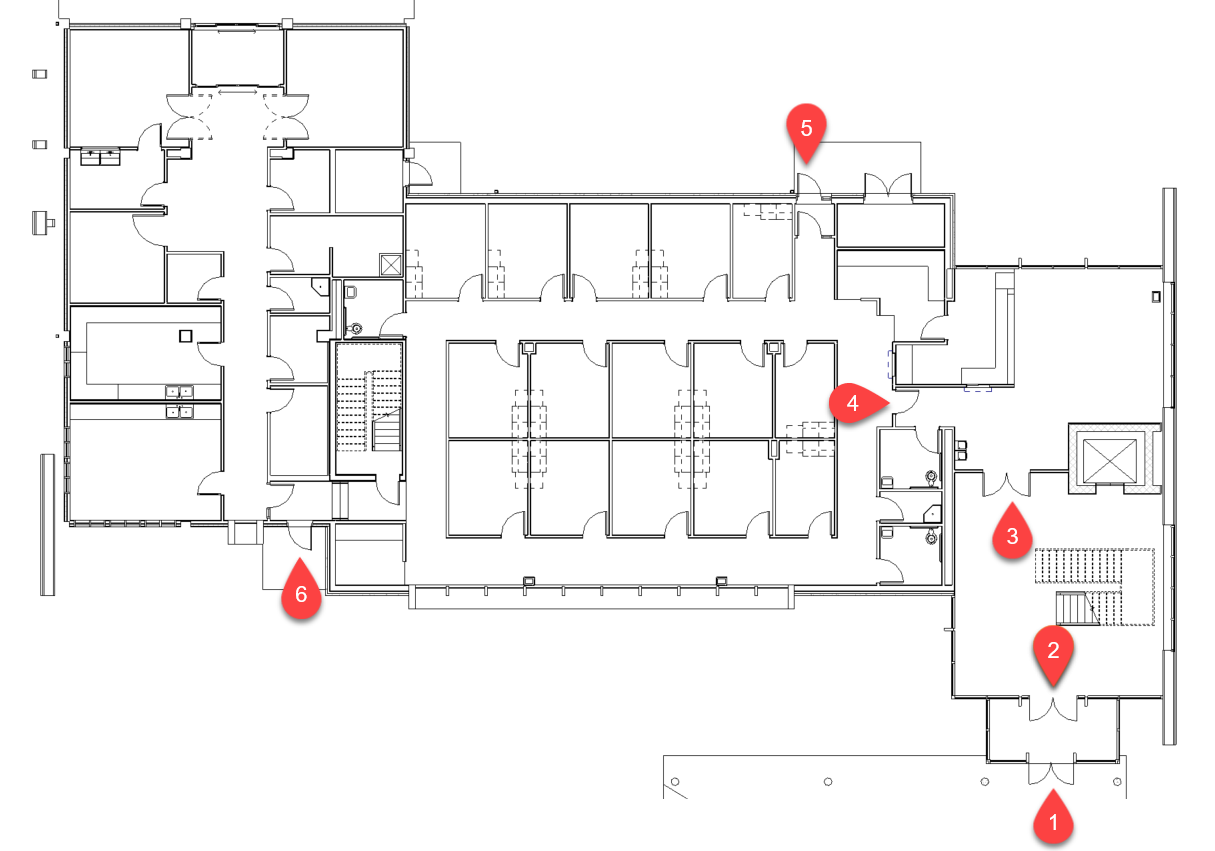
  5. Use the space bar to rotate the indicator instances before placing them.
  6. Be sure to adjust the extents of the indicators so they align with the door openings.
  7. Next, click the “Multiple Paths” tool and define a path from the front entrance (point “A”) to an exam room (point “B”) as shown below:
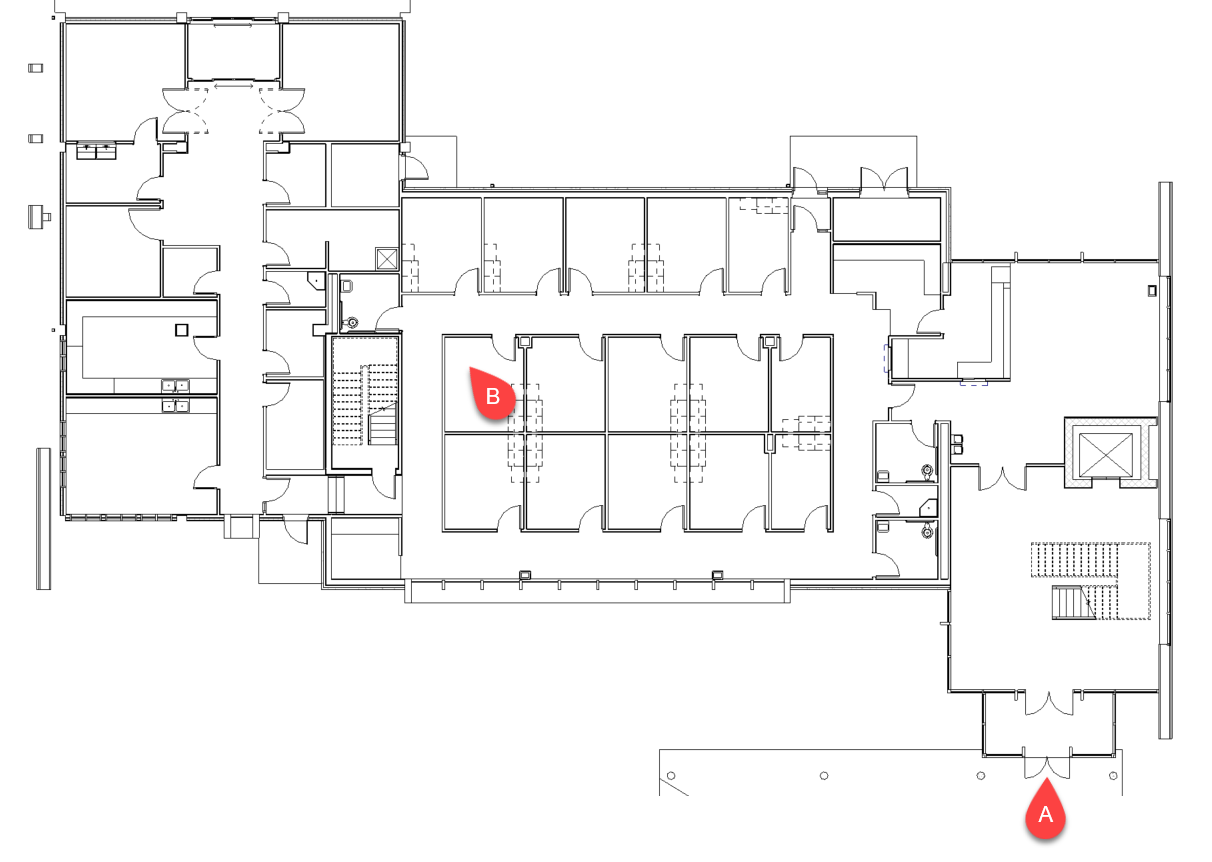
  8. Determine which path best accommodates travel through the building. Delete the other path(s).  
  9. Save your file.
Was this information helpful?