Check out What’s New in Fusion 360 Turning
NEW! – This post has been updated with improvements and features from the April 2019 release. They are marked as New but organized into their respective sections below.
The Fusion 360 CAM team has been busy improving turning in Fusion 360. Keqing includes these updates in the big What’s New blog posts, but there has been so much goodness added recently I thought it was worth calling out all of the turning updates and enhancements. We’ll take a deeper look at some of the updates made since September, and why and how they can improve your turning process. The improvements are listed below and grouped together based on the part of the toolpath they impact. A big thank you to Akash Kamoolkar and Angelo Juras on gathering all this information below!
NEW! – Improved Profile Roughing and Finishing Strategies!
We made some major updates to the Profile Roughing and Finishing strategies that are enabling exciting new functionality (like canned cycles…spoiler!). Take a deep dive into those enhancements in this in-depth blog post. As always, let us know your thoughts on the Fusion 360 Manufacture forum.
General Improvements
Section Analysis in the Manufacture Workspace
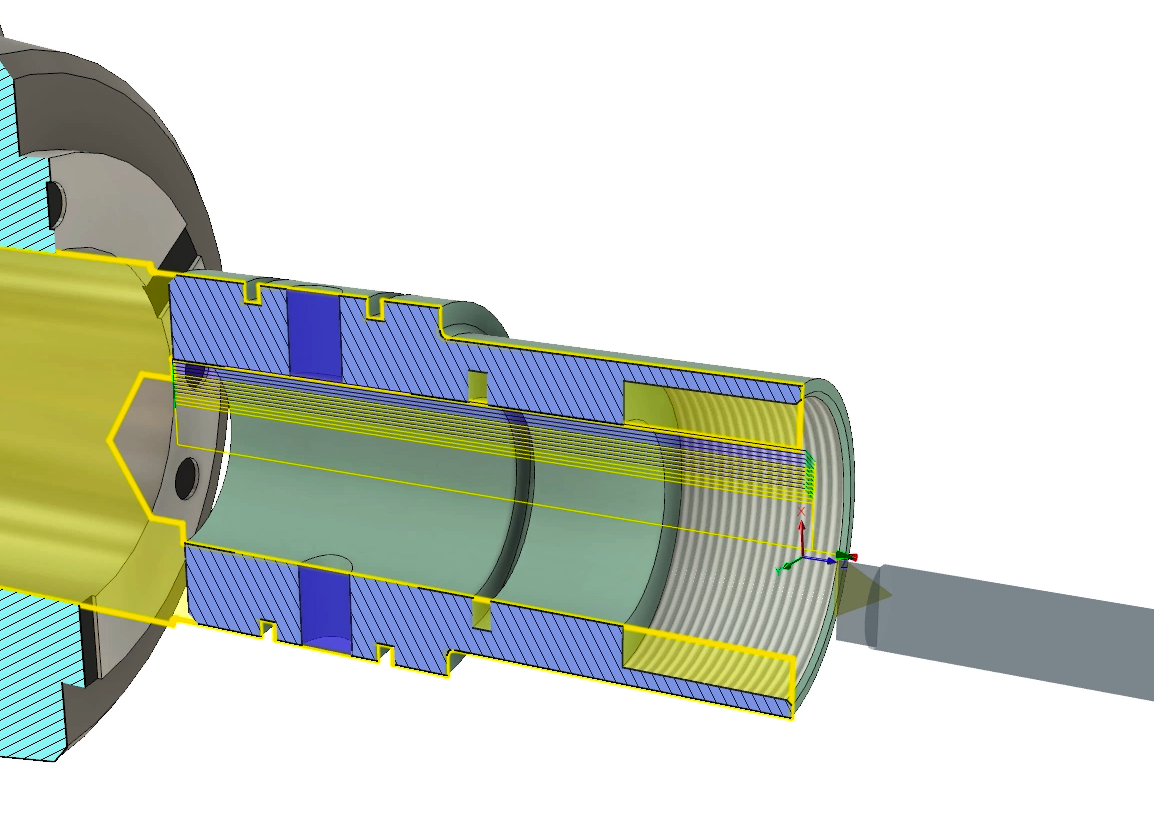
While not necessarily turning specific, this update brings the ability to create a section view to the manufacture workspace, something that was previously only available in model. This is very helpful when creating internal turning toolpaths, so you can actually see what’s going on inside the part without needing to fully toggle the model visibility or continually hop in and out of stock simulations. Check out this link for more information on Section Analysis.
The secret is to remember you can toggle the section analysis visibility in the browser under the Analysis folder. This also means you can create more than one Section Analysis and switch between them as much as you like!
Improved Stock Simulation for Small Parts
Previously, there was a tolerance limit on the stock simulation inside of Fusion 360. We thought this would help with simulation stability, and it often caused issues when simulating small parts like you might typically make on a Swiss machine. The parts would look like low-poly renders and there were significant graphics issues when zooming in. Turns out that limit was unnecessary, simulation is still stable, and now you can successfully simulate way tinier parts without annoying graphics issues.
Tool Library
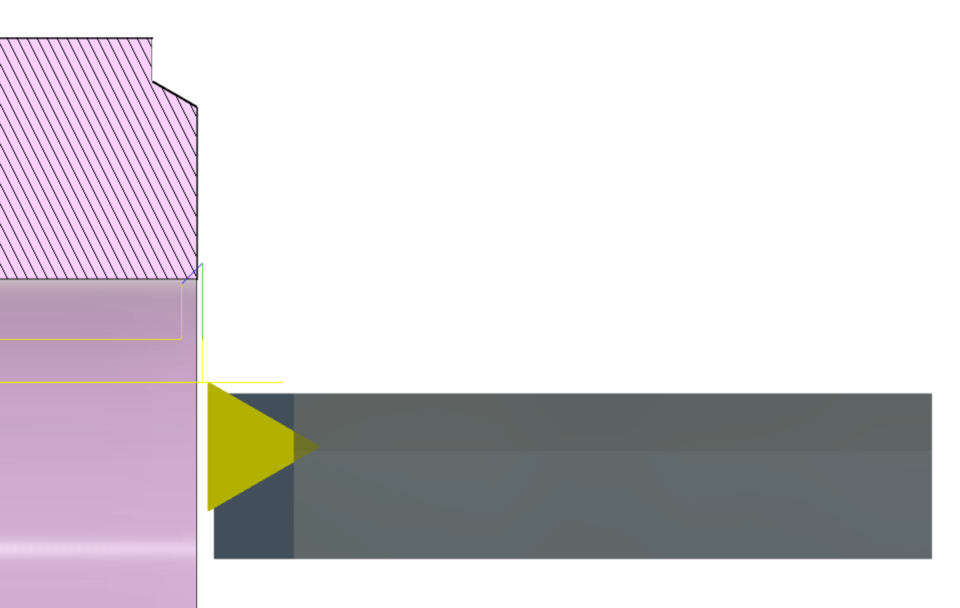
NEW! – Boring Bars for Internal Chamfering
Boring bars are now available to use for Chamfer operations! Make sure you select “Internal Chamfering” when defining the operation.
Custom Holders
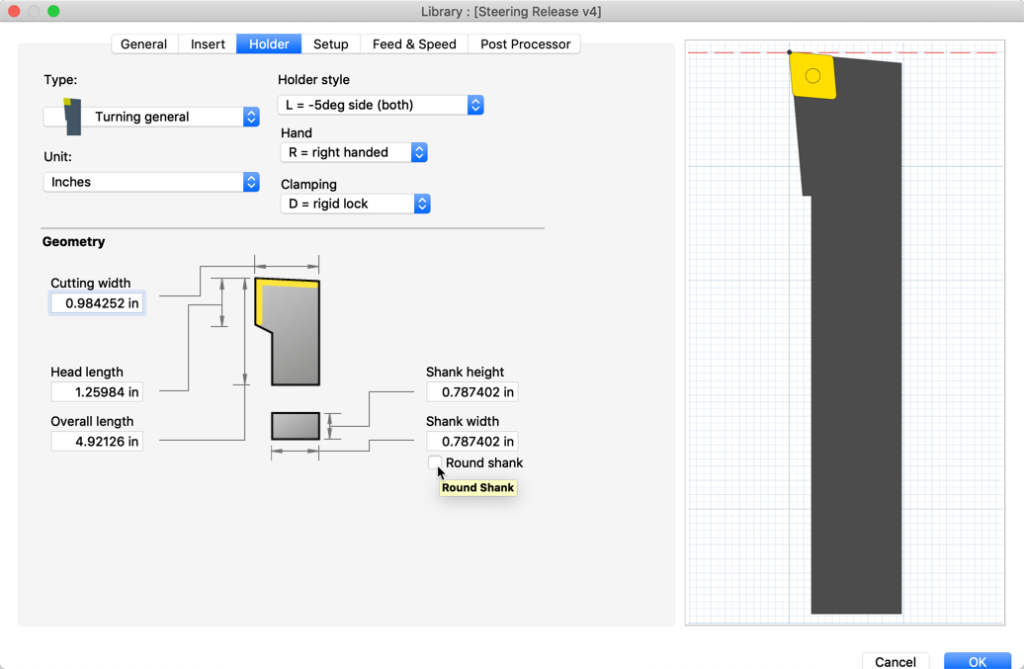
When defining a custom tool holder for either a General Tool or Boring Bar, the Leading Angle and Trailing Angle parameters can be defined for the holder. These parameters ensure accurate results, especially when visualizing the tool holder during creation and stock simulation. I’m sure I don’t have to elaborate on why accurate stock simulation is important!
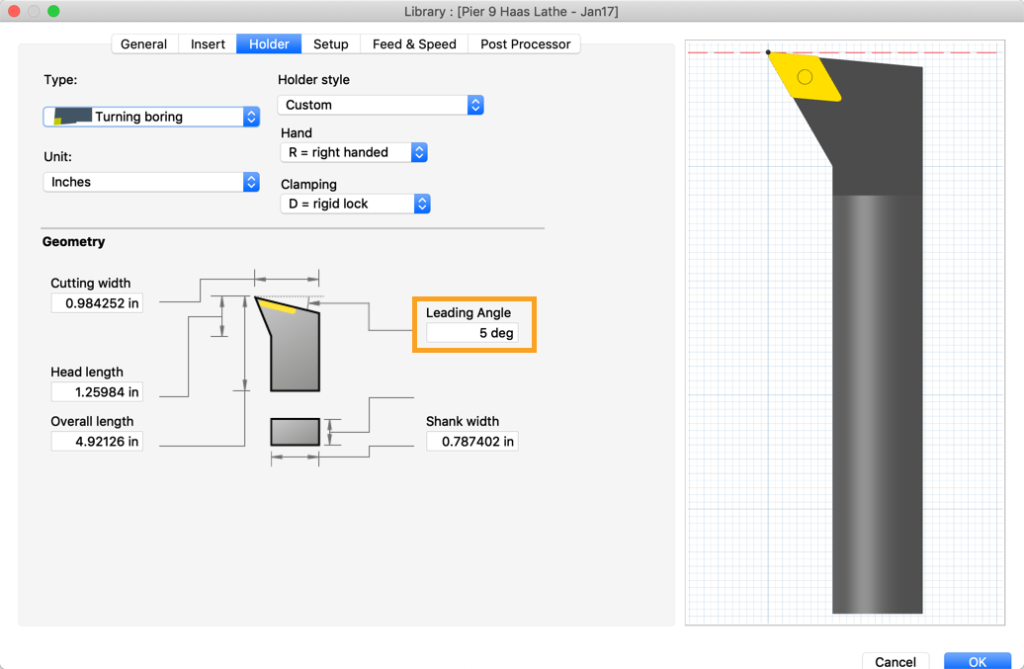
The Lead Angle parameter when creating a custom Boring Bar.
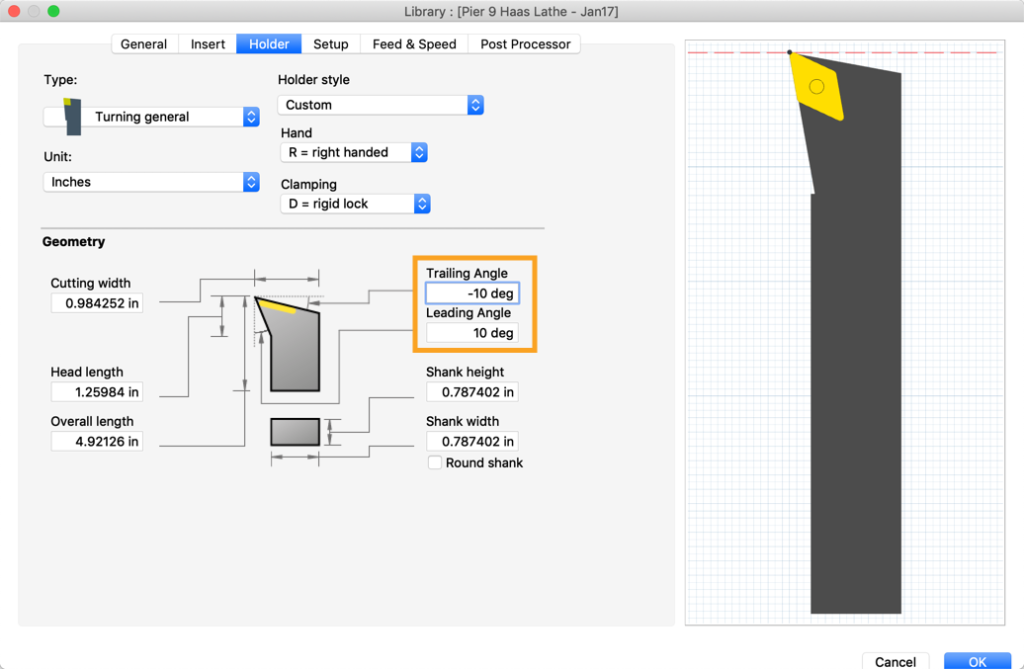
The Trailing and Leading Angle parameters when creating a custom general holder.
Round Holders Galore
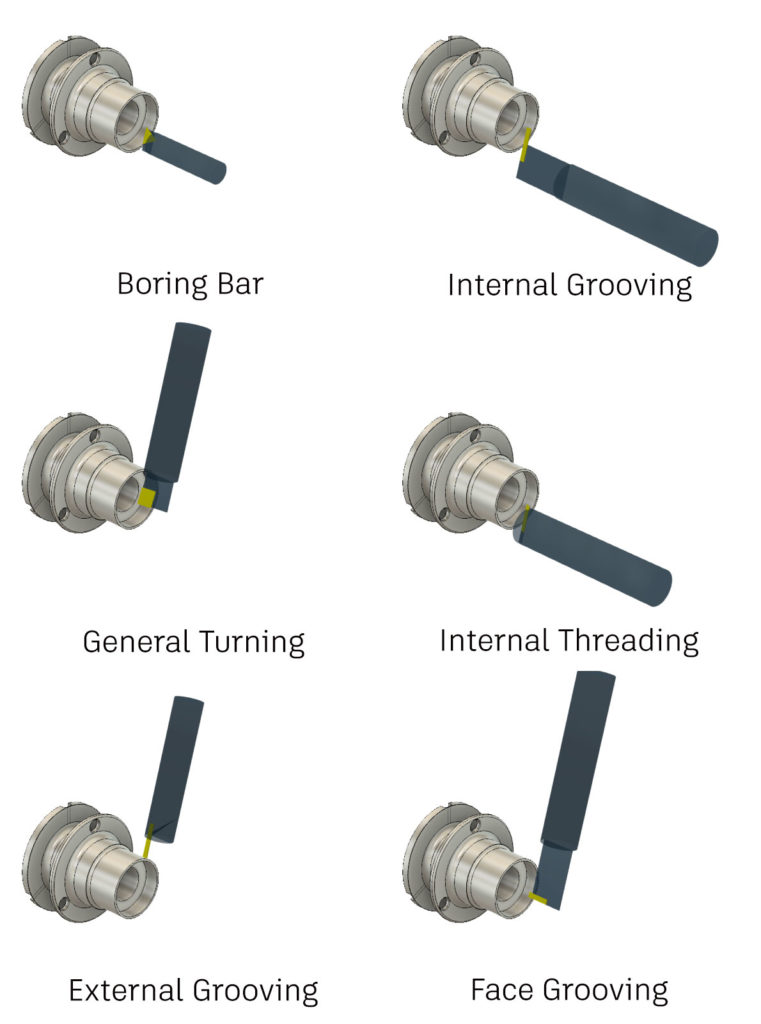
In previous versions, a boring bar could be modeled with a round holder but not with a relief angle. Now, in addition to round boring bars with relief angles, as detailed above, you can now also accurately model the following round shank tools for use during toolpath verification and simulation:
- Internal grooving tools
- General turning tools with “round shank” checked on
- Internal threading tools with “round shank” checked on
- External grooving tools with “round shank checked on
- Face grooving tools with “round shank” checked on
Angled Tools
You can now program Turning Face, Turning Profile and Turning Chamfer operations using angled tools with compensation type set to “tip tangent.”
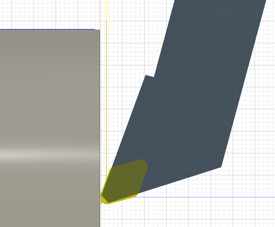
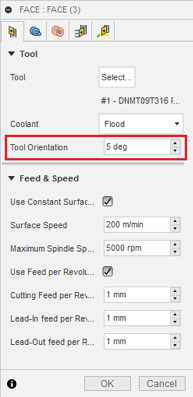
There are two ways to program angled tools – via the “Tool Orientation” parameter in the operation or with the “Orientation” of the tool in the Setup tab in the tool library. Generally, the Tool Orientation parameter will be used with a dynamic rotary angled holder. The holder orientation can change between operations, and this parameter best matches the flexibility of the tool. The Orientation parameter from the tool library is generally used with a fixed angled holder, since this is a more permanent setting.
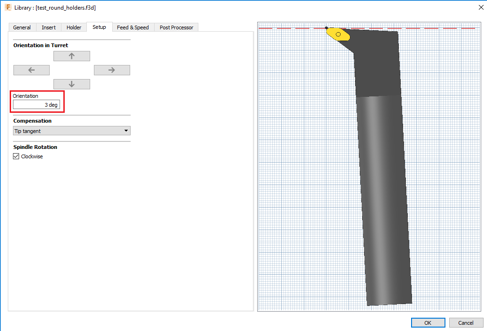
As a bonus bug fix, Fusion 360 now properly renders the tool compensation point in the tool preview for angled tools in the tool library.
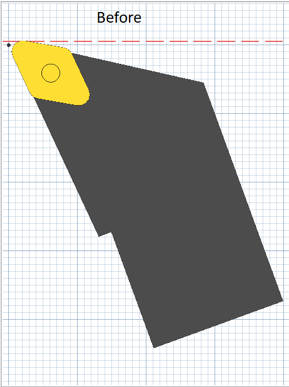
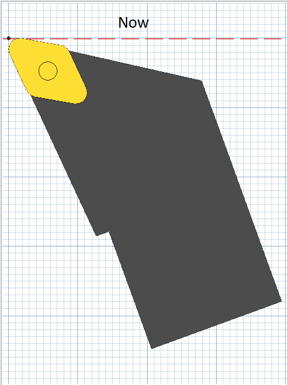
Important Note: Previously, you might have been generating NC code for angled tool turning operations by calculating the correction to toolpath coordinates in the post processor. Be sure to edit your post processor and delete these corrections before using the new angle parameters!
Setup – Parametric Safe Z
The first thing to note here is the renaming of the “Home Position” Setup parameter to “Safe Z.” You’ll find this parameter when creating a new Setup after choosing Turning/Mill-Turn as the type. This change helps clarify the difference between the Safe Z and the machine home position at G28 or G53. Safe Z refers to the position the tool retracts to between machining operations to avoid interferences or collisions.
Now on to the meat of the update. The Safe Z can now reference the Stock Front or Back in addition to the WCS Origin. This gives flexibility to users who might want to place the WCS Origin somewhere like the back of the stock, but reference the Safe Z from the front of the stock. This should make it much easier to ensure adequate clearance between operations – less math and large offsets. Just select the Reference and input an offset where a positive value will move the Safe Z in the Z+ direction and a negative value will move the Safe Z in the Z- direction.
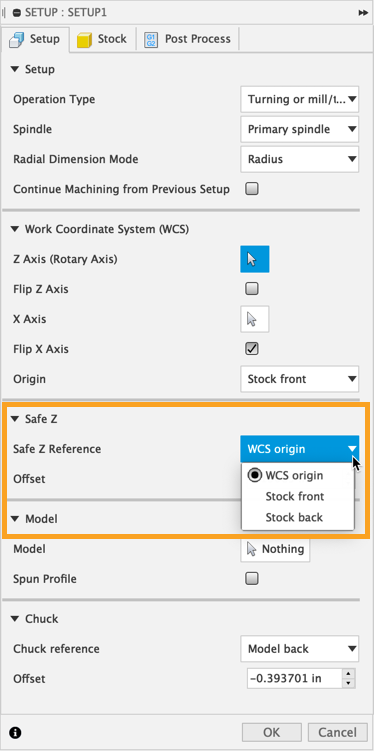
The Safe Z lets you choose from the WCS Origin, Stock Front, or Stock Back with an Offset as well.
Geometry
NEW! – Z Tool Limits
The Z tool limit (contact point or cutting edge) can now be set for the front Z limit for a toolpath being machined by a tool with a right-facing insert. If the toolpath is using a tool with a left-facing insert then the Z tool limit type will be set for the back Z limit. For a neutral insert the Tool Limit parameter will not be shown and will internally be set to contact point.
Radii
Cutting Below Center
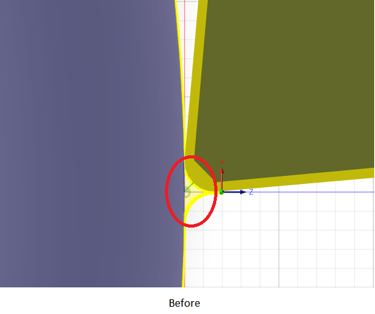
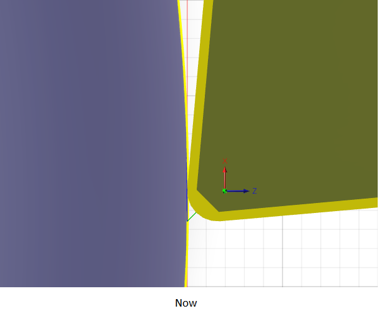
There was always a single face pass included in the Profile finishing operation, but it only brought the radius of the tool tangent to the centerline, leaving a little nub or cone on the end of the part.
This update pushes the initial facing pass down so that the tool goes past the centerline by one corner radius, removing the extra material left on the end of the part. This eliminates the need for hand finishing or additional operations just to get rid of that little nub. For extra control over how far the tool can go past the centerline, there’s a new “Distance to Cut Below Inner Radius” parameter in the Radii tab. This parameter allows you to cut past the Inner Radius to help remove any small nubs on the part. Enter a positive value and the tool will go that distance past the center. This is available in Profile and Grooving.
Facing During Groove Goes Below Center
Similar to the improvement above, Grooving finishing operations were not facing down to the center when there was an axial hole. They would just face down to the hole, leaving the center of the part un-machined. This left an unfinished face on the front of the part or required an additional finishing pass to finish the entire front face. Now the initial facing pass in the Groove finish operation will go down to the center, as shown below.
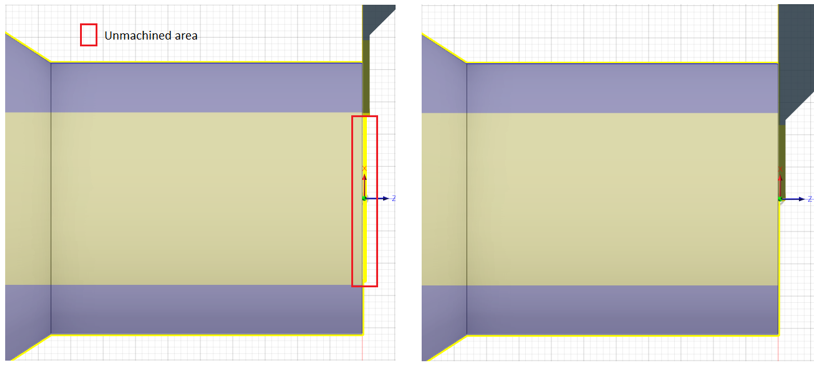
Old behavior on the left. New behavior where tool goes to the center on the right.
We also added the “Distance to Cut Below Inner Radius” parameter to the Groove toolpath to allow the grooving tool to go a certain distance below the inner radius, as mentioned in the update above. This parameter allows you to cut past the Inner Radius to help remove any nubs left on the part. This distance is in addition to the tool nose radius.
Passes
Profile Corner Control
You can now control the shape of the profile turning toolpath at outer corners using the parameter “Make Sharp Corners” in the Passes Tab. This checkbox is unchecked by default, meaning the outer corners of the toolpath are smoothed with arcs. When this parameter is checked, outer corners in the toolpath are machined without arcs. Sharp corners can help with toolpath readability, and may look more familiar if you’re used to hand programming turning operations. Basically, you want your toolpath to look how you want it to look, and we want to help you get the toolpath you want. Note that the resulting part will not be changed – this parameter only affects the toolpath corners.

Default behavior with Make Sharp Corners OFF on the left. Make Sharp Corners ON on the right.

NEW! – Better Linking for Both Ways in Profile Roughing
Cutting depth transition moves for profile roughing with direction set to “Both Ways” used to include a 45 degree retract that was unnecessary. The new Both Ways eliminates these leads and instead leads directly into the next cut depth. It’s probably easier shown than explained, so take a look at the screenshot below to see the old and new toolpaths.

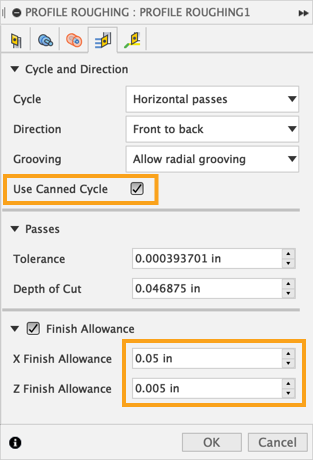
NEW! – Canned Cycles Support Different X and Z Finish Allowances
Previously, Canned Cycles required the X finish allowance to be equal to the Z finish allowance. We know that’s not always everyone’s intent, so canned cycles will support any values – including different ones! – for X and Z Finish Allowance.
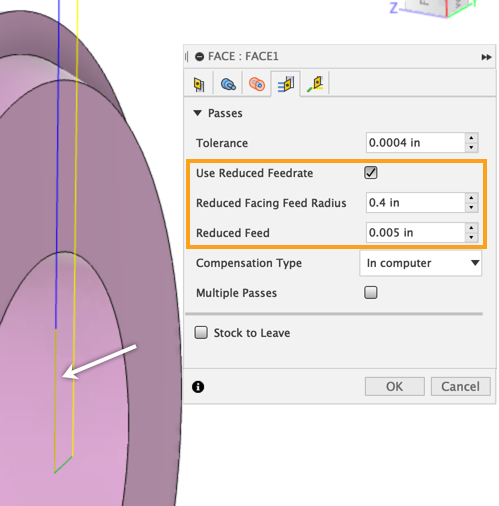
NEW! – Reduced Feedrate for Face
You can now fine-tune the feedrate for Turning Face operations. As the turning tool approaches the center of the part, it also approaches a theoretical zero spindle surface speed. This can cause issues with insert chipping unless the tool slows down while facing off the nub at X = 0. The parameter “Use Reduced Feedrate” allows you to set a Reduced Facing Feed Radius and Reduced Feed. Once the tool reaches X = “Reduced Facing Radius,” the feedrate of the turning tool will reduce to the “Reduced Feed.” This reduced feed segment is shown in goldenrod in the toolpath preview.
NEW! – Axial Stock to Leave for Single Groove
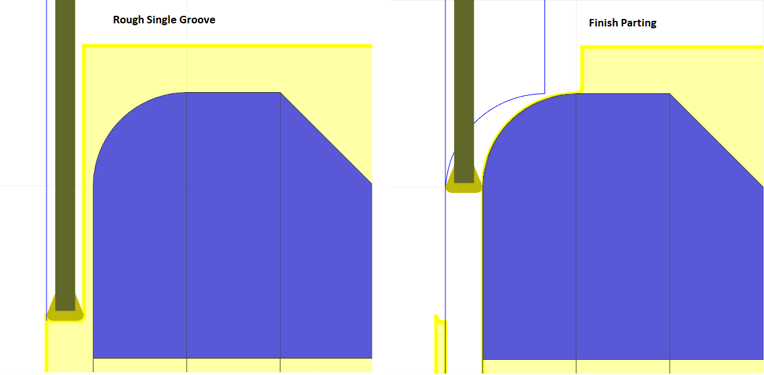
You can now set Axial Stock to Leave in addition to Radial Stock to Leave for Single Groove operations. Make sure the “Groove Side Alignment” parameter in the Geometry Tab is set to Front or Back to see this parameter. In general, this means that you can now use Single Groove as a roughing operation, leaving material on the walls of a groove for a subsequent finishing operation. One common application is creating a Single Groove operation behind the part, but leaving some material on the back of the part to be removed during the parting operation. This can reduce tool load during parting and offer a better surface finish on the back of the part.
Linking
NEW! – Rapid to Next Cut Depth
This parameter, when checked, allows the tool to transition to the next cutting depth with a rapid move. When unchecked, the tool will rapid to the previous cut depth and move to the next cut depth at the cutting feed. This parameter is not compatible with Canned Cycles. If the Canned Cycles option is enabled, this parameter will not appear and the toolpath will behave as if it was unchecked.
Approach and Retract Z
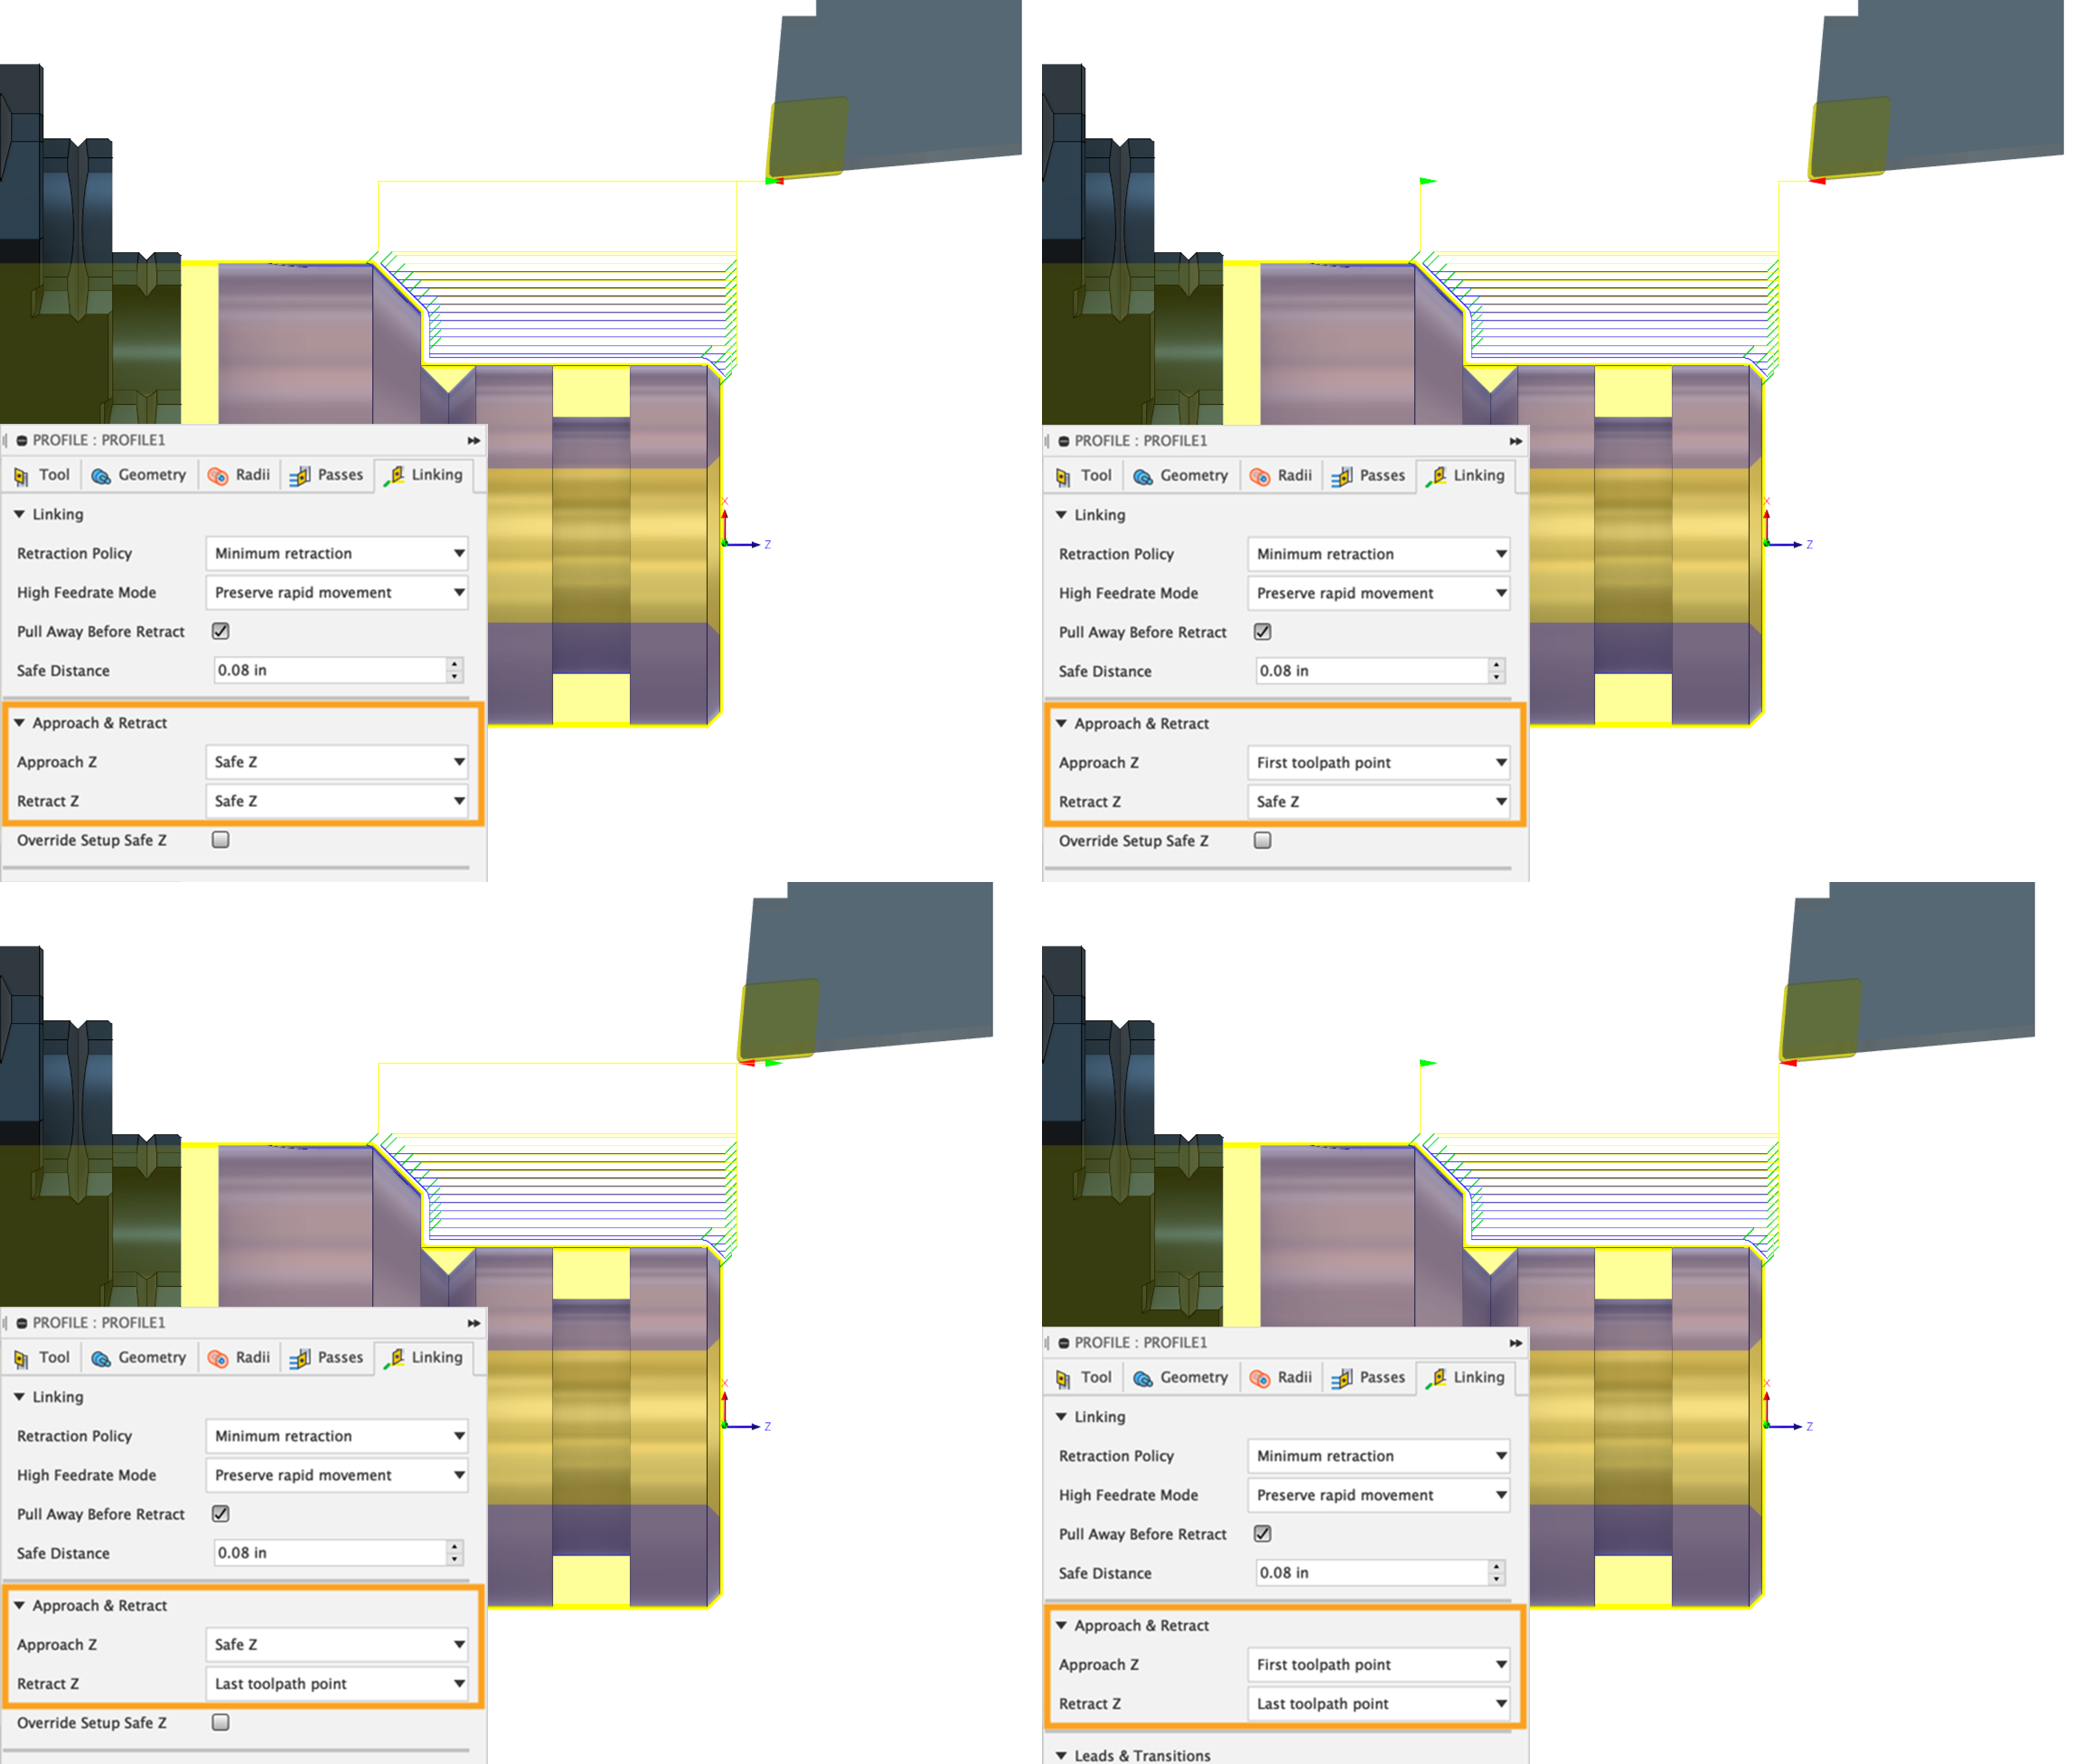
The Linking Tab of every turning operation now has an “Approach & Retract” section where you can set the Z position of the tool before and after the operation. The options are the Safe Z or the First/Last Toolpath Point. The exception is Internal Threading where the Approach and Retract Z will always match the Safe Z position to reduce the chances of a crash.
Override Safe Z
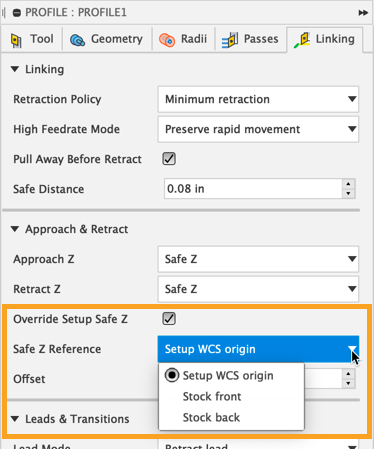
When you select Safe Z as the Approach or Retract, you can also use the “Override Setup Safe Z” checkbox to override the Safe Z defined in the Setup. This gives even more control over the Safe Z at the operation level. For example, one operation might use a tool that’s especially long and requires a larger Z retract to safely clear unfinished material.
Fixed Lead Directions
“Use Fixed Lead Direction” is new to the Linking Tab of Profile and Groove operations. This checkbox determines how the Lead Angle affects the Lead-In/Out moves. Checking the box means the Lead-In/Out moves are relative to the Z-axis of the Setup WCS. When the box is unchecked, the Lead-In/Out moves are relative to the toolpath.
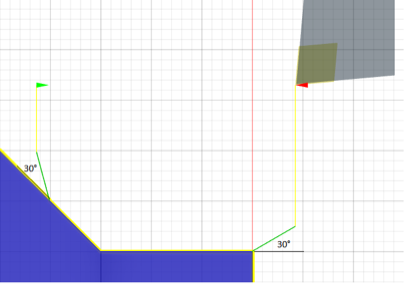
Use Fixed Lead Direction OFF
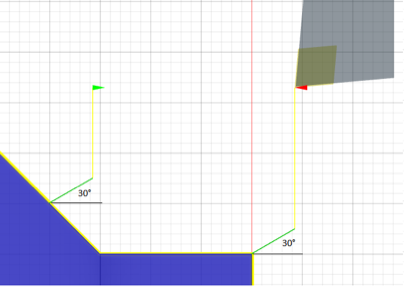
Use Fixed Lead Direction ON
Pull Away Before Retract
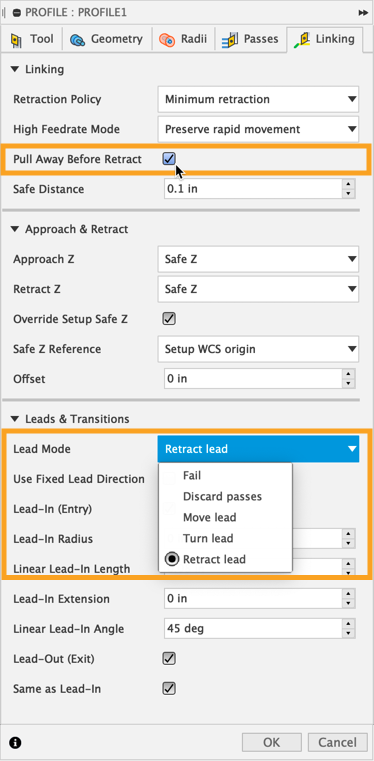
The Pull Away Before Retract parameter overrides the Lead-Out Angle to avoid collisions with the stock. Checking the box may result in slightly different Lead-In/Out moves than specified, but leaving the box unchecked can result in stock collision. We recommend checking this box for safer lead angle results.
Lead Mode
Fusion 360 checks every lead to see if there are gouges with the solid model or the remaining stock. This helps make sure the toolpath is will run safely. If a gouge is found, the “Lead Mode” alters the Lead-In/Out as follows:
- Fail – Toolpath generation will fail if it’s not possible to create the linking moves without causing a gouge. You will need to make adjustments to make the lead-in/out moves fit and generate.
- Discard Passes – Discards any passes that cannot be reached with the current linking settings. This would create rest material for the next operations.
- Move Lead – Moves the lead to a different location along the part until there is room to execute the lead as specified.
- Turn Lead – Changes the Lead Angle parameter until there is room for the lead as specified in the other parameters.
- Retract Lead – This is most automatic option, which is why we recommend it for the easiest way to get safe results. It will adjust the linking parameters so all links are safe and acheivable, and in some cases will use a Radial Retract when there are no other options. This is also the default setting.
When making finishing passes for Profiling and Grooving operations, we suggest making a separate finishing operation using Rest Machining. This helps ensure the operation calculates with the proper rest material. That means gouges are identified more accurately and can make the resulting Lead-In/Out moves more predictable.
We are excited about the many recent updates to Fusion 360’s turning functionality! I’m looking forward to sharing even more of the team’s hard work in the future. Keep an eye out for the new update in May for even more turning goodness. In the meantime, we want to hear from you! Ask any and all of your Fusion 360 CAM questions on the CAM Forum. Let us know your ideas for future improvements on the Fusion IdeaStation.