& Construction

Integrated BIM tools, including Revit, AutoCAD, and Civil 3D
& Manufacturing

Professional CAD/CAM tools built on Inventor and AutoCAD
13 min read
v.2.0.5811
Manufacture: Mesh body position no longer changes stock position
Rsfonzico reported an issue where changing the position of the mesh body he was working with caused some weird behavior in his stock position. We jumped on this right away and made a fix so that this no longer happens.
Manufacture: Post processing previously working programs now works again
Apparently if you tried post processing programs that were working correctly but have been experiencing issues where an “Invalid Machine Configuration” error appeared and and no g-code was being generated. Something got jammed between the gears, and now we’ve un-jammed and it should be working again.
Render: Local and background render issue fixed
We fixed an issue where local render and background render was causing hang-ups. Some parts of Fusion was getting bottlenecked on older Mac machines. Now it’s back at 100%, and you should be able to render new and legacy designs locally without a hitch.
Materials: Pantone colors in color library are back
Amc22298 tried to edit an appearance material and found out that Pantone colors went missing within the color library dialog. Oops, our bad. Now it’s back.
Materials: Favorite materials are back
Similarly, materials you’ve saved to your favorites were missing as well. No, they didn’t just disappear, they were just not visible for some odd reason. Now they are back too.
May 20, 2019 Product Update – What’s New
V.2.0.5790
[toc]
This update is all about improving existing tools so you can get your designs done faster, easier, with time left to work on the more important stuff, like Game of Thrones finale memes.
Improved! File > Export now supports all available formats
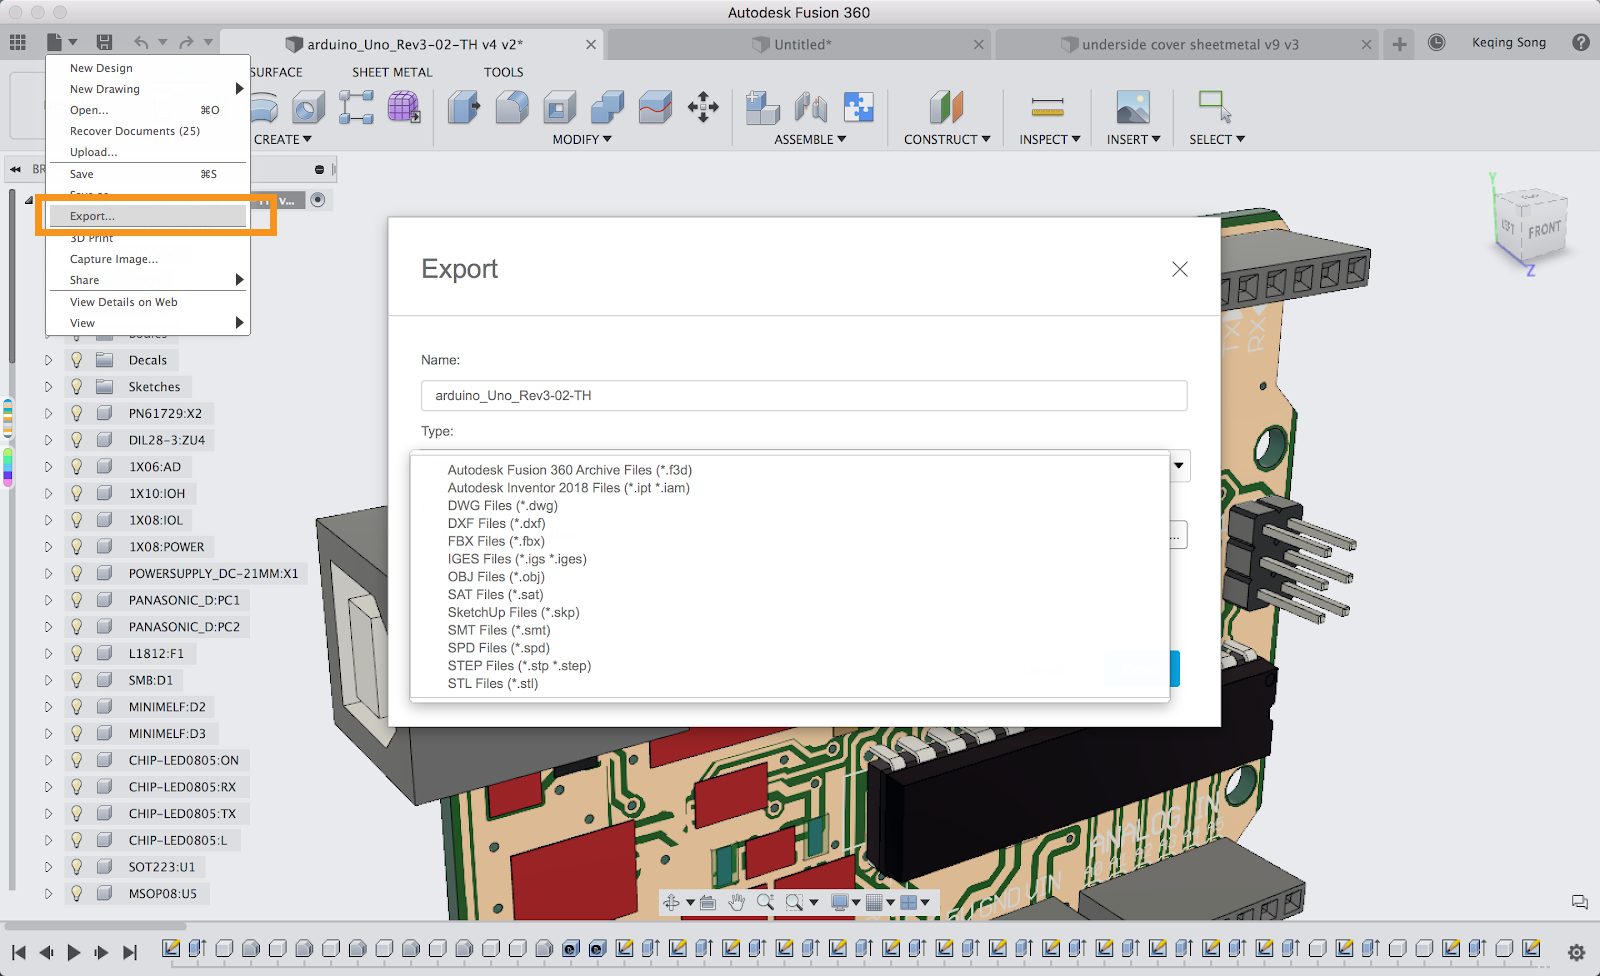
Getting designs into Fusion 360 was half the battle with File > Open, now it’s all about getting designs out. We’ve improved the Export dialog to be more streamlined, and more inclusive of all the exportable formats available to you. Previously only available in Fusion Team as downloadable formats, you can now export your designs as Inventor 2018, DXF, FBX, OBJ, STL, SPD, and SketchUp (SKP) Files right from the Fusion 360 file menu. If you have 2D Drawings and x-ref’d designs in your assembly, you get a F3Z option instead of F3D, which will include your associated drawings and x-ref’d parts as part of the export.
Depending on the file format you pick, we’ll either use a local translator or a cloud translator to export the design. You can keep track of the translation progress in the Job Status dialog (if the format requires cloud translation).
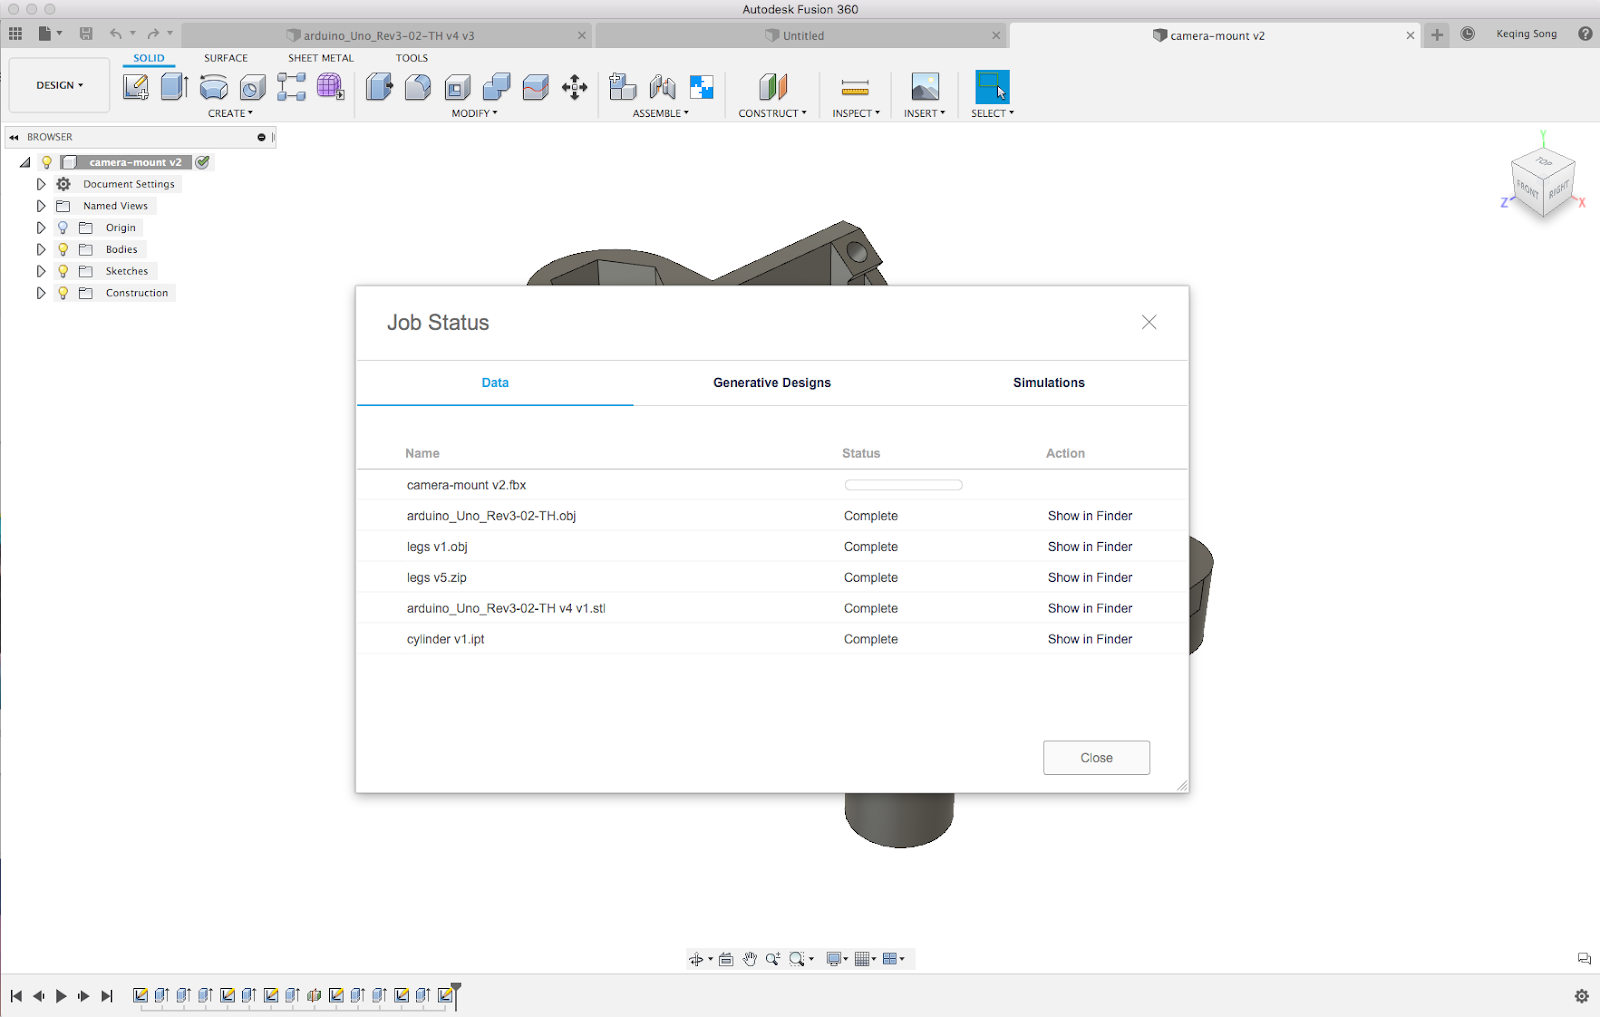
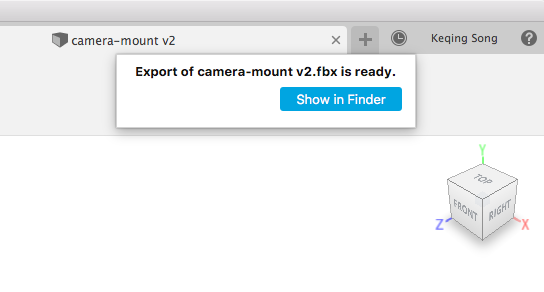
Once the export is complete, you’ll see a confirmation in the top right corner of Fusion 360, giving you the option to go to that file’s location directly.
Note that this new export experience is available from the File menu. If you tried to export a component from the browser via right-click menu, it’ll still be the older experience with less formats only supported by local translators. There’s more work to be done, and it’ll be consistent with the File menu Export path in a later phase.
Improved! Copy and Paste designs now work faster
Previously when you tried to copy and paste a design by its own multiplier, Fusion 360 will eventually get some overwhelmed that it came to a screeching halt. We’ve tuned the performance of how Fusion 360 handles the duplicated instance of a model. Now it should copy and paste much more faster.
Fixed: Wrong Japanese translation for Remove command in the right-click menu
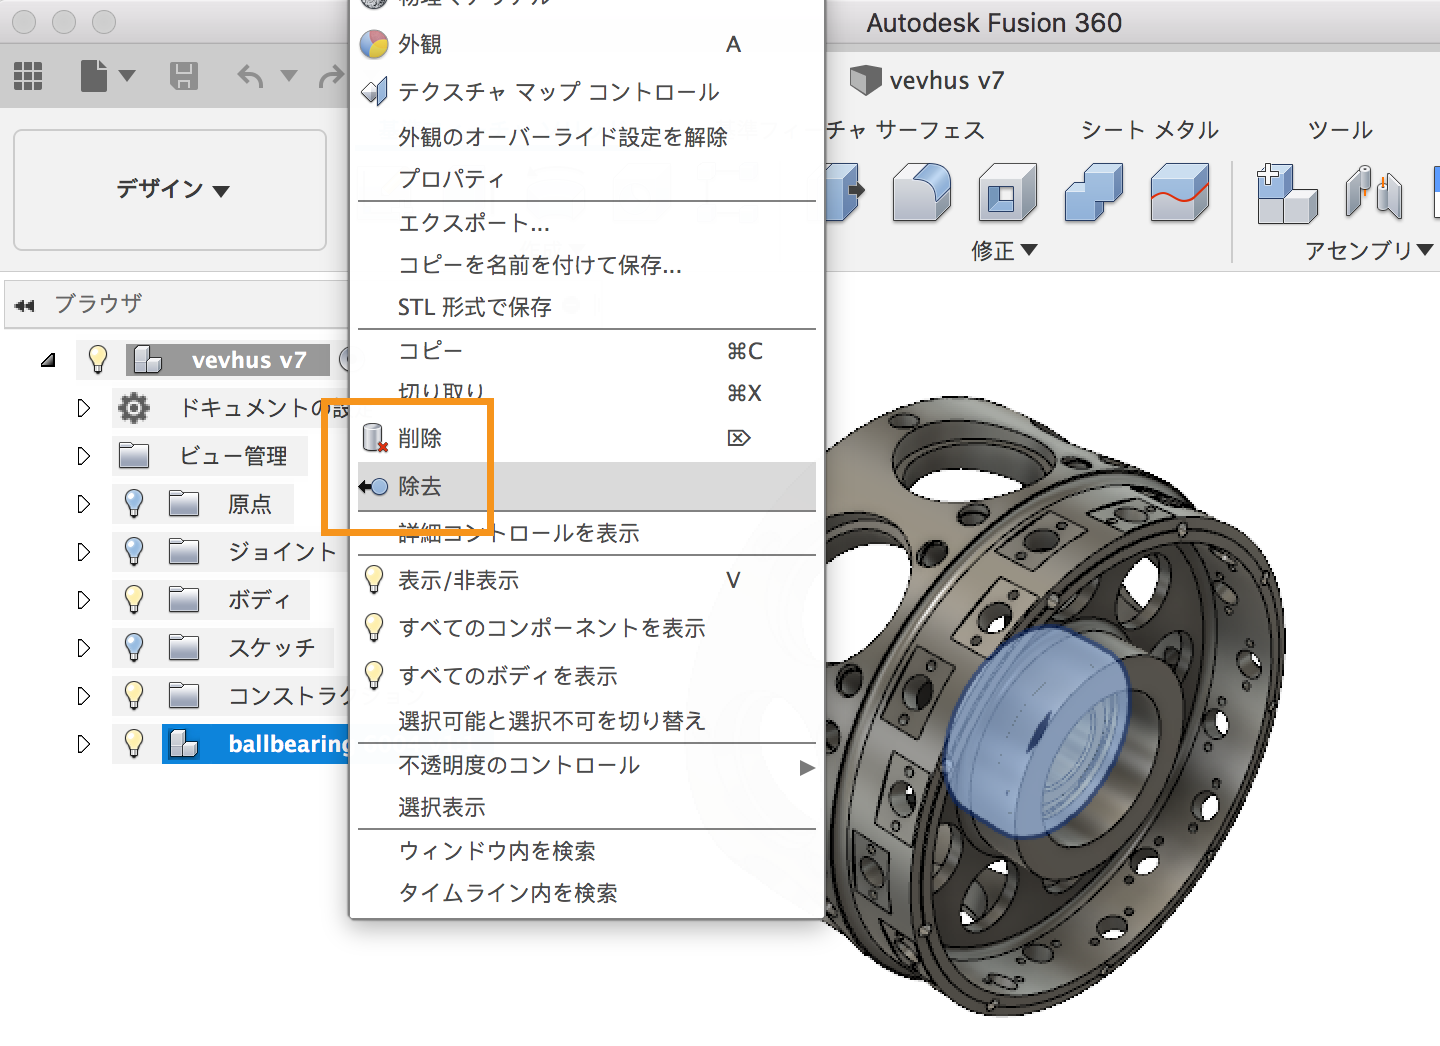
One of our Japanese users reported that the “Remove” command was incorrectly translated as “Delete”, which made it the same as the actual “Delete” command. This resulted in 2 “Delete” command with different outcomes. We’ve swiftly addressed this issue, and now it’s properly translated as “Remove”. Gomenasai!
Fixed: Section Analysis hatches don’t update correctly
Hatching in Section Analysis became un-synced from the Show/hide option when you made a change to the design. Now it updates as it should.
New! Delete Trash Bin Items
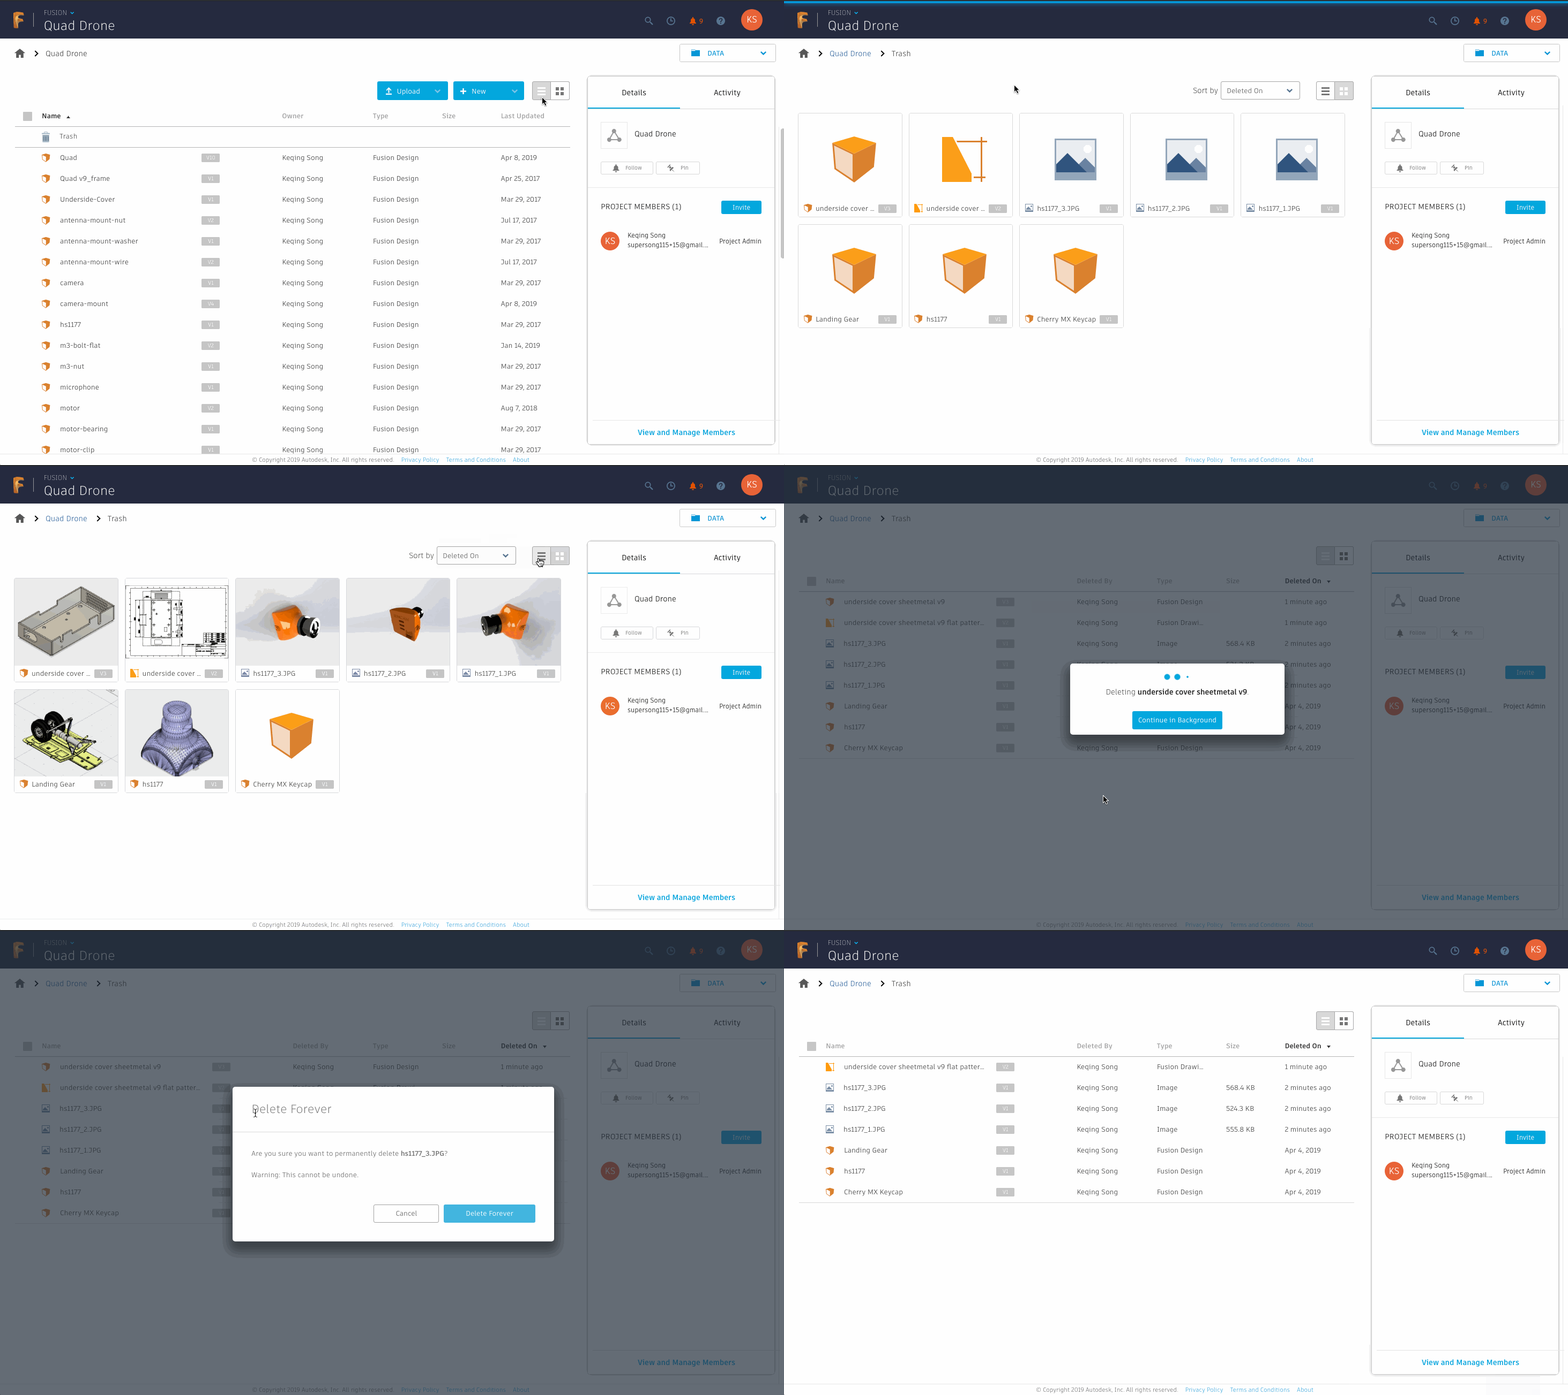
Last update we gave Project admins access to project trash bins, so you can still recover what you’ve deleted from your projects. In addition to restoring what was deleted, you now have the option to purge the trash bin and delete permanently, because it’s good to clean house every once in awhile. Access delete trash and restore in both list and tile views, and continue to organize your project as the delete is happening in the background.
Improved! Split Body now has option to select multiple Splitting Tools
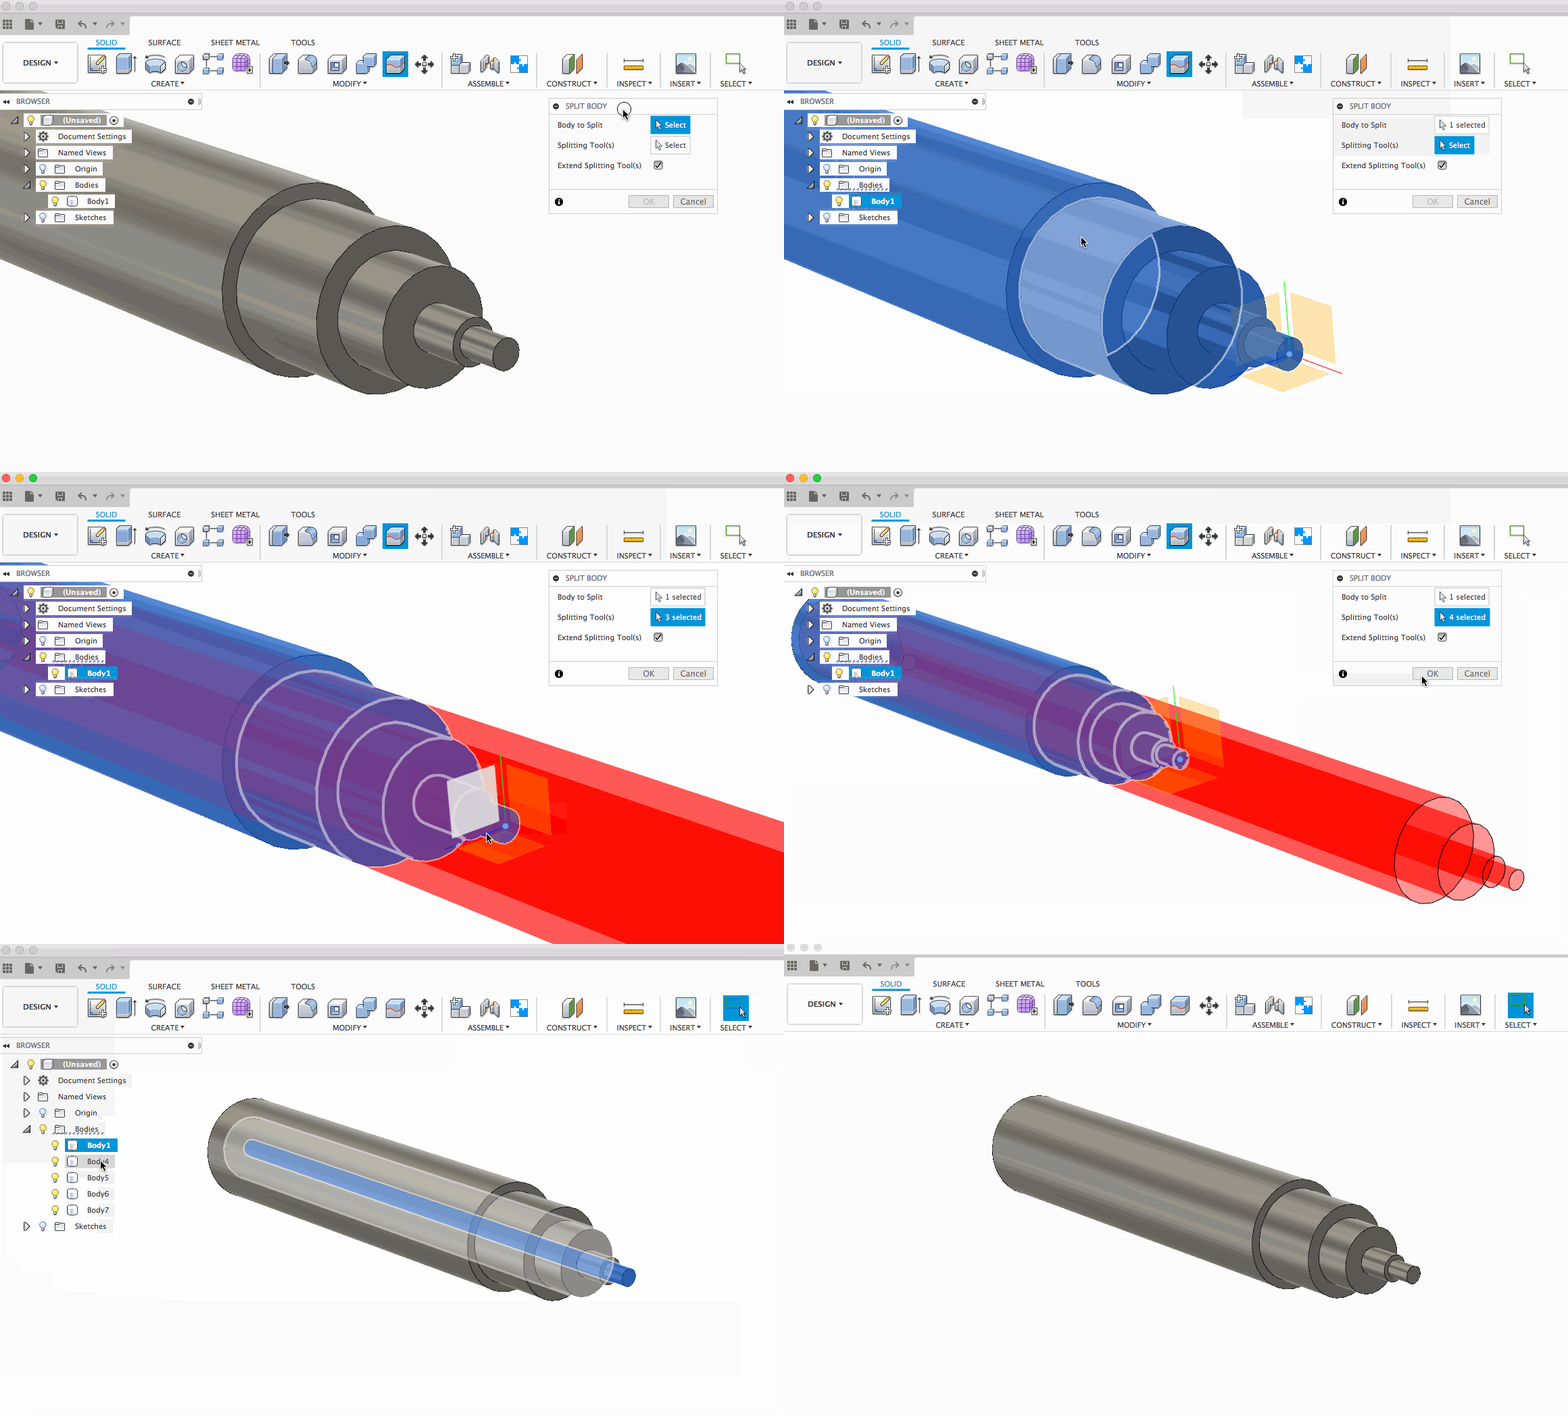
Previously when you used the Split Body tool, you were only allowed to select one splitting tool at a time. If you needed to split the body into multiple bodies, you’d have to use command over and over. Now you can select multiple splitting tools within the command, reducing the number times you need to reuse the tool. Note the this currently only works with tools that are not intersecting each other.
Improved! Work point on path

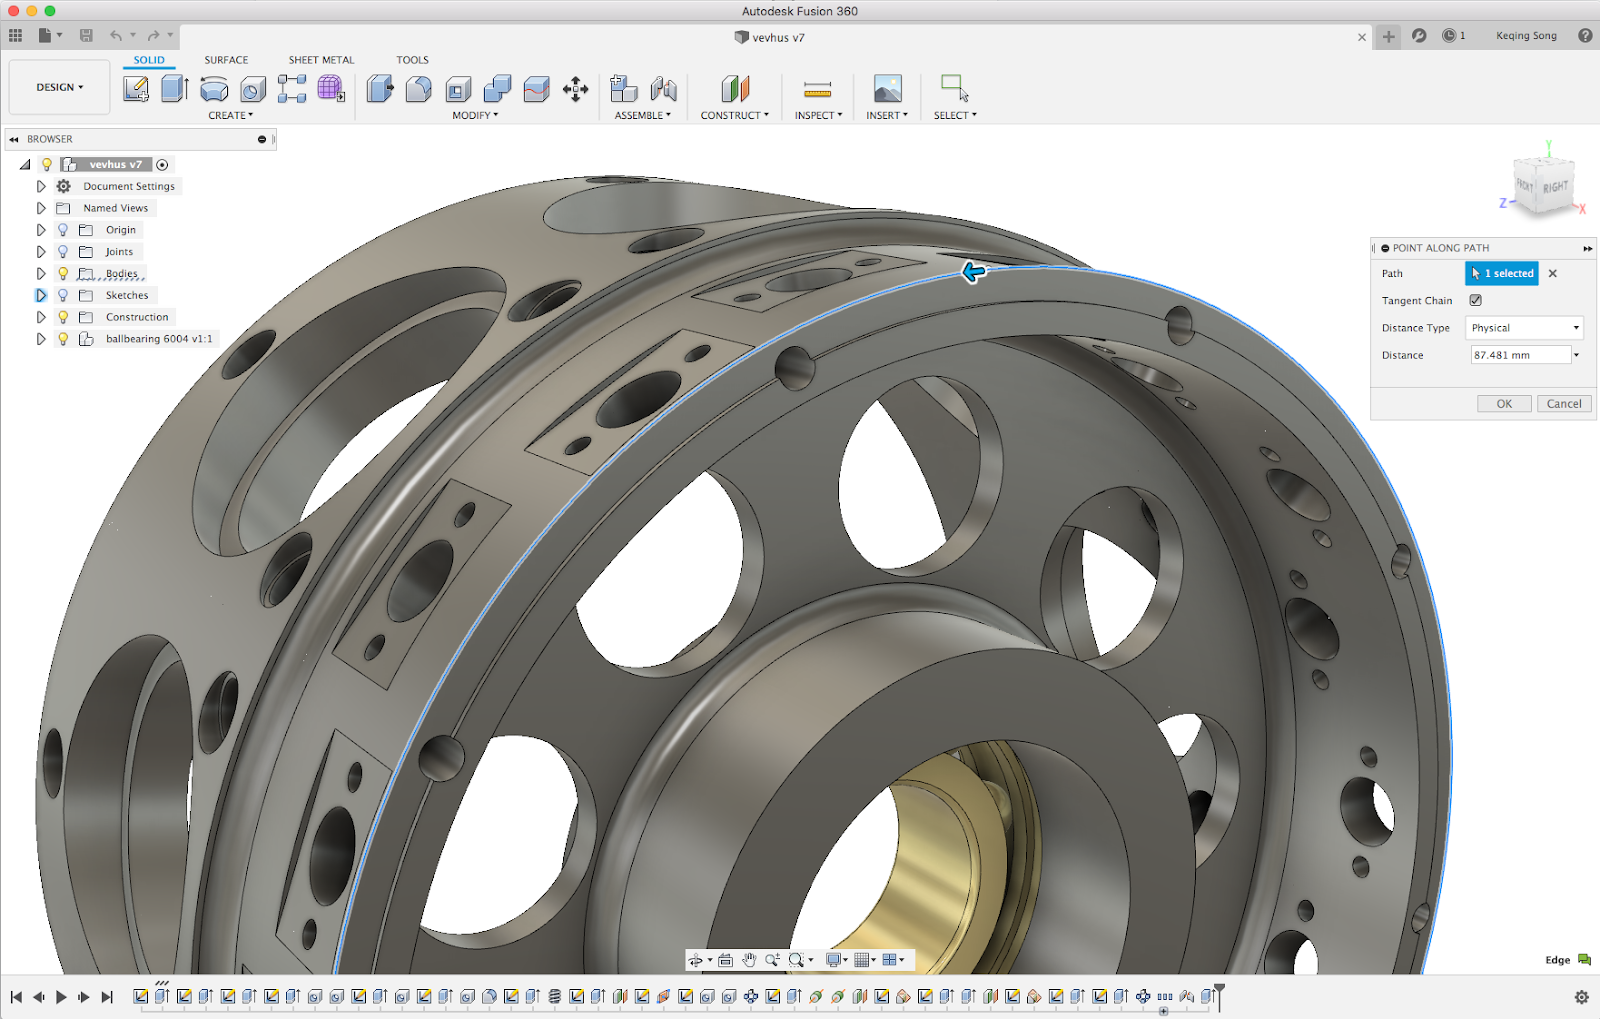
There’s a new construction geometry creation method in town, and that’s Point Along Path. If you need a reference point somewhere on your model to create other construction geometry with, this is your guy. If you can set it by dragging the arrow or give it a physical parametric distance
New! Offset Face command now under Modify Panel
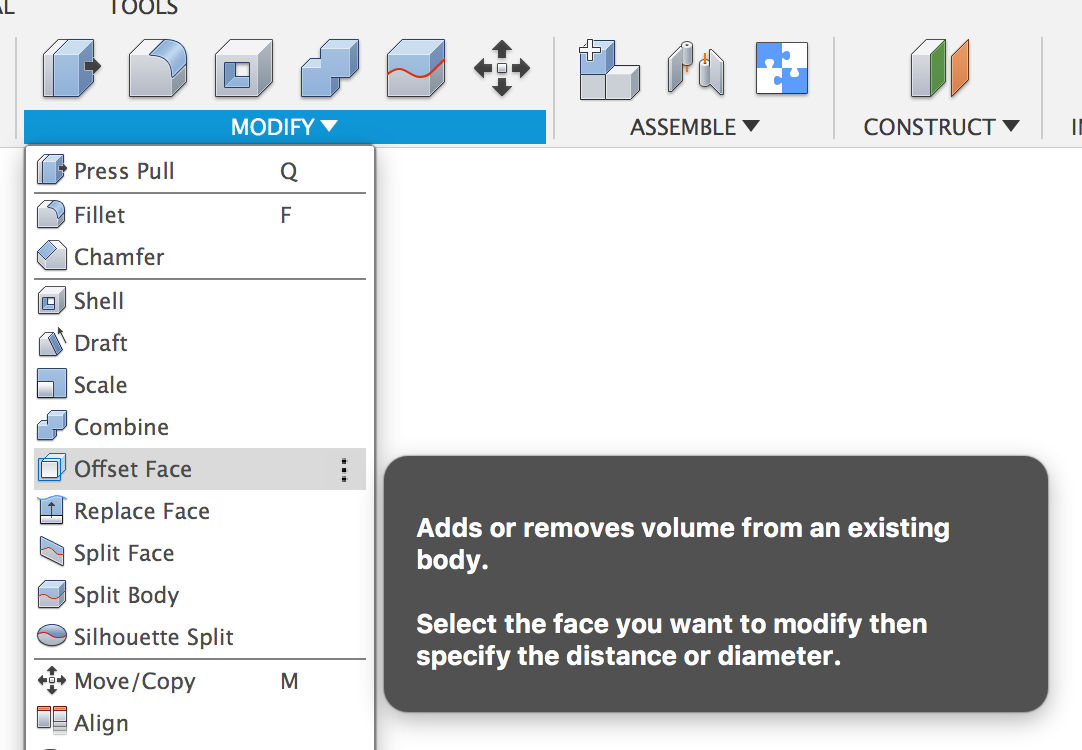
Typically, Offset Face appeared when you have a face selected and invoked the Press Pull command (Press Pull behaves more like a multi-tool that turns into different commands depending on what you select). This behavior has caused some confusion, especially for those of you trying to learn Fusion 360. Now it is its own command under the Modify drop-down menu.
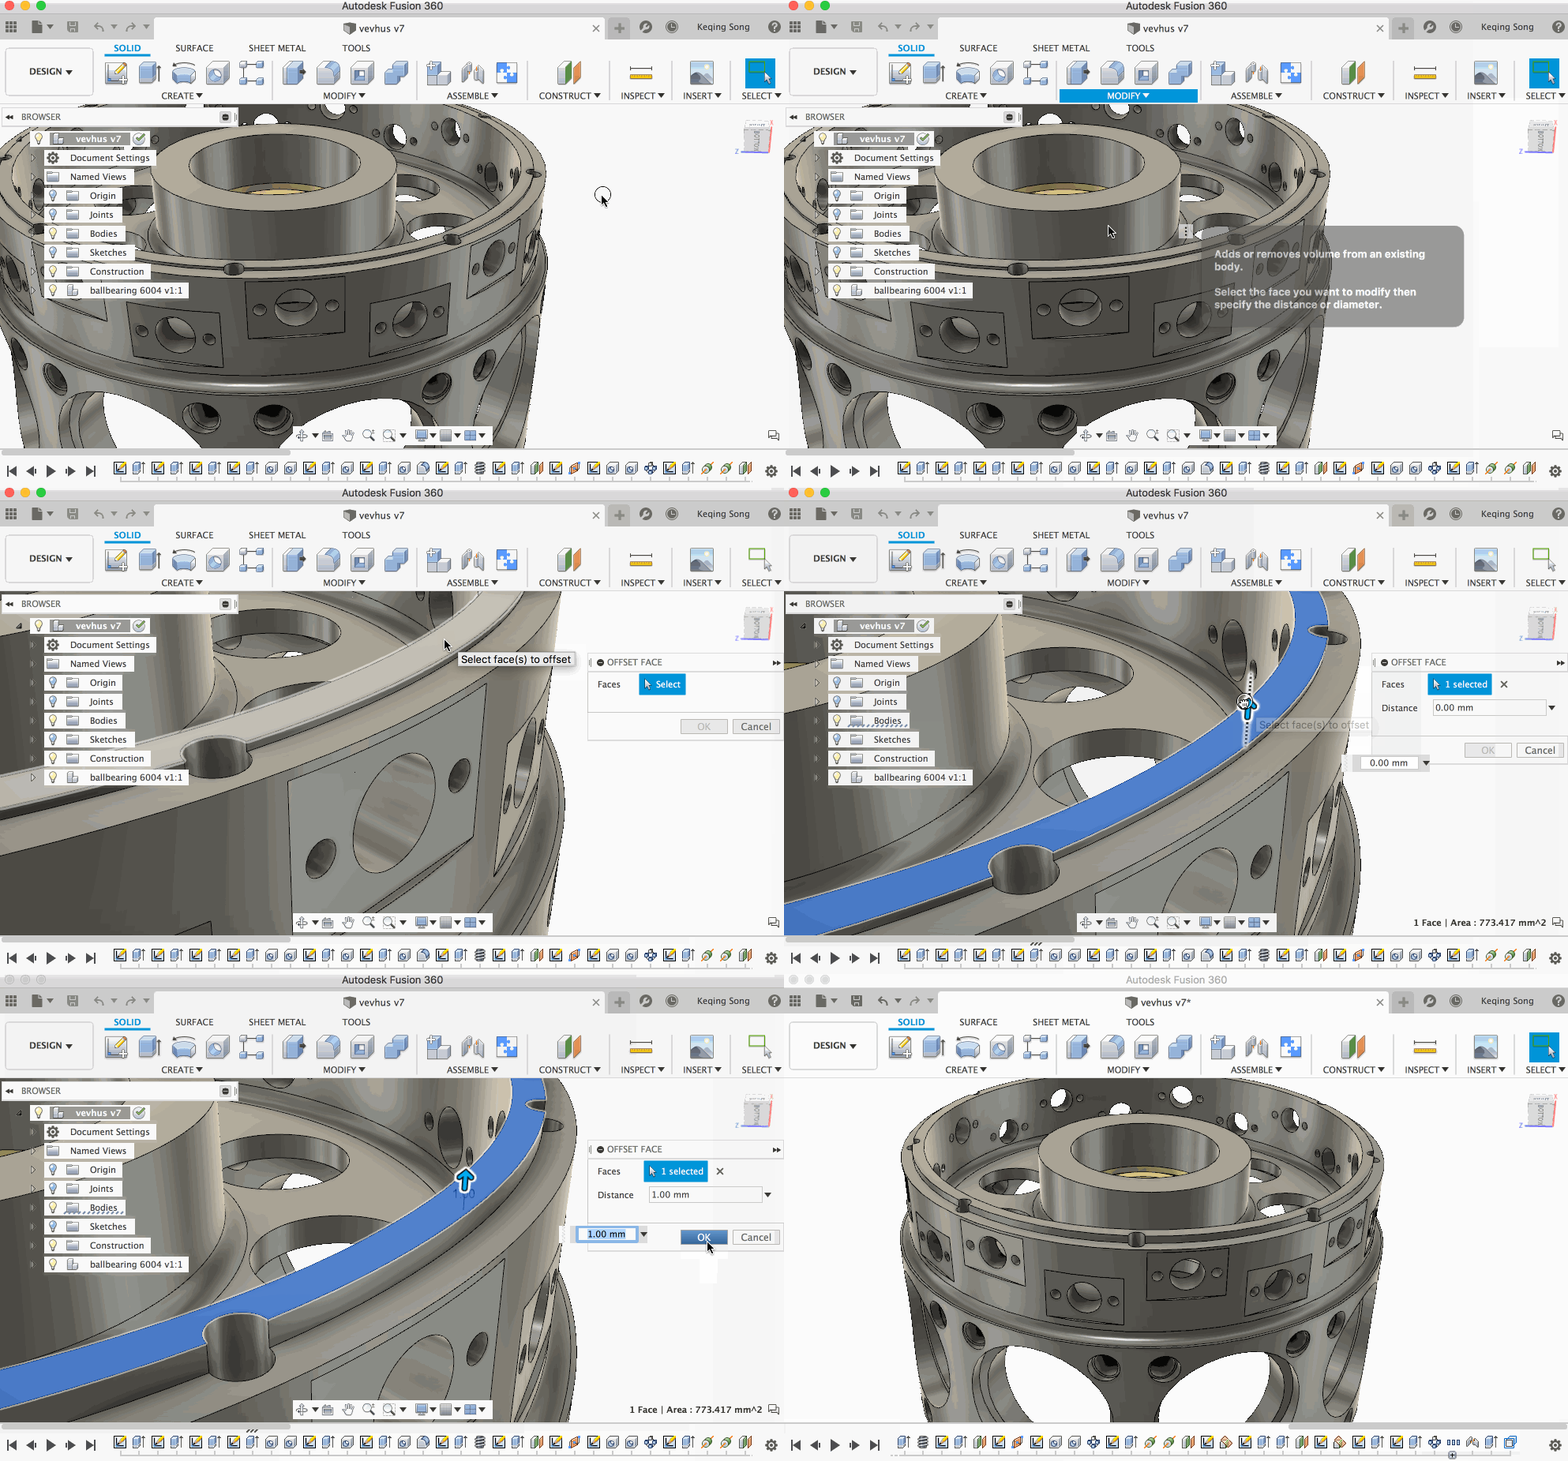
Offset Face is best used when you want to modify a specific area of a model without all the extra options available in the Extrude command. Pick a face, drag it to a new distance, hit OK, and done. Everyone is happy.
New! Break multiple linked components at the same time
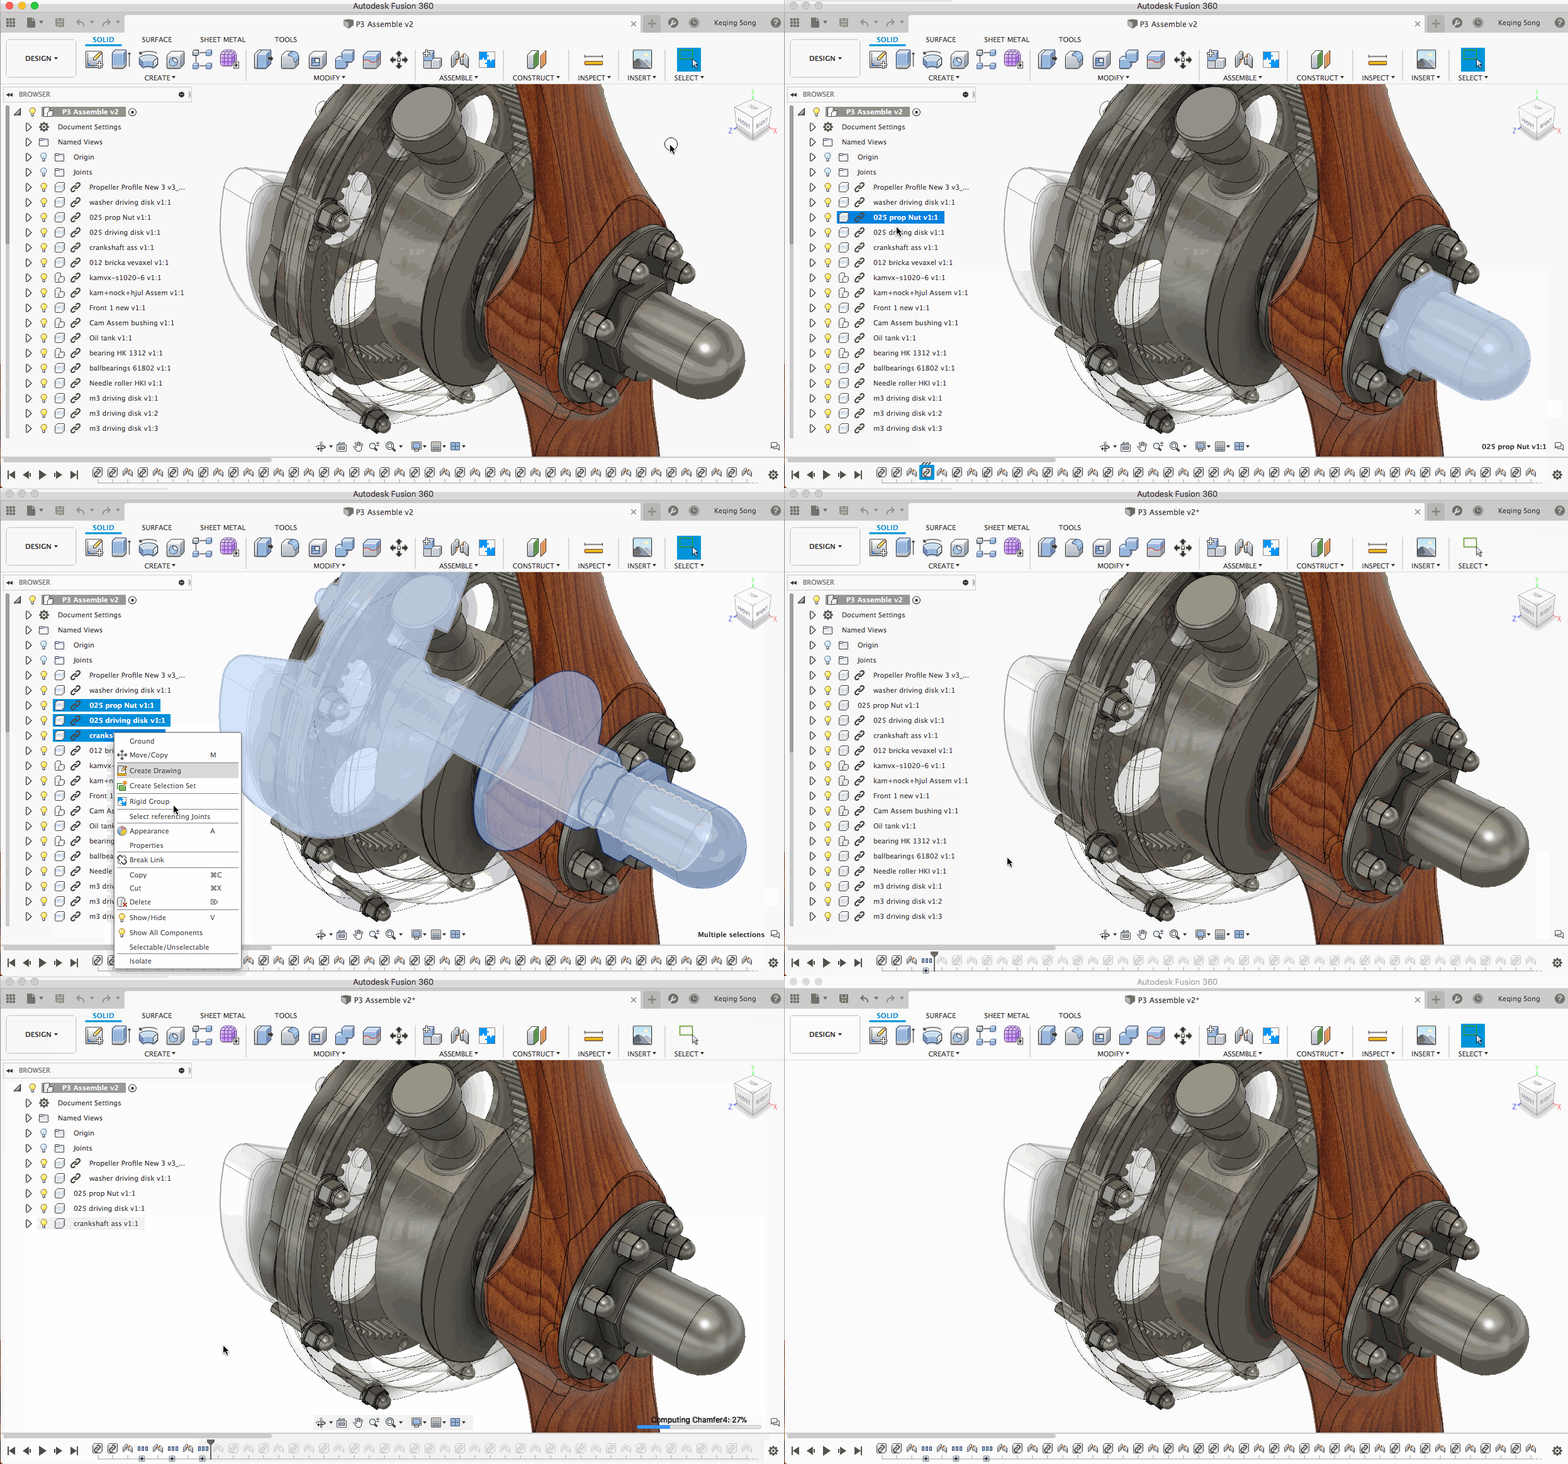
In the last update, we gave you the ability to break link for inserted components that has other inserted components within it. You now have the ability to select multiple inserted components, right-click, and “Break Link”, which will unlink them in a jiffy.
Improved! Auto-populate inputs for Extrude/Revolve when only one valid profile is visible
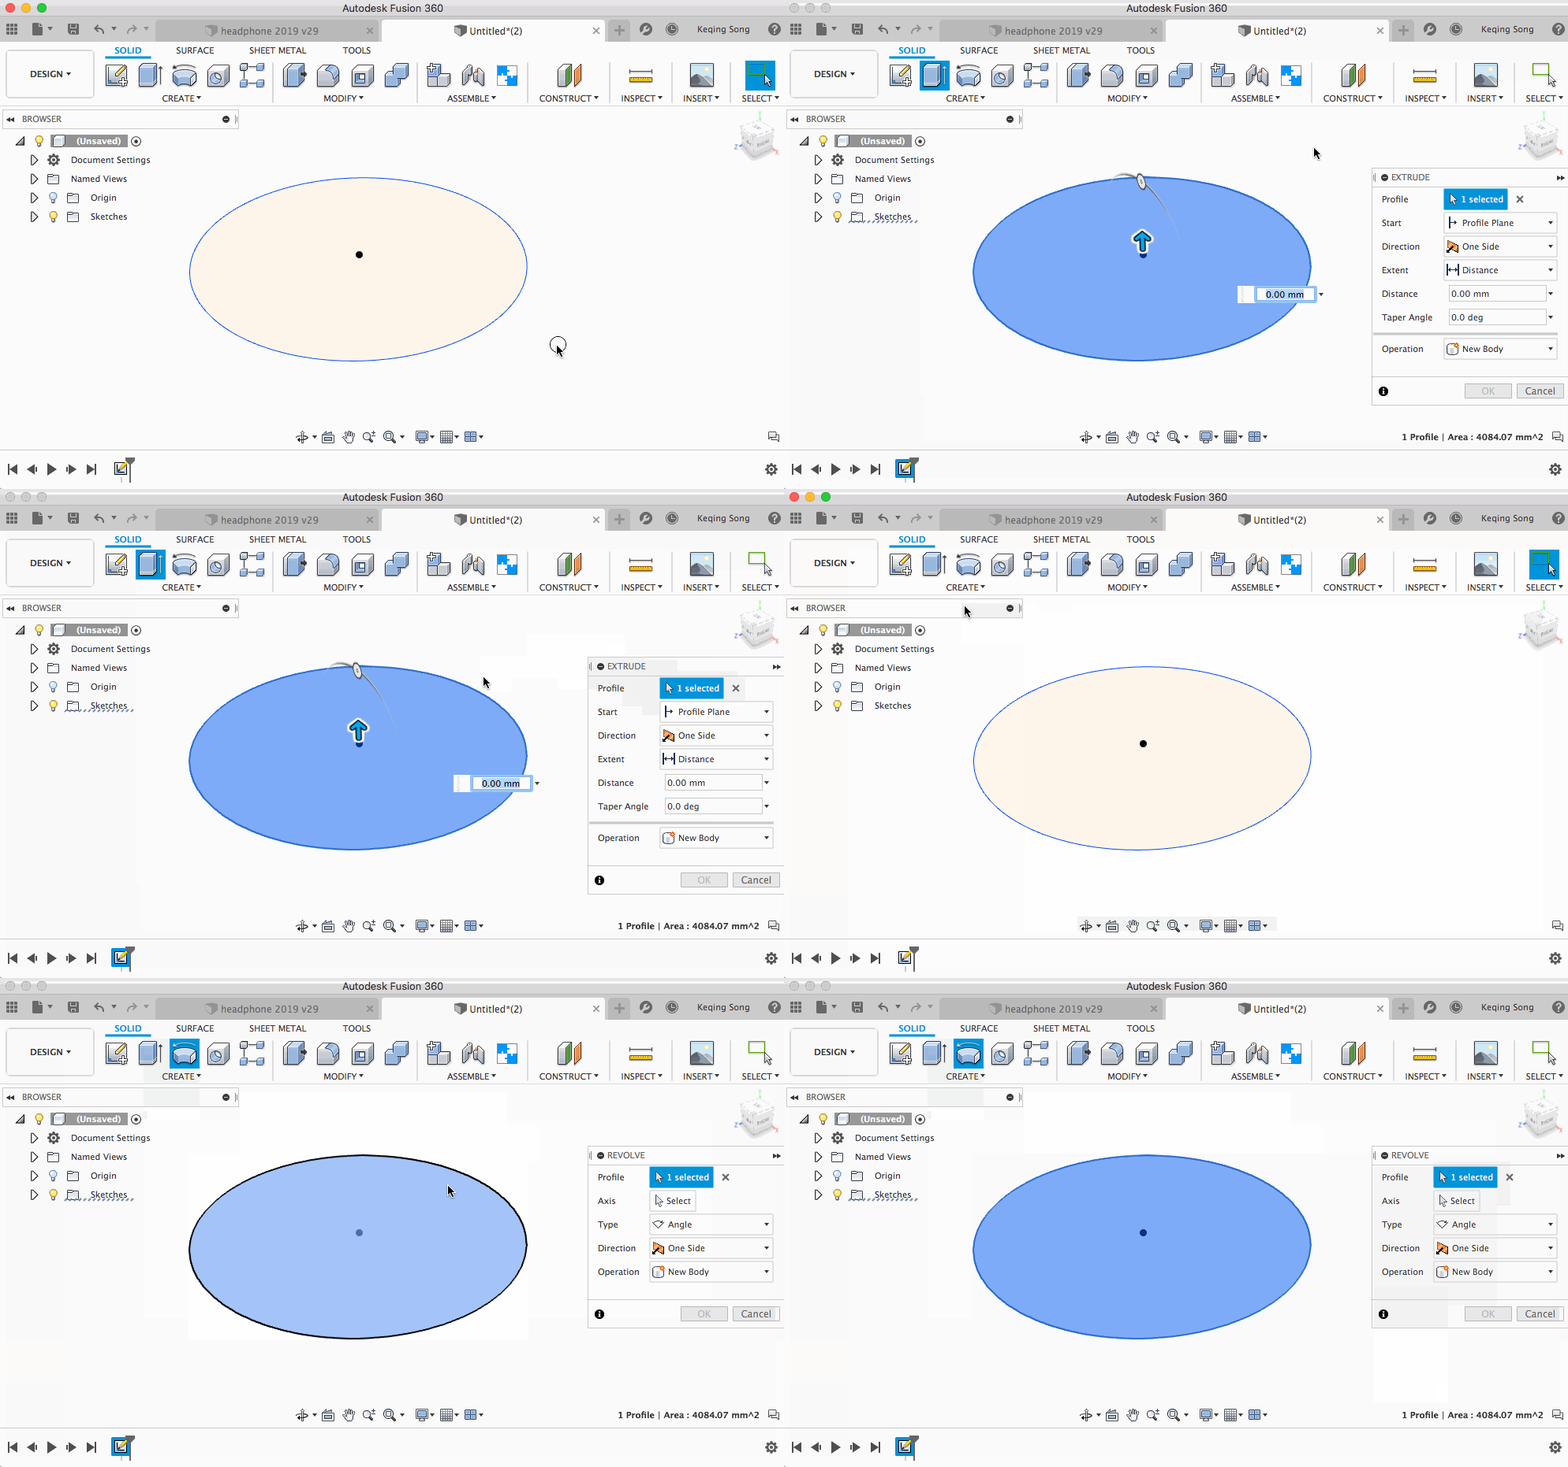
We’re all about making your life easier, so now when you invoke a command like Extrude or Revolve, the command will check to see if it can auto-populate a selection for you, depending on how much information it has on the design. If there is only one profile visible, it will be automatically selected. If there are multiple profiles visible, it’ll leave it to you to select.
Improved! Rename derived components now available
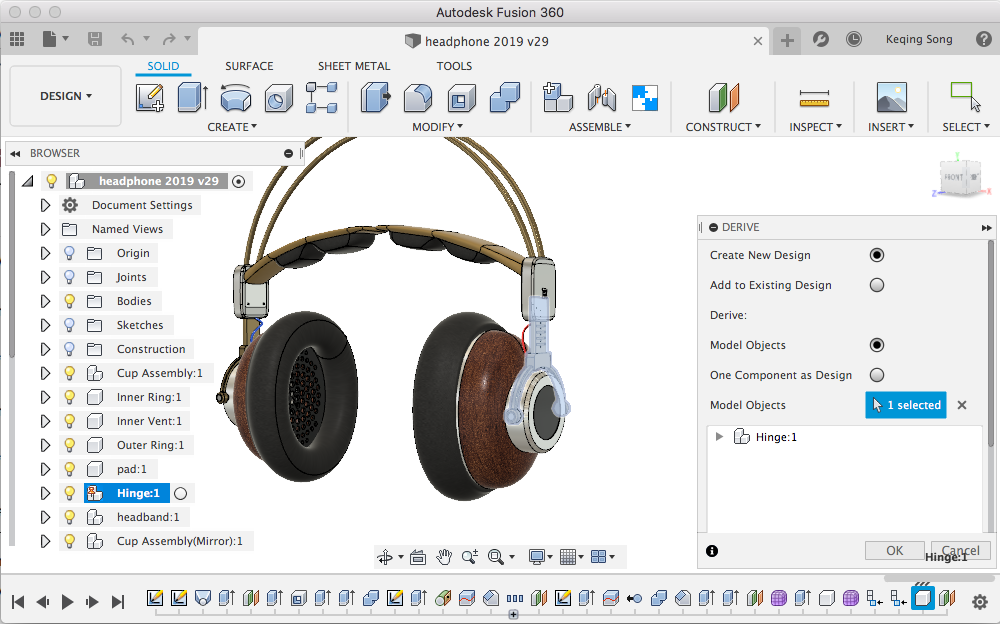
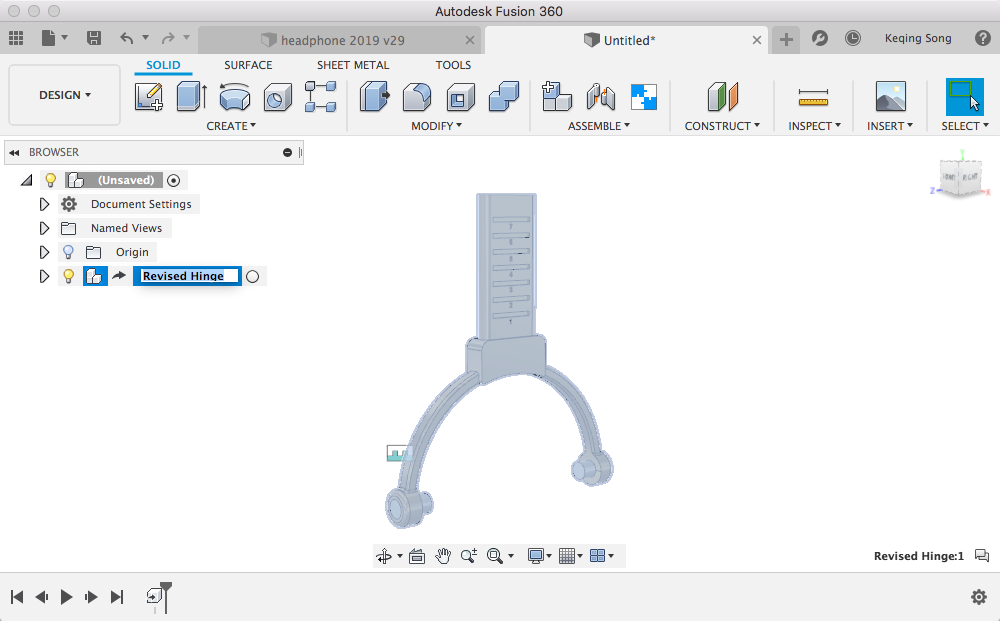
Previously when you derived a component, you didn’t have the option to rename the derived component to something else. Now you can!
Notable Fixes:
We fixed an issue where Fusion 360 crashed when you tried to Switch Rule for Sheet Metal rules from the browser when a sketch is active. Sorry about that, we got this sorted!
A hole on a flat pattern did not want to update even after the flat pattern has changed. We gave it a stern talk and now it’ll behave as expected.
New! Control Point Frame in Insert SVG
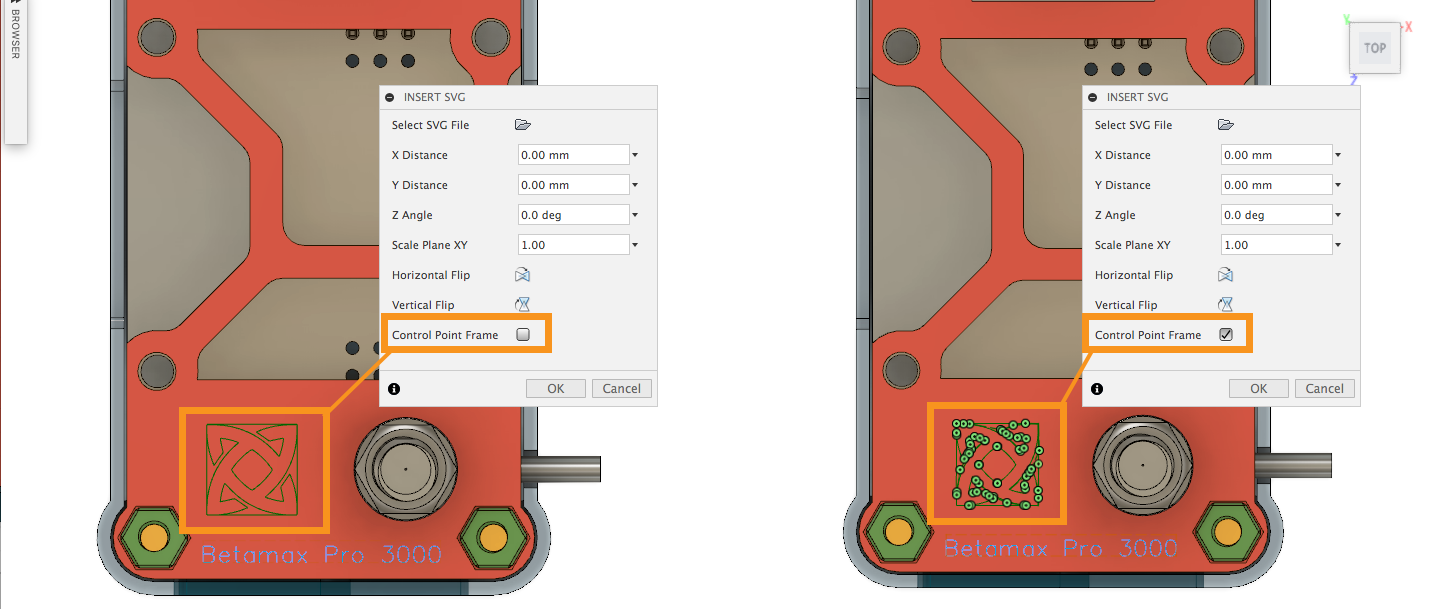
Now when you insert a SVG as a sketch into Fusion 360, the Insert SVG dialog now contains an option for you to turn on/off Control Point Frame, so you can edit those SVG edges as control point splines.
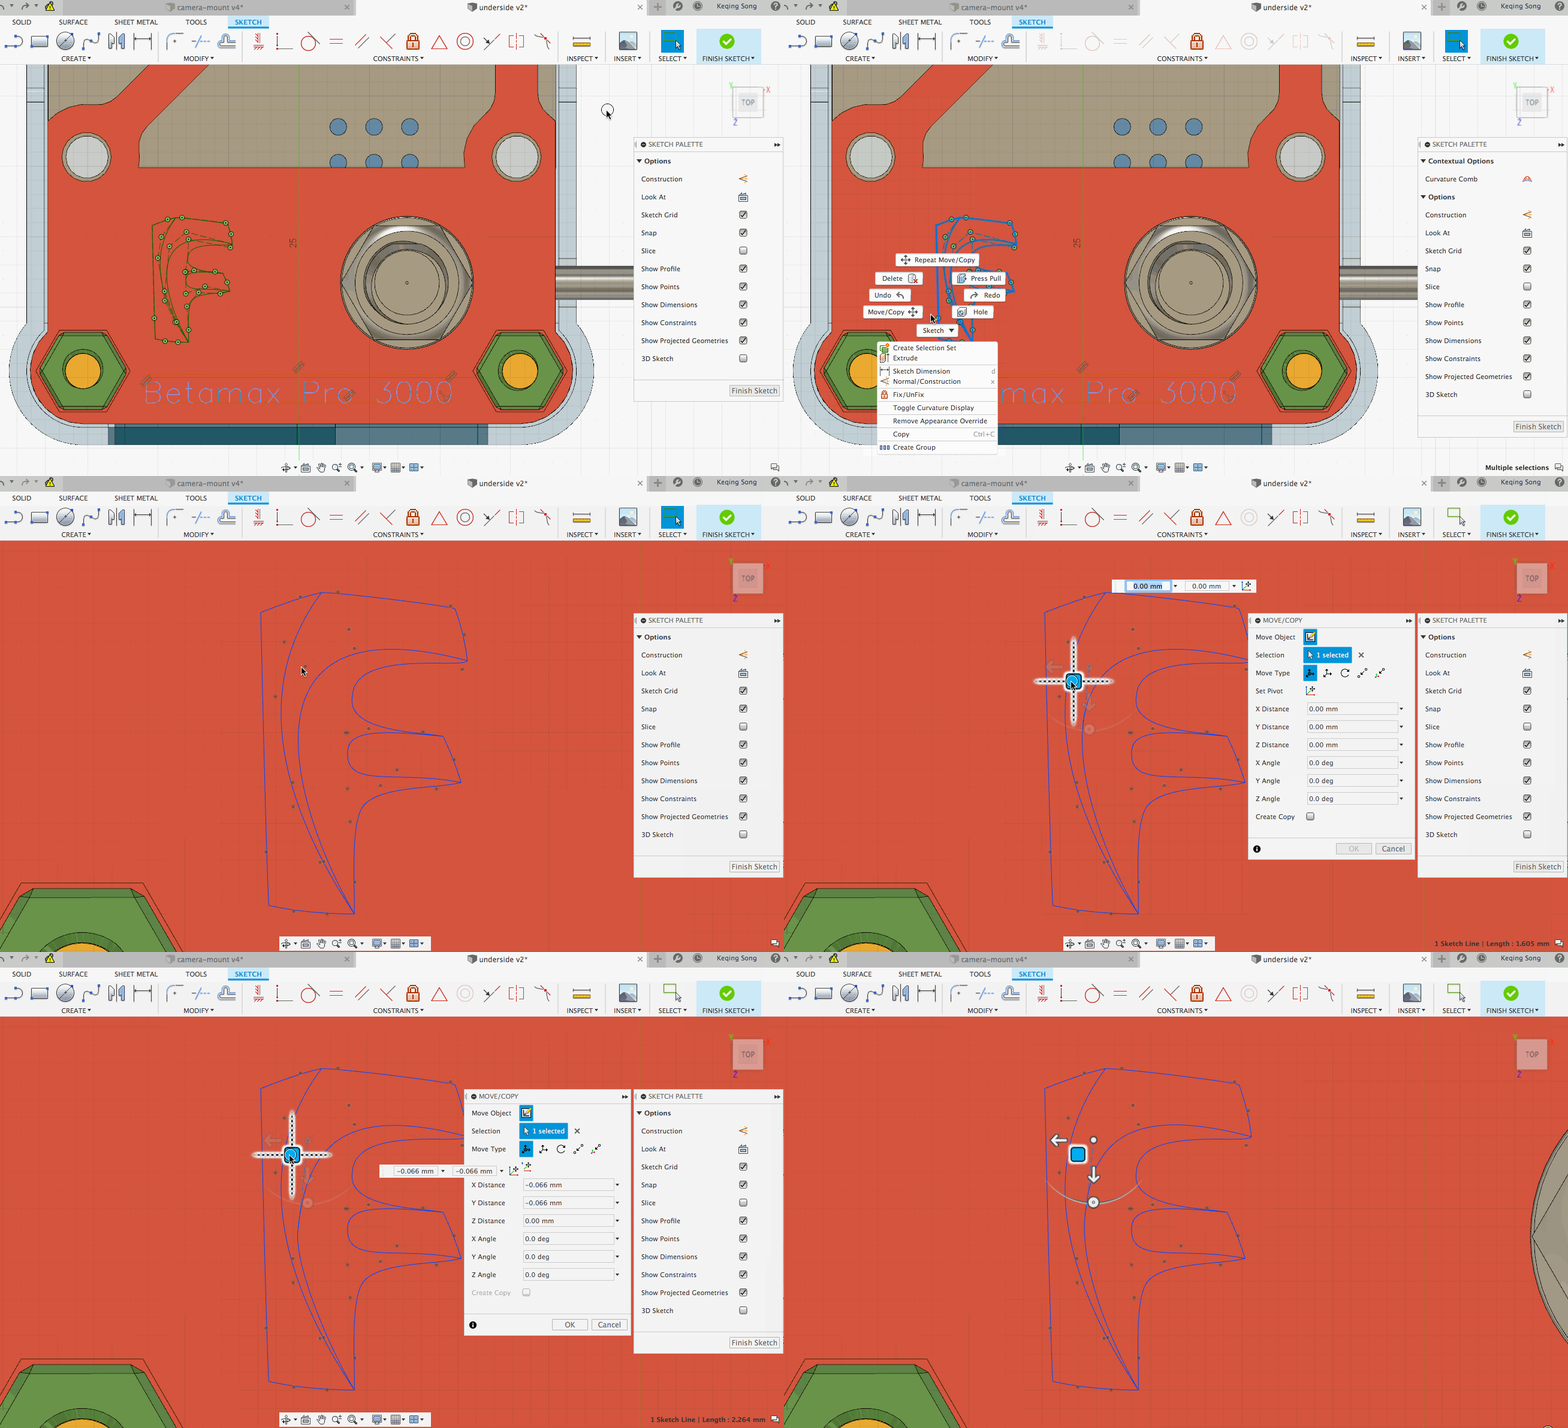
Pro-tip – if you’ve inserted a SVG with this option turned on, you’ll see green control points all over your SVG sketch. To make them editable, window select the whole sketch, right-click and pick “unfix”. This will unfix the points so that they become editable.
Improved! Create Tangent Constraint between two 3D Curves
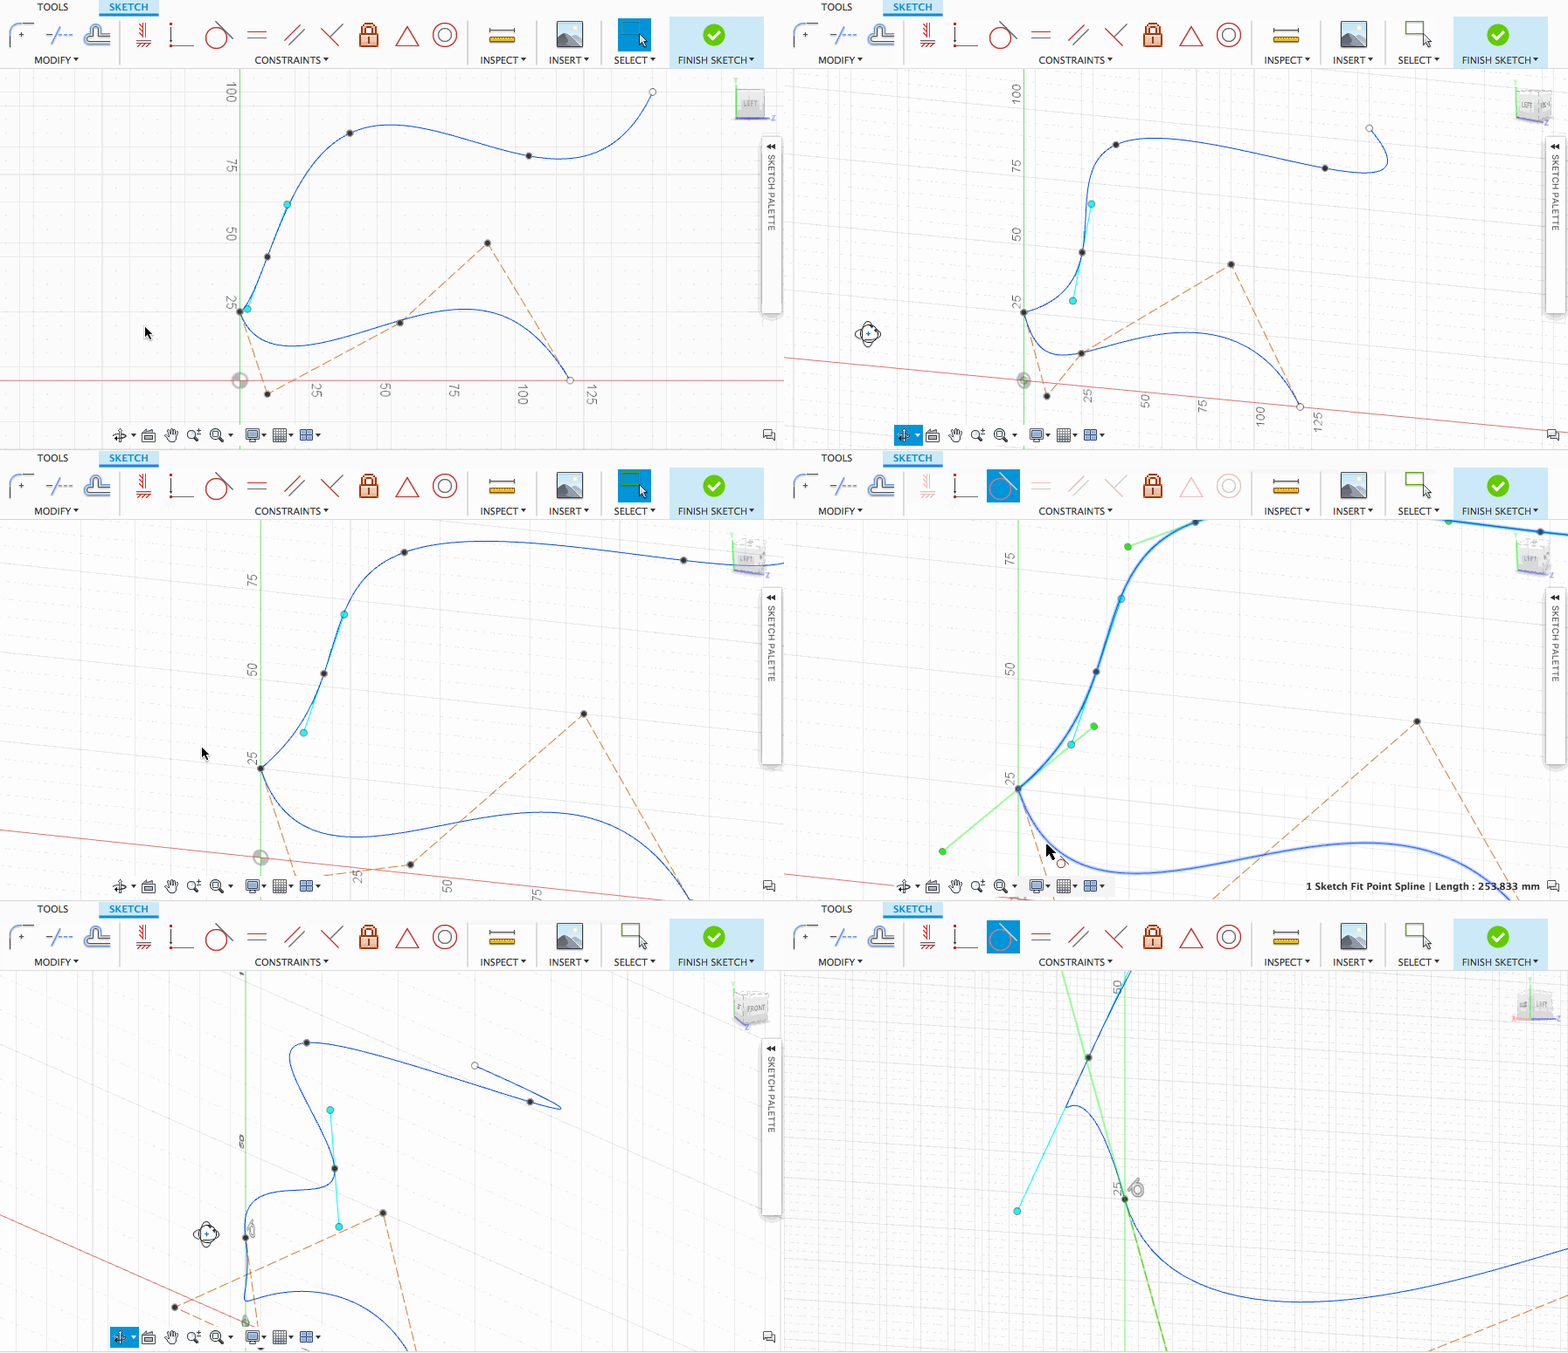
You can now constraint two 3D spline sketches that are connected to each other with a tangent constraint so the two ends become tangent to one and another. Dandy.
Improved! Auto-project edges are now set to Off by default
There was a time not long ago where model edges were being automatically projected onto a new active sketch if you hovered over and placed a sketch on them. This caused confusion and frustration throughout the land. Now the option is turned off by default. If you wish this behavior to return, feel free to turn it back on in your preferences.
Improved! Auto-select when single profile is visible
If only one sketch profile exists, Fusion 360 will auto-select that profile for Solid Extrude, Solid Revolve, and Surface Extrude as well as Surface Revolve.
Fixed: HughesTooling reported an issue where if you accidentally started to drag a line while in the Dimension tool, the dragging caused Fusion 360 to think that you didn’t want to dimension anything anymore, so it would put it away. Now the Dimension tool will remain active until you’ve selected an edge for dimensioning.
Fixed: Navigation pivot point didn’t reset to the sketch origin when you created a new sketch. Now it does.
Fixed: When you dragged the child pattern element of an Ellipse pattern, the result doesn’t match what you expect it to be. Now it should obey the laws of the pattern used.
New! Default Material for Generative Design Studies
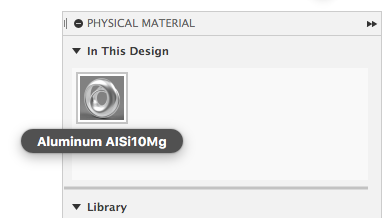
Looking at our usage analytics, we found that a bunch of users were trying to submit generative design studies without defining a material. To help reduce the number of false starts, we have added a default material for all studies. Don’t worry, if you don’t want to use Aluminum AlSi10Mg, you can simply remove it and add the materials of your choice.
New! Arkema Rilsan®polyamide 11 now available for Generative Design and Simulation
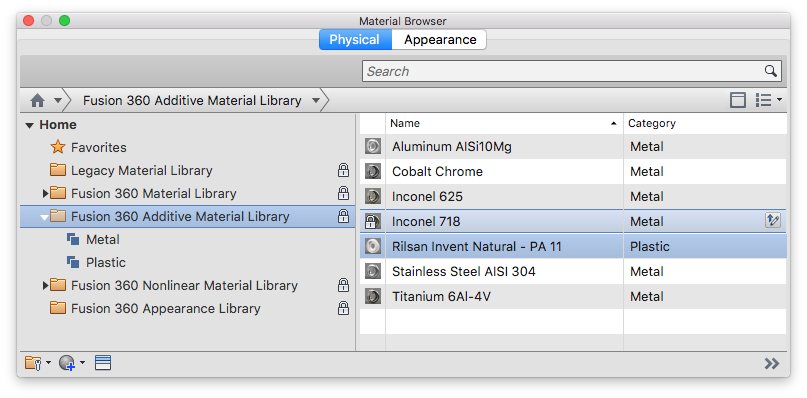
At TCT Asia, Autodesk announced a collaborative partnership with Arkema and Farsoon for advanced additive manufacturing processes. Read more here. As part of this partnership, we have added an approximated (isotropic) version of Rilsan® polyamide 11 to the Fusion 360 materials library accessible for both Generative Design and Simulation.
New! Open Exported Designs from Job Status Dialog
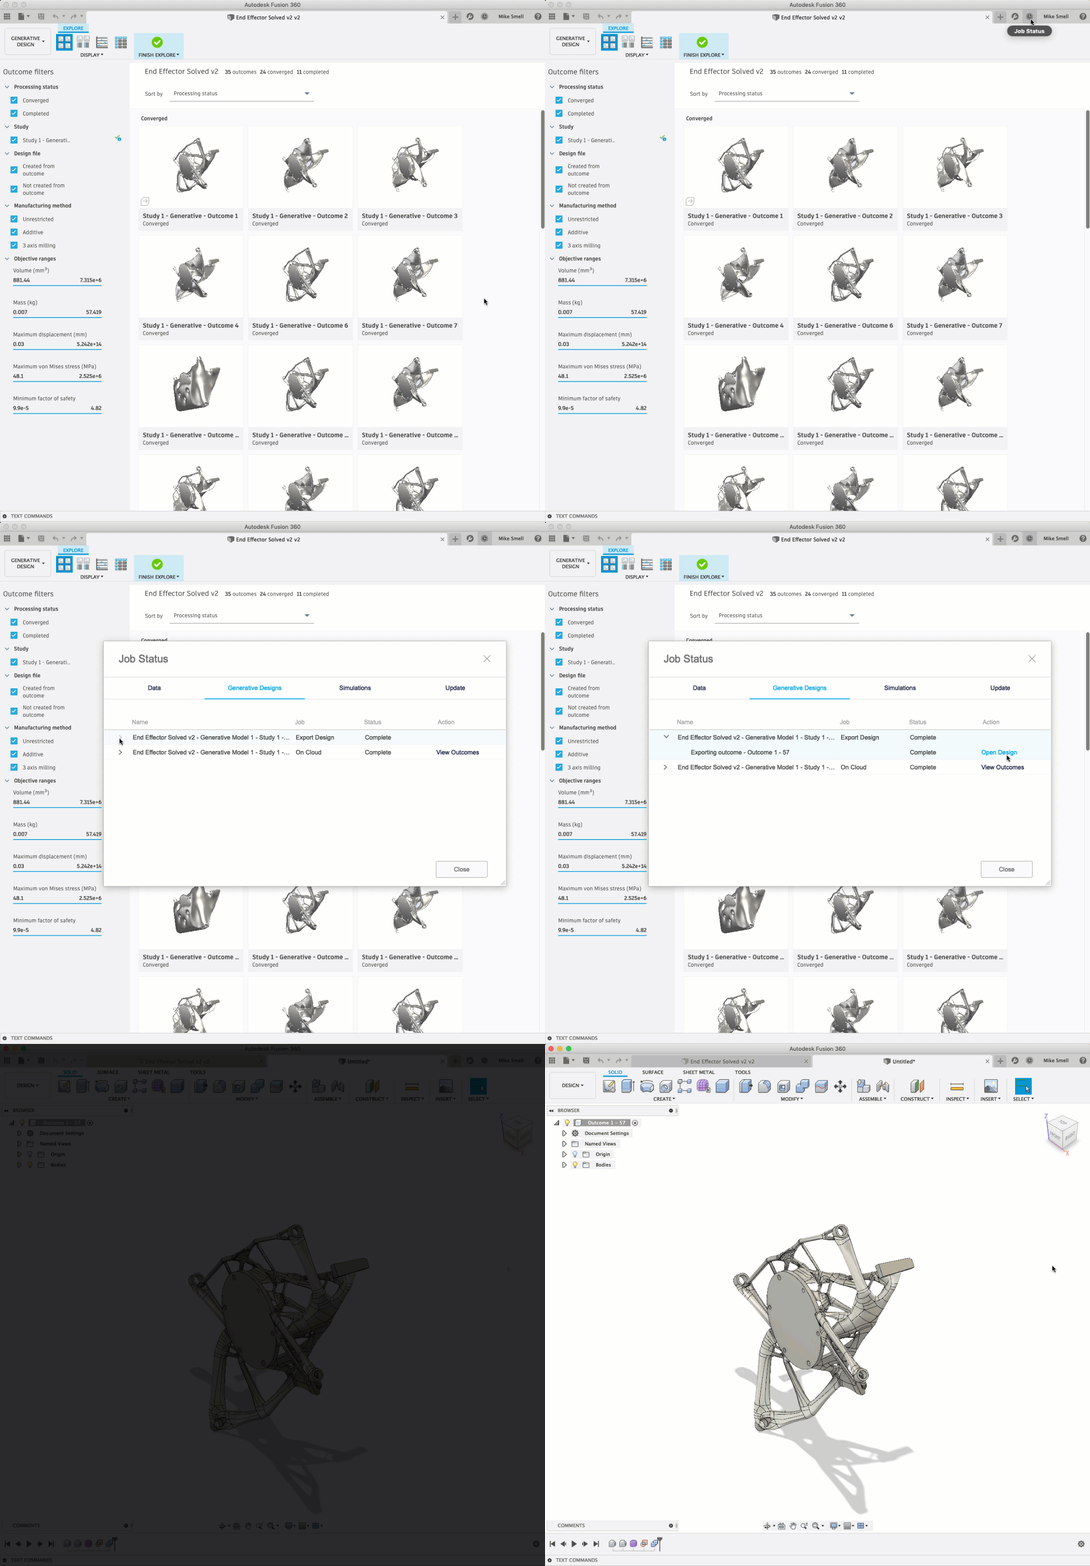
Previously, when you exported an outcome from Explore and didn’t want to wait for it to open, you would have to find your way back to the specific outcome and iteration to be able to open it. Now, you can monitor the progress from the Job Status dialog, and when it completes, you will have an option to open directly, without having to go back to Explore. A real time saver for sure!
New! Converted Outcome Preview in Explore
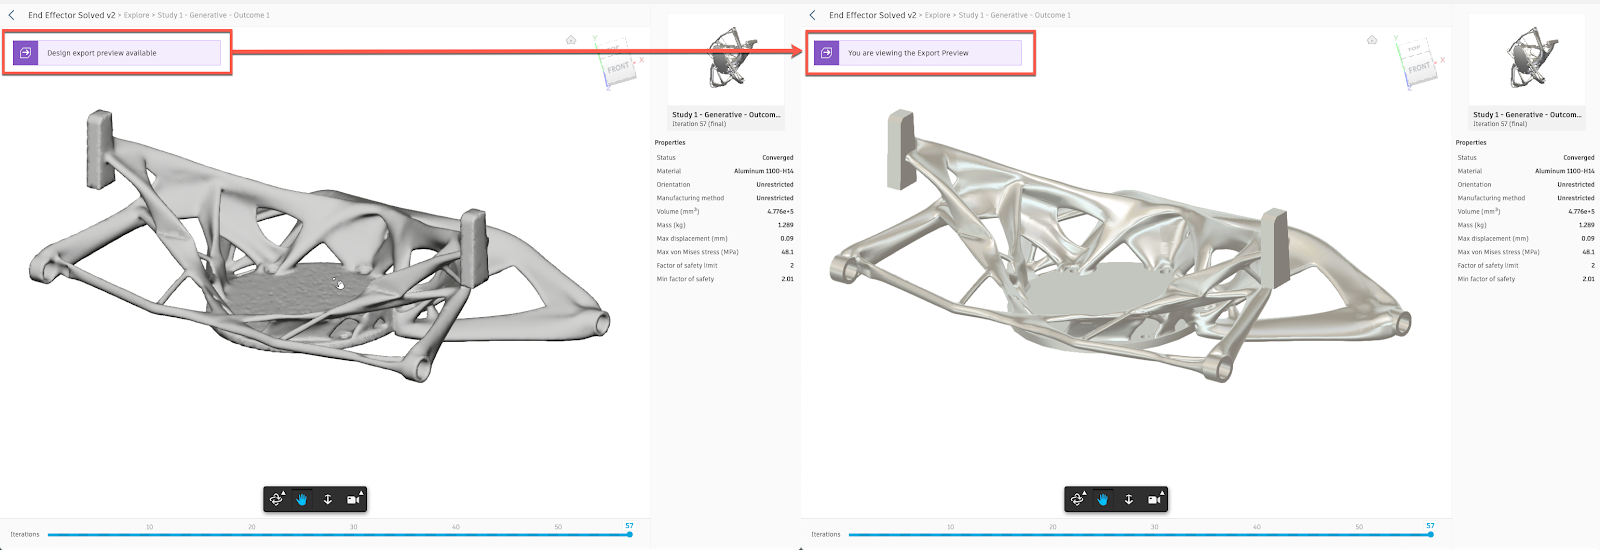
If you have been doing a lot of work in the Generative Design workspace, you have probably noticed that the outcomes displayed in Explore, don’t always look exactly like what you see once you download and open it in the Model workspace. Many of our users have also told us that sometimes, they are reluctant to download an outcome because of what they see in Explore. What you are looking at is a rendering of the mesh, but what you are getting in the Model workspace is the converted BREP design. In this update, all newly generated designs will also have a BREP conversion processed of the final iteration to allow for a better picture of what the design will look once opened in the Model workspace.
Improved! Outcome Samples Now Have Simulation Loads Included
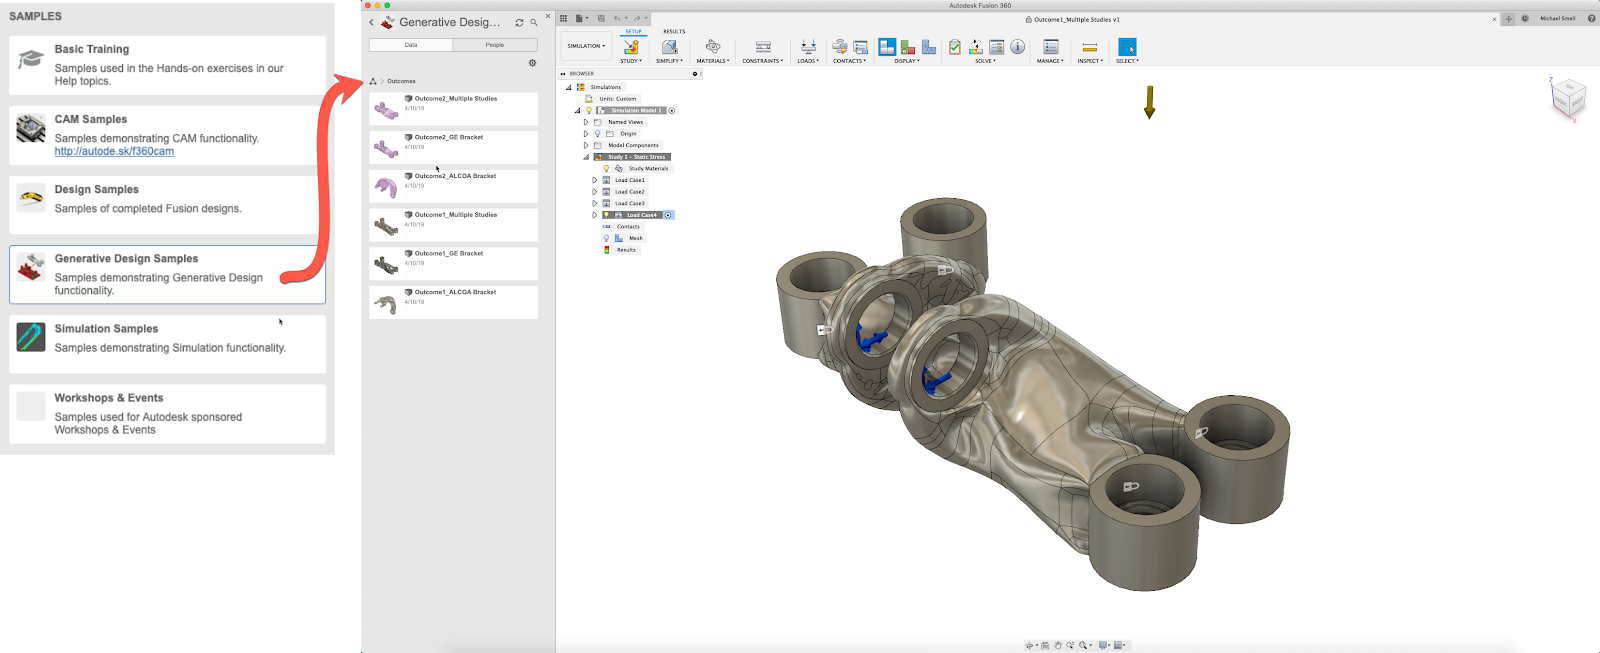
In our April update, we released the ability to reuse loads and constraints from the generative design setup on exported outcomes. Now, we have updated our Outcome Samples to include the loads and constraints for use in the Simulation workspace. If you are checking out our Outcome Samples, they will be ready to run in the Simulation workspace, just like if you went through the entire workflow yourself.
Fixed: Kchhaje told us that they were having problems with a Shape Optimization failing without a clear reason why. We found that the material properties were incomplete, but our Pre-check was not catching it. We fixed up our Pre-check to make sure these types of incomplete setups don’t slip through and fail.
Fixed: Some of you reported that your drawing templates caused hidden edges to appear as solid edges instead of dashed. Now they are back to being solid.
New! Create NC Programs
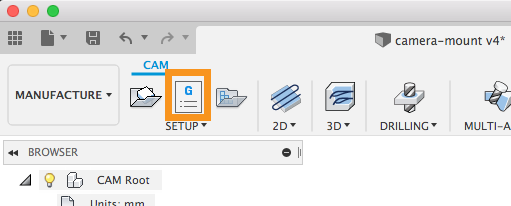
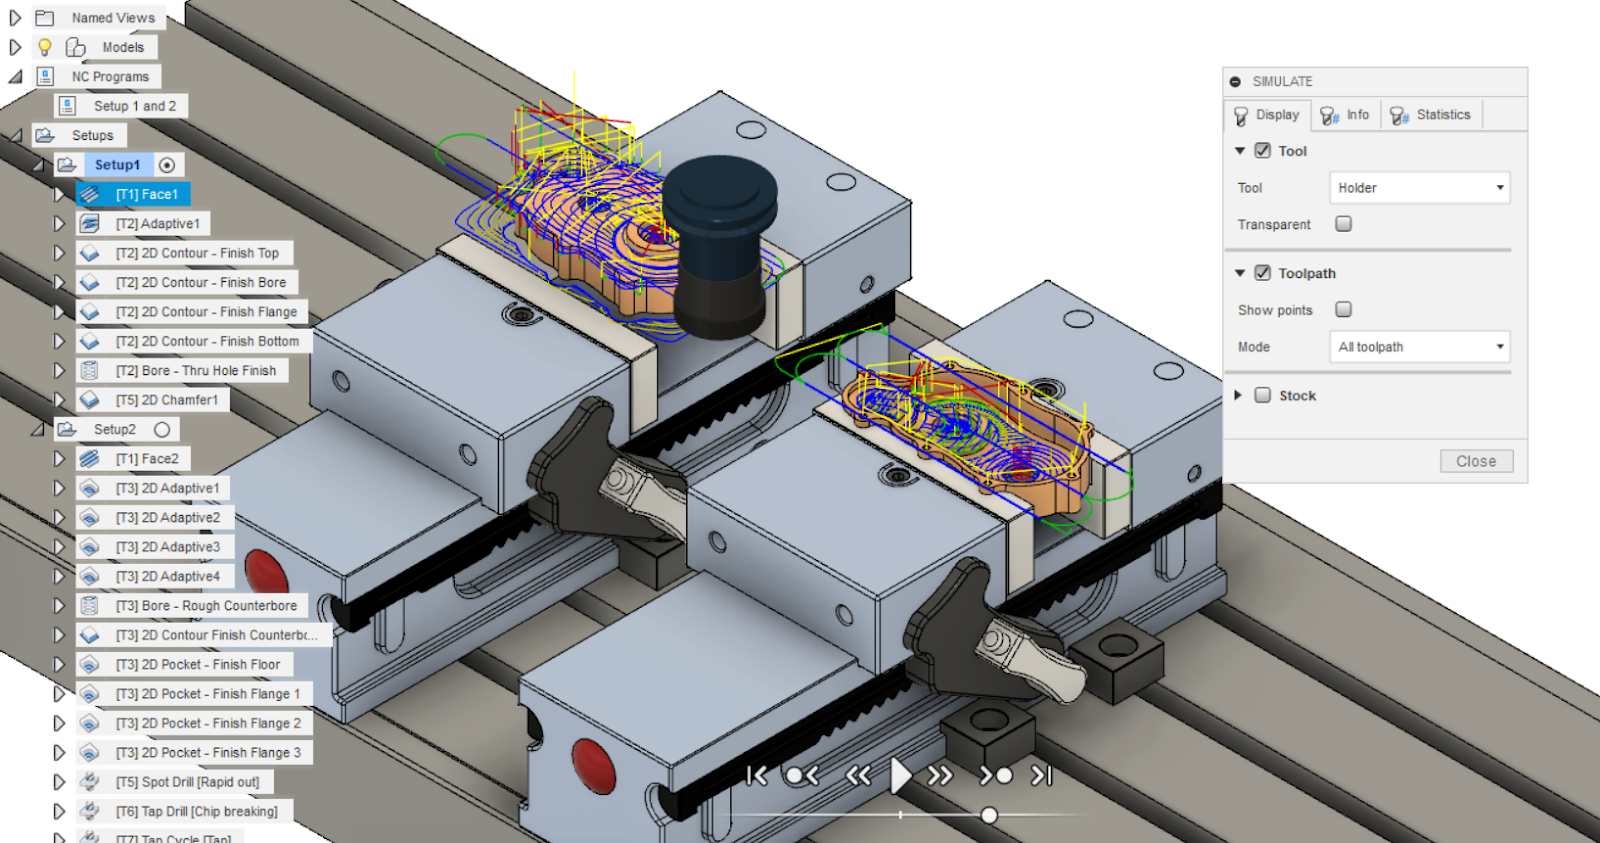
“NC Programs” has been added to the manufacture workspace. By creating an NC Program, a CNC programmer will have more control and visibility over the operations that will be included in a program, as well as the order in which those operations occur. Special scenarios that previously could not be reviewed without post processing, such as optimizing the number of tool changes for a program that contains multiple setups that share tools, can now be correctly simulated and verified before post processing. In addition, the program and post processor settings in an NC Program are saved.
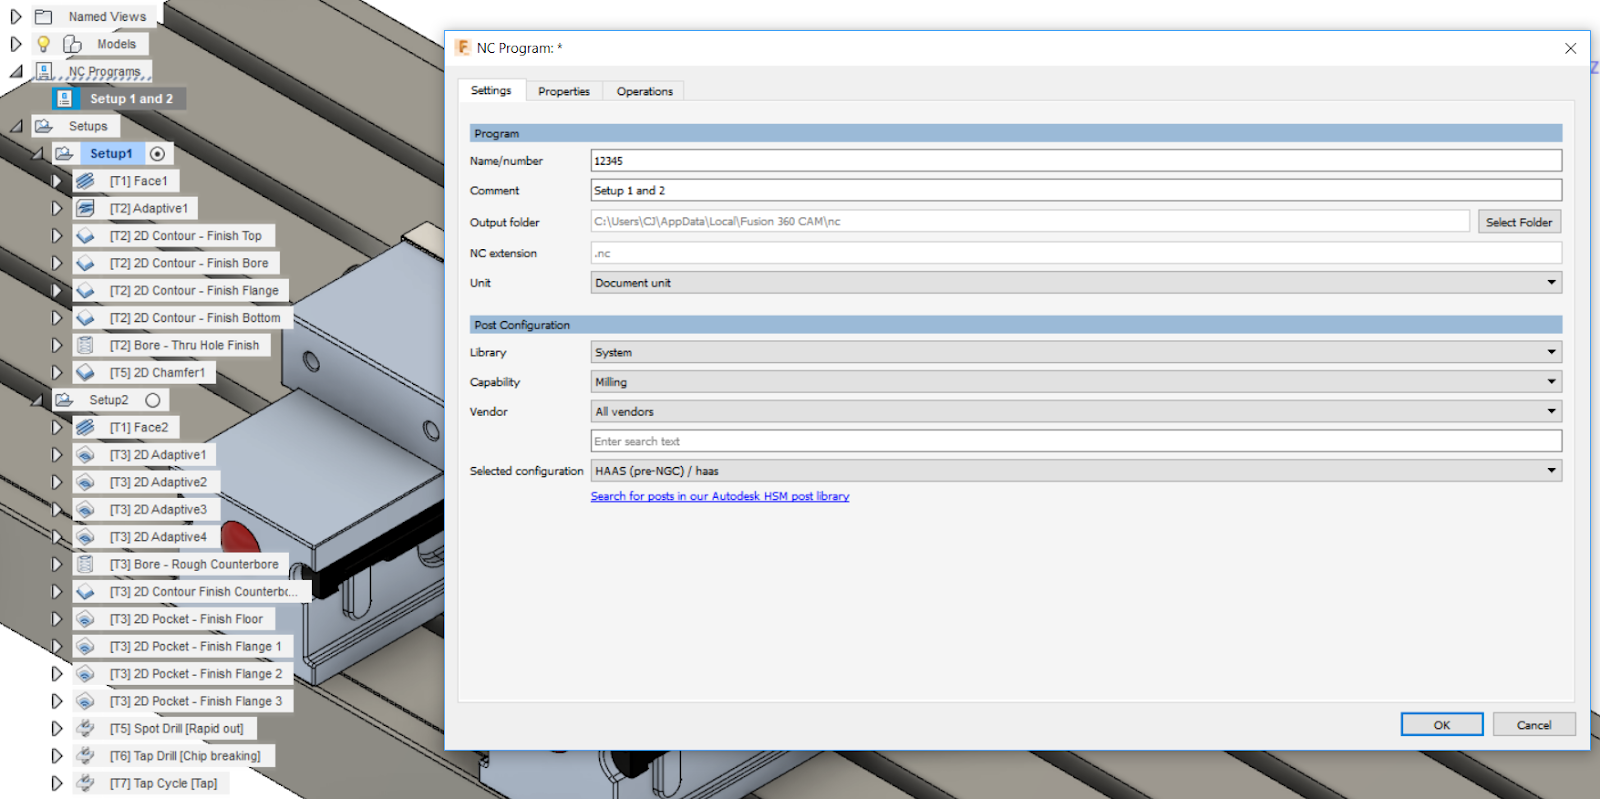
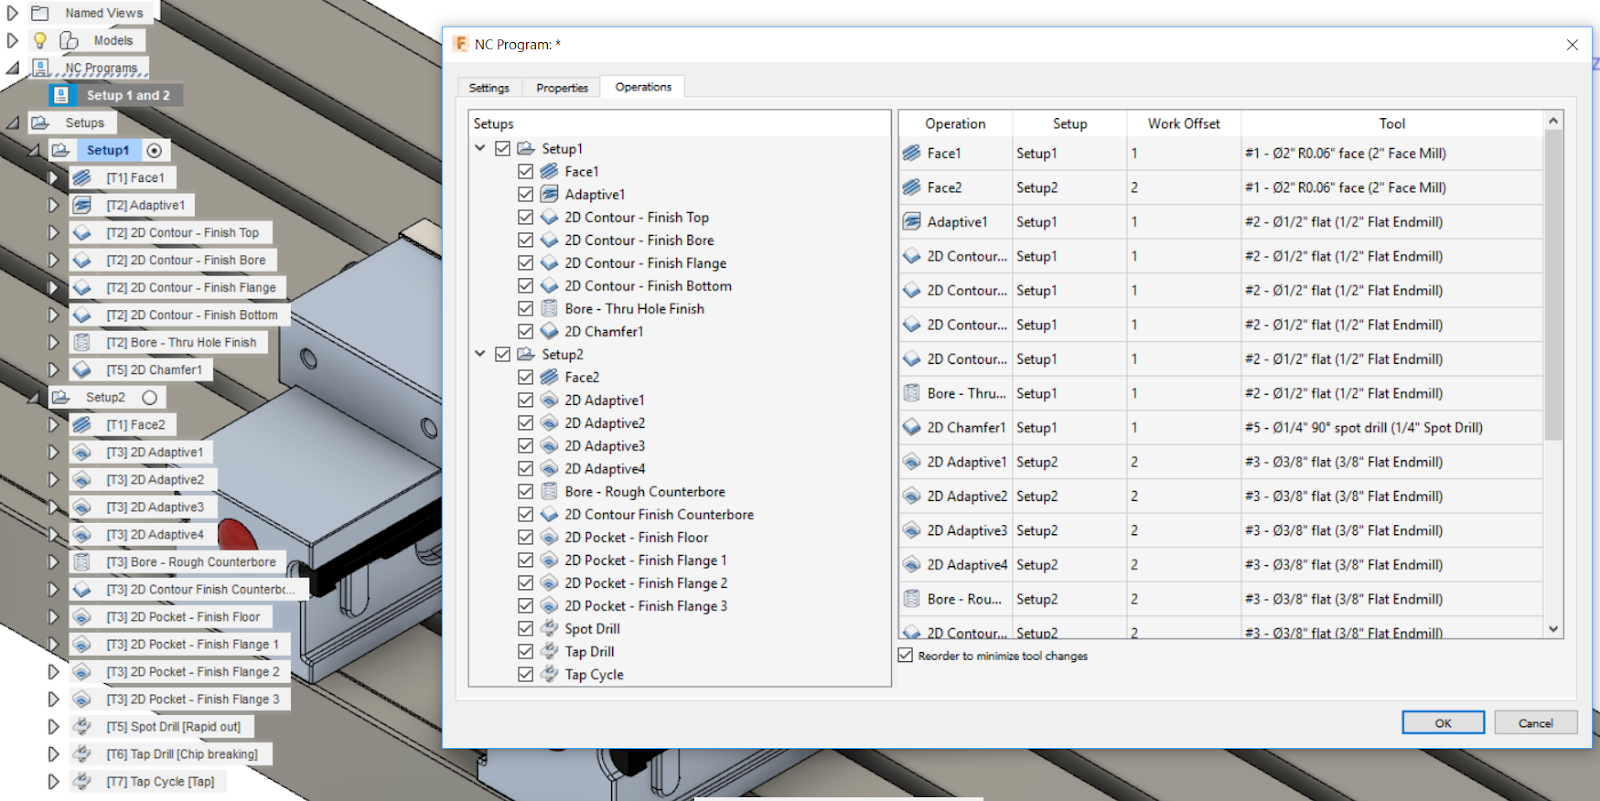
This means that NC programs for different machines can all be posted without opening the post dialog to change the post or the settings! Finally, an NC program tracks the status of posted code, and the NC Program icon will change if the posted code is out of date.
New! Add retract X for parting operation
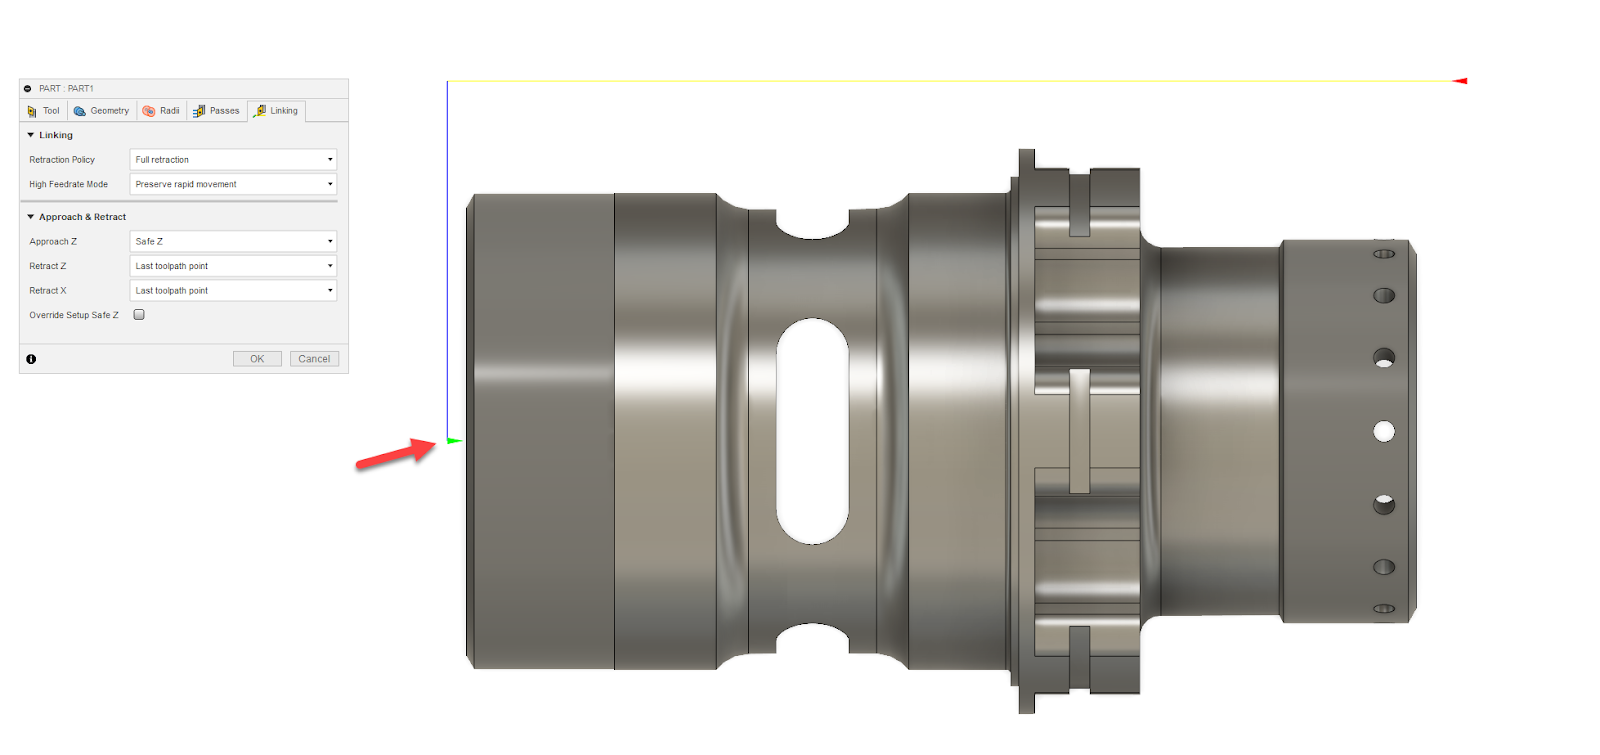
A critical application for retract X is in Swiss machining where, after cut-off, the tool needs to remain at the last tool-path point in both X and Z so that re-chucking can be done without the stock flying out of the guide bushing. To enable this, we’ve added a Retract X parameter in the “Approach & Retract” group in the links tab for parting. There are two options associated with the parameter – ‘Clearance’ and ‘Last Tool-path Point’, with Clearance being the default.
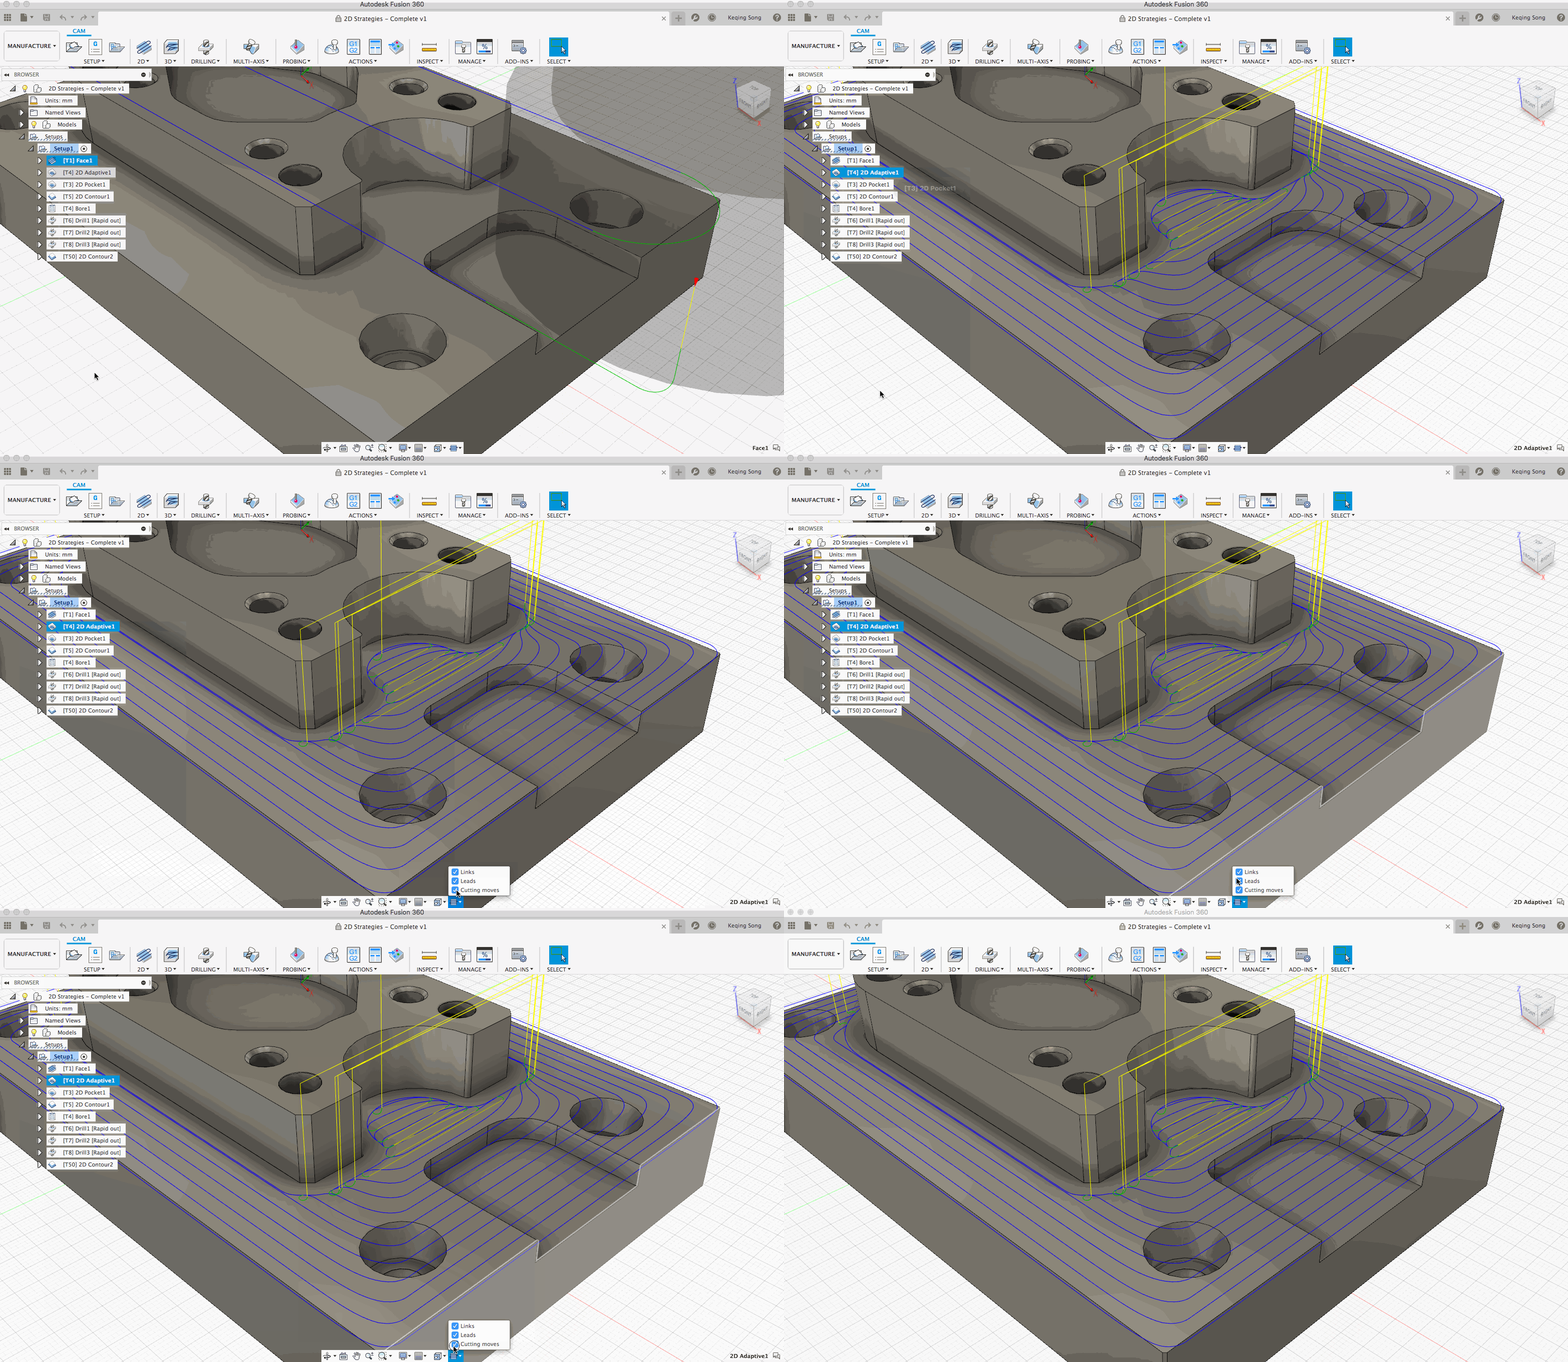
New! Display Tool-path without Leads or Links
New! Simplify Check for newWorkPlane
Post authors need to be able to easily check if a new work plane is needed for the current operation, so that they can add code to ensure the machine moves safely to the new work plane. We added a new global function called ‘isNewWorkPlane(section)’ which returns true if the passed selection requires new work plane calls, simplifying the checking process.
Improved! Set Better Defaults for turning and boring custom holders
For a general turning custom holder, the trailing angle has to be negative and the leading angle has to be positive according to angular conventions. We replaced the original defaults with better ones to help users out thanks to feedback from rachelCX3XK
Notable Fixes
That’s it for this one! We are more improvements and exciting functionality in the works, and we can’t wait to get it out to you all. Look out for the next update!
Cheers,
By clicking subscribe, I agree to receive the Fusion newsletter and acknowledge the Autodesk Privacy Statement.
Success!
May we collect and use your data?
Learn more about the Third Party Services we use and our Privacy Statement.May we collect and use your data to tailor your experience?
Explore the benefits of a customized experience by managing your privacy settings for this site or visit our Privacy Statement to learn more about your options.