& Construction

Integrated BIM tools, including Revit, AutoCAD, and Civil 3D
& Manufacturing

Professional CAD/CAM tools built on Inventor and AutoCAD
11 min read
You spoke up and we listened. We’ve got a bunch of goodies in the oven almost ready to go but are making sure that they are getting the bake time they deserve. In the meantime, we are doubling down on making Fusion’s core functionality better, faster, and more resilient.
Here’s what’s new in this update.
Why did we do this? Because of you. Well, not you Tony Bennet – let me explain.
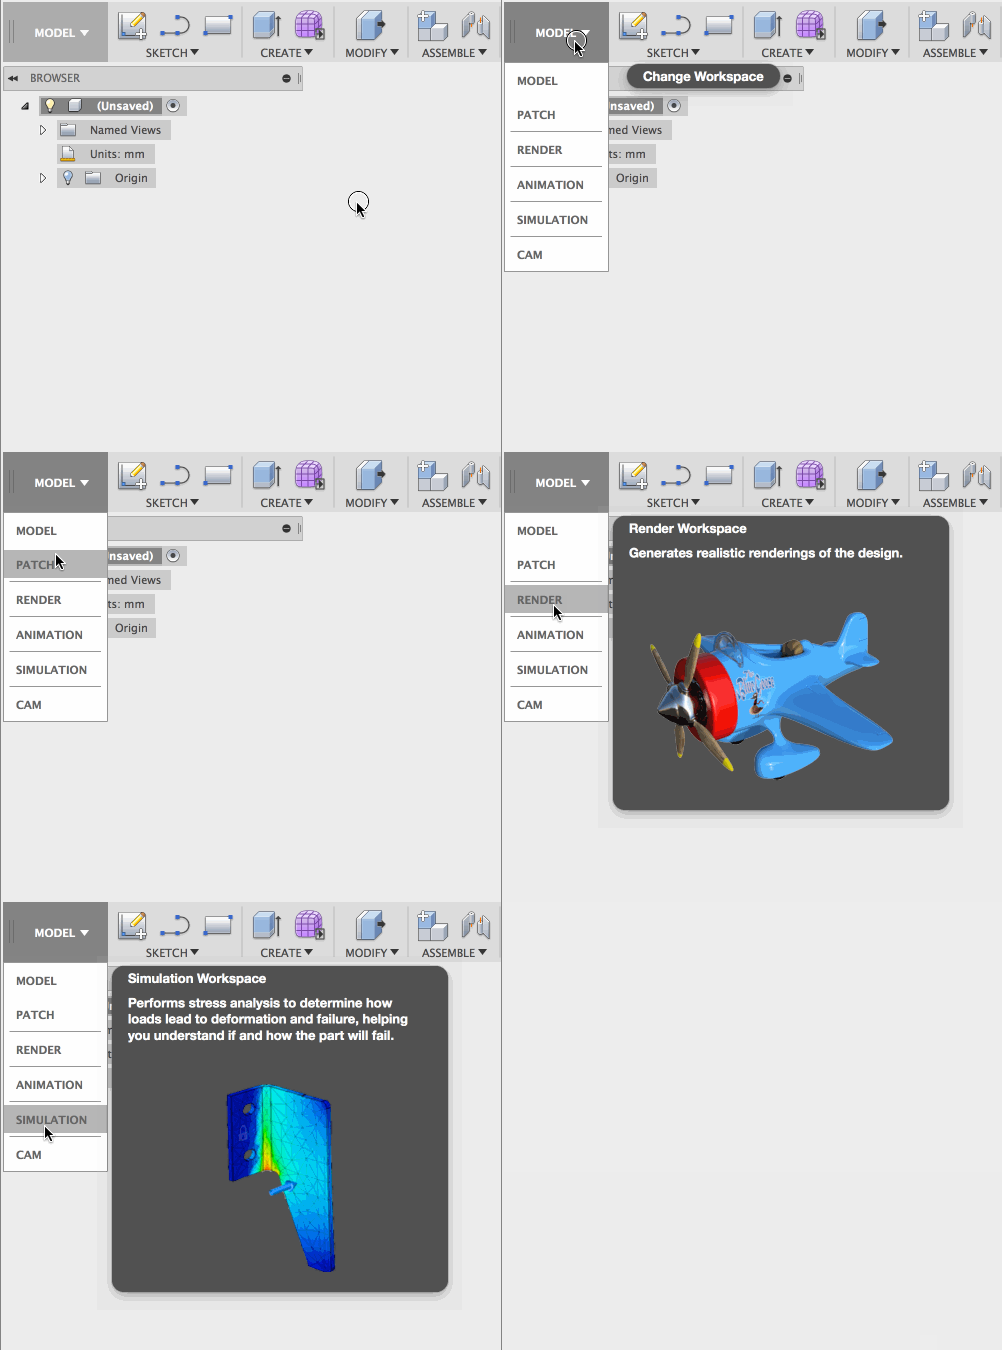
We’ve been hearing pretty regularly now that when you went into Fusion for the first time, you didn’t notice that there is a workspace switcher. Maybe it’s because the color, suggesting that it was grayed out and inactive? Hence we went back to the drawing boards, removed the icons, cleaned up the menu, and provide tooltips for each workspace.
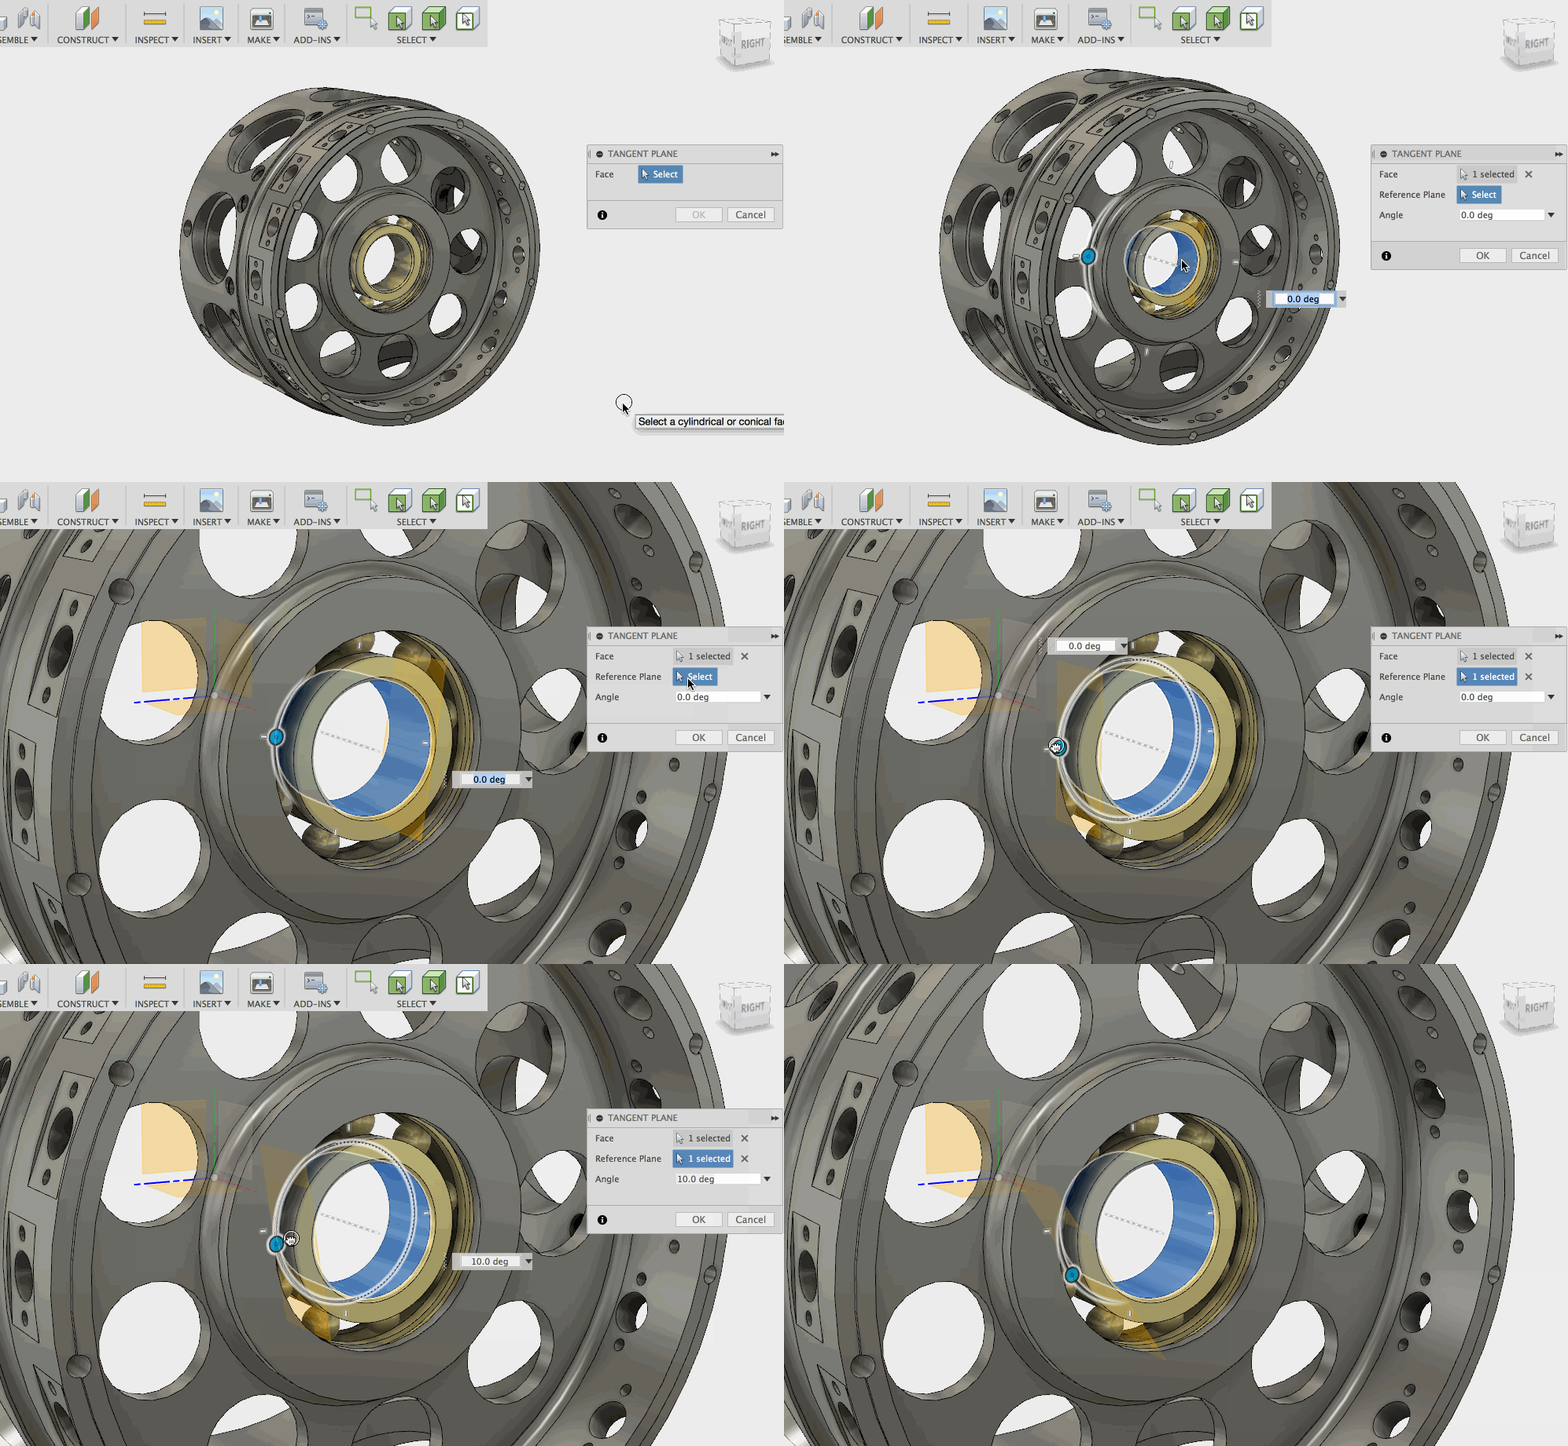
Tangent Plane now lets you select reference plane – Previously when you put a Tangent Plane on a cylindrical face, you had the option to give that tangent plane an angle, but it wasn’t helpful since you had no way to know what the angle is referring to. Now when you do it, you can select a reference plane and confidently set your angle, knowing exactly what plane it is referring to. Nice.
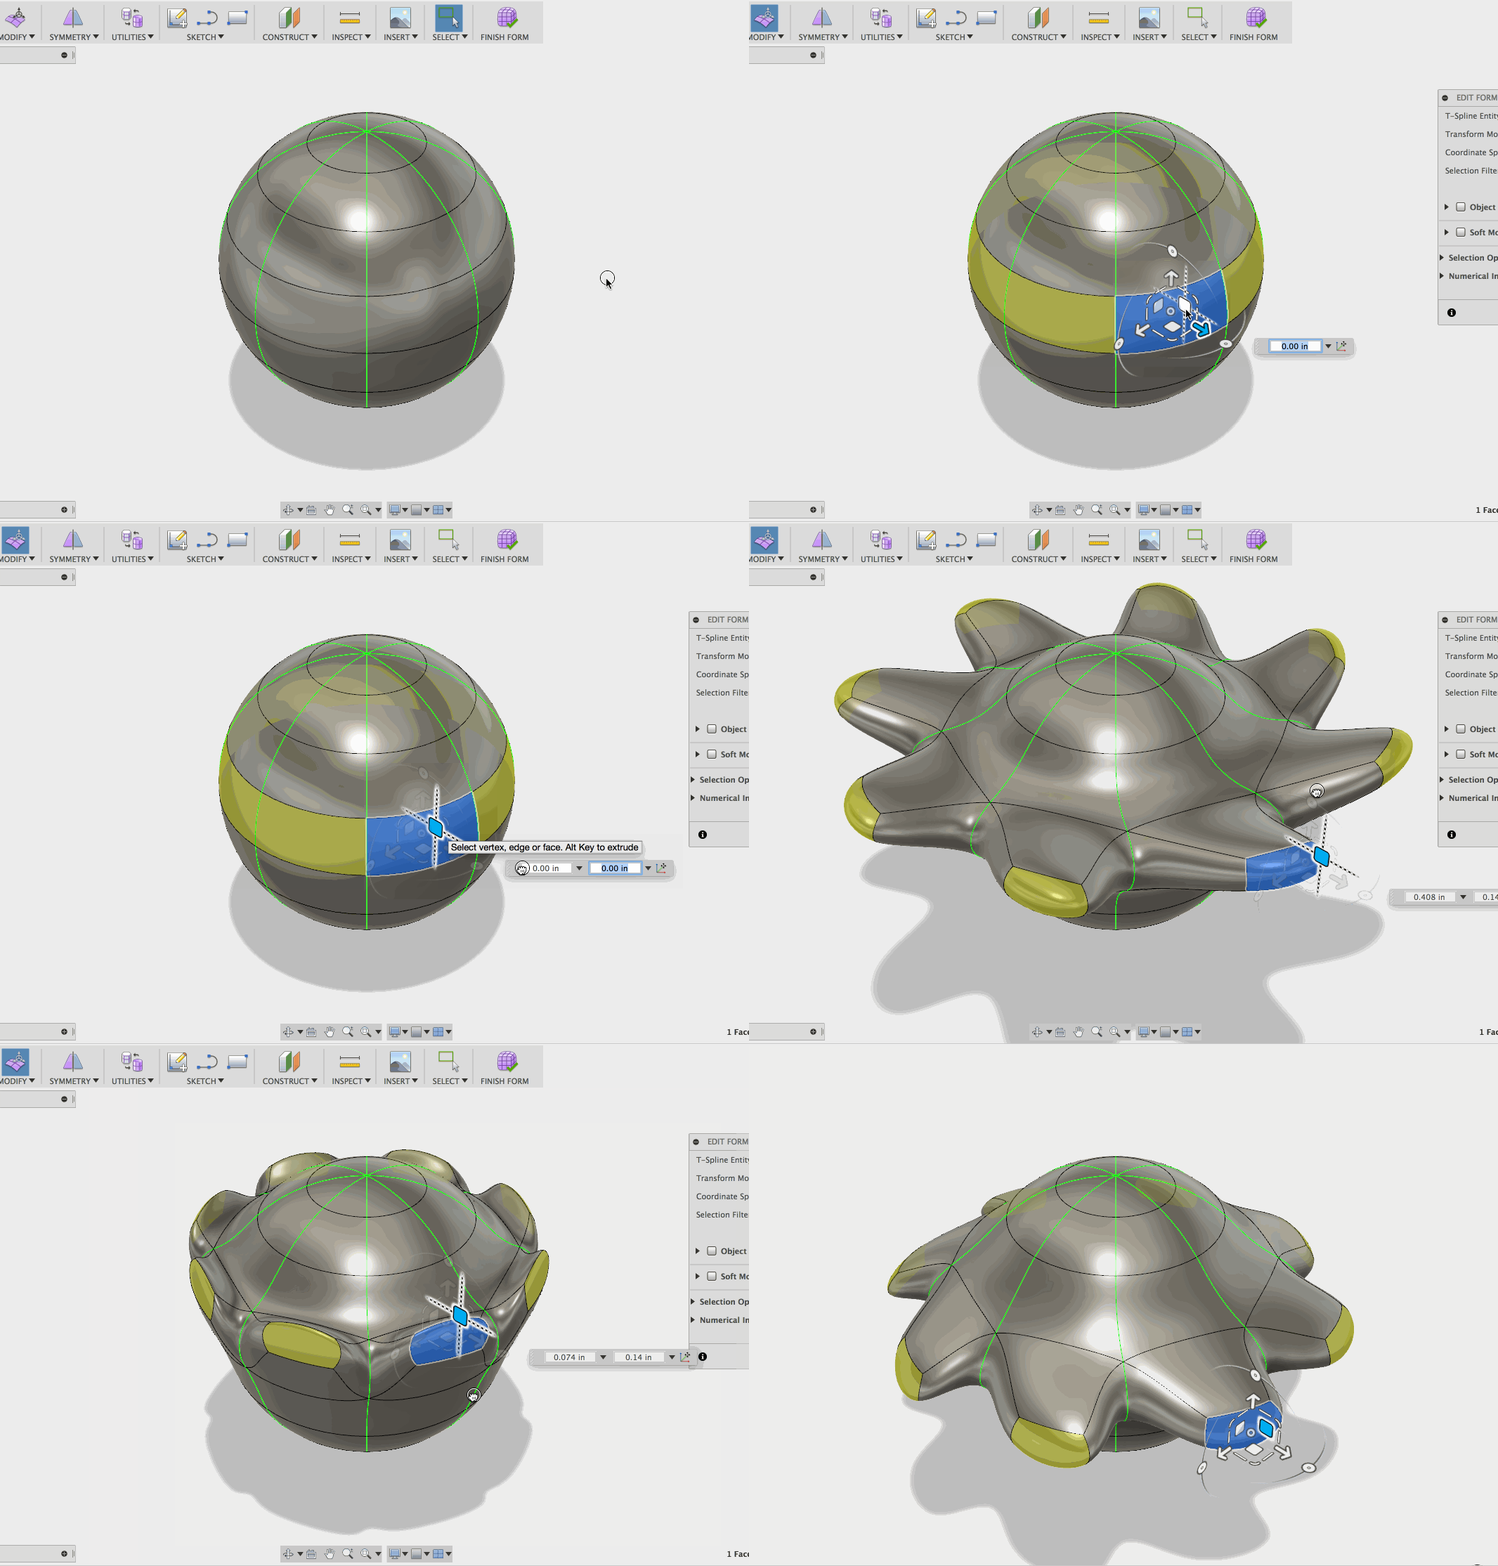
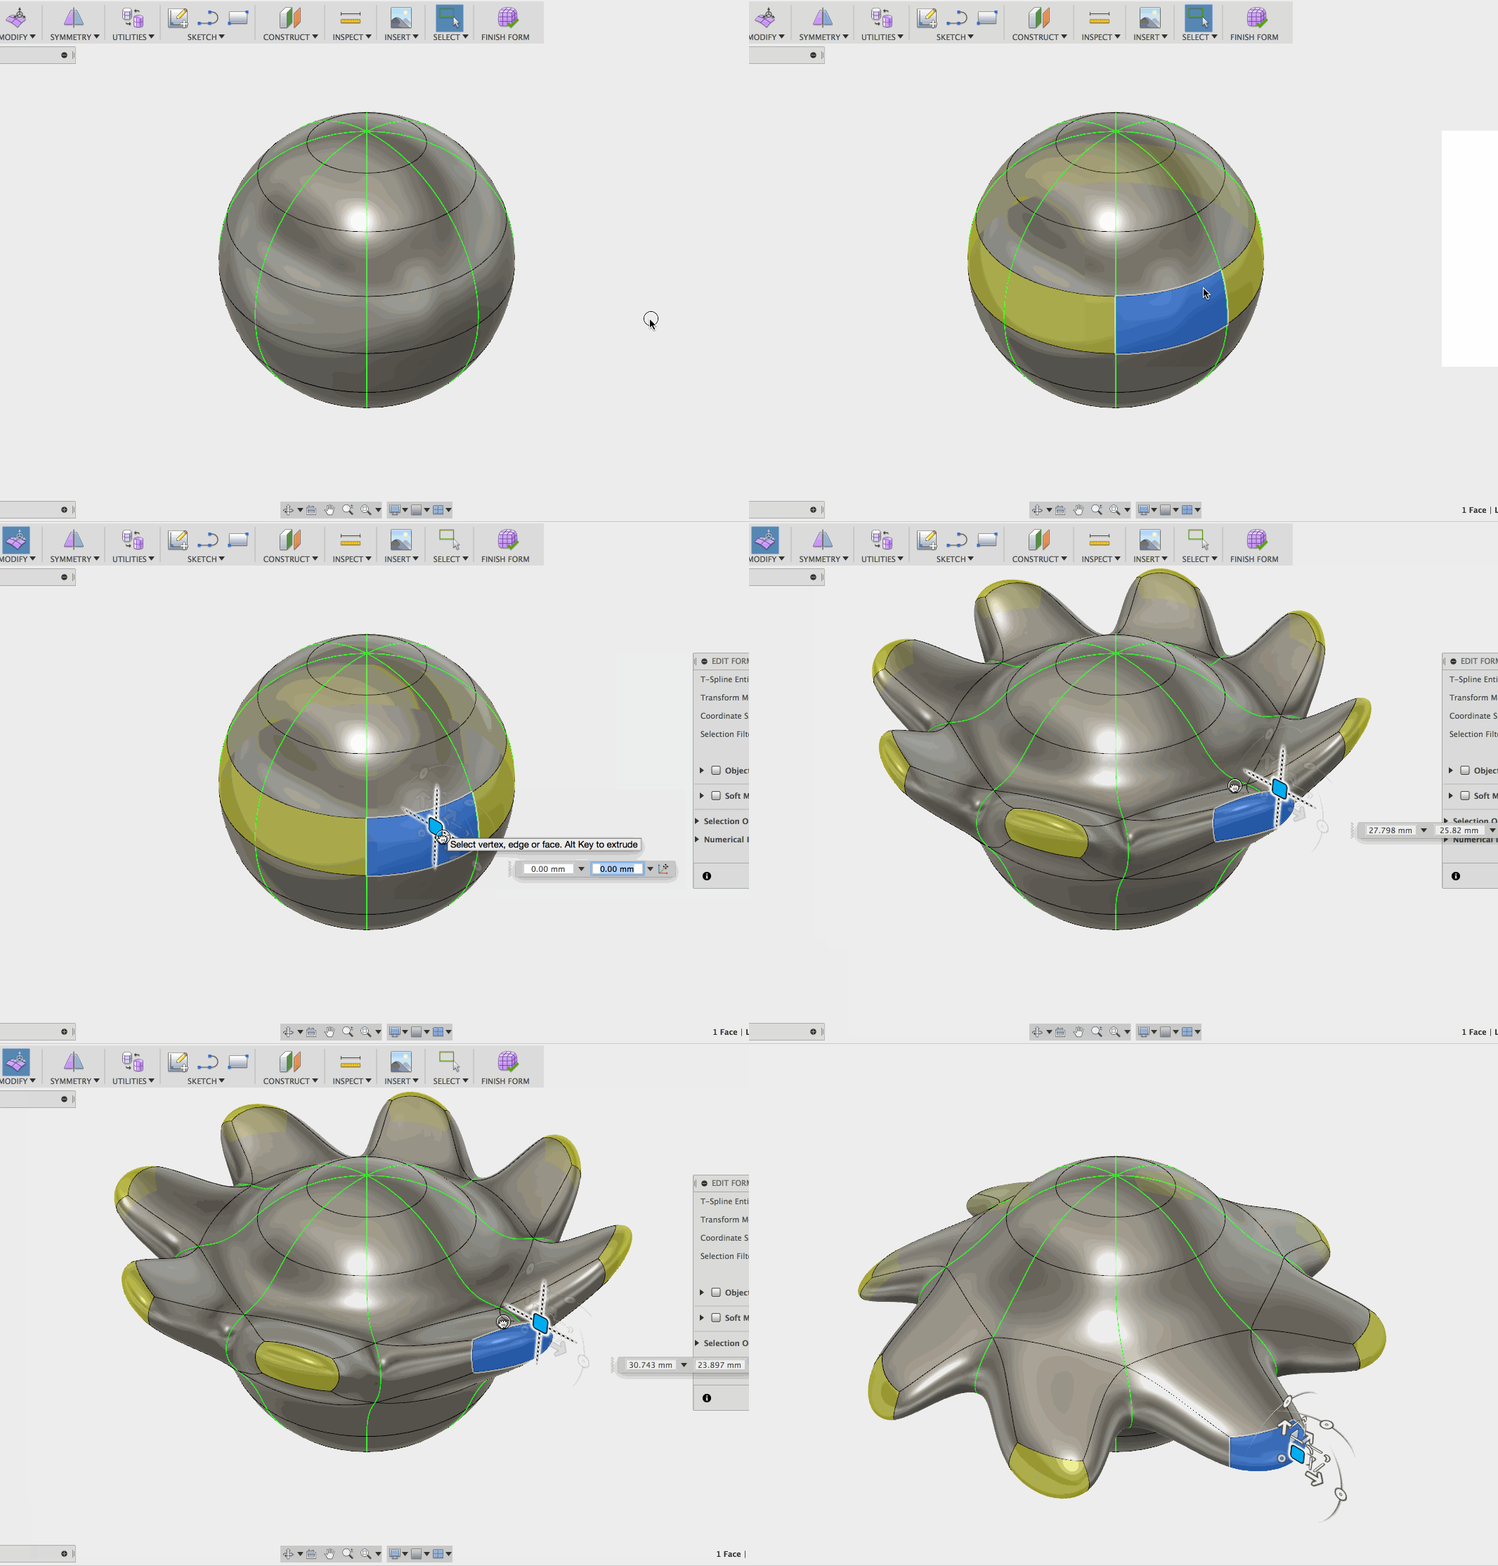
Better T-Spline performance – Check this out. The T-Spline sphere at the left was before the update, and the T-Spline sphere at the right is after the update. Notice when I tried to ALT + drag a face, the action on the left is pretty choppy. I did the same thing after the update and the action is significantly smoother. Awww yeah.
And now, I bring you fix highlights:
Fix – This was an important one to get right. HughesTooling and Beyondforce have been experiencing a constraints bug where if you have any projected geometry or offset geometry in a sketch, the constraint inferencing to the offset curves did not actually create any constraints. The inferencing seem to be the issue since you can create constraints afterwards and they will behave correctly. This is now fixed! As our jeff.strater puts it, “thanks guys for the detective work”.
Fix – TrippyLighting found an issue where construction lines didn’t look like the way they did before. Somehow their colors changed and became solid lines instead of dashed lines. As our graphics experts looked into this, we found that it was related to a component issue. It is now fixed.
Fix – Eahutker reported this Sculpt issue where the edit option in a few of his sculpt features have disappeared from his right-click menu in the timeline. We thought it was a regression, but turns out it’s one of those hard-to-catch bugs that pop-up once in a blue moon. Nice catch! We got it squared away.
Fix – Bensbenz posted a week ago that he was getting an nVidia driver crash after working on SVGs in the Sculpting environment. This also triggered a bunch of wonky behavior in Fusion. Our teams promptly looked into this issue made some tweaks the code and now we no longer see this issue.
Fix – Matthew_Curran ran into a parameters issue where his model did not update after he had set his own parameters. Fusion just refused to compute. We’ve seen Fusion behavior like this before, where it’s immature sketch side will sometimes come out, and we were having none of it. After a serious talk, Fusion is playing nice now.
Fix – While testing our release candidate build, we found a Hole depth issue where if you set the Extents to “All”, hit OK, and then went back to edit the feature and changed the Extents to a specific distance, the resulting depth didn’t update and still remained as “All”. Oh Fusion – thought you could get away with it didn’t you? Not this time.
Fix – No one likes getting hit with an error message after they thought they did the right thing. Apparently that’s what happened when you tried to offset a curve after getting preview of what the offset is going to look like. If it wasn’t valid, you got a error message after you had clicked the OK button. Yeah…sorry about that. Now the error message pops up during the preview so you can adjust it before you commit.
Fix – When you have a shelled design, there are times where you want to select the inner edges as reference geometry for construction planes, such as “Plane at an Angle”. When you tried to select the vertical inner edges, they were un-selectable. Now they are.
Fix – In the new Mesh workspace preview, if you inserted a mesh body, had an area of that mesh body selected and wanted to insert a second one in the same design environment, it would come in with the first mesh body also selected. The manipulators used to move the second mesh body were also incorrectly placed on the first mesh body. What a mess. We got this sorted out.
Fix – Previously when you inserted a mesh body in the Mesh environment and switched over to the Sculpt environment to create T-Spline bodies, there wasn’t a way for you to turn off mesh body visibility. Now you can by going to the browser and clicking on the light bulb next to the mesh body to hide it.
Fix – Since we’re talking about mesh, when you right-clicked, you got Edit Form as one of your options in the marking menu. What was it doing there? Probably our oversight. We updated this to be Erase and Fill, which makes a lot more sense now.

Fix – When you uploaded NX designs to the data panel, our cloud translators brought in mesh versions of the bodies, in addition to the actual solid bodies you needed. Apparently this was a feature that was enabled by default, so we went ahead and turned it off. They now sync up as they should.
Fix – Previously if you created designs while you were in offline mode prior to the July 27th update, those designs didn’t appear in the data panel after your got the update.
Fix – Sometimes when you insert a pretty complex DXF file, it becomes close to unusable in Fusion because of all the points that appear on the sketch. Now we turned off the “Show points” for large DXF files so that you can use it without a hitch.
Fix – So there was this annoying issue where if you canceled the upload of a design via the data panel before it was done uploading, the thumbnail in the data panel would have the spinning icon indefinitely. This is now fixed*
Better section analysis – how better? Now when you perform one, the section views of your components will each be assigned a different color (the same as Component Color Cycling) so that it’s easier to tell them apart.
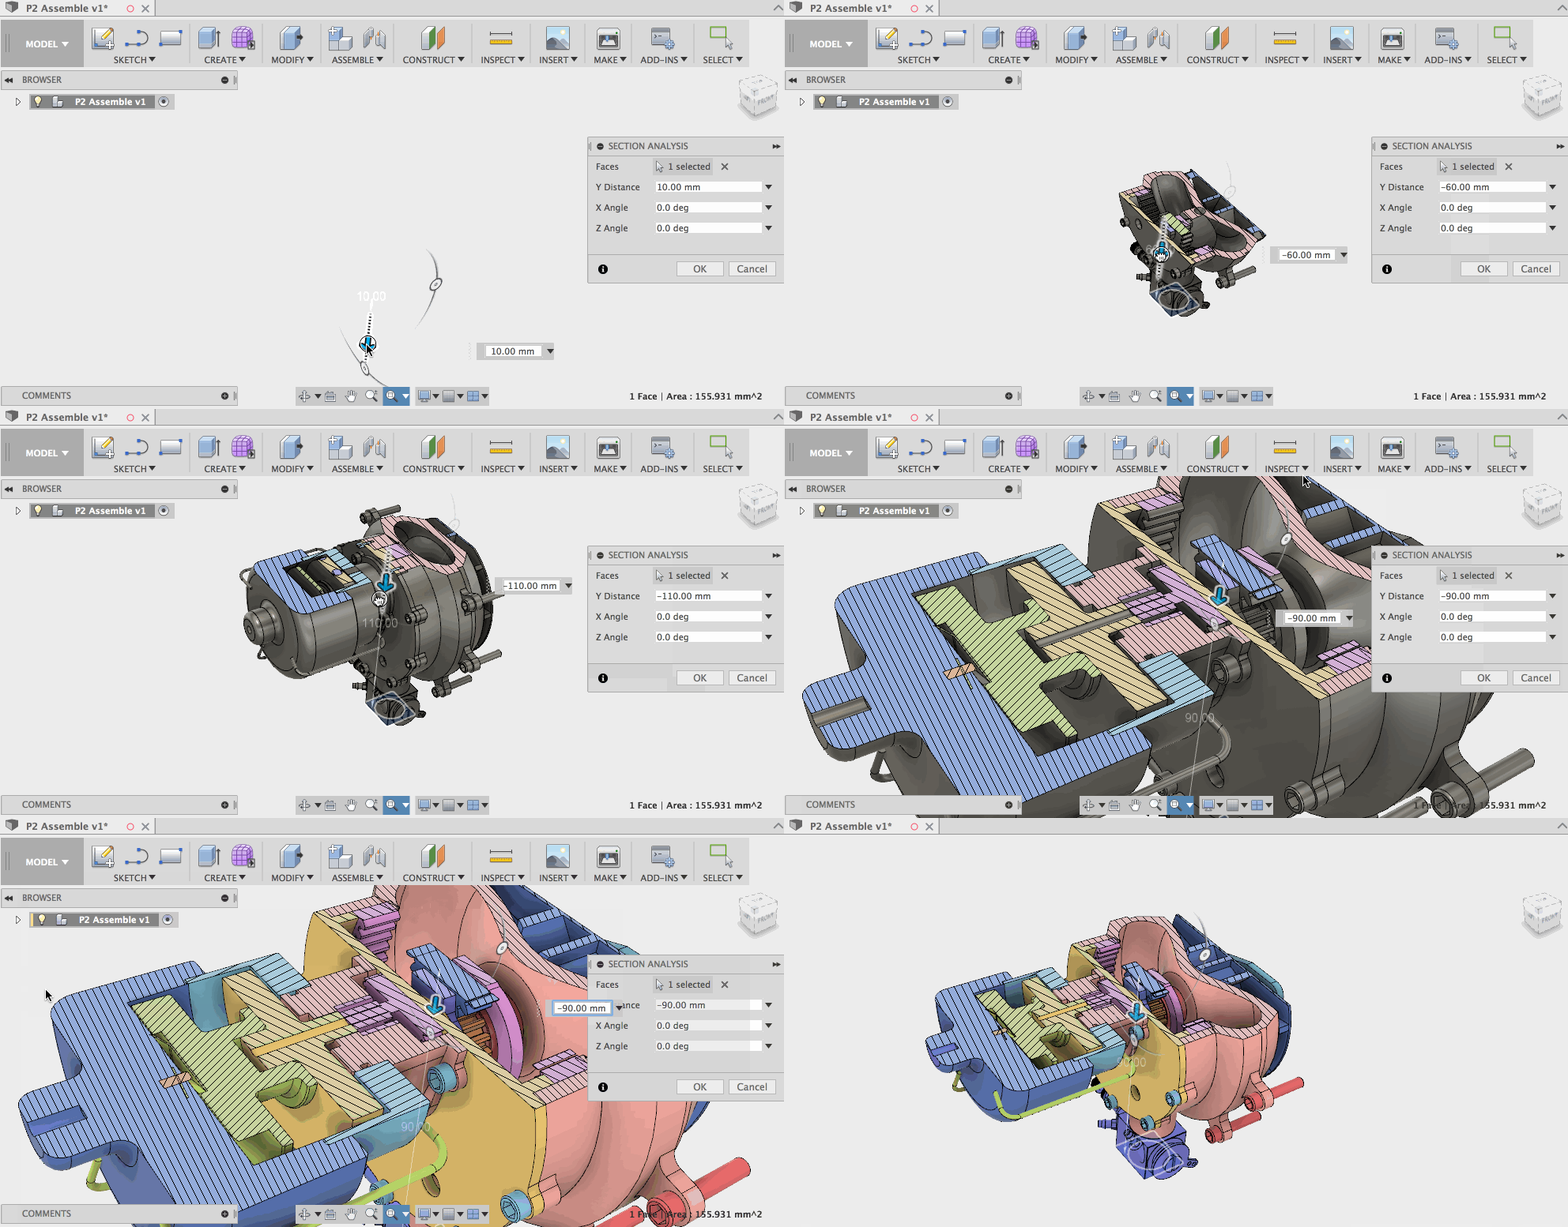
It’s so beautiful…
Fix – When you have a lot of detail on a design, trying to precisely select the correct part when you have the “select through” option checked in the selection filter list can get really hairy. We tweaked how Fusion handled graphics a bit and now when you do it, you’ll notice that the experience has significantly improved, making it easier to pin-point exactly what you want.
Fix – We found an issue where some of your design’s components didn’t show up in the 3D viewer, even though their visibility settings are turned on to show full visibility. We fixed this by adding a visibility override behavior. It all works swimmingly now.
Fix – Previously, if you made edits to the texture mapping on referenced components, Fusion turned a blind eye and refused to save your changes. That’s no way for Fusion to treat our users, and after some 1:1 time, we found out that it was because the original texture mapping would override your changes. Now you can be assured that your changes are saved.
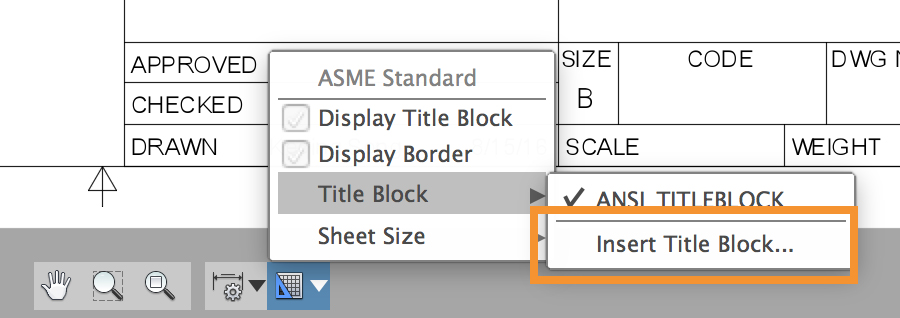
DWG title-block insert – Good news! Now when you create a new drawing, you can insert your own title-block in DWG format. Note that this is not the final solution since we are working on the second phase of improving this feature. Look forward to it in future updates. Let us know how well this works for you.
Fix – Harry.doldersum reported this issue where creating a new drawing from a template gave him a drawing with no dialog box, hence he couldn’t set his Drawing View properties. Yup, that’s definitely a bug, and we squashed it.
Fix – If you edited a referenced design within an assembly and went back into an existing animation of that assembly, the exploded view updated incorrectly, exploding your parts all over the place. We made sure that the exploded view now updates correctly the first time around.
Good news! Support for No Drag turning is now also available in Fusion. As mentioned in the forum link, “This feature will allow the cutting direction to be automatically adjusted to avoid the insert dragging “up” the walls.”
Unified tool library improvements – we’ve made quite a few of them in this update:
When we find an issue that is just down-right nasty, we work on it regardless of our other priorities. Lucky for you, we fixed a bunch of them. Here are some notable ones that we fixed:
For all you script nerds, here are a bunch of API fixes and improvements that went into this update. There’s an even more detailed list of what’s new in the API help if you just can’t get enough of it. Here are some highlights.
Keqing and the Fusion team
By clicking subscribe, I agree to receive the Fusion newsletter and acknowledge the Autodesk Privacy Statement.
Success!
May we collect and use your data?
Learn more about the Third Party Services we use and our Privacy Statement.May we collect and use your data to tailor your experience?
Explore the benefits of a customized experience by managing your privacy settings for this site or visit our Privacy Statement to learn more about your options.