Elevate your design and manufacturing processes with Autodesk Fusion
Library Basics Part 1: Creating Your First Package in Autodesk EAGLE
Greetings, Pirates, and welcome to the Library Basics Series! If you’re having trouble finding the parts you need in all of the free libraries that come with Autodesk EAGLE, then you’ve come to the right place. Parts form the foundation of all our electronic designs, and by learning to create your own, you’ll level up your engineering skills significantly. But making your personal parts isn’t easy. It requires plenty of patience to become a datasheet detective, and you’ll need an excellent attention to detail to make sure you’ve placed your pads precisely.
Are you up for the challenge?
First, The Basics
Just what is a library you ask? Great question! In Autodesk EAGLE, all of the parts that you place on your designs are stored in libraries. These provide an easy way to keep parts organized based on their category. For example, you might have a library for a general category like capacitors. Or specific communities like Sparkfun have their own dedicated libraries that contain a variety of parts for specific projects.
Libraries and the parts within are connected in a simple hierarchy in Autodesk EAGLE. This makes it easy to understand how everything’s connected. Here’s how it’s organized:
- Libraries. All of your parts will be stored in your personal library folder in Autodesk EAGLE. Each part will contain a device, symbol, and package.
- Devices. Within every library, you’ll have one or multiple devices. These devices include both a schematic symbol and a package in one accessible location.
- Symbols. Within every device, you’ll have a symbol, which provides a visual representation of a part for use on a schematic.
- Packages. Within every device, you’ll also have a package, which is the physical representation of a part for use in a PCB layout.
When you put all of these pieces together, you’ll get a tree structure that shows off how libraries in Autodesk EAGLE are organized. Check it out below.
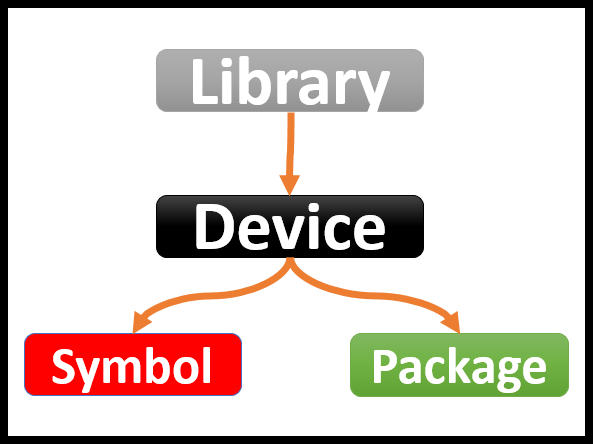
An easy to follow visual representation of how libraries in Autodesk EAGLE are organized. It all starts at the top!
Creating Your Library
Now that you understand how libraries work in Autodesk EAGLE, it’s time to make your own! You can skip this step if you already have your personal library folder, otherwise:
- Open Autodesk EAGLE, and you’ll be greeted with the Control Panel.
- Next, select File » New Library to open your Library Window.
- Before creating any new parts, you need to save your library by selecting File » Save (or Cmd + S on Mac and Ctrl + S on Windows)
- Now that your library is saved, you just need to activate it. Go back to your Control Panel, right-click your new library, and select Use. You’ll know if your library is ready to go if it has a green dot next to it in your Control Panel.
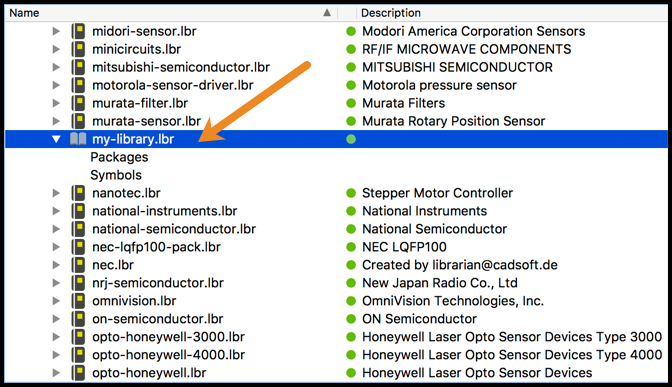
Your newly created library in the EAGLE Control Panel, with a separate directory for Packages and Symbols, which are empty (for now).
Learn to Love Datasheets
During part creation, you’ll find that datasheets are your new best friend. Try not to feel overwhelmed when you first open one up. There’s a ton of data, graphs, and specifications within, but you only need to understand one or two pages to get your part creation done.
The component that we’ll be creating in this Library Basics Series is a MOSFET switch from Texas Instruments. Here’s the TPS92411 datasheet that you’ll want to have handy during this guide. When you open this datasheet, you’ll want to go all the way to the bottom and take a look at pages 24 and 25.
Ok, now breathe!
These are the only two pages you need to worry about, ignore everything else! Unless you need some light bedtime reading.
A Brief Introduction to Packages
Packages serve a super important purpose when used on your PCB layout, offering a set of pads that provide both electrical connectivity and a way to solder parts onto your board. As you can imagine, making sure these pads are placed exactly where they need to be is a necessary challenge; otherwise, you’ll get a board back from manufacturing that doesn’t work! Check out the image below of the package you’ll be creating today. Here are all of the elements that you will start to work with:
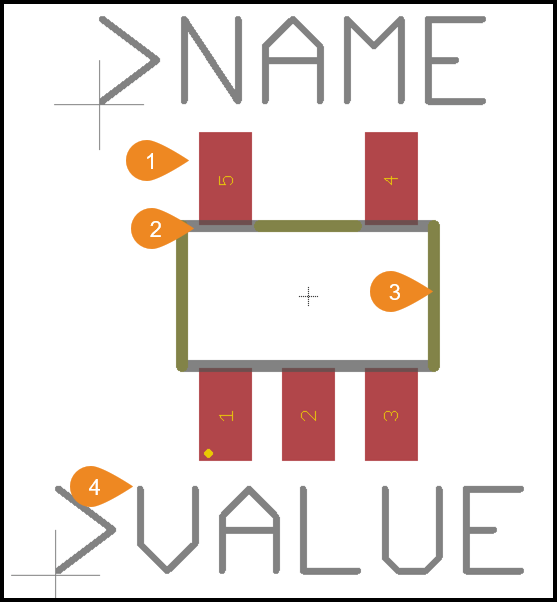
Here’s the completed package we’ll be making today, an SOT23-5.
- Pads. The pads are the red rectangles on this part and are numbered according to your datasheet. When placed on a PCB, each of these pads will be connected to a trace and provide electrical connectivity for a part.
- Package Dimension. The package dimension is the rectangular gray outline that you see connecting all of the pads. This outline represents the actual physical dimensions of your part can help during your PCB layout process to see if you’re placing components too close together.
- Silkscreen Outline. The silkscreen outline is the rectangular yellow lines lying over the gray package dimension lines. While this piece is optional, it helps to provide a visual indicator for your manufacturer when they are assembling parts on your bare board.
- Name and Value. These text elements are placeholders and will come in handy during your PCB layout stage. As the text suggests, Name will be used to identify the unique name of your part when you place it on your PCB layout, and Value can be utilized for things like labeling the resistance of a resistor, capacitance of a capacitor, etc…
Just remember, in this step of the process we’re only making a package for our part, nothing else. And keep that datasheet close by, you’re going to need it!
Step 1 – Creating Your New Package
Alright, time to get rolling with the tutorial part of this guide. The very first step you need to complete is creating a new package in your library. Here’s how:
- Open Autodesk EAGLE, and you’ll be greeted with the Control Panel.
- Select the Arrow icon to expand the main Libraries and lbr folders, then right-click your personal library and select Open.
- This will open your Library Window. From here, choose the Package
 icon to open the Edit Dialog.
 - Next, enter a name for your package in the New: field and select OK. If you’re following our example, then enter “SOT23-5.”
- Select Yes to confirm you want to create the new package.
Great, so with that complete you now have your first very package added to your personal library and a blank Package Editor should be open as shown below.
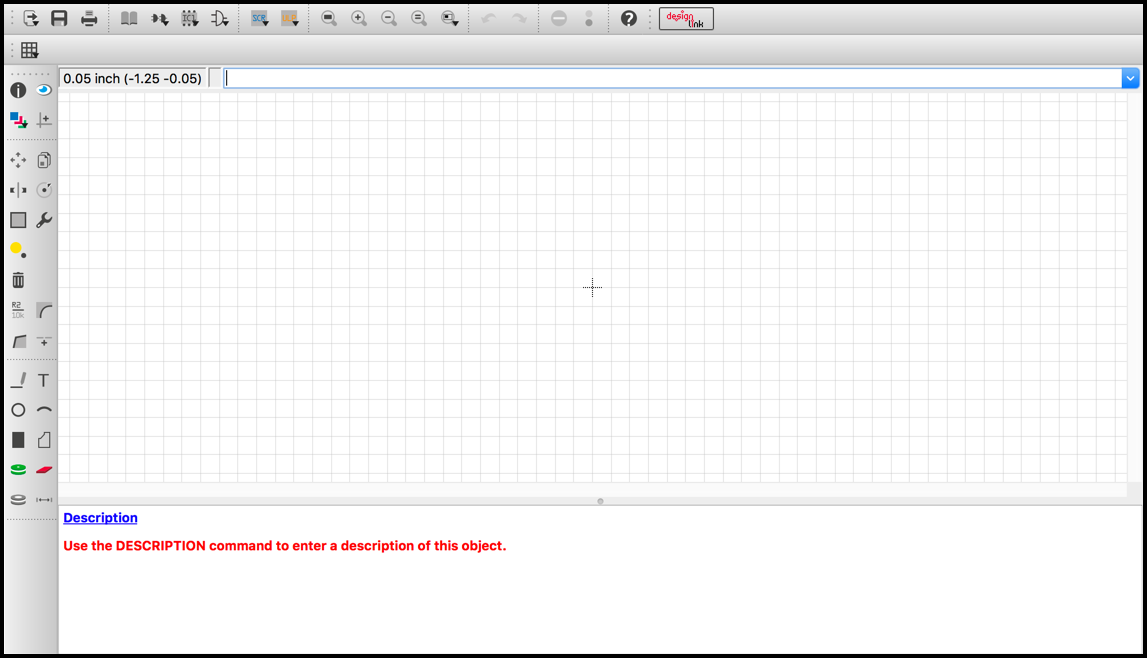
After adding a package name, you’ll have a new Package Editor ready for you to place pads on.
Step 2 – Changing Your Grid Size
Now’s the time to tweak some basic grid settings before you start placing any pads. Changing the grid size will allow you to quickly and precisely place pads according to your datasheet measurements.
- Select the Grid
 icon in the top-left corner of your interface.
 - In the Grid dialog, change your Display from Off to On if it isn’t already enabled.
- Next, change your Size: from inch to mm, and enter “0.05” as the value.
- Select OK to save your grid settings.
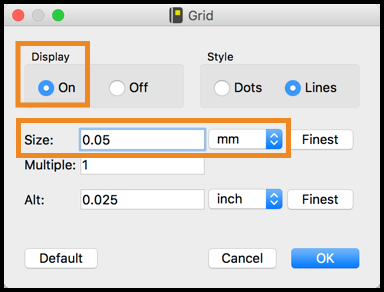
Here are the two grid settings you’ll need to change – Display and Size.
After confirming your settings, you might notice that you can’t see your grid in the package editor. It’s not gone! You just need to zoom in a bit with the Zoom in ![]() icon until it becomes visible again.
icon until it becomes visible again.
That’s all the setup work you need to get the rest of the job done. Let’s dive into the datasheet now and start placing some pads!
Step 3 – Deciphering Your Datasheet
Alright, time for some datasheet detective work. Open your TPS92411 datasheet and head on down to the Land Pattern Data section on page 25. This page will give you all the information you need to precisely place your pads. Here’s what you need:
- Pad Dimension – This is the length and width of the pads that you’ll need to create in Autodesk EAGLE. Looking at our datasheet, this is clearly labeled in the bottom-left corner of page 25. It looks like our pad dimension is 0.6mm x 1.05mm.
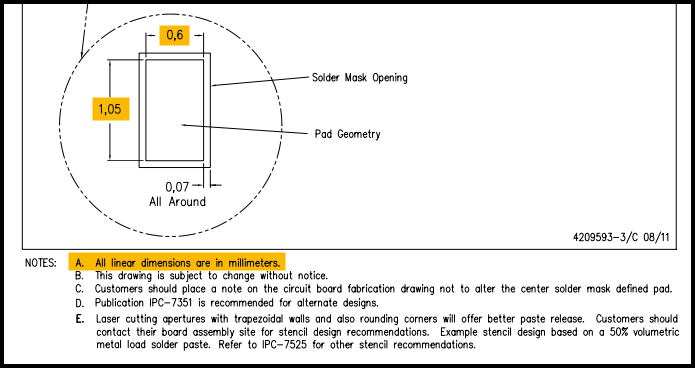
The pad dimension is easy to find in this datasheet. And we know it’s in millimeters by section A in the Notes.
- Pad Pitch – The pad pitch is the distance between the two of two pads on both the X and Y axis. Again, your datasheet has this clearly labeled in the top-left corner of page 25, under the label Example Board Layout.
Your pitch: An X axis pitch of 1.90mm and a Y axis pitch of 2.7mm.
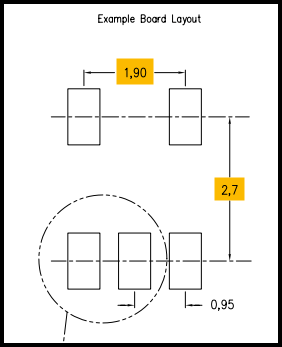
The pad pitch is always measured from the center of two pads.
You’ll also notice there’s a smaller X axis pitch of 0.95mm for the bottom pads, but this won’t be needed since you already have your larger 1.90mm pitc.
- Pad Coordinates – Now, we will do some basic math to create a kind of coordinate grid system for precise pad placement. Take a look at the image below; we’ve created a basic XY graph with our Example Board Layout image on page 25.
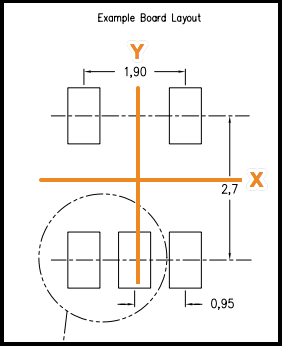
You can use the existing pad dimension chart to create an easy to use XY graph for your pad placement.
The good news is that you only need to get the coordinate position of one pad and the rest will naturally follow. Let’s start with Pad 4, which is in the top-right corner.
- Starting from the origin point on your graph, move along the X axis until you line up with the center of Pad 4 and you’ll be at 0.95mm. How would you get this value? By dividing your X axis pitch of 1.90mm in half, which gives you an even 0.95 spread between both the left and right sides of your X axis.
- Next, move up on your Y axis and you’ll get to the center of Pad 4 at 1.35mm. How would you get this value? Again by dividing your Y axis pitch of 2.7mm in half, which gives you another even 1.35 spread between both the top and bottom sides of your Y axis.
- Put those two numbers together, and you now have your X and Y coordinates for Pad 4, which is (0.95mm, 1.35mm).
Now that you have the coordinates for Pad 4, the rest are super easy to figure out. Here’s what they are:
- Pin 1 (-.95mm, -1.35mm)
- Pin 2 (0mm, -1.35mm)
- Pin 3 (.95mm, -1.35mm)
- Pin 4 (.95mm, 1.35mm)
- Pin 5 (-.95mm, 1.35mm)
Step 4 – Placing Your Pads
Ok, now you have all of the data that you need to start creating and placing our pads in Autodesk EAGLE. In this step, you’ll just be creating our pads with the Pad Dimension that you found in Step 3. Here’s how:
- Select the Pad
 icon on the left-hand side of your interface.
 - In the Size: field at the top of your interface, enter “0.6 x 1.05” and press enter on your keyboard to change the pad size.
- Lastly, drag your first pad anywhere on your grid, and left-click to place it. Repeat this step 4 times to place five pads in total.
You should now have all five of the pads placed that you’ll need for this part as shown below.
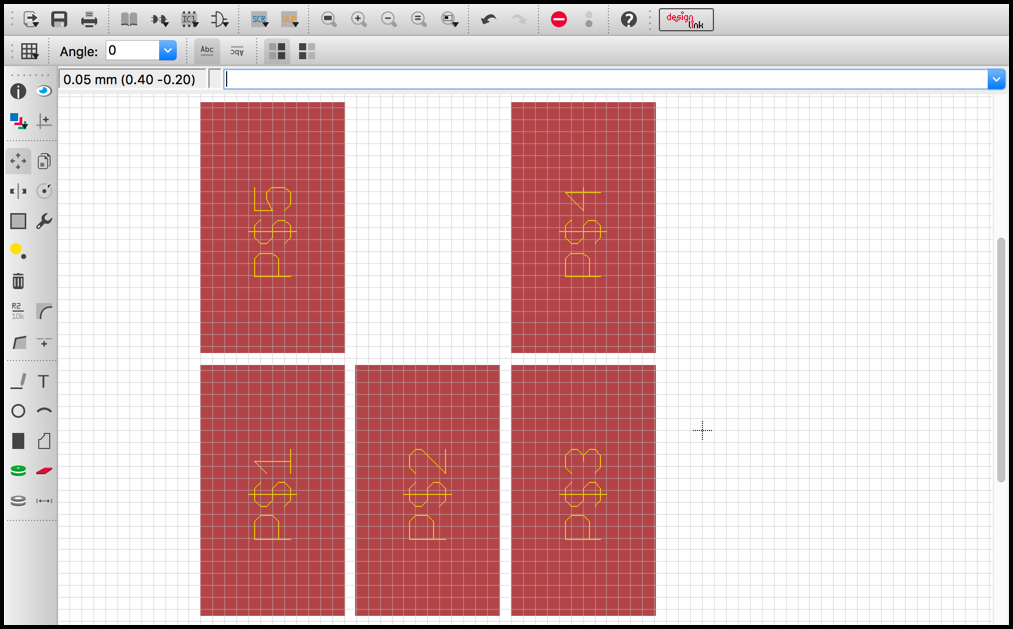
The five pads you’ll need for your package. Placement doesn’t matter right now, that happens later!
Step 5 – Renaming Your Pads
Before you start positioning your pads, now’s a good time rename them to match your datasheet. To do this:
- Select the Name icon on the left-hand side of your interface.
- Left-click a pad to open the Name Dialog.
- Enter a name in the New name: field and press OK to save your change.
You’ll want to modify the name of each pad from its default P$(1,2,3,4,5) to simply be 1, 2, 3, 4 and 5. Here’s how it should look when you’re done:
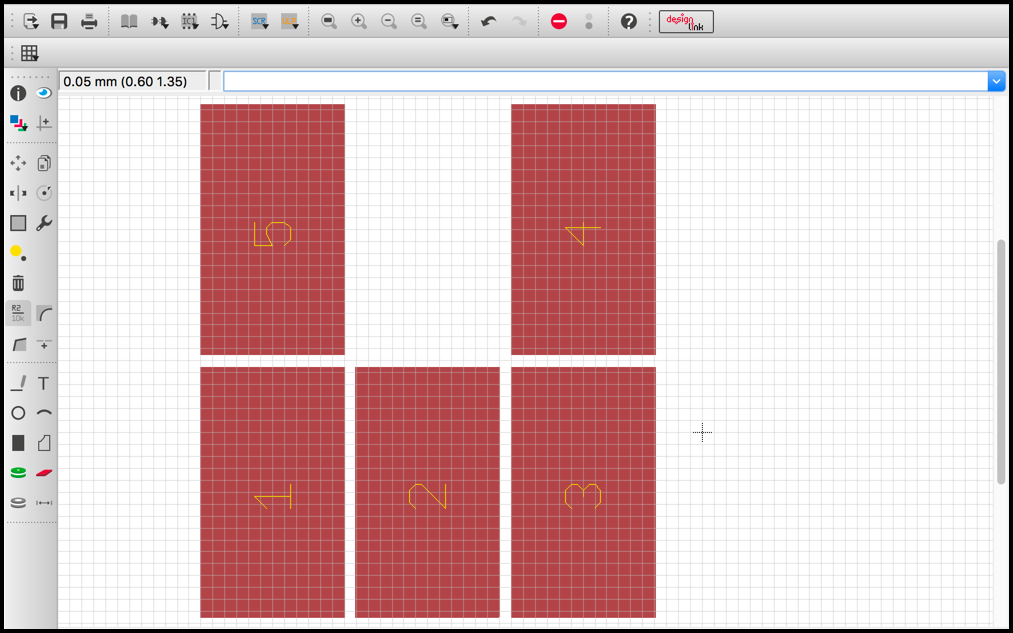
Make sure to rename your pads according to your datasheet, the numbers matter!
Step 6 – Positioning Your Pads
Placing your pads will be super easy with a 0.05mm grid and the coordinates that you found in Step 3. It’s important that you place your pads in the order the pins are presented in your datasheet, check it out below.
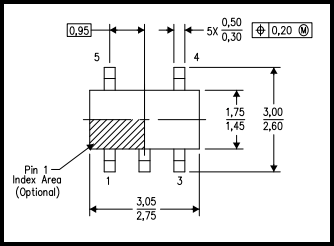
Here you can see the counterclockwise pin numbering from 1-5, which your pad placement needs to match.
So we’ve got pins 1, 2 and 3 on the bottom, and pins 4 and 5 on the top. It all flows in a counterclockwise direction. And here again are the coordinates you’ll need for this task:
- Pad 1 (-.95mm, -1.35mm)
- Pad 2 (0mm, -1.35mm)
- Pad 3 (.95mm, -1.35mm)
- Pad 4 (.95mm, 1.35mm)
- Pad 5 (-.95mm, 1.35mm)
Let’s place Pad 4 first, and we’ll leave you to do the rest. Here’s how:
- Select the Move
 icon, and then Cmd (Mac) or Ctrl (Windows) + left-click Pad 4. This should snap the pad’s center to your cursor regardless of where you move it.
 - Next, move Pad 4 right along the X axis from the origin point until the coordinates in the top-left of your interface reads (0.95 0.00).
- Then move Pad 4 up along the Y axis until the coordinates read (0.95 1.35).
- Lastly, left-click to confirm the placement of Pad 4.
You can follow this same process to place all of the pads, following the X and Y coordinates for each that are listed above. When you finish, your pads should be placed similarly to ours below.
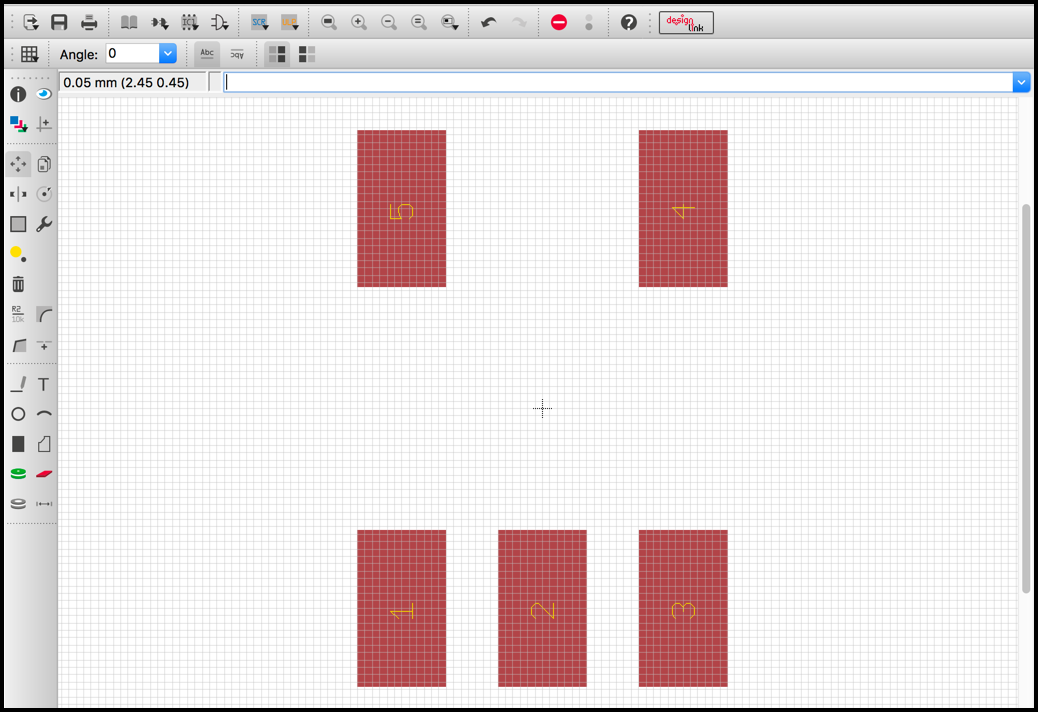
Our pads placed in relation to our center origin. Remember to place each pad in relation to the pin on your datasheet.
It’s Half Time
Congratulations! You just completed the most important step in creating a new package, the precise placement of your pads. Now that you know your pads are in the right location, you won’t have any trouble soldering parts onto your board. At this point, your job could be considered done, but we need to add a few bits of information to make this package readable not only for machines but for humans as well.
Step 7 – Adding Your Origin Point
You’ll need to add an origin point to Pad 1 so that your manufacturer knows the correct way to orient your part during assembly. Here’s how to do this:
- Select the Circle
 icon on the left-hand side of your interface.
 - Select the Width: dropdown at the top of your interface and select 0.
- Select the Layer dropdown at the top of your interface and select layer 21 tPlace.
- Left-click in the bottom-left corner of Pad 1 and drag your cursor to the right to adjust the size of your circle.
- Left-click again to confirm the size of your circle and place it.
The size of your origin point is totally up to you. All that’s important is that it’s on Pin 1 so your manufacturer knows how to orient your part. If you need to move your origin point, use the Move ![]() tool.
tool.
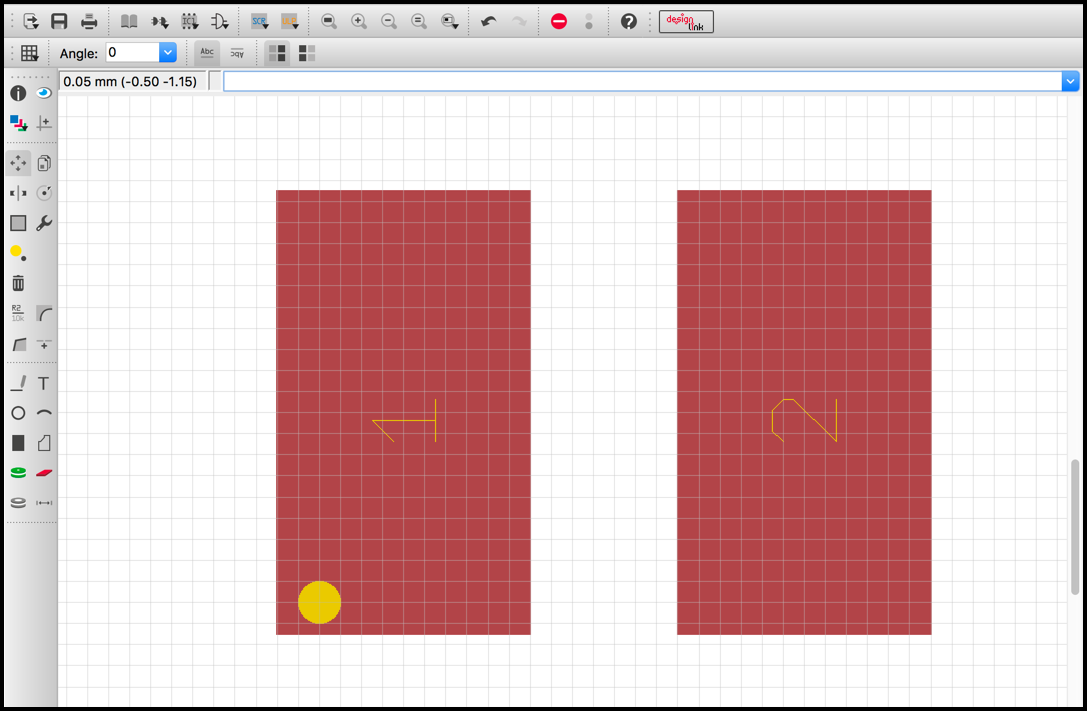
A quick origin point added to Pad 1; now our manufacturer will know the orientation of our part.
Step 8 – Adding Your Package Dimension
You now need to add a package dimension, which will help you to see if your parts are placed too close together on your PCB layout. This process again requires some brief datasheet detective work. Let’s look at the Mechanical Data section on page 24 of your TPS92411 datasheet. There are four images on this page, but all you need to be concerned with is the one in the top-left corner.

The package outline has all the data we need to determine our package dimension.
This image shows you the exact physical dimensions of your part as it will appear in physical form. Most package dimensions come with tolerance, which is why there’s a fraction looking number for each dimension measurement. The top number is the maximum value, and the bottom is the minimum value. What value you choose is up to you. In our example we’ll just take the middle value for both, which ends up being:
- A package length of 2.9mm
- A package width of 1.6mm
And now that you have your length and width, creating a package dimension in Autodesk EAGLE is easy. Here’s how:
- Select the Line
 icon on the left-hand side of your interface.
 - Select the Layer dropdown at the top of your interface and choose layer 51 tDocu.
- Select the Width dropdown and change your width to 0.127 if it’s set at 0.
- Next, Move your cursor on the grid until you find your starting point at (1.45 0.8) and left-click to begin drawing your wire.
- Complete the outline of your package dimension following these coordinates:
- (1.45 -0.8)
- (-1.45 -0.8)
- (-1.45 0.8)
- And back to your starting point at (1.45 0.8)
- Press Esc on your keyboard to exit wiring mode.
When complete, your package dimension should look like ours below.
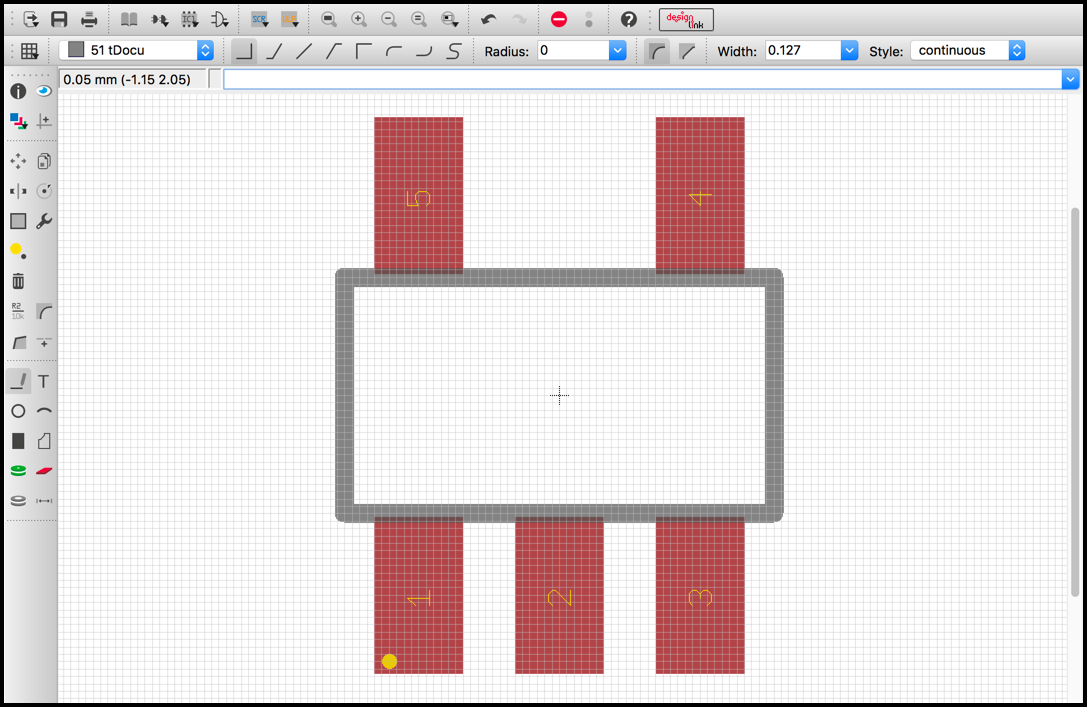
A completed package dimension will make it easy to spot overlapping components on your PCB layout.
Step 9 – Adding Your Silkscreen Outline
Now you just need to add a silkscreen outline, which is a helpful way to tell your manufacturer where your part will be placed. Here’s how to do it:
- Select the Wire
 on the left-hand side of your interface.
 - Select the Layer dropdown at the top of your interface and choose layer 21 tPlace.
- You now need to draw three silkscreen wires on top of your package dimensions – one on the left side of your package, one on the right, and one in between pins 4 and 5. To do this, left-click on top of your existing package dimension, drag until you reach your ending point, and left-click again to place the wire.
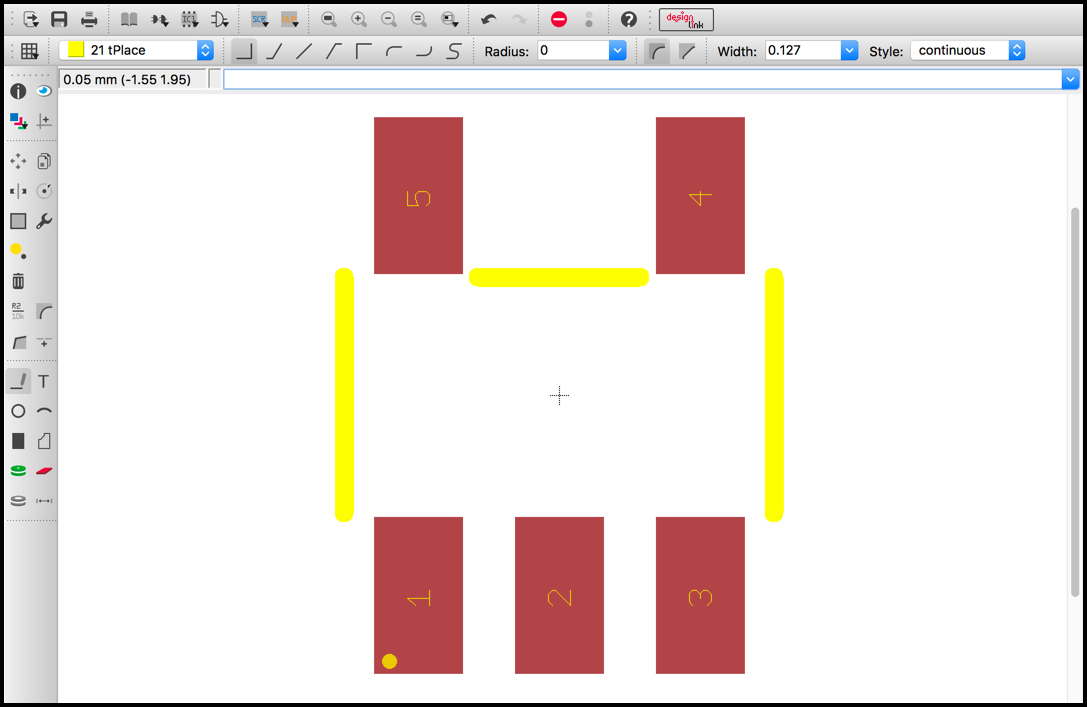
Silkscreen outline with the grid and Layer 51 turned off so you can see how it will look on your PCB layout.
Step 10 – Adding Your Name and Value Placeholders
Alright, time to finish this up! The last thing you need to add is both a name and value placeholder to your package. This will allow EAGLE to create a unique identifier for each and every part on your PCB layout, making it easy to reference specific parts if you need to make changes down the road. Let’s do it:
- Select the Text
 icon on the left-hand side of your interface.
 - In the Text Dialog, enter “>NAME” in the Enter text: field and select OK.
- Next, select the Layers dropdown at the top of your interface and choose layer 25 tNames.
- Optional: If the text size is too big for your liking, select the Size: dropdown at the top of your interface and choose a new size.
- And now drag your >NAME text over the top of your package and left-click to place it.
- Press Esc to exit text placement mode.
You’ll know that you put your >NAME text on the right layer if it displays in a gray colored font. Go ahead and repeat the steps above, this substituting >NAME for >VALUE on layer 27 tValues and place it on the bottom of your package. Here’s how your completed package should look:
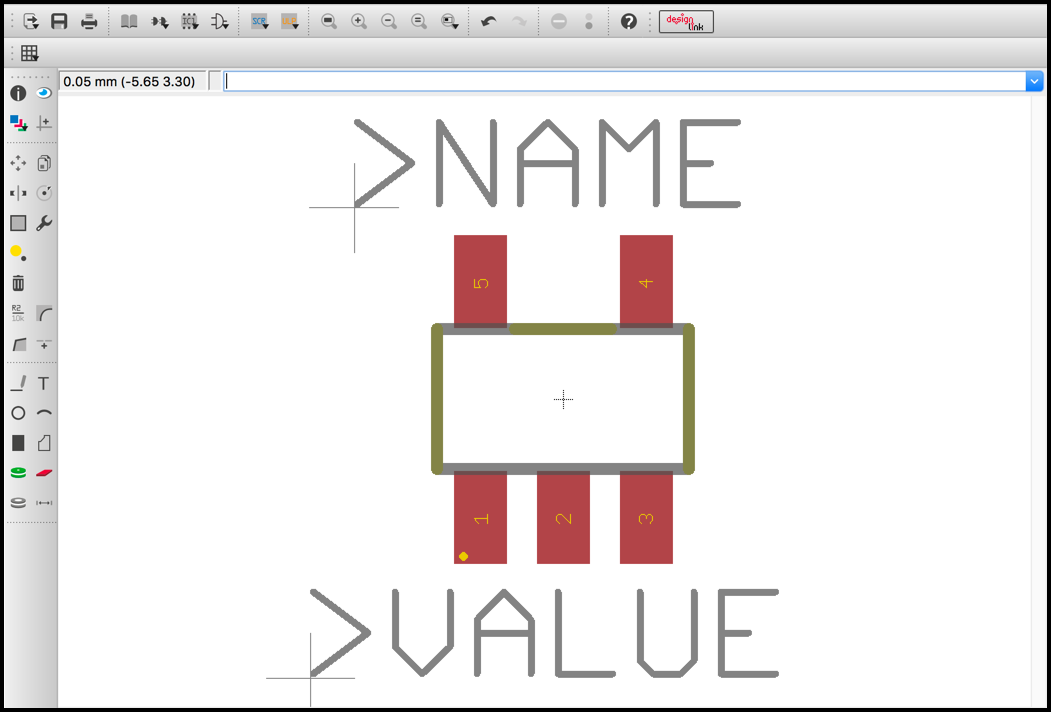
At last, you’re done! This is how your completed package should look with its new name and value placeholders.
Nicely Done
That X marks the spot, you have successfully created your first package! This process required a ton of steps, and for good reason, it’s the most important process of your entire part creation workflow. The remaining parts in this Libraries Basics Series deal with the final two steps of part creation:
- In Library Basics Part 2, you’ll learn how to create your very first symbol, which is used on a schematic.
- In Library Basics Part 3, you’ll learn how to bring both your packages and symbols together in a device.
Hopefully you won’t have to do this too part creation journey many times, as you’re bound to find the parts you need in all of the free libraries that ship with Autodesk EAGLE. But if not, then at least you know how! See you next time Library Pirates, and nicely done.