In this tutorial, you’ll learn how to modify selection choices effectively while arc dimensioning in Autodesk Fusion.
When working in the sketch environment of Autodesk Fusion, you might come across situations where you need to add dimensions to arcs. However, the default behavior of Fusion is to dimension arcs from their center. While this works in many cases, there are instances when you’d want to dimension an arc from its outer edge or tangent.
In this article, we’ll guide you on how to change the selection choice when dimensioning an arc, ensuring that you have full control over your design and dimensions.
Understanding dimensioning in Fusion
Before we delve into the process of changing the selection choice, let’s briefly discuss dimensioning in Fusion. Dimensioning is a crucial aspect of 3D modeling as it defines the size and position of objects, helping you create accurate and precise designs. In Fusion, you can add dimensions to various elements, including lines, circles, arcs, and more.
Dimensioning an Arc from Its Center
When you add dimensions to an arc in Fusion, the software automatically selects the center of the arc as the reference point. This is suitable for many scenarios, but there are situations where dimensioning from the arc’s center might not provide the desired results. For instance, you may need to specify the total length of a slot or control the distance between the arc’s center and another object.
Changing the dimensioning reference to the tangent of the arc
To change the selection choice when dimensioning an arc, follow these simple steps:
- Enter the Sketch Environment: Make sure you are in the sketch environment in Fusion.
- Select the Arc: Choose the arc you want to dimension by clicking on it.
- Right-click on the Arc: After selecting the arc, right-click on it to bring up a context menu.
- Choose the Tangent Option: From the context menu, you will see an option to change the dimensioning reference to the tangent of the arc. Click on this option.
By selecting the tangent of the arc as the reference point, you can now dimension the arc based on its outer edge or the point where it intersects with other sketch elements. This added flexibility allows you to create intricate designs and control the dimensions precisely.
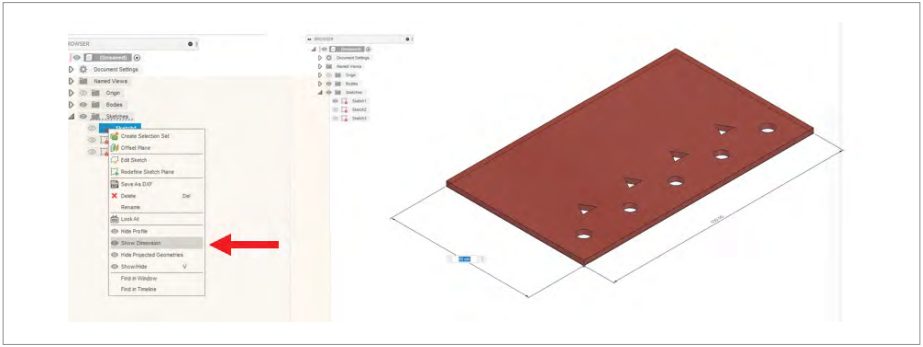
Using ‘Show Dimension’ to change sizes
Sometimes, while working on your 3D model in Fusion, you might need to change the dimensions. Instead of jumping back into the sketch environment, Fusion offers a handy feature called ‘Show Dimension’ that allows you to make instant dimension changes while in the 3D view.
To use ‘Show Dimension’ and edit your 3D model’s dimensions, follow these steps:
- Enter the 3D View: Make sure you are in the 3D view of your model in Fusion.
- Right-click on the Sketch: Identify the sketch containing the dimension you want to edit and right-click on it.
- Choose ‘Show Dimension’: From the context menu, select the ‘Show Dimension’ option.
- Edit the Dimension: The selected dimension will now appear outside the sketch environment, and you can freely edit it by entering the desired value.
Using ‘Show Dimension’ saves time and enhances your modeling workflow, as you can instantly see the results of dimension changes without switching back and forth between the sketch and 3D views.
Watch this video for a more detailed guide on how to use ‘Show Dimension’ in Fusion:
Arc dimensioning is a critical skill for creating accurate and precise 3D models in Fusion. By understanding how to change the selection choice when dimensioning an arc and utilizing the ‘Show Dimension’ feature, you can have better control over your designs and efficiently make necessary changes. Fusion’s versatile tools empower you to bring your ideas to life, and mastering dimensioning techniques is a valuable step toward becoming a proficient 3D modeler.
FAQs
- Can I change the dimensioning reference for other sketch elements in Fusion?
Yes, you can change the dimensioning reference for lines, circles, and other sketch elements in Fusion by following similar steps as for arcs. - Are there any shortcuts for accessing the ‘Show Dimension’ feature in Fusion?
Yes, you can access the ‘Show Dimension’ feature quickly by selecting the dimension and pressing the ‘D’ key on your keyboard. - Can I switch back to dimensioning from the center of the arc after choosing the tangent option?
Absolutely! You can switch back to dimensioning from the center of the arc by repeating the steps and selecting the ‘Center’ option from the context menu.