V.2.0.6263
Manufacture
A number of you have reported a weird bug in manufacturing workflows where shallower arcs are creating tool-path chains that are 360 degrees of sweep of non-existent geometry, which also became un-selectable. Well, this was embarrassing. We got this sorted now.
August 22, 2019 Product Update – What’s New
V.2.0.6258
Generative Design
- We fixed an issue in the Generative Design workspace where if you double-clicked the “starting shape” browser element in a generative study, Fusion 360 attempted to launch the Simulation environment for some reason. Double-clicking it should bring up the starting shape command, not Simulation, and now it does.
- We fixed a crash issue related to changing the Factor of Safety scale of Generative Design simulation studies being run in the cloud.
Manufacture
- If you created a new NC program and selected posts from a custom post location, editing the NC program did not show the custom library. Now when you do this, the custom library will correctly appear.
- We found selection issue in 2D pocket operation and modifying tool parameters.If you regenerated a tool-path for the 2D pocket operation or edited the 2D Pocket operation and then checked the geometry input, the previous chain selection was lost on the geometry after the tool was modified. Now the chain selection will remain selected.
- We fixed a macOS issue where the the post processor didn’t post when you selected a machine. Sorry about that!
Usability
- Many of you have told us that the contrast of the new visibility icons in the browser were not enough, so we improved the contrast. Now it should be easier to see, at a glance, which entities in the browser are visible and which ones are not.
- If you had a 2D drawing of a sheet metal part with a flat pattern and you tried to open the flat pattern part by right-clicking on it in the browser and selecting “open”, Fusion 360 got scared of what would happen next so it refused to open it, causing itself to crash. Now it’s no longer afraid and opening a flat pattern works as it should.
August 13, 2019 Product Update – What’s New
V2.0.6231
[toc]
Usability
[icon name=”gift” class=”” unprefixed_class=””] New! Meet the New Toolbar UI
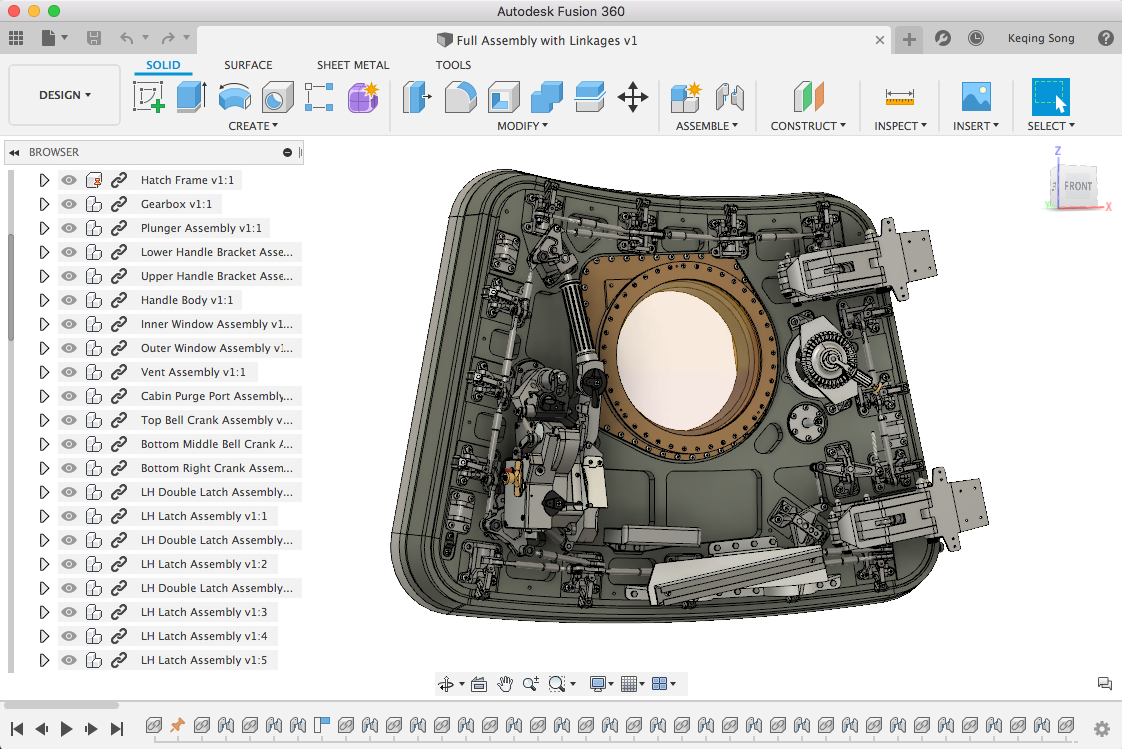
Apollo 11 Command Module Hatch assembly by Andrew Barth, courtesy of Project Egress (https://airandspace.si.edu/events/project-egress-build)
Hooray! As of today, we’ve updated our toolbar UI to the new layout as default. The new toolbar UI offers improved tool organization, terminology, and discoverability. It also sets Fusion 360 up to be more scalable as more functionality is introduced in the future.
[icon name=”arrow-down” class=”” unprefixed_class=””] Get Started Here [icon name=”arrow-down” class=”” unprefixed_class=””]
If this is the first time you’re seeing this, don’t fret – we’ve got you covered. Jake Fowler and I made a video around the top 5 things you should be aware of when using the new toolbar UI, and our Expert Elite/Fusion 360 connaisseur Kevin Ellingson made a great video comparing the old and new. Watch any of these two videos and you’ll be up and running in no time.
If reading is more your speed, we’ve also created this quick guide to the new toolbar UI, which includes the top 5 things to know, as well as a few FAQs we’ve heard along the way.
If you need to switch back to the old toolbar for whatever reason, you can still do it via the preferences (under the General section), but this option will only be available for a limited period of time. Also, if you’re running add-ins you’ve downloaded from our Exchange App Store, now is a good time to update them. Just head over to the app store and make sure you are running the latest version. If you run into issues, let us as well as the add-in author know and we’ll be happy to help you out.
As always, feel free to reach out to us for any questions or comments around this new experience, and we’ll be happy to help you out!
[icon name=”gift” class=”” unprefixed_class=””] New! Fresh Icons
![]()
Along with the toolbar UI, you’ve probably also noticed that we’ve also updated the command icons in the toolbar. They are now sporting a new look, making your tools look crisper and more modern. And we’re not the only ones modernizing our icons. Our work is part of a company-wide initiative to standardize on a more consistent look and feel for all of Autodesk’s products, from Fusion 360, to Inventor, to AutoCAD. This first phase is focused on updating toolbar icons across all workspaces. The modeling timeline icons and some browser icons will be updated as part of this, but finishing icons in other areas will come at a later date.

Jake looking out into the city, thinking of all the icons he’s made
Sketching & Modeling
[icon name=”thumbs-up” class=”” unprefixed_class=””] Improved! Change Components When Editing a Joint
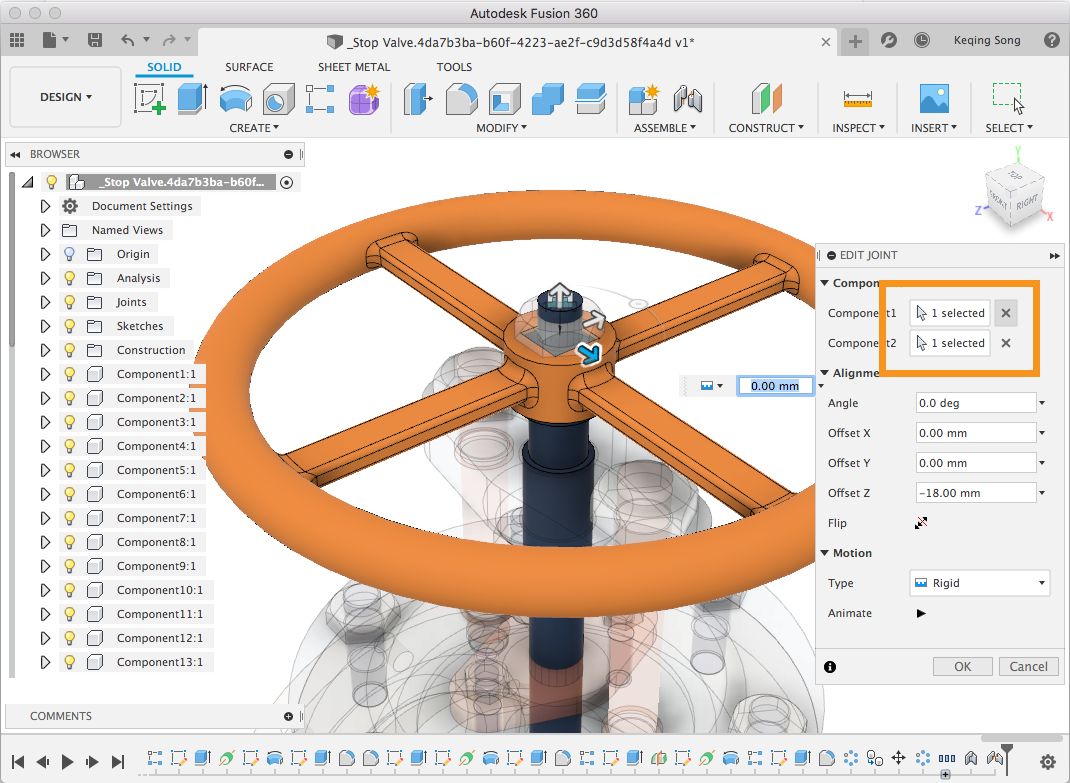
Previously when you wanted edit a joint and select a different component for the joint, you’d have to delete that joint, create a new one, and re-pick your components. Now you can find the joint you want to edit in the timeline, right-click to select edit, and pick a different component all within the Edit Joint dialog. No more re-creating the joint from scratch.
[icon name=”thumbs-up” class=”” unprefixed_class=””] Improved! Scale Entire Sketch on First Dimension Creation
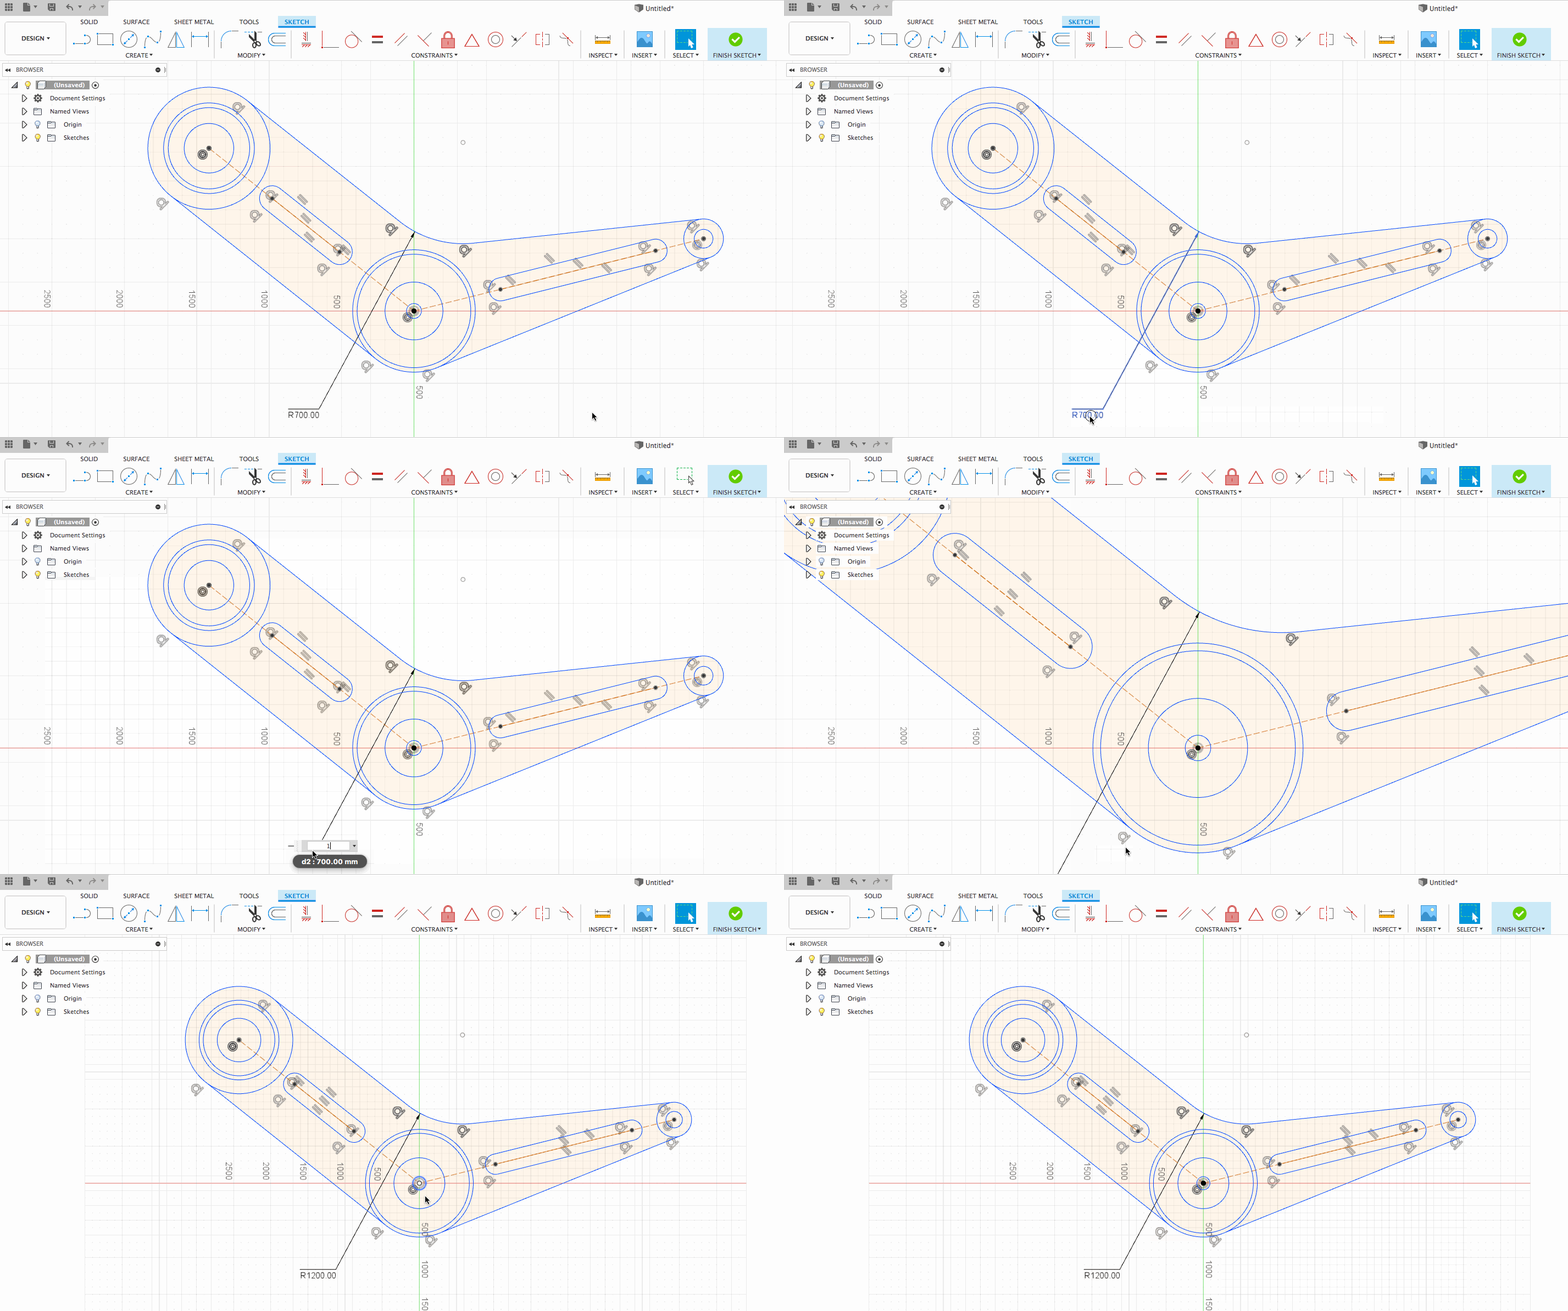
Good news everyone! This option was talked about in this post awhile back, and we’re glad to share it with you. Now when you create multiple sketch entities in your sketch, you can affect the scale of entire sketch by just editing the very first dimension that you have created. This should make it easier to scale/edit the scale of sketches earlier in the design workflow, without needing to dimension every single sketch entity separately.
Fixed: HughesTooling found a bug in the sheet metal flat pattern DXF export workflow where exporting the sheet metal design as a DXF in-corrected marked the design as “dirtied” (as indicated by an asterisk next to your design name in the document tab). This should not happen, so we made it so. Now when you export a DXF flat pattern, the design will remain unchanged.
Fixed: HughesTooling also told us an issue where constraining the midpoint of a line vertically above a point it failed if you selected the line midpoint first. Sorry about that; this is now fixed.
Fixed: We found some wonkiness around how exported DXF sketches are inserted into Fusion 360. The splines in the DXF sketch came in really weird, and were not consistent with how they looked when the sketch was originally exported. Now they should remain unchanged.
Fixed: LMF5000 reported that if you created dimensions or constraints to a sketch text item, and then edited the text, all constraints somehow got lost along the way. Probably because we are creating an entirely new text item during edit.
Issue we’re working on:
- If you have a 2D drawing with a sheet metal part, right-clicked on the sheet metal part and selected open, Fusion 360 would hang.
Generative Design
[icon name=”gift” class=”” unprefixed_class=””] New! 2.5 Axis Milling Constraints in Preview
We see manufacturing constraints as a key part of our solution, as it plays a critical role in making the solution applicable for wider audiences. Continuing our focus in this area, we are proud to announce 2.5 axis milling constraints will be available in preview! This is a major milestone for Fusion 360 and should be even more exciting for you as our users, as we will have an exciting generative design solution for those of you using more traditional manufacturing methods.

The 2.5 axis milling constraint will join the 3 and 5 axis constraints under the Milling section of the Manufacturing dialog. Users will be able to control the tool direction and the solution will produce 3 outcomes, from the top, from the bottom and from both sides of the design space.
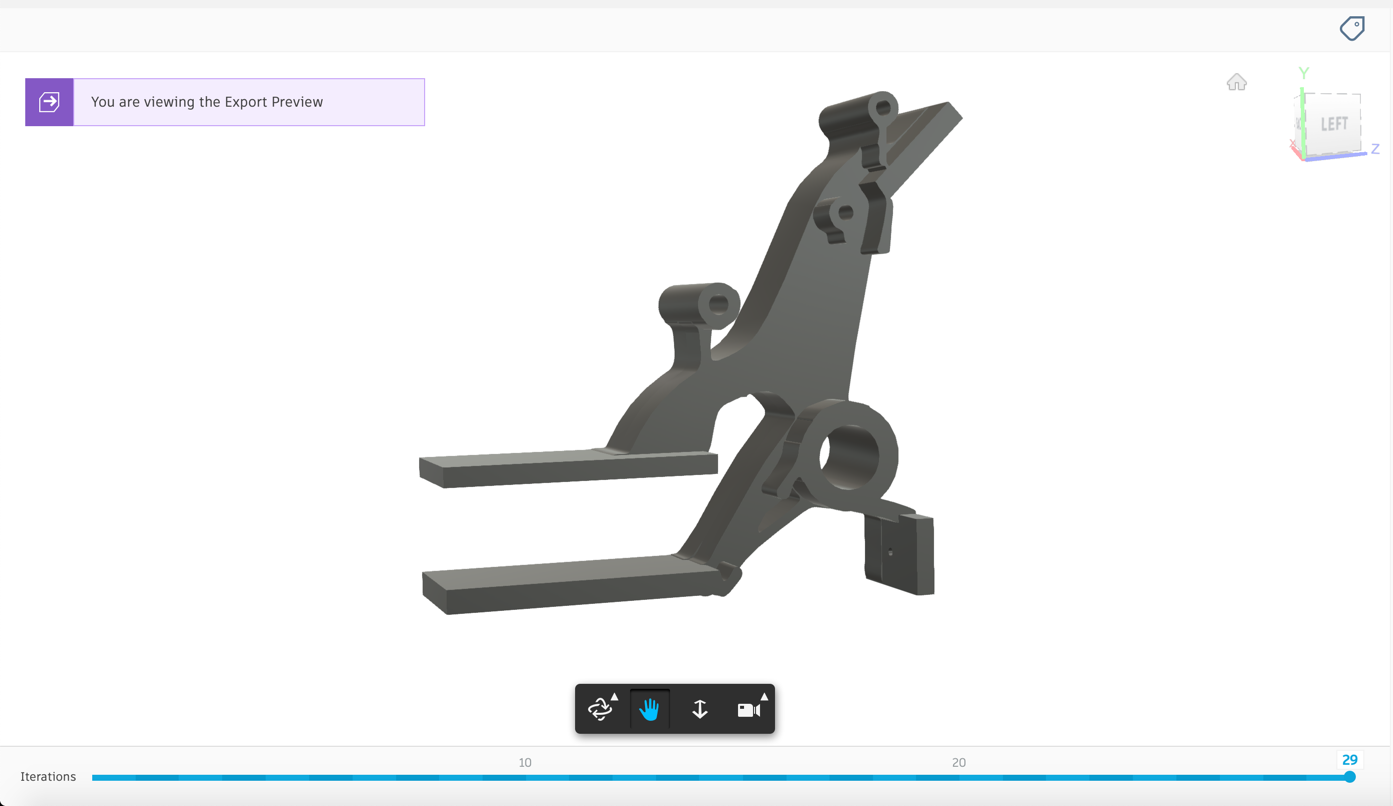
Like the rest of our generative design outcomes, 2.5 axis milling outcomes will have a parametric recipe once exported allowing users to further refine the design for manufacturability, as well as have the load, constraint and material information that can be used to further validate the design in the Simulation workspace. Looking ahead, we will be focused on tool accessibility checks and general solution robustness and refinement. We are really excited to hear your feedback on this solution.
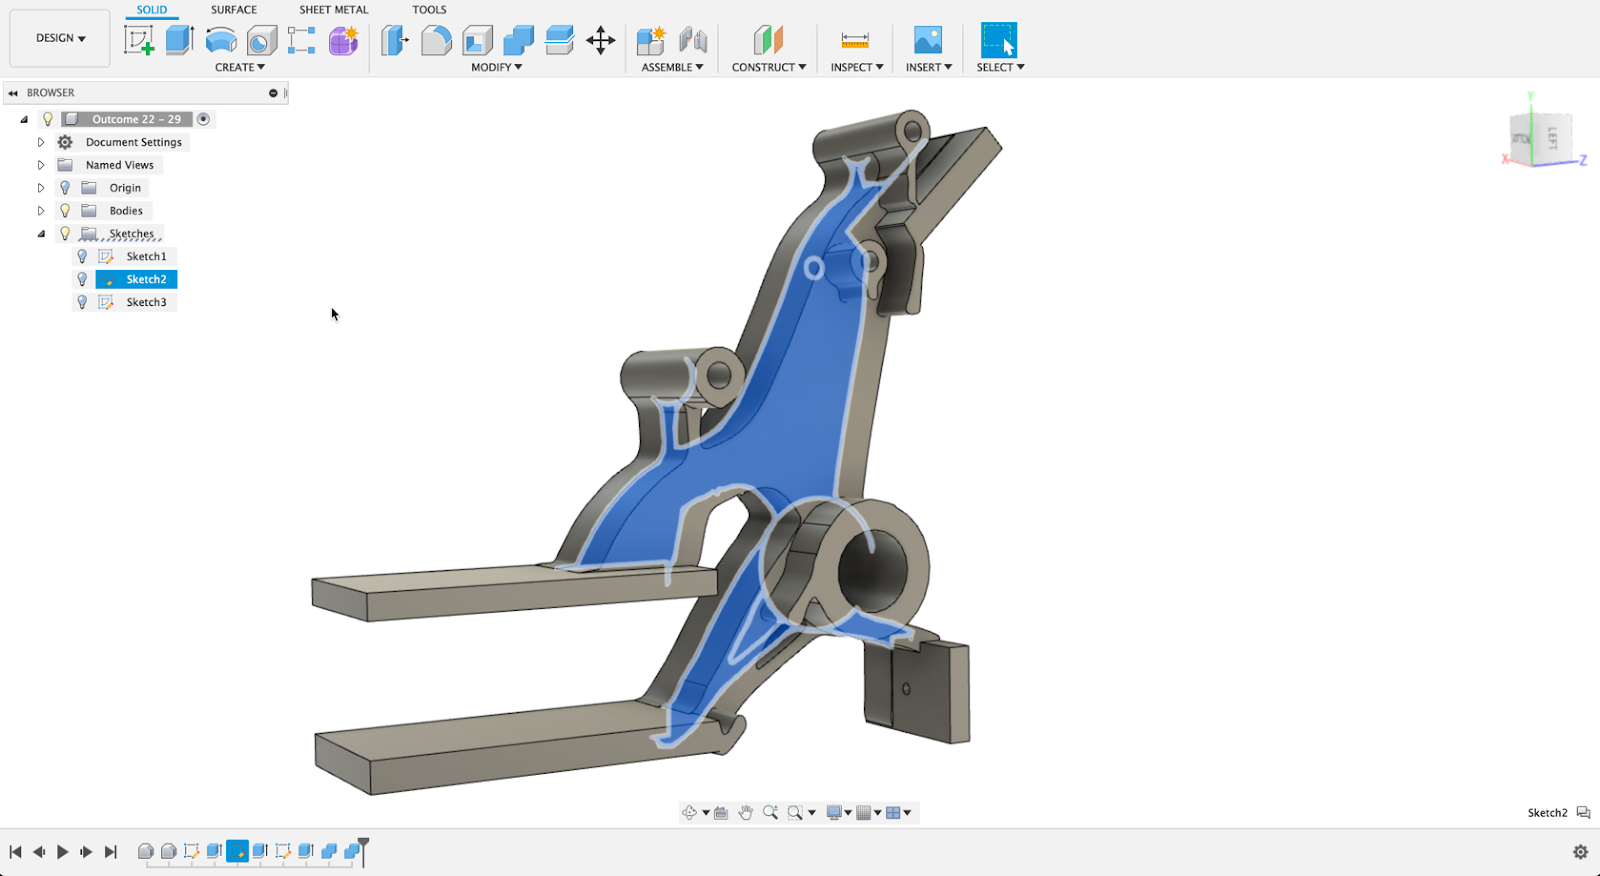
[icon name=”thumbs-up” class=”” unprefixed_class=””] Improved! Outcome Navigation in Explore
We are continuing to refine our Explore navigation patterns to be more consistent with the rest of Fusion 360. In this update, we have changed the way users navigate from a specific outcome view to back to the main Explore view. Before this update, you probably remember using a mix of toolbar buttons and breadcrumbs in the canvas to switch between the Explore view and the outcome views.
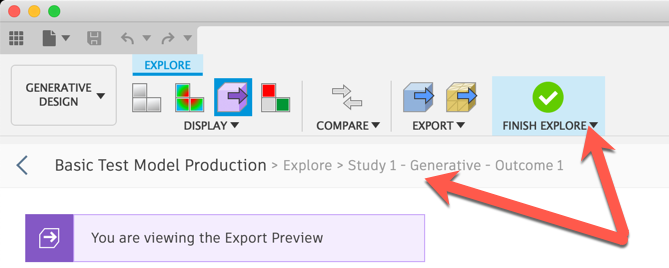
Before
Now you will see that the Outcome View is now its own tab, and we have a button to finish the Outcome View and go back to the Explore view. This should feel more consistent with the other ways you use Fusion 360.

Now
[icon name=”thumbs-up” class=”” unprefixed_class=””] Improved! Milling Constraint Tool Parameter Defaults
This one was pretty simple. We found that our default setting for the Milling Head Diameter was too big and often causing warnings in our Pre-Check. This was creating some confusion for our users, so we sat down with our machining experts and came up with a better value. As always, you should verify that these values make sense for your scenario.
[icon name=”thumbs-up” class=”” unprefixed_class=””] Improved! Handling of Moment Loads from Generative Design to Simulation
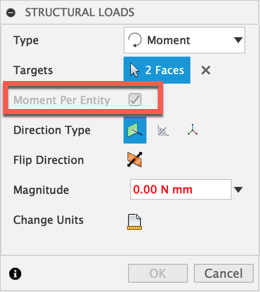
We needed to add clarity to the UI to help users understand how Moment loads are being applied in Generative Design, as it is a bit different than in our Simulation workspace. This was creating some confusion when users took advantage of the Generative Design to Simulation workflow. By default, if a user applies a Moment load to multiple faces in Generative Design, that magnitude is being applied to each face. If you have not read our Help documentation closely, this could have been easily missed, as this is different than how Moment loads behave in the Simulation workspace. To make this more clear, once multiple faces are selected when applying a Moment load in Generative Design, you will see a grayed out check box titled “Moment Per Entity” to indicate the behavior. The box is grayed out because a distributed load is not currently supported. This will hopefully make things more clear and prevent any issues going from Generative Design to Simulation in the future.
Manufacture
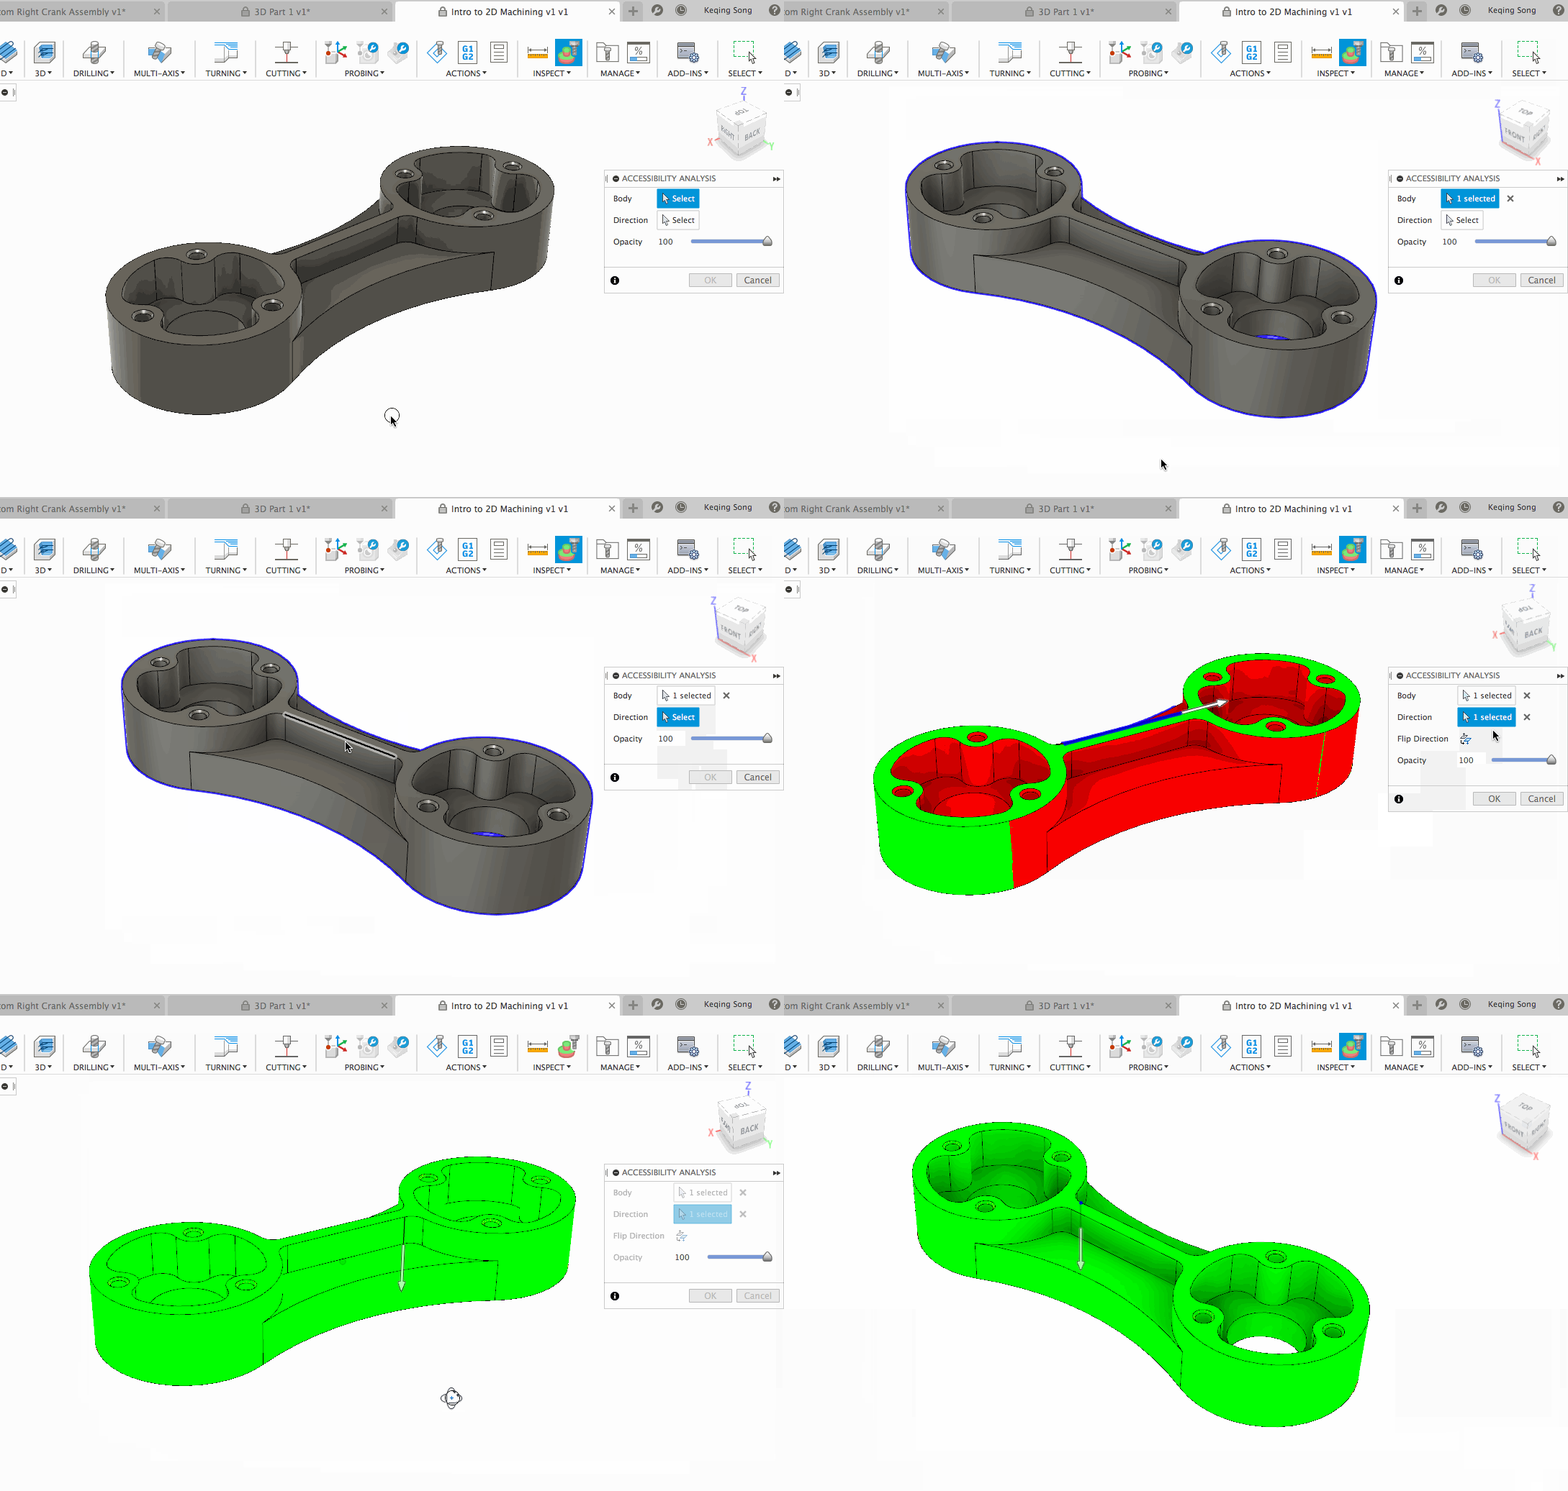
[icon name=”gift” class=”” unprefixed_class=””] New! Accessibility and Minimum Radius Analysis
Following the recently released Section Analysis tool highlighted in the last update, we’re introducing additional powerful analysis tools to Fusion 360:
Accessibility analysis is used to highlight which parts of a model are visible from a particular direction, and is dynamically updated as the model is moved. This will help customers determine how best to machine the part by referencing the shading to assess for undercuts and whether or not the surface can be accessed from the currently defined work axis.
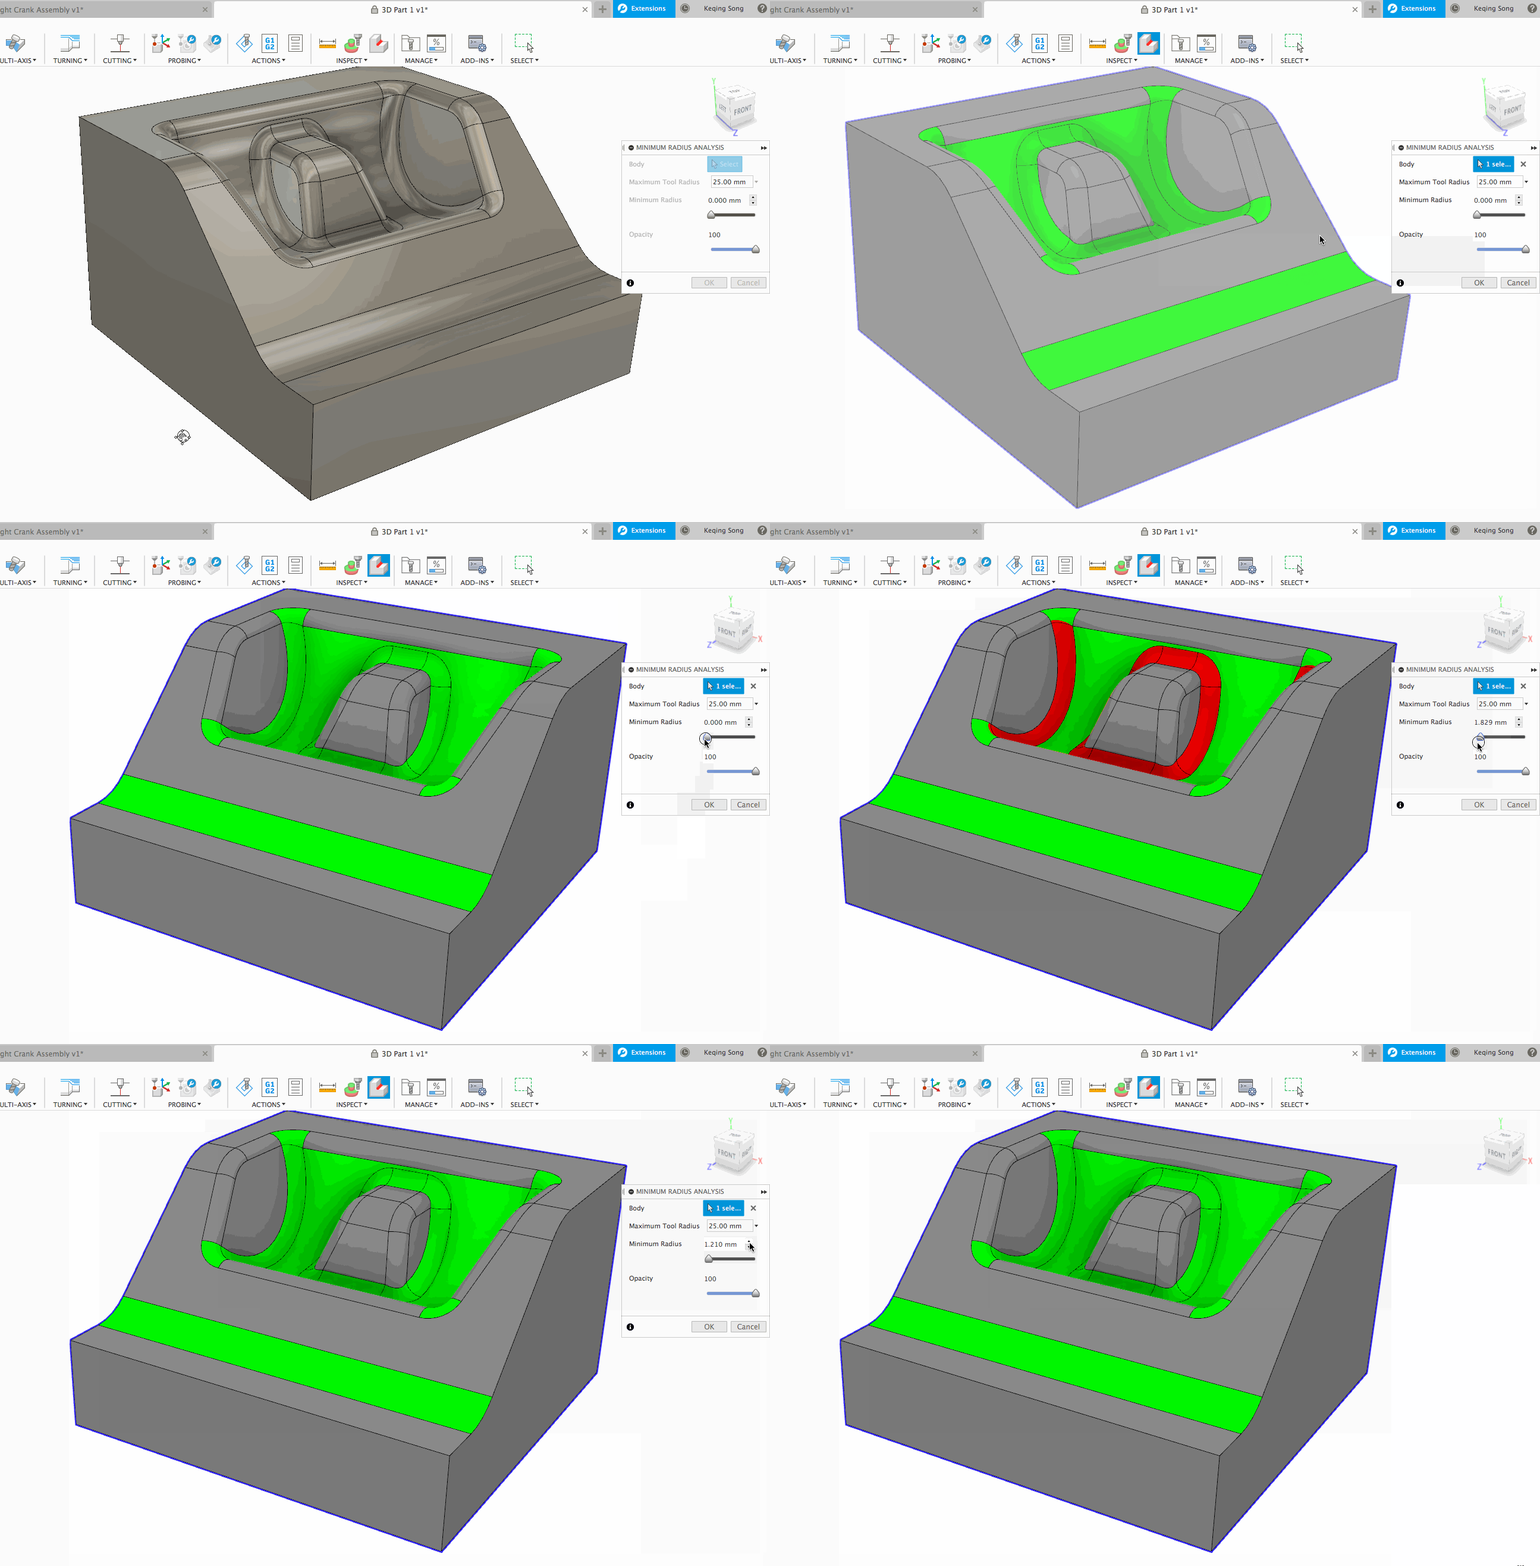
Minimum radius analysis is used to identify areas of high and low curvature on a model, and will help customers identify the correct tool size needed to machine their part.
[icon name=”gift” class=”” unprefixed_class=””] New! [Extension] Smoothing Options Added for Steep and Shallow
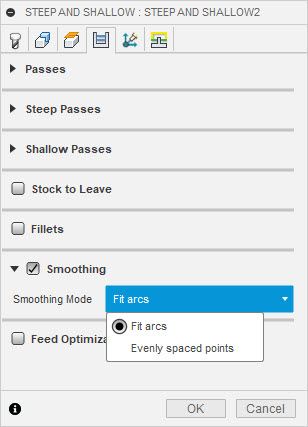
We’ve added a Smoothing check box in the passes tab for the Steep and Shallow finishing strategy available in the Advanced Manufacturing Extension. This option smooths the tool-path to reduce machining time and improve the part surface.
There are two smoothing modes – The first, “Fit arcs”, is the default smoothing functionality already available in other Fusion 360 tool-path operations, and is generally aimed at machines with older, slower CNC controls which benefit from fewer points in a tool-path.
The second, “Evenly spaced points”, introduces a new point distribution option best suited for newer machines with fast CNC controllers capable of handling many, equidistant points. Evenly spaced points will help these controls to more closely achieve the programmed feed rate throughout the duration of the tool-path which can significantly reduce the cycle time. The machine tool is also likely to run much smoother which helps to improve the surface finish of your machined part. For more information, see Smoothing for Steep and Shallow.
[icon name=”thumbs-up” class=”” unprefixed_class=””] Improved! [Extension] Probing and UI updates
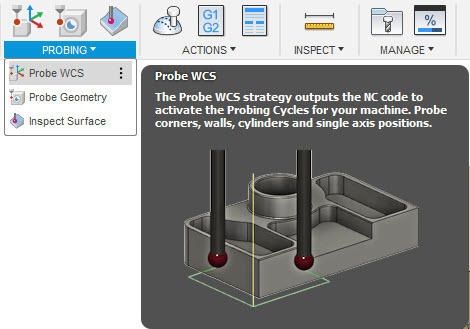
The existing Probe command has moved from the Setup menu to the Probing menu (which includes the Extension features, Inspect Surface and Probe Geometry) and has been renamed Probe WCS:
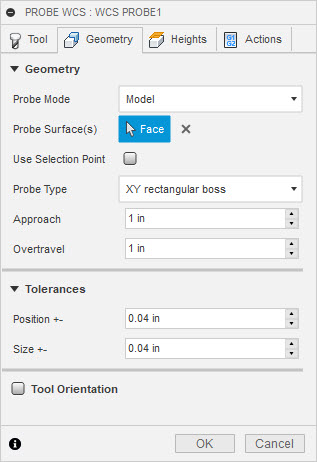
In the Geometry tab of the Probe WCS dialog, a Tolerances area has been added, which matches the Tolerances area in the Probe Geometry dialog:
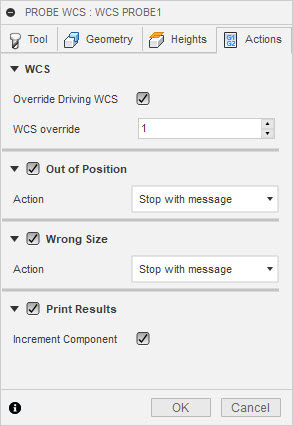
In the Actions tab of the Probe dialog, we’ve added options for Out of Position, Wrong Size and Askew (The options displayed will vary according to the geometry you pick for the probing operation.) When selected, these allow you to instruct the machine tool to stop machining and display a message on the controller if the measured position, size or orientation of the stock material is out of tolerance.
Additionally, we’ve added a Print Results option, which allows you to display probing results on the CNC controller.
[icon name=”thumbs-up” class=”” unprefixed_class=””] Improved! NC Programs
Should a change occur that causes an NC Program to reference a deleted object, we’ll now remind you to re-generate the NC Program. We’ve also made a tweak so that should you try to post same-named NC Programs simultaneously, you’ll receive an error and prompt to re-name rather than an instant overwrite of the first file.
Fixed: Tooltip Blocking Progress Bar
We’ve fixed an issue reported by @punking315, where the Simulate progress bar tooltip was blocking selections on the progress bar in cases where text commands was open or the window was not full screen. We’ve gone in and made changes so the pesky blocking behavior won’t happen anymore.
Fixed: Buggy OK Button in Mac Post Processing Dialogue
We fixed an issue @lukerl let us know about where the OK button in the Mac Post Processing dialogue was sometimes grayed out even with a post selected.
Issues we’re working on:
- When you have a 2D pocket operation and have modified the parameters of the selected tool and regenerated the tool-path (or edited the operation), the pocket was no longer selected to machine. The previously selected geometry chain was lost for some weird reason.
- We found an issue where the post didn’t work properly after you selected the setup machine if you’ve modified the output folder. This issue is specific to macOS, and we’re chasing it down now.
API
[icon name=”gift” class=”” unprefixed_class=””] New! Toolbar UI API
http://help.autodesk.com/view/fusion360/ENU/?guid=GUID-36B1FFB5-5291-4532-8F11-90E912769B34
With the new toolbar UI as the official default toolbar for Fusion 360, we’ve introduced a new paradigm in the toolbar known as tabs. In the UI hierarchy, Tabs existing within a workspace, and contains a number of panels. We’ve also added new API to support the placement of designed panels within a specific tab, in a specific workspace.
As mentioned in our comparison video, tabs can be persistent or contextual. Contextual tabs will appear based on the command that you invoke. For example, Create Sketch will show a contextual tab that includes only Sketch tools within that particular tab.
Existing add-ins that have not been updated to the new API are placed in the “Tools” tab as a default location under the new toolbar UI. Some add-ins might only show up in certain contextual tabs, like Sketch. You can use the new API to specify a certain tab for your add-in to live under, as well as the panel you want it to be in.
To those of you who attended the Fusion 360 Academy in Portland, Oregon this past week, thank you so much for attending! We’ll have to do it again next year, bigger, better, and with crazier design slams!
