V.2.0.4383

[toc]
2D Drawings
🎁 New! Create Custom Title Blocks
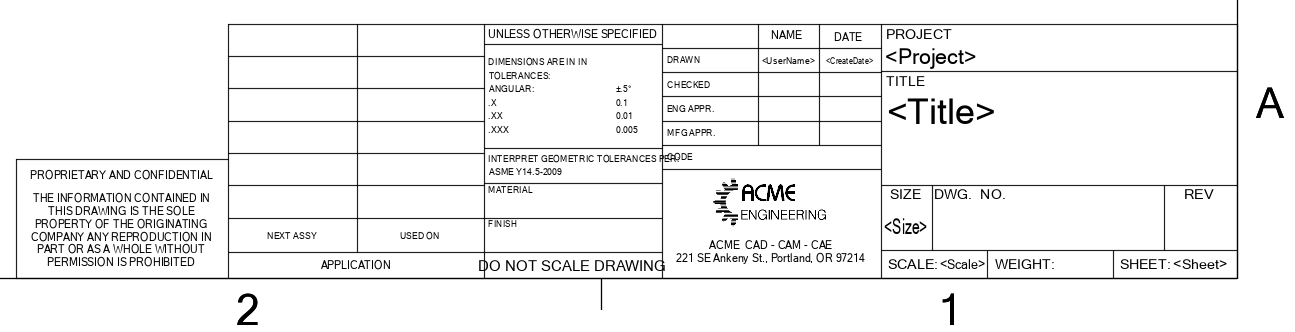
This is the most highly requested Drawings feature of all time, so we’re so excited to get it into your hands! The title block above does not look like the one that appears by default in our 2D Drawings workspace, and that’s because it’s been created with our new Edit / Add Title Block functionality, now available with this update!
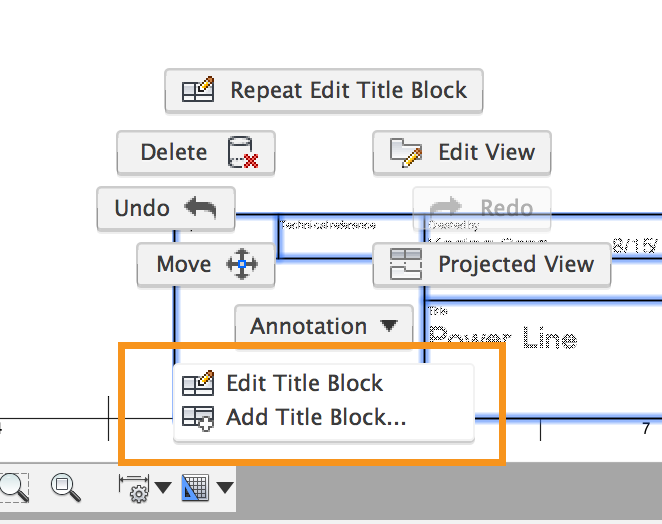
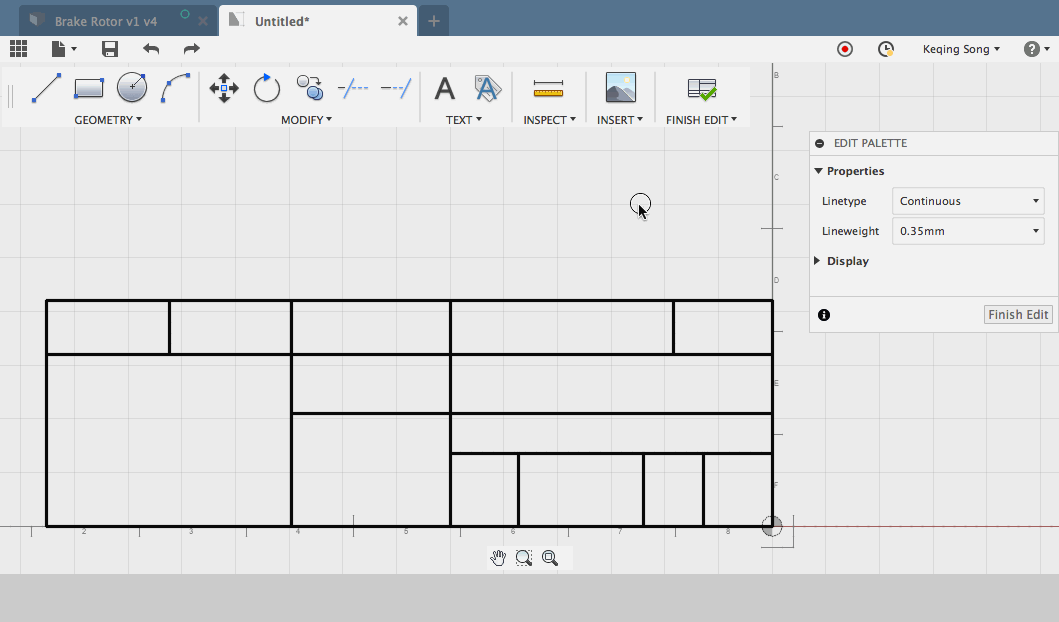
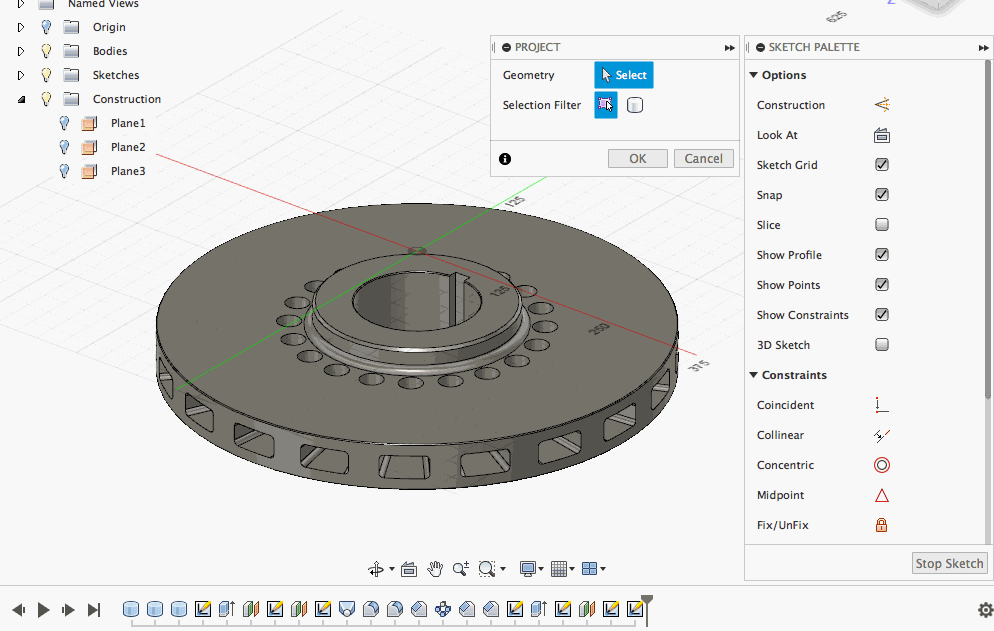
Get to it by starting a drawing, selecting the existing title block, and right-click. You’ll see options to Edit Title Block and Add Title Block.
3 ways to add custom title blocks
Upon selecting the Edit Title Block option, you’ll get a dialog telling that the default one can’t be changed, and that you’ll have to add a new title block. You choose how you want to start, either from the existing default title block, from scratch, or from an existing DWGs with title blocks you already have. Once everything looks good, click OK and you’ll enter a title block editing environment, much like the Sketch, Form, or other environments where you work in and “finish” to get out of.
Familiar tools for block creation
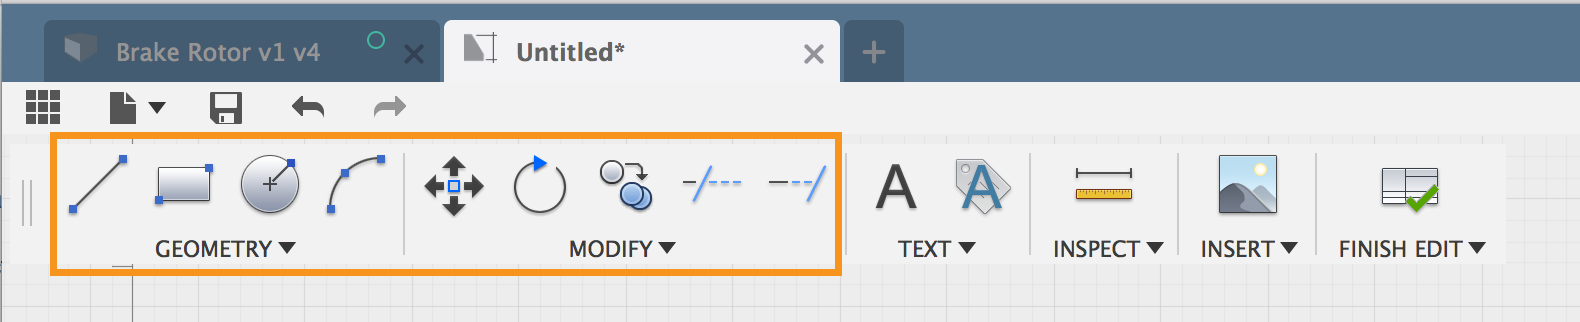
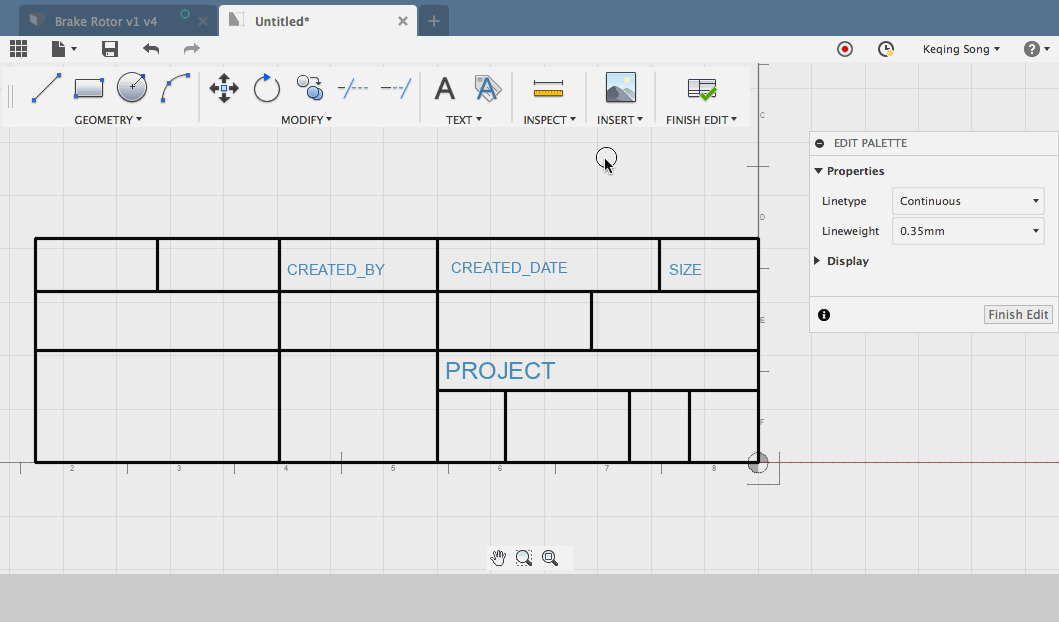
Some of you eagle-eyes will notice that we’ve repurposed some of our Sketch geometry creation tools to be title block geometry creation tools. Remove existing title block geometry by selecting and simply deleting there. Drag the end of a line to extend. All points snap into place. After you’re happy with your edits, you can save to the existing drawing or save as a new title block template.
In the Modify panel, you can Move, Rotate, Copy, Trim and Extend your lines. In the Text panel, you can input your custom text or place existing attributes into the appropriate cells and they will auto-populate once you finish the edit.
Deep dive coming soon
Oh yeah, there is definitely more to this than what was mentioned here. For a deeper dive on how to best use this functionality as well as some pro tips, look out for a blog post from the Drawings team coming soon.
Sketching
Improved! Projected geometry now obeys Construction setting
We found a workflow issue where if you used the Sketch Project tool while the Construction toggle was turned on, the projected geometry turned out to be regular sketch entities and not construction sketch entities. Now all projected sketch entities will obey whatever the Construction toggle tells them.
👍 Improved! Sketching Performance
- Our teams continue to make the sketch environment more stable and resilient, so that it can handle complex sketches and yields more predictable outcomes.
- In one example, Aradarbel10 reported that Fusion would take a really long time to solve some rectangular patterns. We verified the case, and then made some improvements to the solver such that some patterns which used to take 2 minutes to solve will now solve between in between 2-15 seconds!
- We untangled some crossed wires in the solver’s backend that made moving and editing your sketches excruciating slow to work with.
- The team also crushed crash errors related to the sketch palette, and another issue where deleting a driven dimension would take a ridiculous amount of time.
👍 Improved! Dimensioning on new line creation
- Previously if you wanted to dimension a new line on creation, you had to enter the dimension and click enter. Entering the dimension removes any implied constraints, and clicking enter exits out of the line command, which was annoying. This combination means there is no smooth way to forward-create dimensioned and constrained lines. Now when you do this, Fusion 360 maintains any inferred constraints when you’re entering a dimension, and you stay in the command after you press enter.
👍 Improved! Sketch Constraints behavior
- We’ve experience weird constraints issues in the past, where in some cases, dragging sketch geometry breaks Coincident constraints.
- In other cases, constraints did not updating correctly when changes were made to the sketch.
- We even found instances where sketches were being falsely advertised as fully constrained when in reality they were under constrained.
- We resolved a bunch of these cases in this update, and will continue to hunt them down as we find them.
👍 Improve! Sketch Offset behavior
- With the work we did on improving sketch solver performance, we were also able to crush a number of annoying Sketch Offset issues.
- There was an instance where the sketch offset you create can flip inside and out unpredictably depending on how many times you select the edge you want it to offset from.
- There were other times where an offset from a Fillet or a Spline was behaving out of control like it had just won the lottery when you tried to drag the sketch geometry the offset referring to.
👍 Improved! Control Point Splines
- After releasing Control Point Splines last update, we ironed out a number of kinks made the experience smoother in this one.
- Fusion 360 forum Mentor and Industrial Design professor Claas Kuhnen quickly found a crash when moving a 3D spline to a 2D sketch plane. We worked with him and go this fixed right up.
- We were also notified that when editing a previously patterned Control Point Spline, the control frame and the curve itself would get out of sync. Now they’re back in action, together.
- Finally, we fixed some dragging issues with the Control Points. In some cases they weren’t draggable at all, and in others, the behavior was unintuitive.
CAM
🎁 New! Make Sharp Corners (or not) option
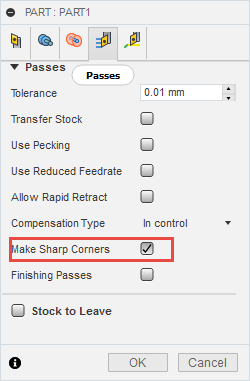
In the Passes tab, we’ve added a toggle that can tell Fusion 360 to round sharp corners in a parting tool path, specifically when edge break with a chamfer is enabled.
🎁 New! Turret column
Goods news! Now there is a Turret column in the tool library, so that if you are an uber geek and use dual turrets, this is laying the groundwork to support that workflow.
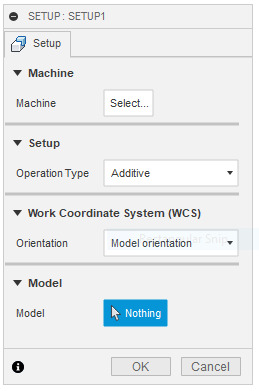
👍 Improved! Hide Stock, Post Process tabs from Setup when Additive Machine is selected
👍 Improved! Turning Single Groove
Currently this only allows the tool to cut to the geometry selection. Sometimes you’ll want to cut to the inner radius for outside grooving and outer radius for inside grooving. Now we’ve added the option “Selected position(s)” to Inner radius, outer radius, clearance cylinder and retract cylinder parameters, which allows the single groove to cut down to either the X position of the selected topology or the inner radius for outside grooving. For inside grooving it will allow the single groove to cut either up to the X position of the selected topology or outer radius. Also, with this change, clearance and retract cylinders can be parametrically set based on these selected positions to avoid air cutting. Rad.
💪 Fixed pecking issue
We fixed an issue where, for single groove and part toolpaths, if the final peck ended exactly at the total depth of cut, an extra yet useless peck was created for no darn reason. Now it doesn’t happen anymore.
💪 Fixed ID groove issue
There was a particular case of single groove where the ID groove was starting and ending at the Z axis instead of the clearance plane. Somehow this bug slipped through the cracks.
💪 Fixed units inconsistency issue in Machine Configurations
According to what michael.woodrum mentioned in this thread, he noticed an inconsistency where, if you use inches on everything, and input inches in the kinematic definition page, it’ll convert the value into millimeters. That’s all dandy, but when the G-code tells the machine to use mm, the machine actually is using inches to move around. Something was getting lost, so we got in there and made should the communication was happening smoothly. Now the Machine Configuration dialog shows consistent units as they appear in the entry fields as well as the units drop-down menu and your machines should be using the correct units provided by the G-code.
Generative Design
🎁 New! Tech previews and Improvements
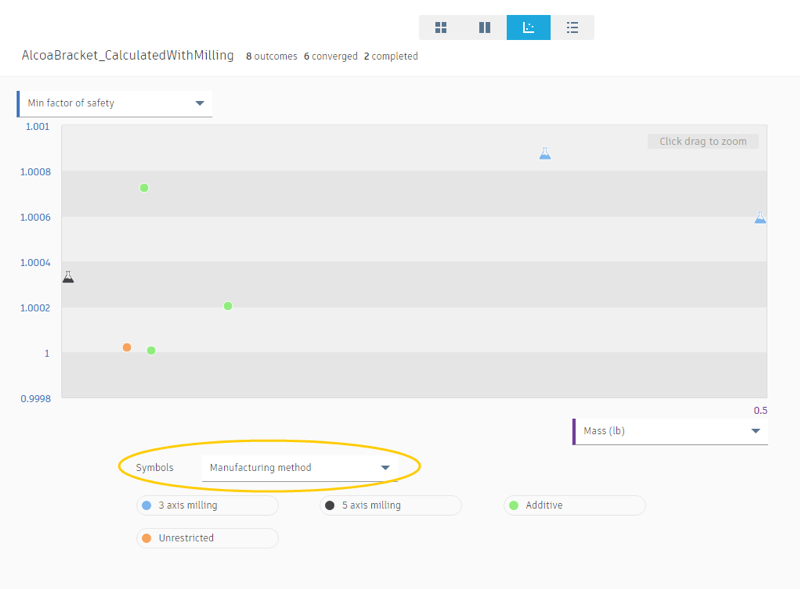
We made an update to Autodesk Generative Design that includes a couple new nifty tech previews such as a Structural Synthesis Method, Milling Manufacturing Method, as well as outcome filters based on tech preview and manufacturing methods. These filters will also show up in grid, column, scatter plot, and list views.
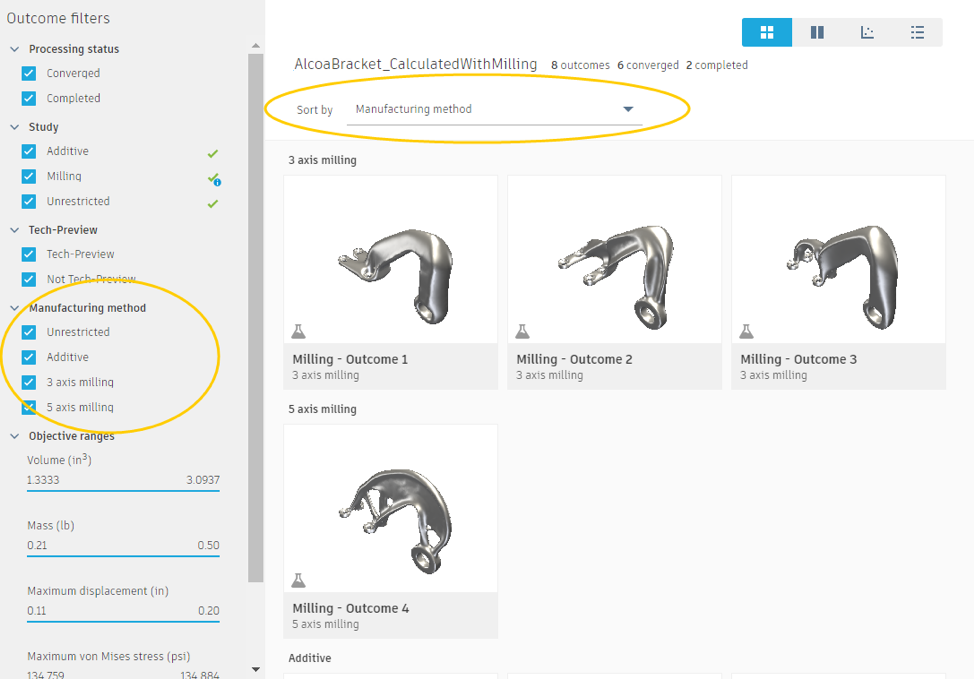
Outcome filters by tech-preview and Manufacturing methods
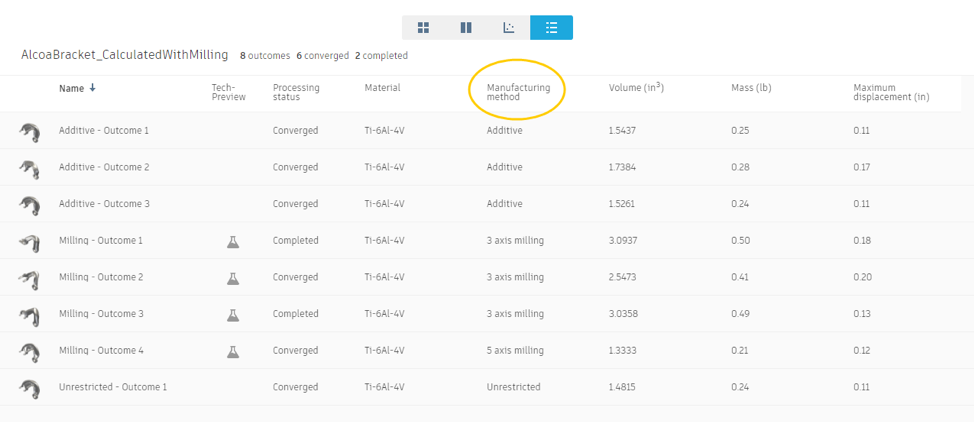
Tech-previews will also show up list view as well as scatterplot view, with a beaker icon, indicating that they are Tech-preview outcomes.
Along with this update we’ve also introduced a nice 3D view that shows you preserved and obstacle geometry. How handy!

If you’re using Generative Design, you can try new tech previews by going to your Preferences > Tech Preview and turning the ones you want to use on or off. If you’re not sure where to start on your Generative Design journey, check out the help pages for more information. Also feel free to discuss it with us in our Preview Functionality section of our forum.
That’s a wrap for this one, look out for the next what’s new! Until then, we’ll keep the discussions going in our forums, meet-ups, and where-ever you may find us ✌️.
Cheers,
Keqing and the Fusion 360 Team