This post is also available in: Français (French) Italiano (Italian) Deutsch (German) 日本語 (Japanese)

Understanding the relationship between components and bodies is a vital step to becoming proficient in Fusion 360. Unless you’ve been using Fusion 360 for some time or have a lot of experience with a manufacturing 3D CAD package, however, the very notion of components is really confusing. Many Fusion 360 users were taught that Rule #1 to begin a project is to “start your files with empty components,” but what does this really mean? In this article, we’re going to take a look at how and why we use components and bodies in Fusion 360 and finally put the ongoing “bodies vs. components” discussion to rest.
Components vs Bodies
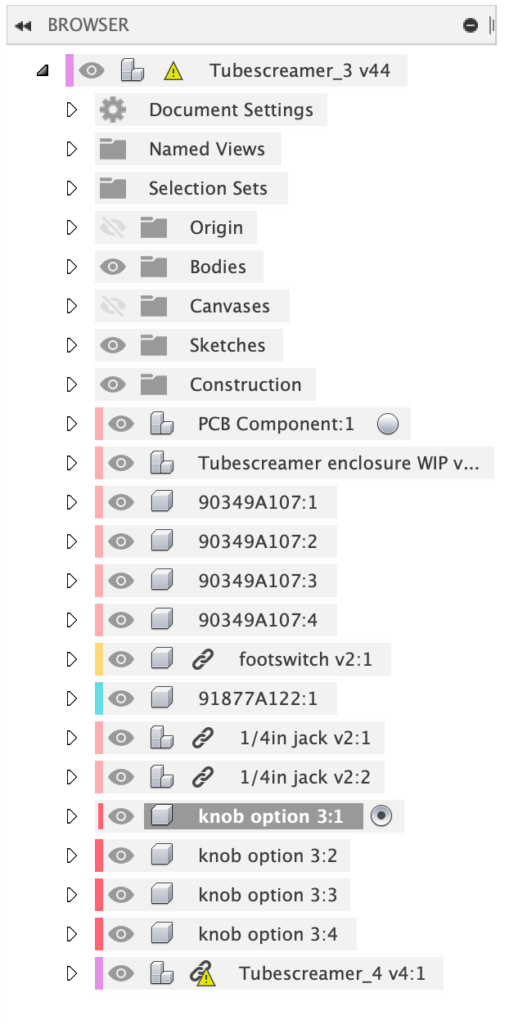
This is an interesting conundrum. Strictly speaking, you can’t compare components to bodies because components are made of bodies. Let’s take a step back and think about the top-down functionality of the data structure in Fusion 360. When you start a file in Fusion 360, your browser remains quite empty. If you do not use any components, you’ll see folders start to automatically populate: sketches, bodies, construction, etc. But what’s important to note is that all of these folders sit under a top assembly. The top assembly is the top-level umbrella where everything else falls under—it’s the final point of your file, and it’s a type of component in and of itself.

What does this mean in relation to your data and structuring, and where does this fit into bodies vs. components? Now that we understand that the top assembly is a component, and the bodies sit inside that top assembly, we can begin to understand their relationship. Bodies are an element of a component, not something that can be compared to components.
If this still doesn’t make sense, consider this: When you have multiple separate bodies that are not part of components or a sub-assembly in your top assembly, they are unable to interface with one another in the manner components usually can. This is because you are technically trying to interface one component with itself—this is why joints don’t work on bodies!
Bodies vs Rule #1
So does the bodies vs components argument matter? Absolutely, but it was important to clarify right off the bat that what people are actually asking is if Rule #1 is really a rule at all—whether they should leave everything in a top assembly or create empty components and go from there.
Unfortunately, there’s no definitive answer to this question, but that’s probably a good thing. If there were a definitive answer, everyone would probably be making the same things, which would be very boring.
The real answer is: do whatever makes the most sense for your workflow.
My product design process often starts off as exploratory. Then as I continue to flesh an idea out, the concept/idea becomes more structured. Because of the nature of my workflow, I choose to start off with everything as separate, new bodies—figuring out the interface, what will go where, and how I will use it all. Then from there, I start a new file from scratch with a guideline of my components and sub-assemblies laid out in the browser before I begin anything.
Of course, if you have a clear idea in your head of what you are working on, you can jump straight into planning your components and assemblies before diving in.
Why does Rule #1 exist then?
Well, no matter what approach you decide to take, organizing your data into components and sub-assemblies as early as possible in your design process is beneficial. Here are a few things you’ll gain from doing so:
Condensed timelines
You may have noticed that when you activate a component, your timeline condenses, showing you only what is relevant to the component. This is super helpful when you have a large assembly or a complex geometry that would usually have many steps in its timeline because it compresses things to be more manageable for edits.

Associated root parts
If you create a new component and then populate it, pattern it, or copy it, the same change will be applied to all components. This can get tricky when you’re working with multiple bodies in a single component. You generally do not want to do that as a workaround to the above copy-paste tip. A component is ideally just one body inside, as operations such as joints only work at the component level. Say you have multiple unique bodies in one component. When you go to apply a joint, that joint works at the component level—not the body level—so it applies the constraint to everything.

Sub-assemblies as file management
Sub-assemblies aren’t designed for file management, but they are excellent for managing your data. They’re great for consolidating a portion of your physical assembly together to perform a function. This can also work for consolidating your timeline, as mentioned above.
Portability
Portability? With all that file structuring? It sounds preposterous. however, using components does make your data portable. They make it very easy to fragment data out for derives, save copies for exploring alternative designs, and push portions of a total dataset out for drawings or exporting.

Whether you’re machining, 3D printing, laser cutting, casting, or molding, the use of components and sub-assemblies can be hugely valuable to keep your workflow and components organized. If you’re looking for more information related to Fusion 360 bodies and components, Kevin Kennedy created a useful tutorial that delves deeper into the core concepts and shows how to use them in real-world scenarios:
Now that you’ve mastered the relationship between components and bodies, try Fusion 360 today!
