This post is also available in: Français (French) Italiano (Italian) Deutsch (German)
Learn how to convert a solid body to a mesh body, adjust its basic refinement settings, and edit the feature in the parametric timeline in Fusion 360.
In the Design workspace, the Tessellate command converts an existing solid or surface body to a mesh body and automatically applies base groups to it.
As an example, let’s use the Tessellate command to convert a solid body to a mesh body. First, on the toolbar, navigate to the Mesh tab. Then in the Create panel, click Tessellate. The Tessellate dialog will then display.
In the canvas, select the solid body you want to tessellate. You can check the preview box to display a preview of the tessellated faces that will be created on the mesh body based on the current refinement settings.

Refinement options & settings
There are four refinement options – high, medium, low, and custom. Medium is selected by default. As you switch between them, the preview updates on the selected body in the canvas. You can also check the Create Quads box and Fusion 360 will attempt to generate quad faces on the mesh wherever possible. Otherwise, the faces that are created are triangular.
There are four additional refinement settings that you can adjust:
- Specify a surface deviation value to control how much the surface of the new mesh body can deviate from the original solid body. As soon as you adjust one of the refinement settings, note that the refinement option switches to custom.
- Specify a normal deviation value to control the maximum angle allowed between the normal vectors of each face on the mesh body.
- Specify a maximum edge length for the faces on the mesh body.
- specify an aspect ratio to control the proportions of the faces on the mesh body.
You can switch back to the high, medium or low refinement presets at any time to restore the preset values. Then, click OK to complete the Tessellate command. The solid body is then converted to a mesh body.
Mesh body
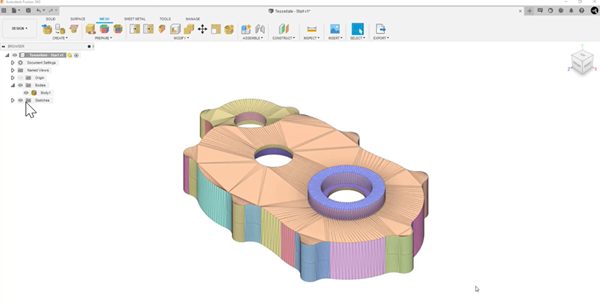
The new mesh body displays in the canvas and in the browser inside the Bodies folder. The Tessellate feature displays in the timeline. When you tessellate a solid body, Fusion 360 automatically generates face groups on the new mesh body. If you don’t see the face groups on the mesh body immediately, you may need to turn on the display setting.
On the Navigation bar, click Display and then hover over the mesh display. Then check the Face Groups box. The generated face groups will display on the mesh body in the canvas. If you need to adjust the refinement settings as you evolve your parametric design, you can edit the tessellate feature and the converted mesh body will update to reflect your changes.
In the timeline. Right-click the Tessellate feature, then click Edit Feature. The Edit Feature dialog displays. Adjust the refinement settings until the preview displays the changes you want to see. Then click OK. The converted mesh body updates in the canvas to reflect your changes.
Check out the following video to see the entire process in action:
For more information on how to use the parametric mesh modeling tools in Fusion 360, check out this video series.
If you haven’t given Fusion 360 a try yet, download a 30-day free trial today:
