Cutter compensation can add accuracy and automation to your manufacturing process. Learn about the different types of cutter comp and when to use them.
A few days ago, I was at a friend’s shop. He is someone I would consider a competent machinist, programmer, and businessperson. Most of his business involves rapid prototyping parts for Silicon Valley and Bay Area companies.
Many of the parts are complex. After a part was done, he measured a bore, punched some numbers into his calculator, ran back into his office, and made some adjustments to his program. He reposted the program and re-ran the bore operations. I watched all of this activity, and once the part was done I asked what he did. He explained that he needed to bore another 0.0015″ larger, so he went into Fusion 360 and entered negative Stock to Leave to adjust the size.
I always say that whatever process you have that makes good parts and is profitable is an acceptable process. But, I’ve also started to see that there are a lot of people not using cutter compensation to adjust the size of their features. So I thought it was time to write something about it.
What is Cutter Compensation?
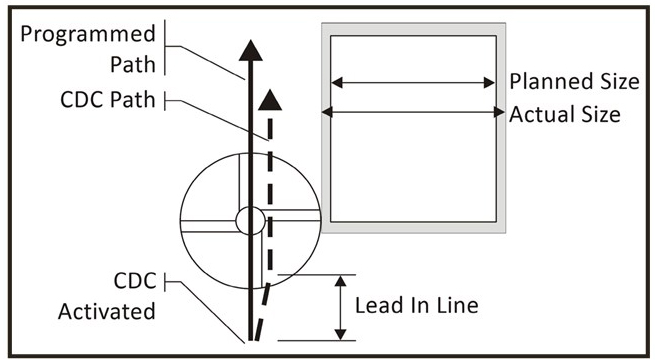
Cutter compensation (cutter comp), also sometimes called Cutter Diameter Compensation (CDC), provides a way to adjust the toolpath at the machine to compensate for tool size, tool wear, and tool deflection. When I originally started programming by manually writing G-Code, I used cutter comp to offset the tool by the radius. This allowed me to program toolpaths centered along part features rather than needing to offset the tool path geometry to compensate for the tool size. Figure 1 shows how CDC Right (G41) causes the tool to move to the right of the programmed path to adjust the feature size.
Note: Cutter comp turns on or off with a line move, but never an arc. Commanding G40/G41/G42 with an arc move will cause a diameter compensation error that will stop the program. Notice the line move labeled “Lead In Line” in Figure 1. The line move needs to be longer than the radius of the tool in the diameter offset table of your machine control. Remember this as I talk about “In Control” and “Wear” compensation types later.

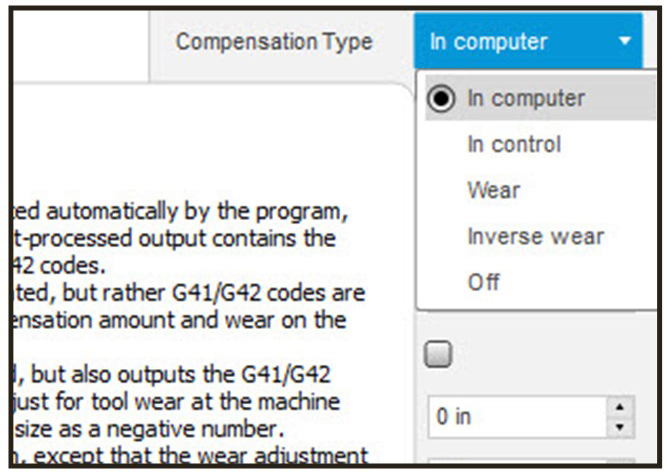
Most CAM systems offer different compensation types. See Figure 2 for the list Fusion 360 offers. “In Computer,” “In Control,” “Wear,” “Inverse Wear,” and “Off” are the common compensation types. “In Computer” and “Wear” are the most common compensation types I tend to see in industry. Here is a basic run down of the different types and when you might use them.

In Computer
The toolpath is offset from the feature geometry by the radius of the selected tool. I mostly use this when roughing or machining features I don’t plan to adjust for size. When roughing I may have a 0.010” stock to leave allowance, but my tool size typically varies less than 0.001.” So there is no need for tool compensation. Also, roughing cycles don’t typically offer tool compensation options. When no compensation type is offered, the default is “In Computer,” as the CAM system offsets the toolpath by the radius of the selected tool. I also use “In Computer” when chamfering. I buy quality tools that have accurately defined tip diameters, so I use consistently accurate tool offset measuring and rarely need to adjust my chamfer size.
In Control
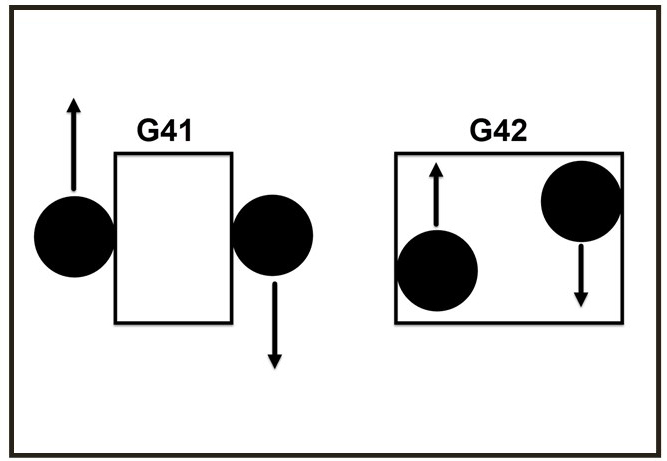
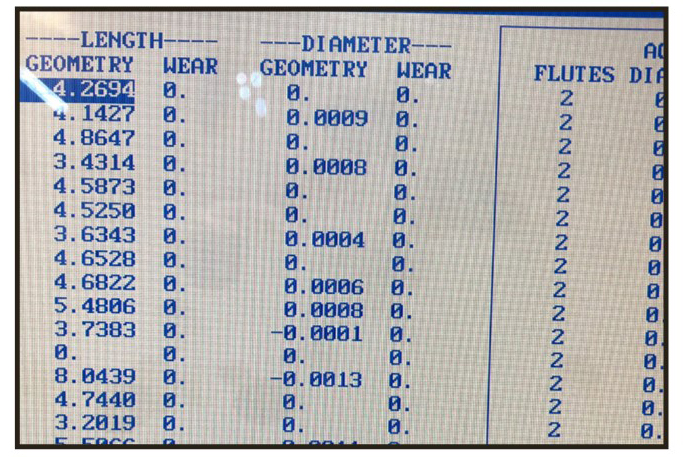
The toolpath centerline follows the feature geometry. The output code includes a G41 (right comp) or a G42 (left comp), shown below in Figure 3, to offset the tool by the tool radius from the Diameter Offset Table in the machine control. For example, a ¼” tool should have .250 listed in the diameter offset table in the machine control. The output code also includes a G40 to cancel the compensation when the tool path is complete.
“In Control” is an older method of cutter comp and is common when manually programming G-Code. This method saves a lot of time compared to manually calculating offset toolpaths. It makes sense for shops to use this method when they use both CAM software and manually write G-Code programs. Remember that the line move to turn on/off cutter comp needs to be at least the radius of the tool. This means that the lead in/out lines need to be at least 0.1251” for a ¼” diameter tool. To adjust the part feature size for a boss or a bore, incrementally change the diameter offset table by the positive or negative amount you want to adjust the size.
Example: A target of boss of 1.000” measured at 1.001” would require an incremental adjustment of -0.001”.

Wear
The toolpath centerline outputs offset from the feature geometry by the radius of the selected tool. Just like “In Control” compensation type, the output code for “Wear” comp includes a G41 (right comp) or a G42 (left comp) to offset the tool by the tool radius from the Diameter Offset Table in the machine control. The output code also includes a G40 to cancel the compensation when the tool path is complete. The difference is that the diameter in the offset table in the machine control is typically set to zero or the small difference between the programmed tool diameter and the actual measured diameter.
Example: a ¼” diameter tool measures 0.251 inches. The diameter listed in the offset table in the machine control would be 0.001”.
Wear compensation
Most shops that strictly use CAM software to generate toolpaths use “Wear” compensation, as there is more flexibility with smaller lead in/outs. If your ¼” diameter tool measured .251” and your tool offset table had a 0.001” diameter you would only need a 0.0006” lead in/out to turn on/off your cutter comp. This allows you to get into smaller pockets and other confined areas. Adjusting the part feature size uses the same workflow as “In Control,” as explained in that section. A common work flow to set up your tool for wear comp is to probe the length and diameter of your tool and then back out the programmed tool diameter from the offset table in the control. This leaves only the difference between the programmed tool diameter and the measured diameter in the offset table.
With a well-calibrated tool probe, it’s common to get very accurate parts with no compensation needed. One trick for people who have tool probes in their machines is to edit the tool probe macros to back out the tool diameter automatically. This requires a fairly good understanding of Macro programming and editing. Years ago, Henry Llere from Selway helped me edit my macros to do this automatically. It’s a small thing that has saved me hours over the years. This is a great example of why you should have a good relationship with your machine tool partner.
Inverse Wear
This is identical to “Wear,” except you enter the wear adjustment opposite of “Wear”. Example: If you needed to make a boss .001” smaller you would change the diameter offset table incrementally +.001. This is driven by settings in the machine control and is less common than standard wear comp.

Off
The tool path centerline follows the feature geometry on center and the output code has no compensation codes. This is commonly used for operations like tracing text with an engraving tool.
Nothing I’m writing here is revolutionary. My hope is to get people that aren’t using cutter comp, or don’t have a solid understanding of what it is, to learn more about it and consider using it. Beyond cutter comp, we all have details about our trade that we could and should learn more about.
Ready to try out cutter compensation in your manufacturing process? Try Fusion 360 for free today!
