v.2.0.7046
Manufacture
- Additive 3MF export issue fixed – When exporting a print scene with multiple parts and supports, some supports were being assigned to the wrong parts. This has been fixed!
General
- Instability with lofts – We were noticing some instability related to lofts in the modeling, patch, and form workspaces. This has been fixed.
- Change parameter issue fixed – Some crashes were occurring when editing parameters. This was addressed and shouldn’t cause issues going forward!
- Fusion Team and AnyCAD – Users trying to view models in Fusion Team that had been converted with AnyCAD, were noticing an inability to view the models from the web interface. This was reported and addressed within 10 days.
v.2.0.7036
Manufacture
- Setup WCS Origin issued fixed – Some of you reported that when you set your WCS origin to Setup WCS origin, whatever you were seeing in the canvas becomes blank. Maybe Friday the 13th had something to do with it.
- Machine configuration post problem fixed – HughesTooling told us about an issue he came across in machine configuration posts, where instead of using the post from the selected machine configuration, the setup kept picking the post that was last used.
- Steep & Shallow issue fixed – Embarrassingly, setting the wrong parameters to Steep & Shallow as default values and invoking Steep & Shallow again caused and Fusion 360 to become unstable. We got this sorted.
December 10, 2019 Product Update – What’s New

V.2.0.7029
[toc]
Usability
Improved! Insert 2D Images – Canvas and Decals from cloud projects
When you previously wanted to insert a decal or an image as reference for your design, you had to find the image file from your local machine. If someone on your team uploaded an image to your Fusion 360 project, there wasn’t an easy way to insert that image into an active design without downloading it locally first.

A couple updates ago we streamlined how the Insert Decal and Insert Canvas command dialogs behaved, making them progressively disclose more options as you work through the workflow. This was the first step to improve this experience.
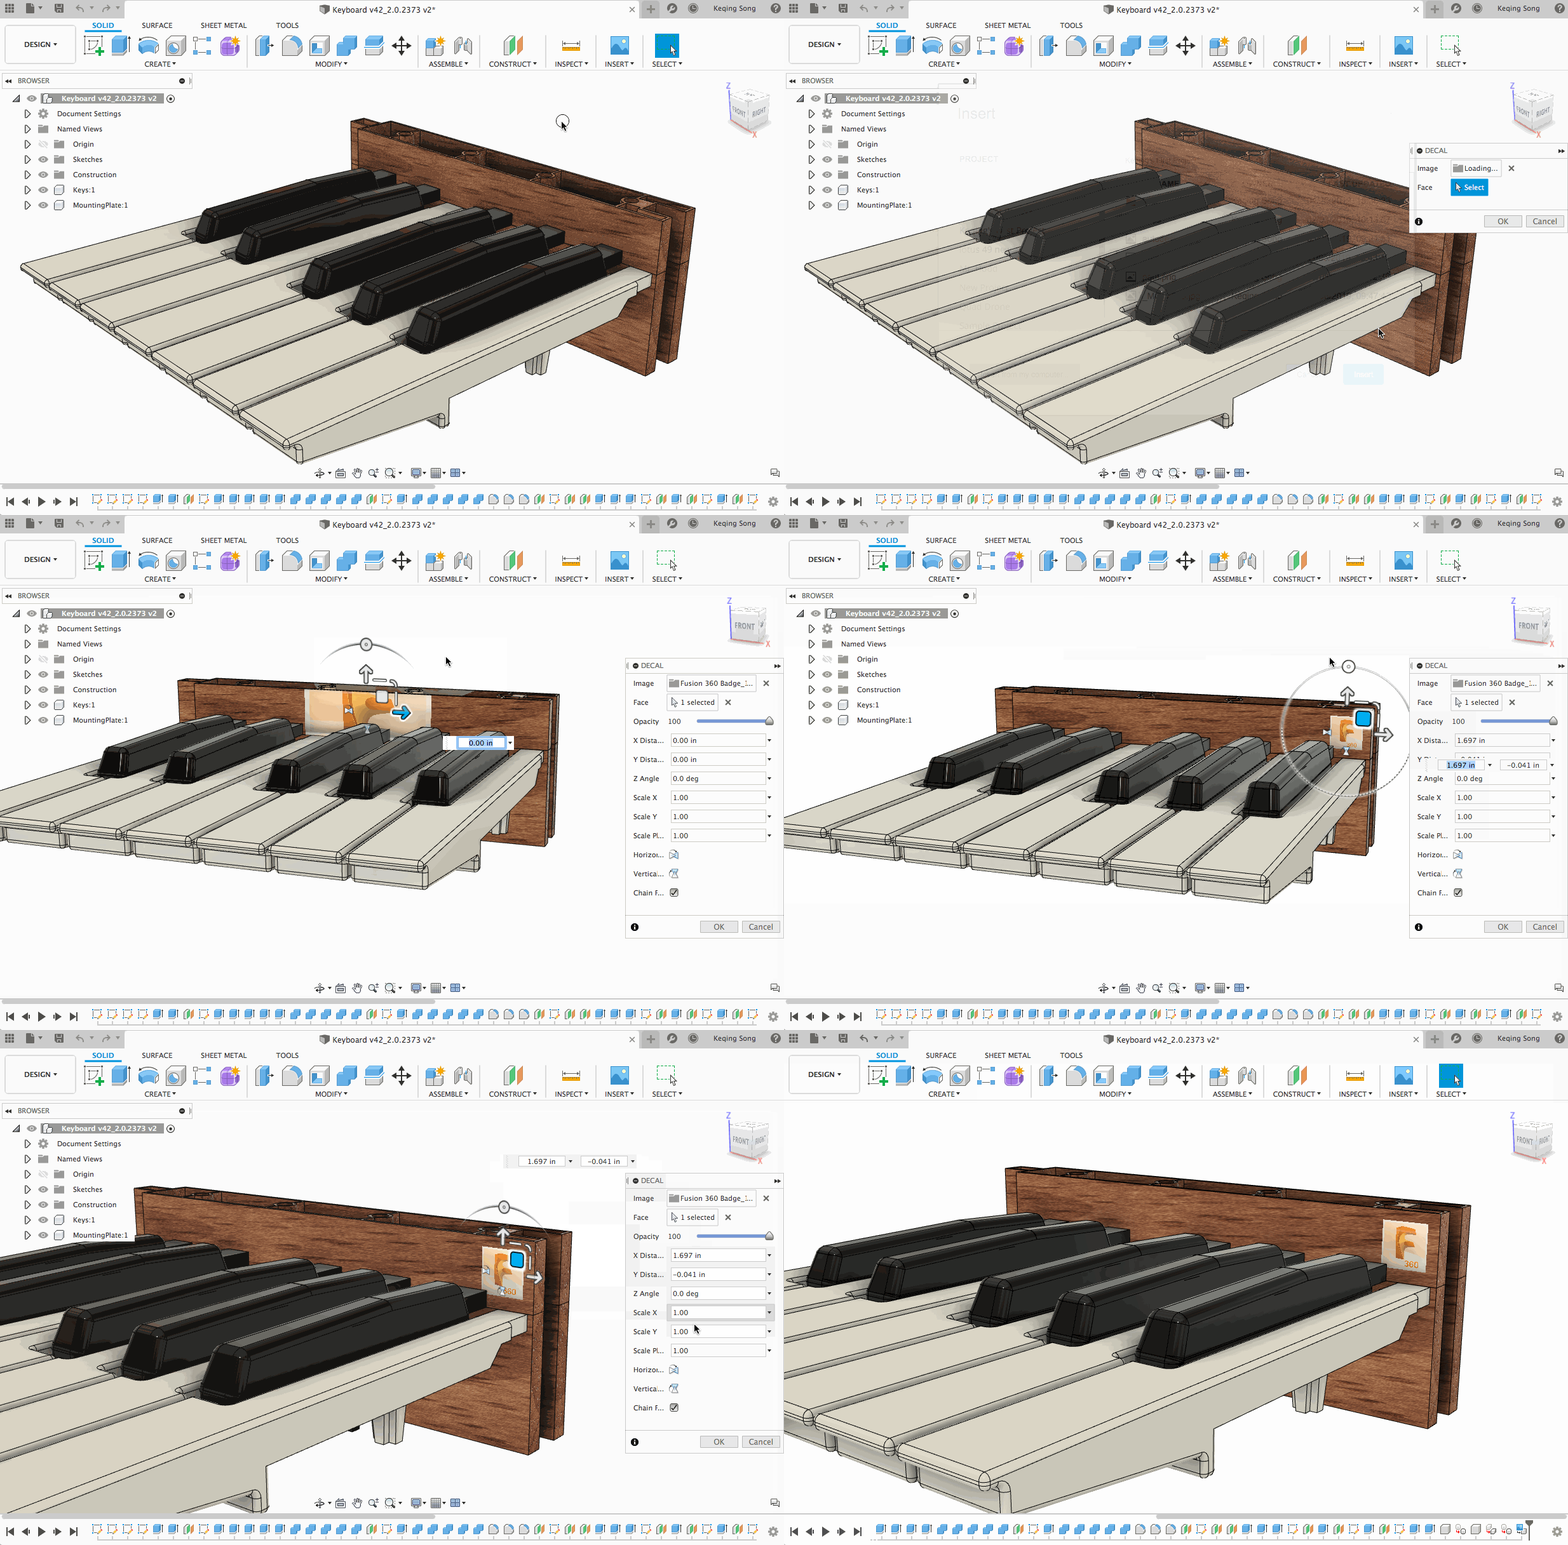
Now when you go to Insert, you’ll be presented with a new Insert file navigator dialog. Here you’ll be able to select images you or your team have uploaded to the project, and insert them directly without any wonky work-arounds. Of course, you’ll also be able to insert from your local computer if you need to.
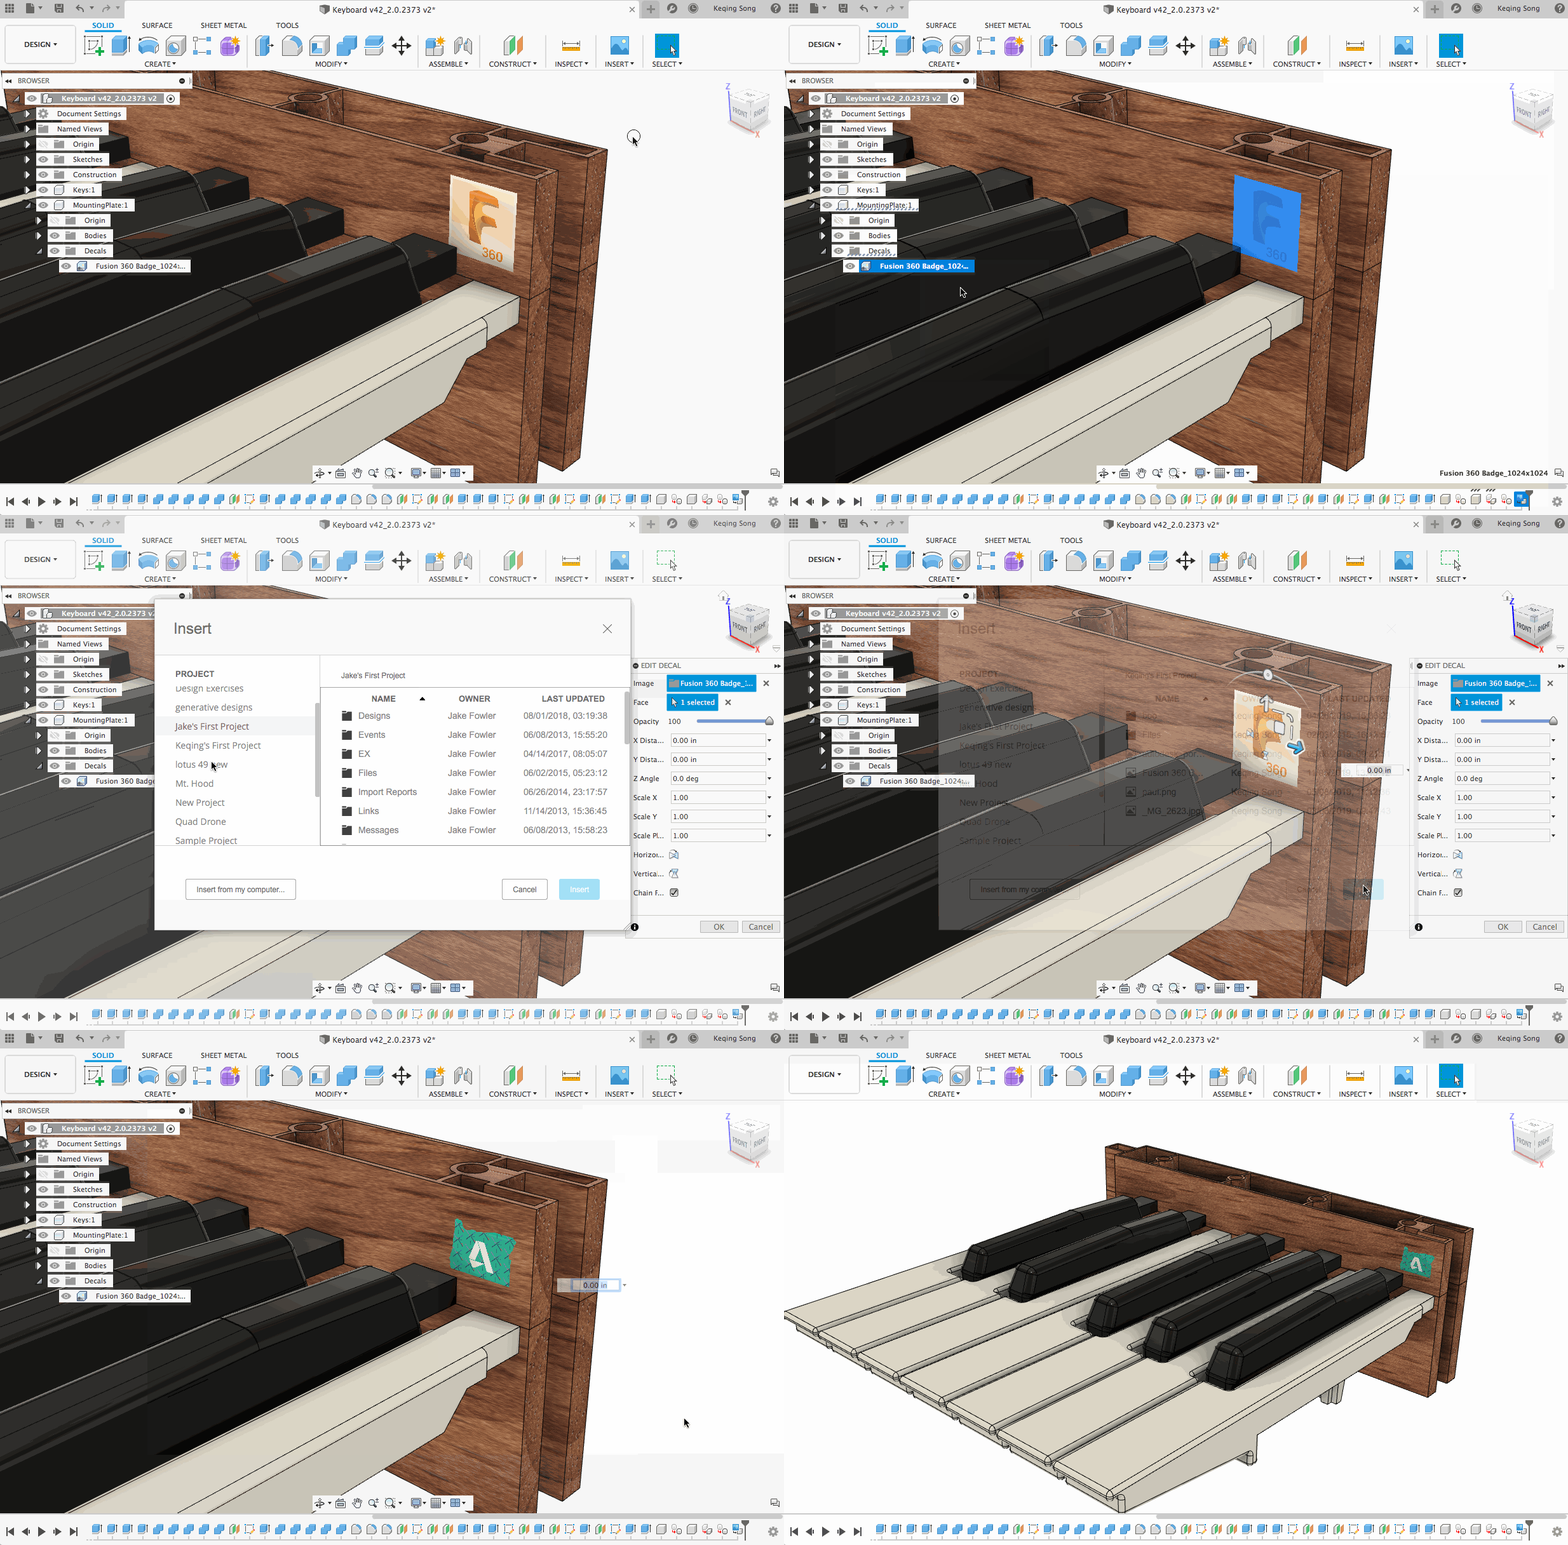
Editing your decal from the browser will allow to select a new decal and replace the existing one while maintaining its placement and scale.
New! SolidWorks 2020 File Format Support
Fusion 360 now is able to work with the latest native SolidWorks file format from SolidWorks 2020. This means you’ll be able to:
- Upload SolidWorks 2020 Part and Assembly from the Data Panel, and Fusion 360 will translate it to a useable Fusion 360 Design.
- Upload SolidWorks 2020 Part via Fusion Team or Desktop Connector, which will maintain it’s native format without any translation. This also enables AnyCAD workflows for SolidWorks 2020 Parts.
- View SolidWorks 2020 Parts web browser model viewer
Improved! Preview section in Preferences
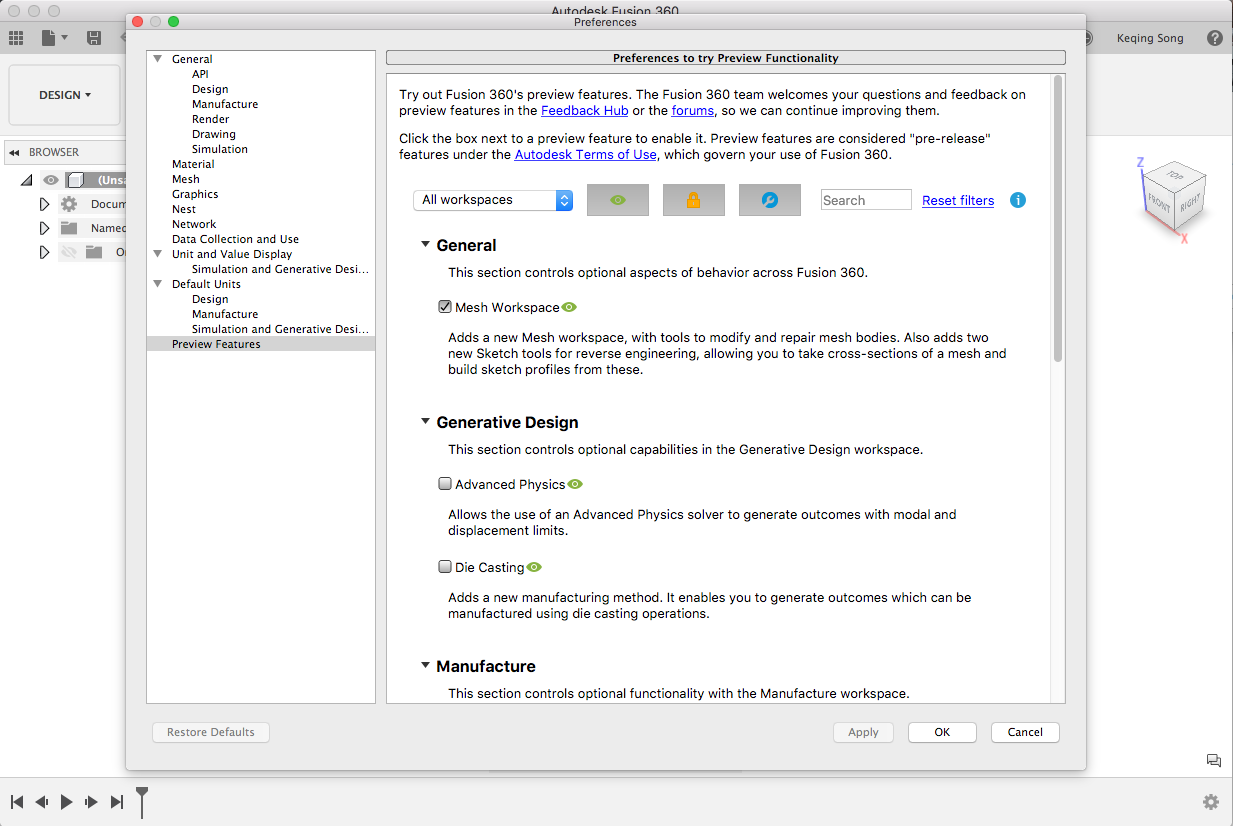
As Fusion 360 continues to evolve into an end-to-end production development platform, we are rolling out more and more preview technologies for you to try. Soon you’ll need a better way to see what previews are available so you can make better decisions at trying the ones that matter to you the most. That’s why you now see a revamped Preview Features section in the Preferences, where you can now filter by workspaces, as well as 3 different filter options:
 Public preview available to everyone
 Previews accessible only to selected users
 Previews that are part of an extension package
Improved! Copy version number and license type in About Box
Here’s a quick timesaver improvement – now instead of typing out the version number and active plan, you can now go to the About box, highlight, and copy them to your clipboard so you can paste it wherever you see fit.
Sketching & Modeling
Improved! Bend from Sketch now supports multiple bends

Now when you use the Bend command in the Sheet Metal tab, you’ll notice that the UI has been updated to support the ability of creating multiple bends within the same command. Simply select the sketch line you’d like the bend to occur, and Fusion 360 will bend it. 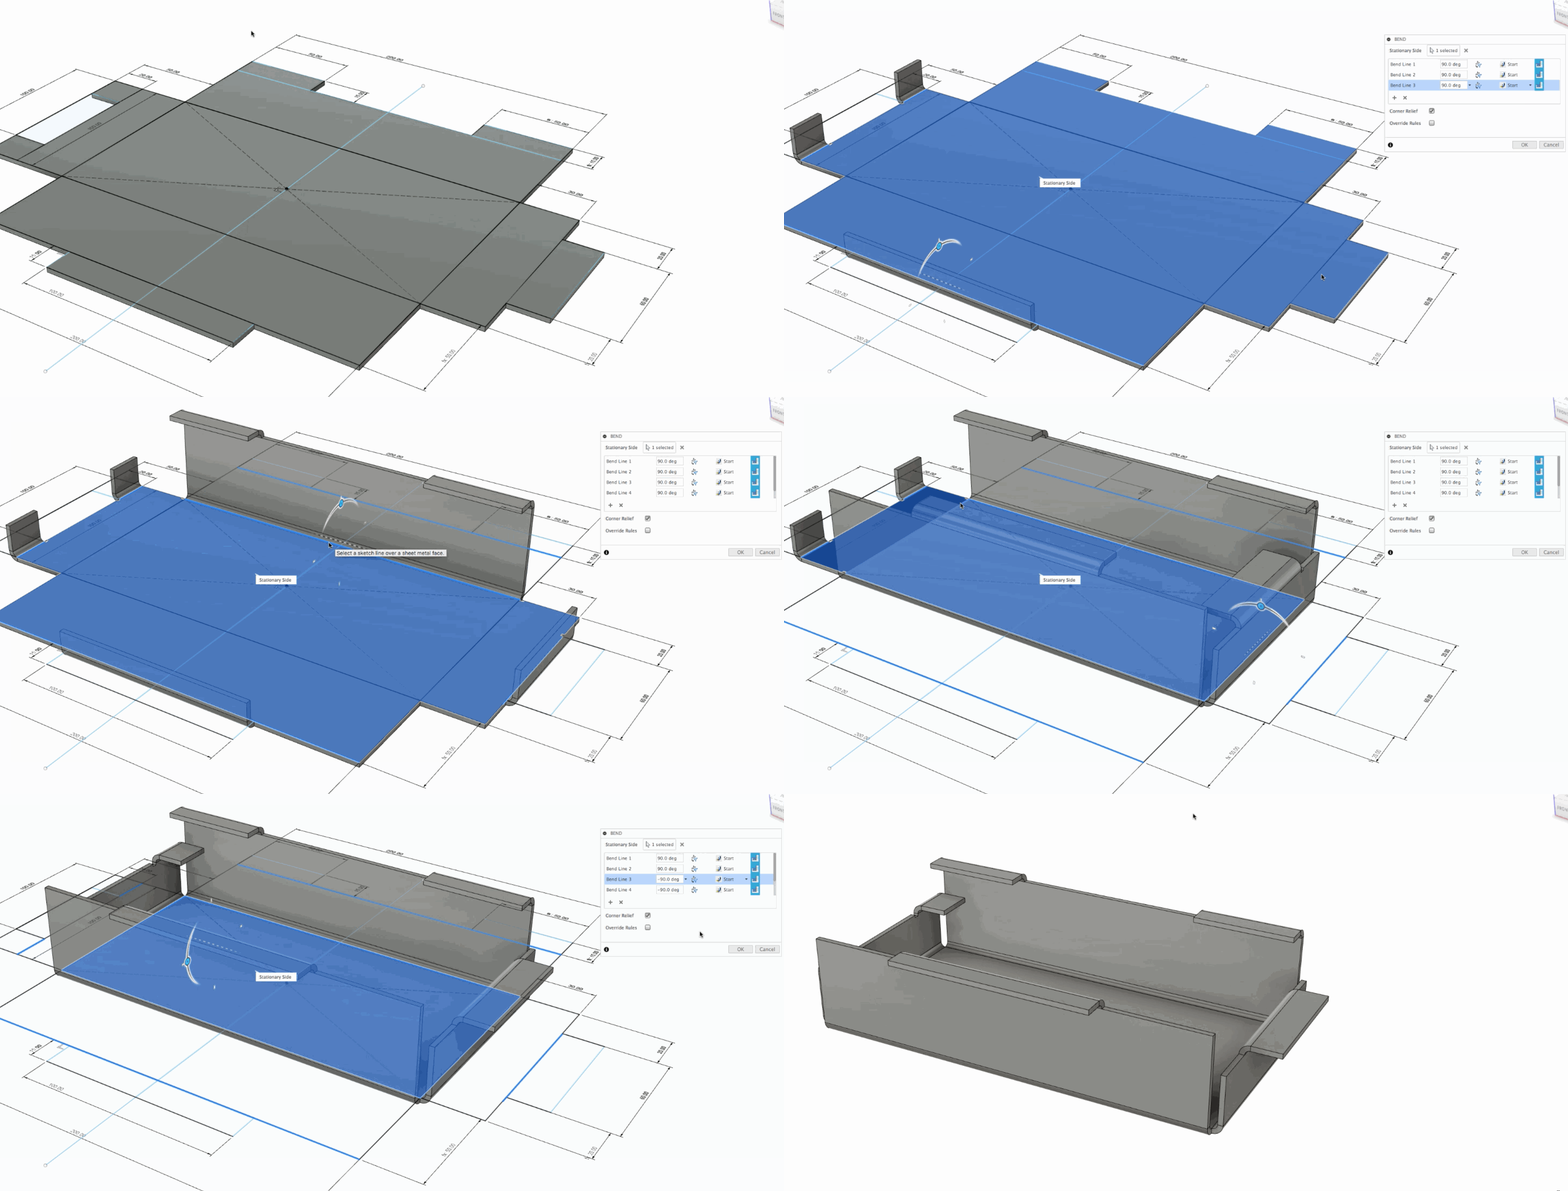
Pro tip: One thing to keep in mind while you are creating bends is to start on the outermost bends first and work your way in.
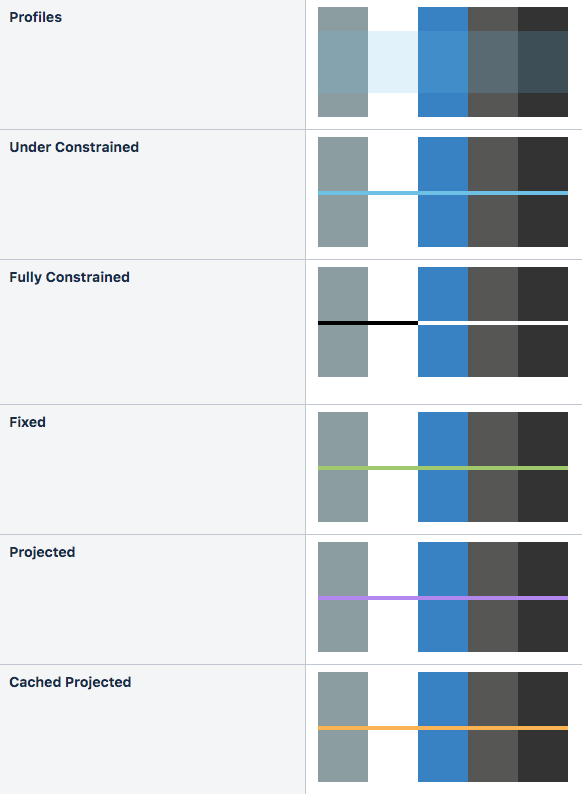
Improved! Sketch Edge and Profile Color Scheme now more visible
For the longest time, sketch lines were 1 px wide. In addition, the colors made it sometimes difficult to distinguish and pinpoint specific areas when the sketch got complex.

We’ve updated the line-weight as well as color scheme of sketch entities to be 2 pixel width, with colors that work well in all of Fusion 360’s display environments. These colors are now also standardized as part the overall Autodesk color palette, used across the family.

Here what the updated line colors will look on top of the various environment background colors (Infinity Pool, Photo Booth, Tranquility Blue, Grey Room, Dark Sky)
Fixed linkage issues related to Motion Study and Drive Joint
We got word from the support team that some of you have been experiencing issues with your motion studies and driving joints. We’ve also been tracking this forum post around joints not behaving as expected. We lubricated those linkages and now they should be working fine.
Fixed export issue for SketchUp and OBJ formats
There has been a few hiccups around exporting assembly files as SketchUp or OBJ file formats, specifically around using the File > Export path. We got rid of the hiccups by scaring them off – now these formats exports as expected.
Fixed visibility issue regarding Joint Origins in referenced designs and f3zs
Joint origins decided to make themselves visible in a referenced part even though they have been set to be invisible, way before the part was even inserted into the overall assembly. In this update, we made sure that they don’t turn themselves on again.
Manufacture
New! Toolpath Visibility
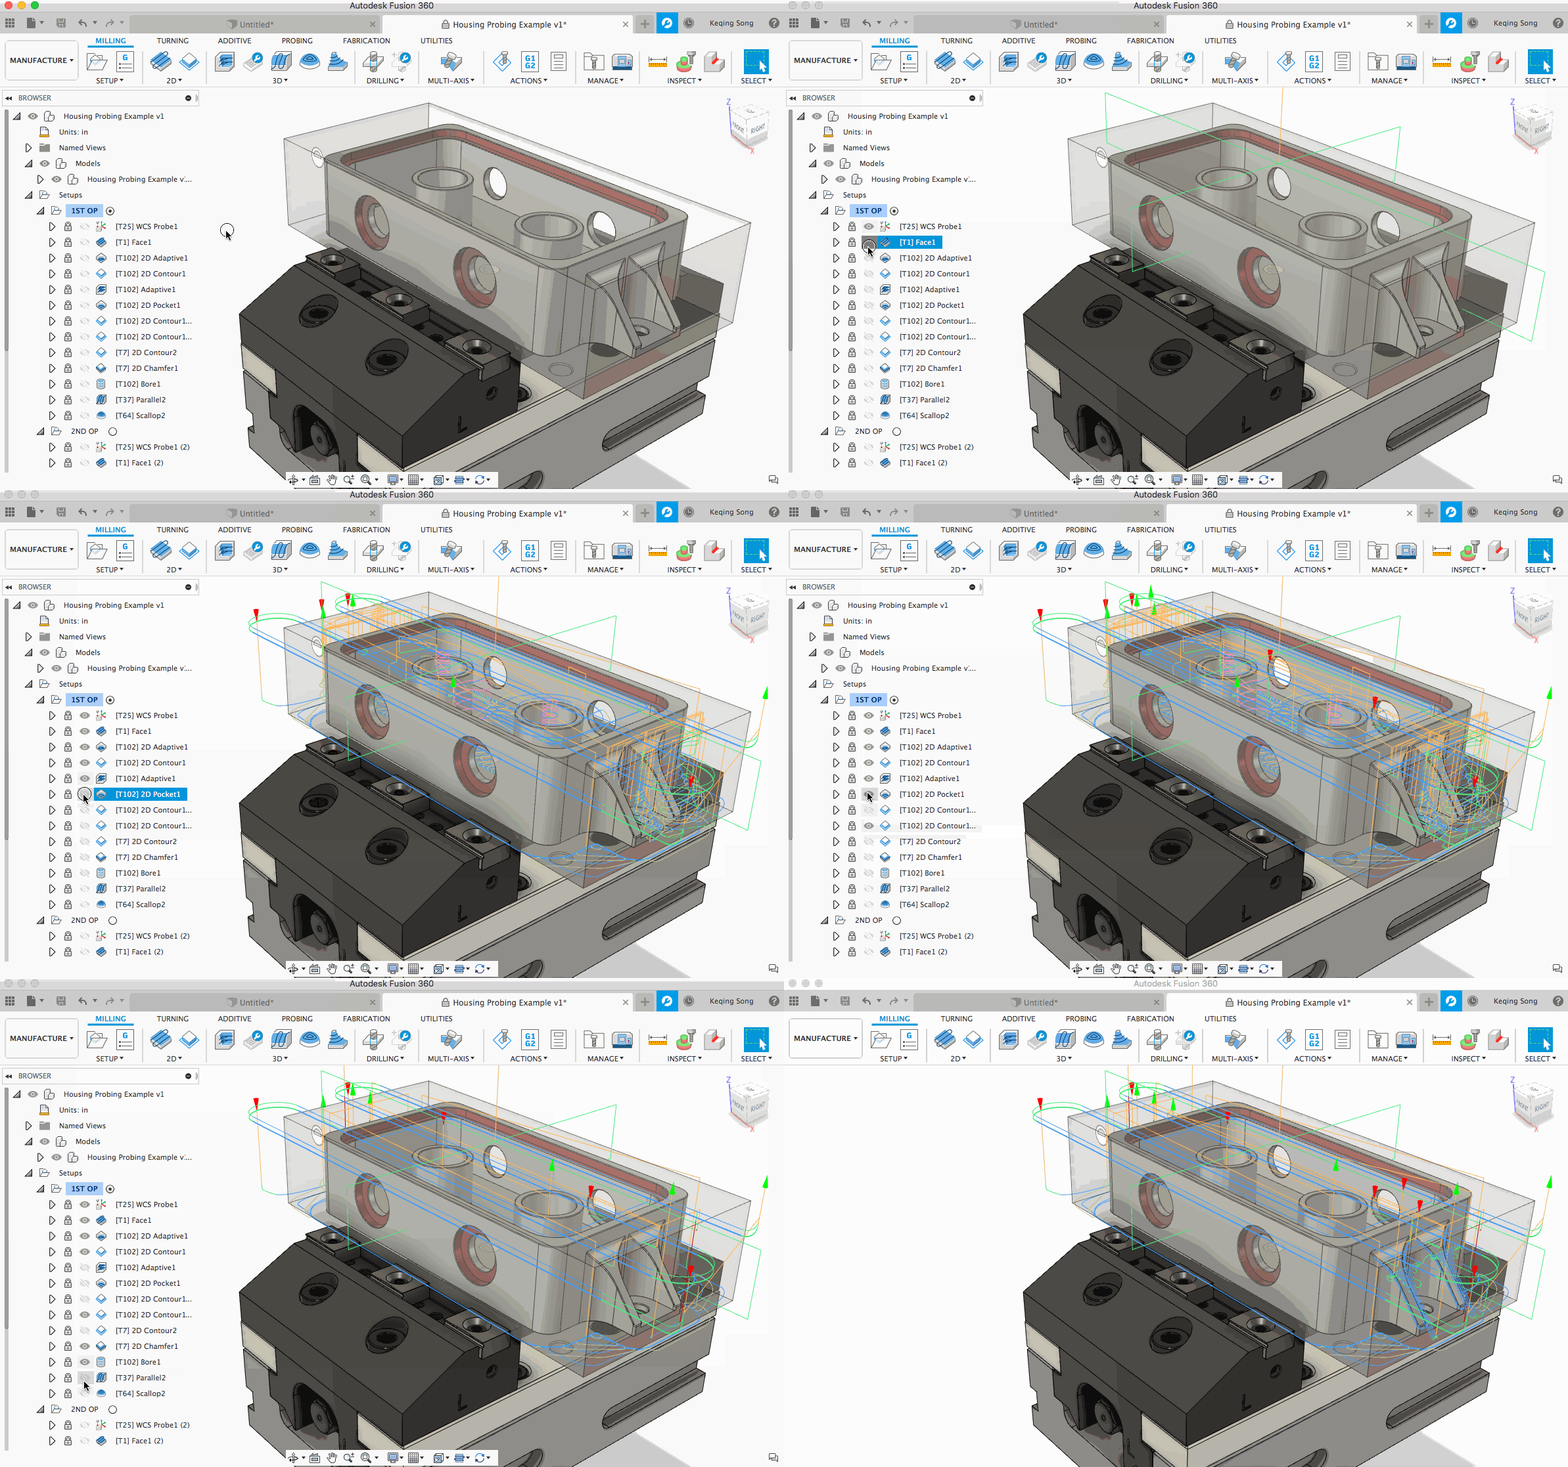
This handy new feature will let you turn the visibility of unselected toolpaths on by clicking the ‘eye’ icon in the browser. This is helpful for comparing different toolpaths, as well as for visualizing the toolpath during section analysis. Learn more here.
New! [Extension] Surface Inspection Display Points Options

If you’ve purchased the Manufacturing Extension and are using Surface Inspection, you’ll now have the option in the Manufacture section of the Preferences dialog to choose how you’d like to display your inspection results on the part. From the ‘Results Display Type’ option, simply choose whether you’d prefer ‘confetti’, pins, or cylinders.
Learn more about Surface Inspection Display Points on our help page
Improved! Sync Named Views with Active Setup
We’ve extended the ‘Sync view with active setup’ option many of you have been using since the October release – now, you can choose to associate an existing or new Named View with a particular setup, such that when that setup is active, your view automatically adjusts to match that associated Named View.
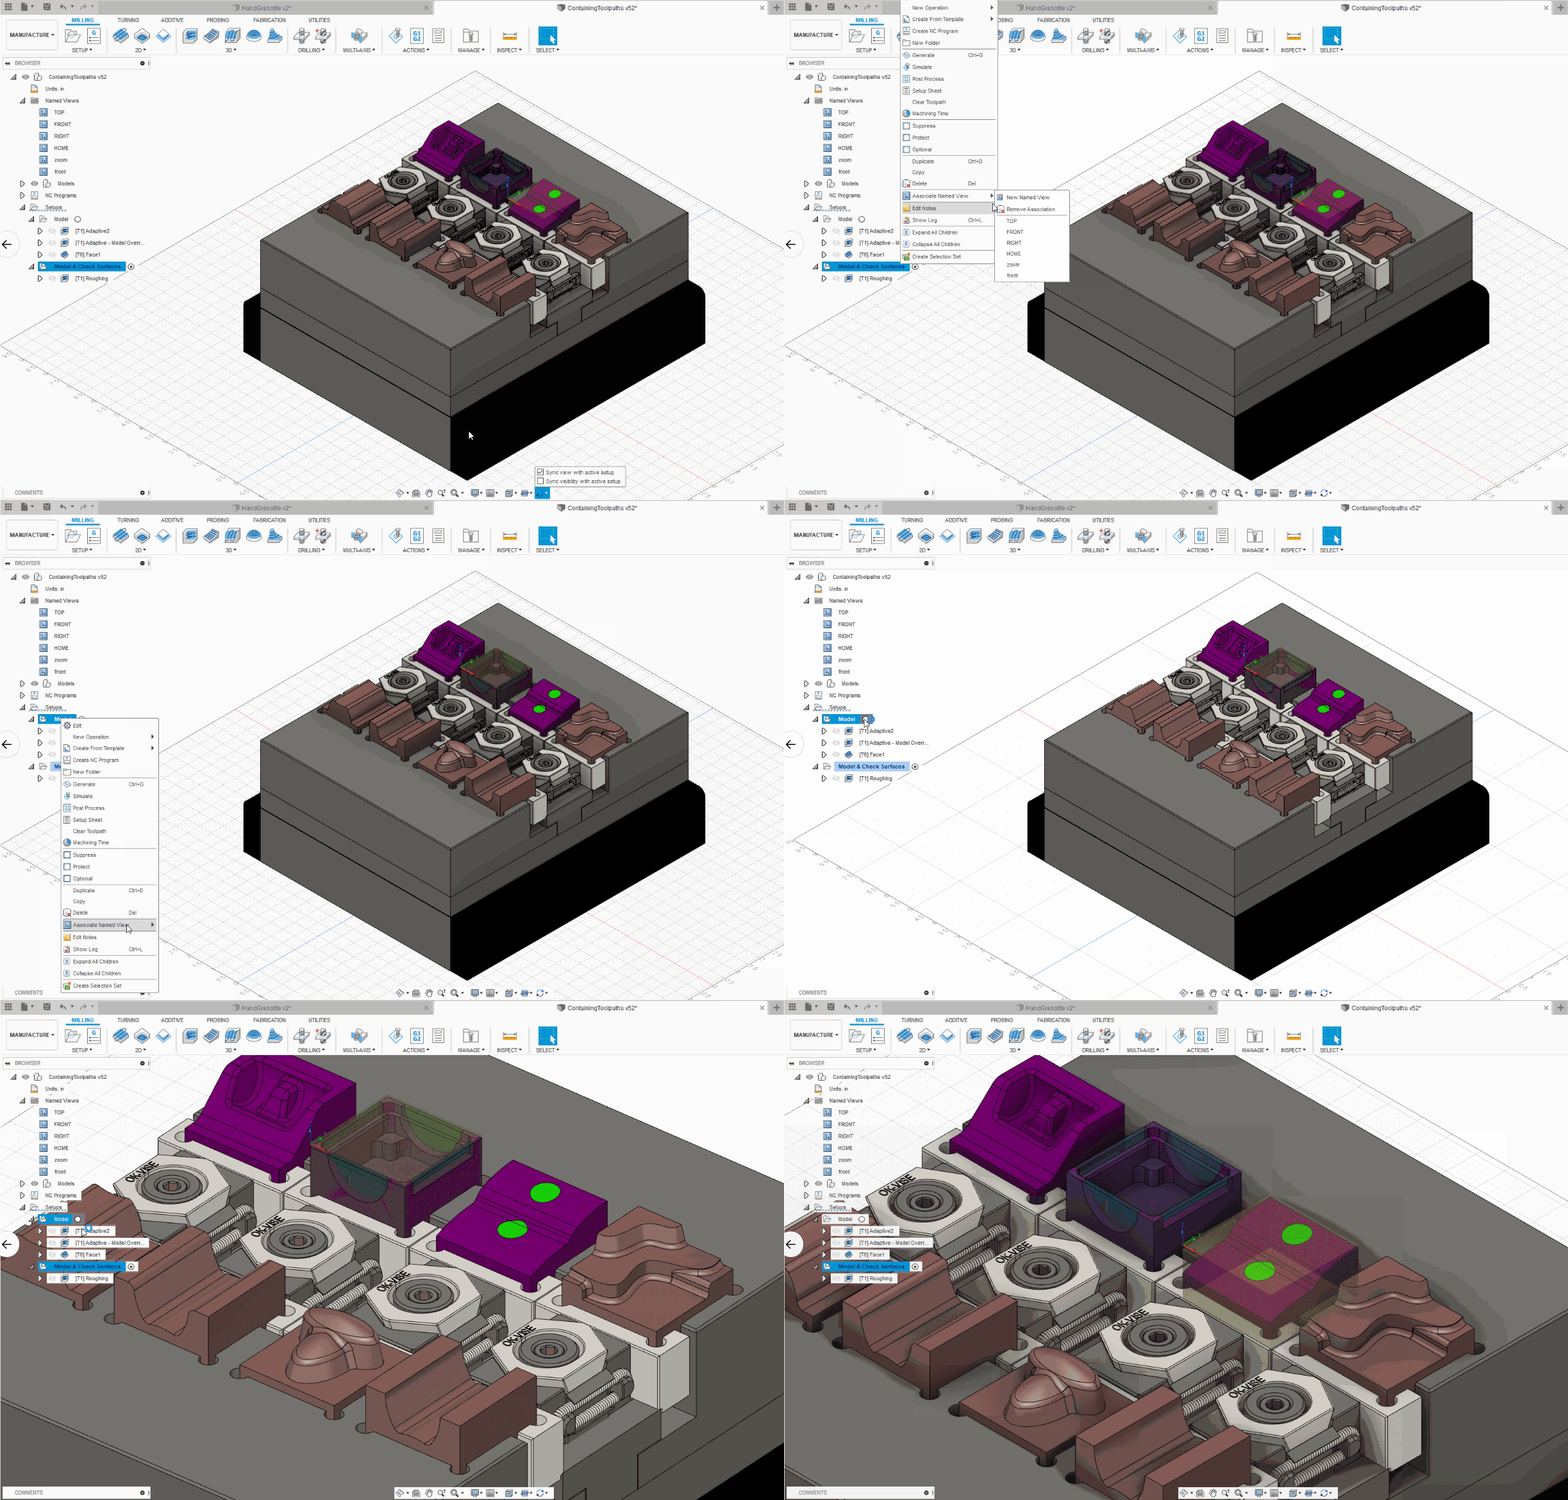
You can try this by activating the ‘View Sync’ option in the navigation toolbar, then right click on your setup -> Associate Named View and choose whether you want to link an existing Named View or create a new one with your current view cube settings. You can remove or change the association at any time by imply right-clicking on your setup and choose ‘Remove Association’.
Improved! Single Groove: Axial Stock to Leave

We have added the ability to specify axial finish allowance for a turning Single Groove operation. This will allow you to rough a single groove before a parting operation, leaving axial stock on the sides of the groove, then finish it with a parting tool.

Improved! [Extension] Multiple Holes Selections for Probe Geometry function
You will now be able to probe multiple holes in a single operation, saving programming time and allowing better organization of your probing operations. From the Geometry tab in the operation dialog, you’ll now be able to select multiple Probe Surfaces at a time.
Learn more about Multiple Holes Selections for Probe Geometry here
Improved! Profile Roughing: Rapid to Next Cutting Depth

We’ve added the ability in a turning profile roughing operation to choose whether to rapid directly to the next depth of cut or perform a dual move consisting of a rapid move to the previous depth of cut, then feed to the next depth of cut. When unchecked (canned cycle compatible motion), the tool will rapid to the previous cutting depth, then move to the next cutting depth with cutting feed. If “Use Canned cycles” is checked, this parameter will not be visible and the toolpath will behave as if the parameter was checked off.
Improved! Profile Roughing, Finishing: Z Tool Limits

You can now set the front Z tool limit (contact point or cutting edge) for a toolpath being machined by a tool with a right-facing insert.
If the toolpath is using a tool with a left-facing insert then the Z tool limit type will be set for the back Z limit.

For a neutral insert the Tool Limit parameter will not be shown and will internally be set to contact point.
Improved! Profile Roughing Canned Cycles
Profile Roughing canned cycles now support contact point tool limits in Z and X. The first move in a G71 / G72 canned cycle profile is now a G0 rapid move. This allows the tool to retract, then move to the next cutting pass depth with a rapid move instead of a feed move, thus shortening the toolpath cycle time.

The first move in the canned cycle profile is now positioned at X Clearance for G72 and Z Clearance for G71 canned cycles, thus ensuring that the tool starts outside the stock. This also allows users to use Type I canned cycles on their controller.

Thanks to VicKosta, we caught an issue with canned cycles where it is possible to enter a negative value for radial stock to leave which results in positive stock to leave when posted. Now, we prevent you from setting a negative X or Z finish allowance -we’ll give the following error “Negative Finish Allowances are not allowed for a Turning Profile Roughing Canned Cycle operation”
Improved! Auto Turning Mode on Tool Selection
We’ve improved the workflow for turning profile roughing and profile finishing operations by automatically setting the default turning mode based on the type of turning tool selected. For Profile Roughing and Profile Finishing strategies the default Turning Mode is now set based upon the type of tool selected. If a turning general tool is selected the default Turning Mode is set to “Outside profiling” and if a turning boring tool is selected the default Turning Mode is set to “Inside profiling”.
For Profile Roughing strategies with cycle set to Vertical Passes, the default Direction is now set based upon the Turning Mode. If the Turning Mode is set to “Outside Profiling”, the default Direction is set to “Outside to Inside” and if the Turning Mode is set to “Inside Profiling”, the default Direction is set to “Inside to Outside”.
Fixed: Thread Pitch Simulation
In stock simulation for a threading operation, the distance between threads will now match the thread pitch from the operation rather than from the tool.
Fixed: 2D Contour Generation Bug on Windows
We fixed an issue where a 2D contour with a circular input contour failed to result in a toolpath due to linking constraints.
Generative Design
New! Generative Design Free-for-All

Yup, you heard right. During Autodesk University 2019 in Las Vegas we launched the free generative design until 2020 marketing campaign with a bang. We have teamed up with Amazon Web Services (AWS) and NVIDIA to offer free unlimited generative design in Fusion 360 from now until December 31, 2019. There are no strings attached allowing our customers and prospects to take advantage of this offer to learn and explore all of the benefits of generative design on us.
To get started now, click here or to learn more about how to get started in our Fusion 360 blog post. If you need more help to figure out how to get started, drop us an email at generativedesignhelp@autodesk.com
New! Outcome Cost Estimation now available


In our last update, we released Outcome Cost Estimation in Preview. In this update, we have put the finishing touches on this collaboration with aPriori and it will be available by default for all users of Generative Design. Cost information will automatically be generated for all new studies based on the production volume, manufacturing method and materials defined. Now cost will be front and center as part of the decision making conversation when exploring generative design outcomes. To learn more about how to get the most out of this feature, check out our Help content on this topic.
New! Visual Similarity Filter in Explore
Often when discussing generative design with our users, the topic of visual appearance comes up as something they need to pay attention to as part of their design process. Further, when presented with so many viable options, users have asked us for better ways to narrow in on the outcomes they like best.

We have enlisted the help of machine learning to help users manage these interests by creating a new filter to help organize outcomes. The Visual Similarity filter will identify and group outcomes with similar visual characteristics to make it easier to find the ones you like and quickly rule out the ones you don’t. Also, when in the Compare view, there is now a new option to find similar and we will automatically find the most similar outcomes for comparison. Because we are using machine learning, the Visual Similarity filter will always be adapting to what it is observing. As you start to expand your design space through additional studies with new or refined setups, the filter will continue to update groupings based on your outcomes, making it easier and more efficient to find that perfect design. Check out our help page to learn more.
New! Design Objectives in the Browser

We wanted to make it easier to quickly identify the setup of a study. The Design Objectives and Limits for a study play a major role in the way outcomes are generated. Now, a user will be able to view and edit the Objectives and the Limits used for the study directly in the browser. For those users using the Advanced Physics preview, the Modal Frequency and Displacement limits will also be visible from the browser.
Improved! 2 Axis Cutting Outcomes

Continuing our efforts around manufacturing constraints and creating more interesting outcomes that can be produced with more widely available tools, we have made another round of improvements to our 2-Axis Cutting strategy. From this update forward, you will start to see 2-Axis cutting outcomes that are more efficient at mass reduction and void generation.
Improved! Parametric Recipe for 2 Axis Cutting and 2.5 Axis Milling Outcomes

Highly editable outcomes are a cornerstone of our Generative Design solution. We have been watching closely how our users have been taking advantage of our 2 and 2.5 axis solutions. The parametric recipe that we use for these strategies is different than our 3D strategies in that it uses sketches to reproduce the generated geometry, rather than T-Spline bodies. Up to this point, the sketch profiles have only been created for the generated geometry. Through our work with customers, we found some limitations on the overall robustness and editability of these sketches. With this update, we have changed our strategy and are now extending the sketch to include the profiles of the preserve geometry. This will give users better control for the transitions between the preserve and generated geometry, allowing for easier editing and for an overall more robust conversion rate.
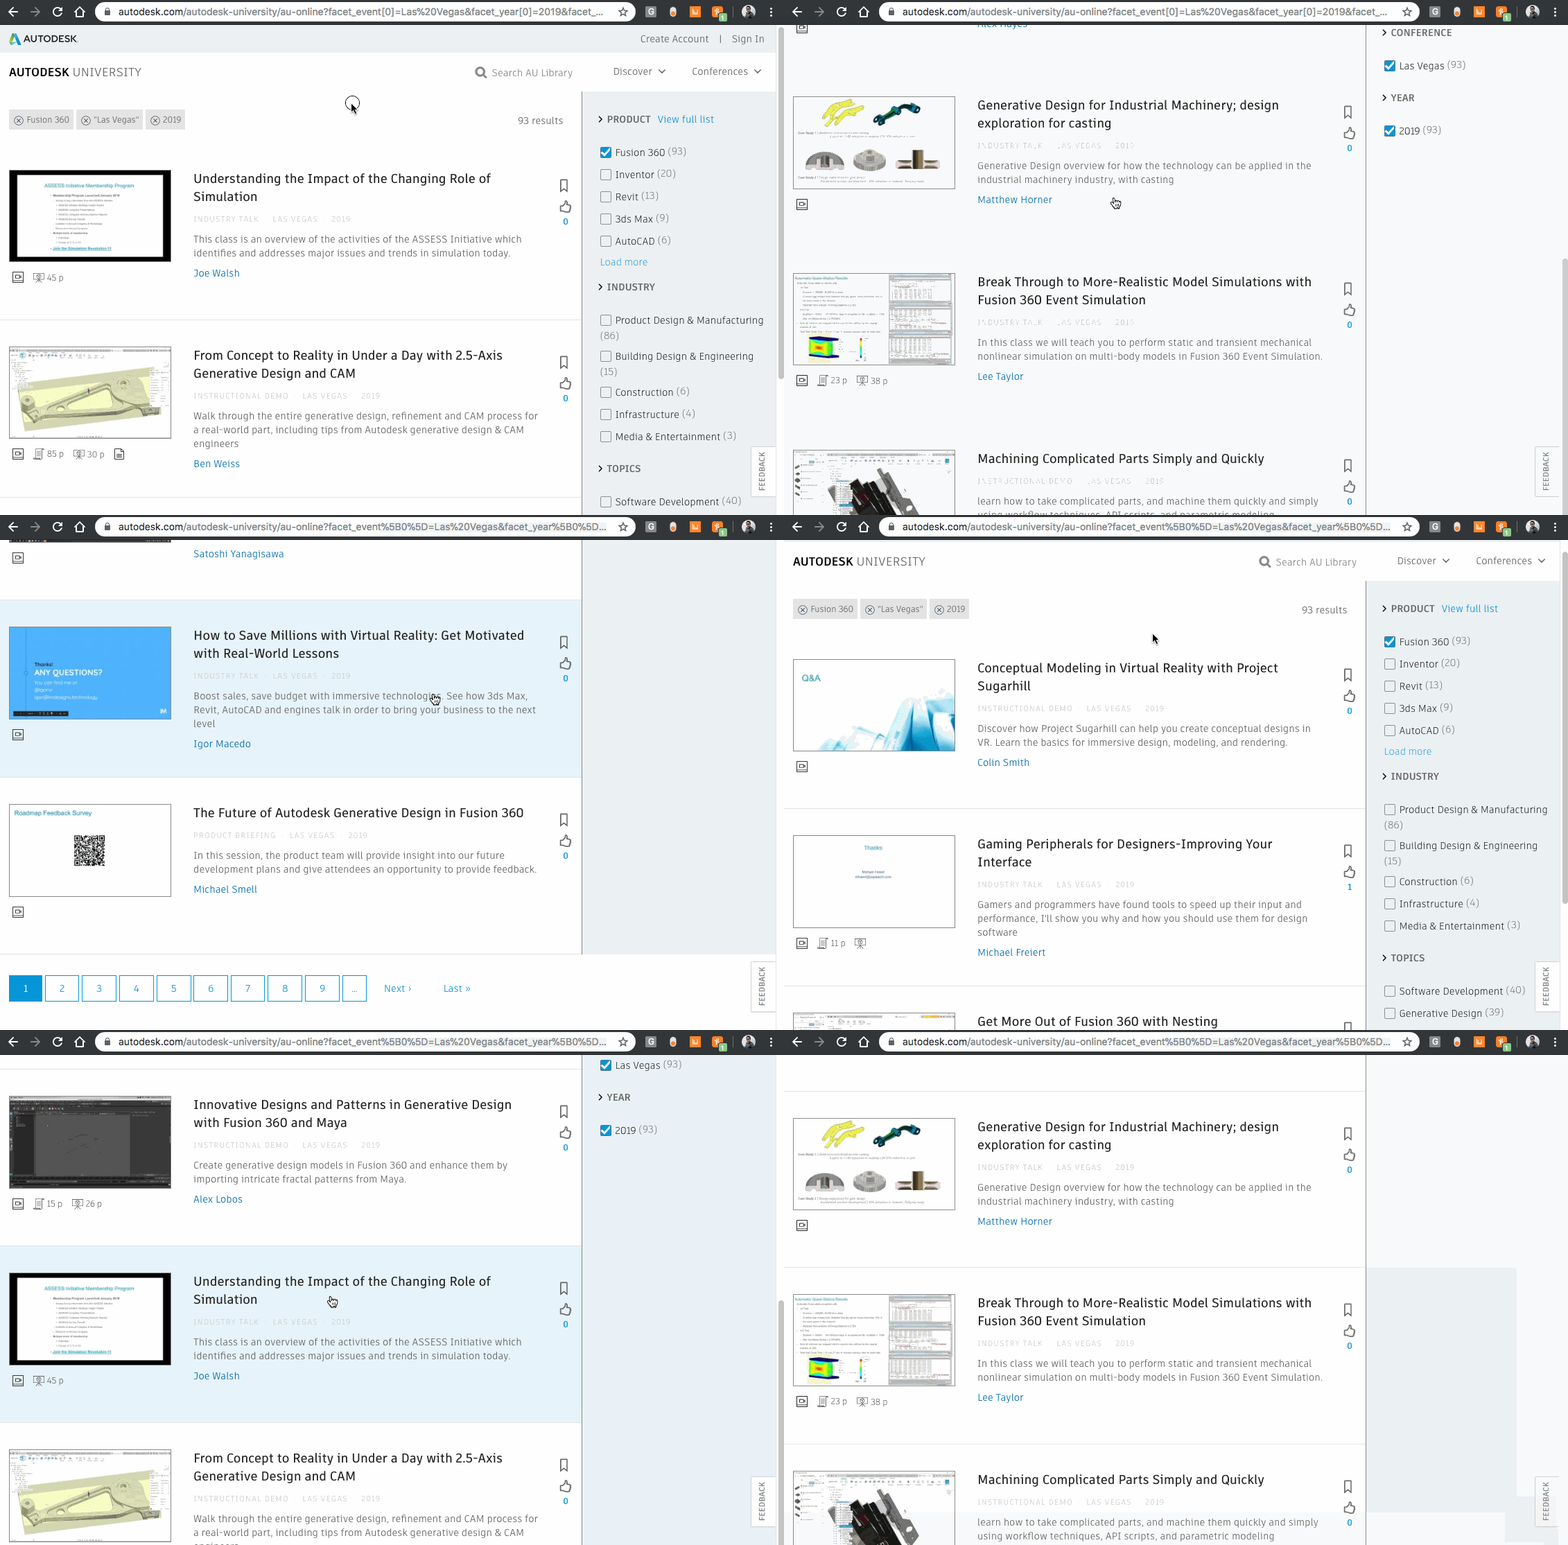
AU 2019 Class Recordings

If you missed Autodesk University this year, don’t fret – over 100 Fusion 360-related classes have been either recorded with class materials made available to everyone.
For free. Sometimes we forget just how valuable of a resource the Autodesk University classes are. If you don’t know where to begin, check out these 3 classes:
[icon name=”arrow-circle-right” class=”” unprefixed_class=””] 1. Design and Manufacturing Tips and Tricks with Scott Moyse


Scott is no stranger to AU, and always attracts a packed room as he delivers 90+ tips and tricks in 90 minutes. Scott walked us through starting with a blank canvas and built a design from scratch, ending with documentation and manufacturing tips and tricks. If you’re looking to improve your skills in sketching, modeling, assemblies, third-party CAD models, generative-designed parts, sheet metal, and CAM, this is the one to check out.


Kevin teaches regularly at Saunders Machine Works, and has a great reputation of being a top AU speaker. If you’ve been curious about Fusion 360’s manufacturing capabilities, or are in the process of assessing whether you should switch to Fusion 360 or not, check out his class. It’s worth it.


Need to level up your rendering skills? Looking for ways to best show off your design with Fusion 360’s built-in rendering engine? Alex Lobos, Professor and Graduate Director of Industrial Design at Rochester Institute of Technology, goes through his process of how he sets up his renderings so that they tell a story and look absolutely stunning.
Of course, it doesn’t just stop there. Check out all the other incredible classes taught this year and find the one that peaks your interest.
