We have a guest author for today’s blog! Thomas Ravenscroft completed a 1 week work placement at the Autodesk office in Birmingham and we asked him to write a blog about the project he worked on (learning Fusion 360 to design and make a part). Without further ado, Thomas does a blog takeover!
Interning at Autodesk
I’ve always enjoyed working on bikes (BMX and mountain bike) which has led me to become interested in pursuing a career in Engineering. Now that I’m a 17-year-old student preparing to enter my final year of A-Levels (Maths, Physics and Business Studies) I decided that I needed to find myself a work placement with a focus on something relating to Mechanical Engineering. After sending off a few applications I secured a week-long work placement at Autodesk in Birmingham, UK.
On day one of my placement I was given a laptop and guided to the Fusion 360 web site from where I downloaded and installed Fusion 360. When I first launched Fusion 360 for the first time it felt like I could probably navigate my way around the tools and workspaces without tuition because of the intuitive look and feel of the menus but the advice I was given by my mentor at Autodesk was to use some of the many learning tools on the Fusion 360 Design Academy site. As a complete beginner I chose to start with the Fusion Mastery Course which is a set of twenty-one short digital lessons that take users through all the foundation areas of Fusion 360 (Open/Close/Save, Toolbars, Modelling, Team Hub, etc.). After watching all the videos and following along, I had the necessary basic knowledge required to get going with Fusion 360 and create something with my newly acquired 3D design and modelling skills.
Home Improvement
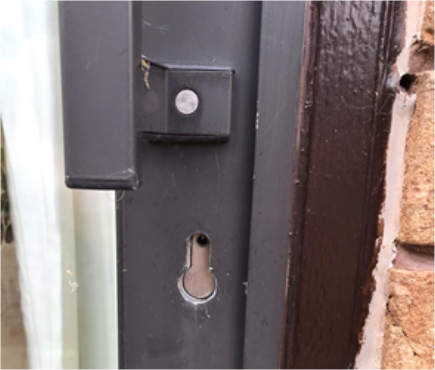
The inspiration for my first 3D design and make project came from my parents. My Dad had been moaning that he was unable to find a blanking plate that he could use to cover a hole where a lock once was in our patio door at home.

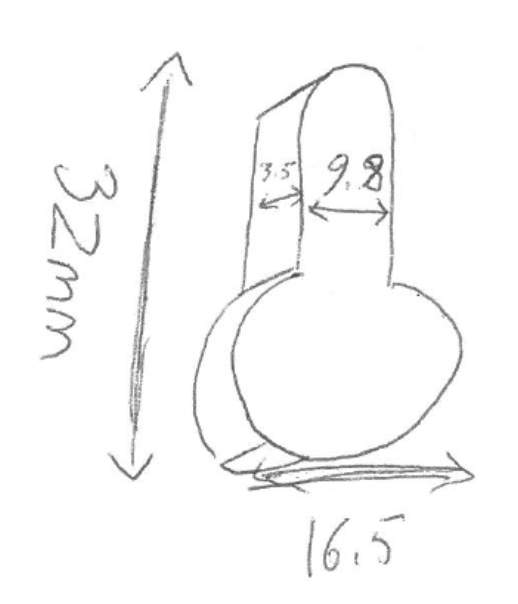
I took a few measurements from the hole and made a pencil sketch so that I had a record of the basic sizes that my custom blanking plate had to fill, then I started making some basic sketches in Fusion 360 which allowed me to d
generate the basic body shape of my design.

Design challenges
I use my measured dimensions to make a shape that could be inserted into the hole so that there would be no movement when the blanking plate was in place. Now I had to consider how the blanking plate was going to stay in position and not fall out when it was inserted into the hole. Inspiration to solve this design problem came from a packet of breath mints sat on my desk, with a plastic flip lid. The lid of the mint packaging has a single clip that kept the lid firmly in place when closed. I started to create more sketches and solid bodies to turn my design ideas easily into 3D shapes allowing me to clearly visualize my ideas. When changes were needed my parametric sketches could be edited and the whole design would instantly update. Clips were added to my design in no time at all. Amazing and easy to do.

My final design challenge was to make the outer facing aesthetic part of the blanking plate. My Dad said that he wanted a boring flat plate, but I thought something with a little more shape and detail would look great on our patio door.

Mmmm…. donuts
After a few failed design experiments, I settled on a blanking plate design inspired by my love of doughnuts – and the design of my part was finished. My design was one single body in Fusion 360, and it was ready for printing. I saved the solid body as an STL file then transferred the STL file to the Cura software that processes printing data for the Ultimaker 3 printer. With a little help from one of the Workshop Specialists from the Autodesk Birmingham Technical Centre I orientated my part, processed the slice data and it was ready to go. One press of a button on the Ultimaker 3D printer and it sparked into action and 28 minutes later it was finished, and my Fusion 360 design was reality. It was really exciting for me to realize the possibilities available with 3D design and printing. Before my work placement I knew what CAD was and I knew that 3D printers existed but designing something in Fusion 360 and half an hour later having a physical printed part in my hands was quite amazing and much easier than I’d imagined.
The final product in action
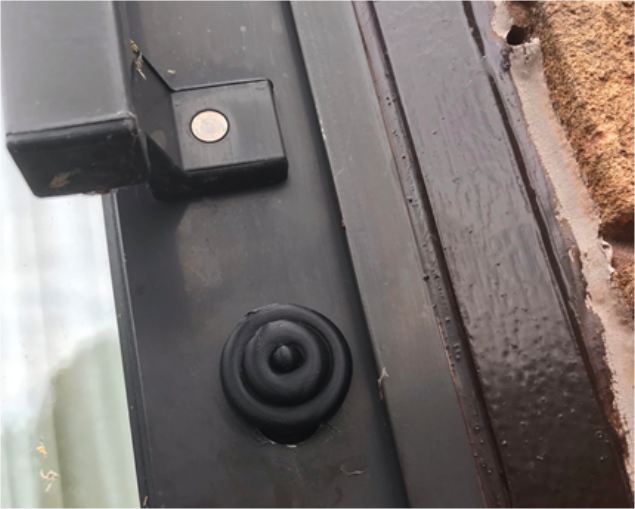
Back at home I nervously offered my blanking plate up to the hole in the door – wondering if it would fit or not. The clips were slightly tight, which was exactly how I’d designed them, but with one small push with my finger and my blanking plate snapped into position and fitted perfectly into the hole where the lock once was. Even my Dad managed to break into a smile when he saw the results of my work placement at Autodesk.

— Thomas Ravenscroft