This post is also available in: Français (French) Italiano (Italian) Deutsch (German)
Are you wondering how to install Autodesk Fusion? Check out this easy guide for both Windows and Mac users.

We’re often asked how to install Autodesk Fusion on both Windows and Mac computers. If you’re interested in trying Fusion for the first time, we have good news! It’s super easy to install and get started designing within moments. Follow this guide for step-by-step instructions.
Fusion Installation Guide
When it comes to installing Fusion, having the right computer setup is essential. Here’s what you need to consider:
- Memory (RAM): Ensure your computer has enough memory according to the system requirements outlined in the official Autodesk guide.
- Monitor: Invest in a good quality monitor to accurately view and manipulate your designs. High resolution and color accuracy can make a big difference.
- System choices:
- DIY builds: Some users prefer building their own systems to meet specific needs.
- Pre-built systems: Alternatively, you can buy pre-built computers that meet or exceed the requirements of Fusion.
- Affordable options: For general use, more affordable systems can still handle most Fusion tasks effectively.
- High-performance setups: For demanding projects, some users opt for high-performance setups. Gaming computers or high-end MacBooks are often sufficient for many users’ needs.
- Operating Systems: Fusion runs on both Windows and Mac platforms. Choose the one that fits your workflow and personal preference.
- Essential Components:
- RAM: Ensure you have adequate memory (RAM) for smooth operation.
- Graphics card: A quality graphics card is crucial for optimal performance, especially for complex designs and simulations.
By focusing on these key elements, you can set up your system to run Fusion smoothly and efficiently. For more information see here.
Elevate your design and manufacturing processes with Autodesk Fusion
System Requirements for Windows and Mac
Before installing Autodesk Fusion, it’s important to ensure your computer meets the necessary system requirements for a smooth experience. For Windows users, a 64-bit operating system is required, along with at least 8 GB of RAM (16 GB or more is recommended for handling complex designs and simulations) and a dedicated graphics card to support advanced 3D modeling. Mac users should have macOS 11 or later, with the same RAM and graphics recommendations.
Since Fusion is cloud-based, a reliable and fast internet connection is essential for accessing your files, running simulations, and collaborating with others. Make sure you have at least 10 GB of free storage space available to accommodate the software and your design files. Meeting these requirements will help you take full advantage of Autodesk Fusion’s powerful features, whether you’re working on a Mac or Windows computer.
Step 1: Sign up for a Fusion License
The first step is to sign up for a Fusion license based on your needs:
- Fusion Commercial Subscription
- Note: There is a 30 day fully-featured trial that is available before purchasing a subscription.
- Fusion for Educational Use (free for qualifying students and educators)
- Fusion for personal use, hobby use (free, for non-commercial use)
- Fusion for startup use (free for eligible venture-backed, angel-backed, or bootstrap startups that are less than 3 years old and have 10 or fewer employees.
- Note: You need to apply for a start-up license. It is not automatically granted and is subject to denial.
Each different license type has its own sign-up process that must be fully completed before being activated.
Once you obtain your Fusion license, you can visit your Autodesk Account to view your available licenses or create an Autodesk Account if you have not done so. Commercial subscribers who purchased a license can also manage the license users and view subscription and billing information.
Step 2: Download and Install Fusion
Once you have obtained your license for Fusion, you are now ready to download and install Fusion! Fusion is a cloud-based product, so it always downloads the latest updates to run on the most current version. To ensure your machine is equipped to run Fusion, review the System Requirements for Fusion.
Follow the steps below to get started today:
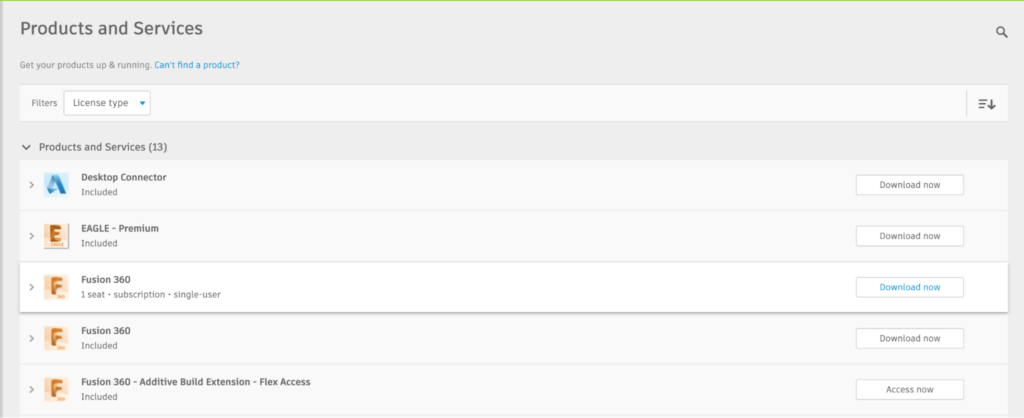
1. Visit manage.autodesk.com and select All Products and Services
2. Click the Download Now button next to the Fusion product. There are multiple services that come with Fusion, so make sure you select Download Now.

3. After clicking Download Now, you will be redirected to a webpage where the download for the installer will automatically occur. Note: The webpage detects what Operating System you are using and either provides a Windows install file or a Mac install file.
4. Once the file is downloaded, run the installer to start the process.
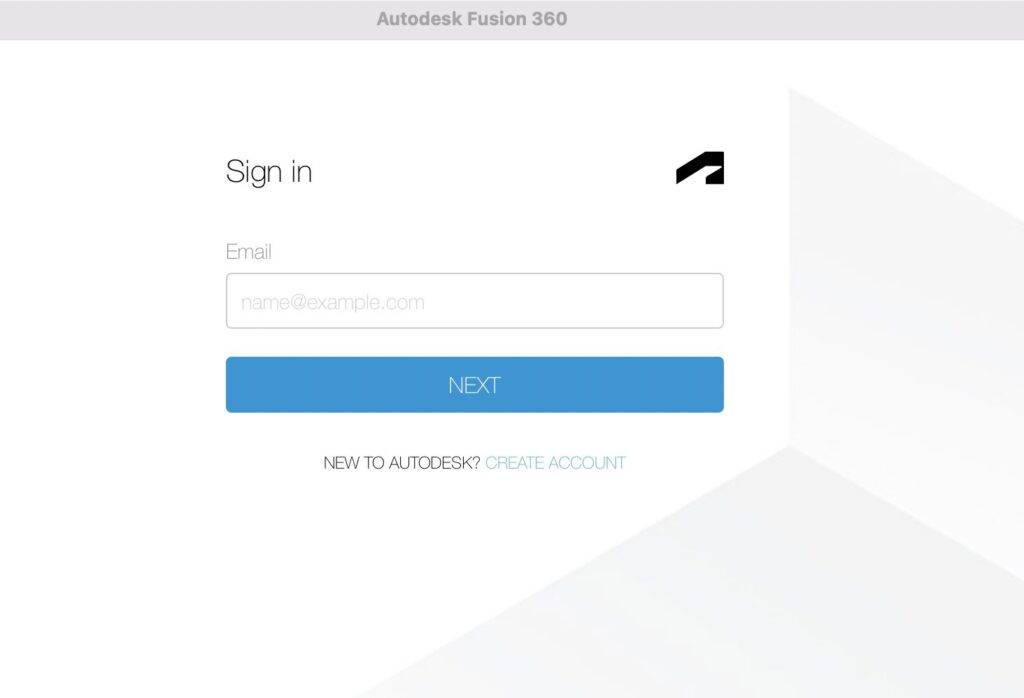
5. Once the installer successfully completes, Fusion will automatically run for the first time and you will be asked to sign in to your Autodesk Account using your email address and password.

Setup Up Autodesk Fusion After Installation
After installing Autodesk Fusion, getting up and running is straightforward. Follow these steps to begin:
- Launch the application: Open Fusion and sign in with your Autodesk account. If you’re new to the platform, you can create a new account.
- Initial setup: Once logged in, you’ll be prompted to select your preferred units and customize your workspace to suit your design and manufacturing needs.
- Explore the interface: Take some time to familiarize yourself with the user interface. Fusion offers a comprehensive range of features for parametric modeling, 3D CAD, and CAD/CAM workflows.
- Utilize built-in resources: Access built-in templates and step-by-step tutorials to help you become comfortable with the software’s powerful tools for machining, product development, and collaboration.
- Start your first project: Begin a new project to discover how easy it is to manage your designs, work with components, and manufacture your products—all within a single, integrated environment.
- Use cloud-based collaboration: WithFusion, you can move confidently from concept to finished product, collaborating with team members and accessing your data and designs from the cloud.
Now you know how to install Autodesk Fusion on a Mac or Windows computer and get started!