
Elevate your design and manufacturing processes with Autodesk Fusion
Let’s do it right and do it big – let’s kick off 2017 with an awesome update that will take your data management, modeling, rendering, and CAM to the next level. We’ve got a lot to cover, so let’s get cracking.
See a topic you like? Jump to it:
Fusion 360 resiliency: Phase 1
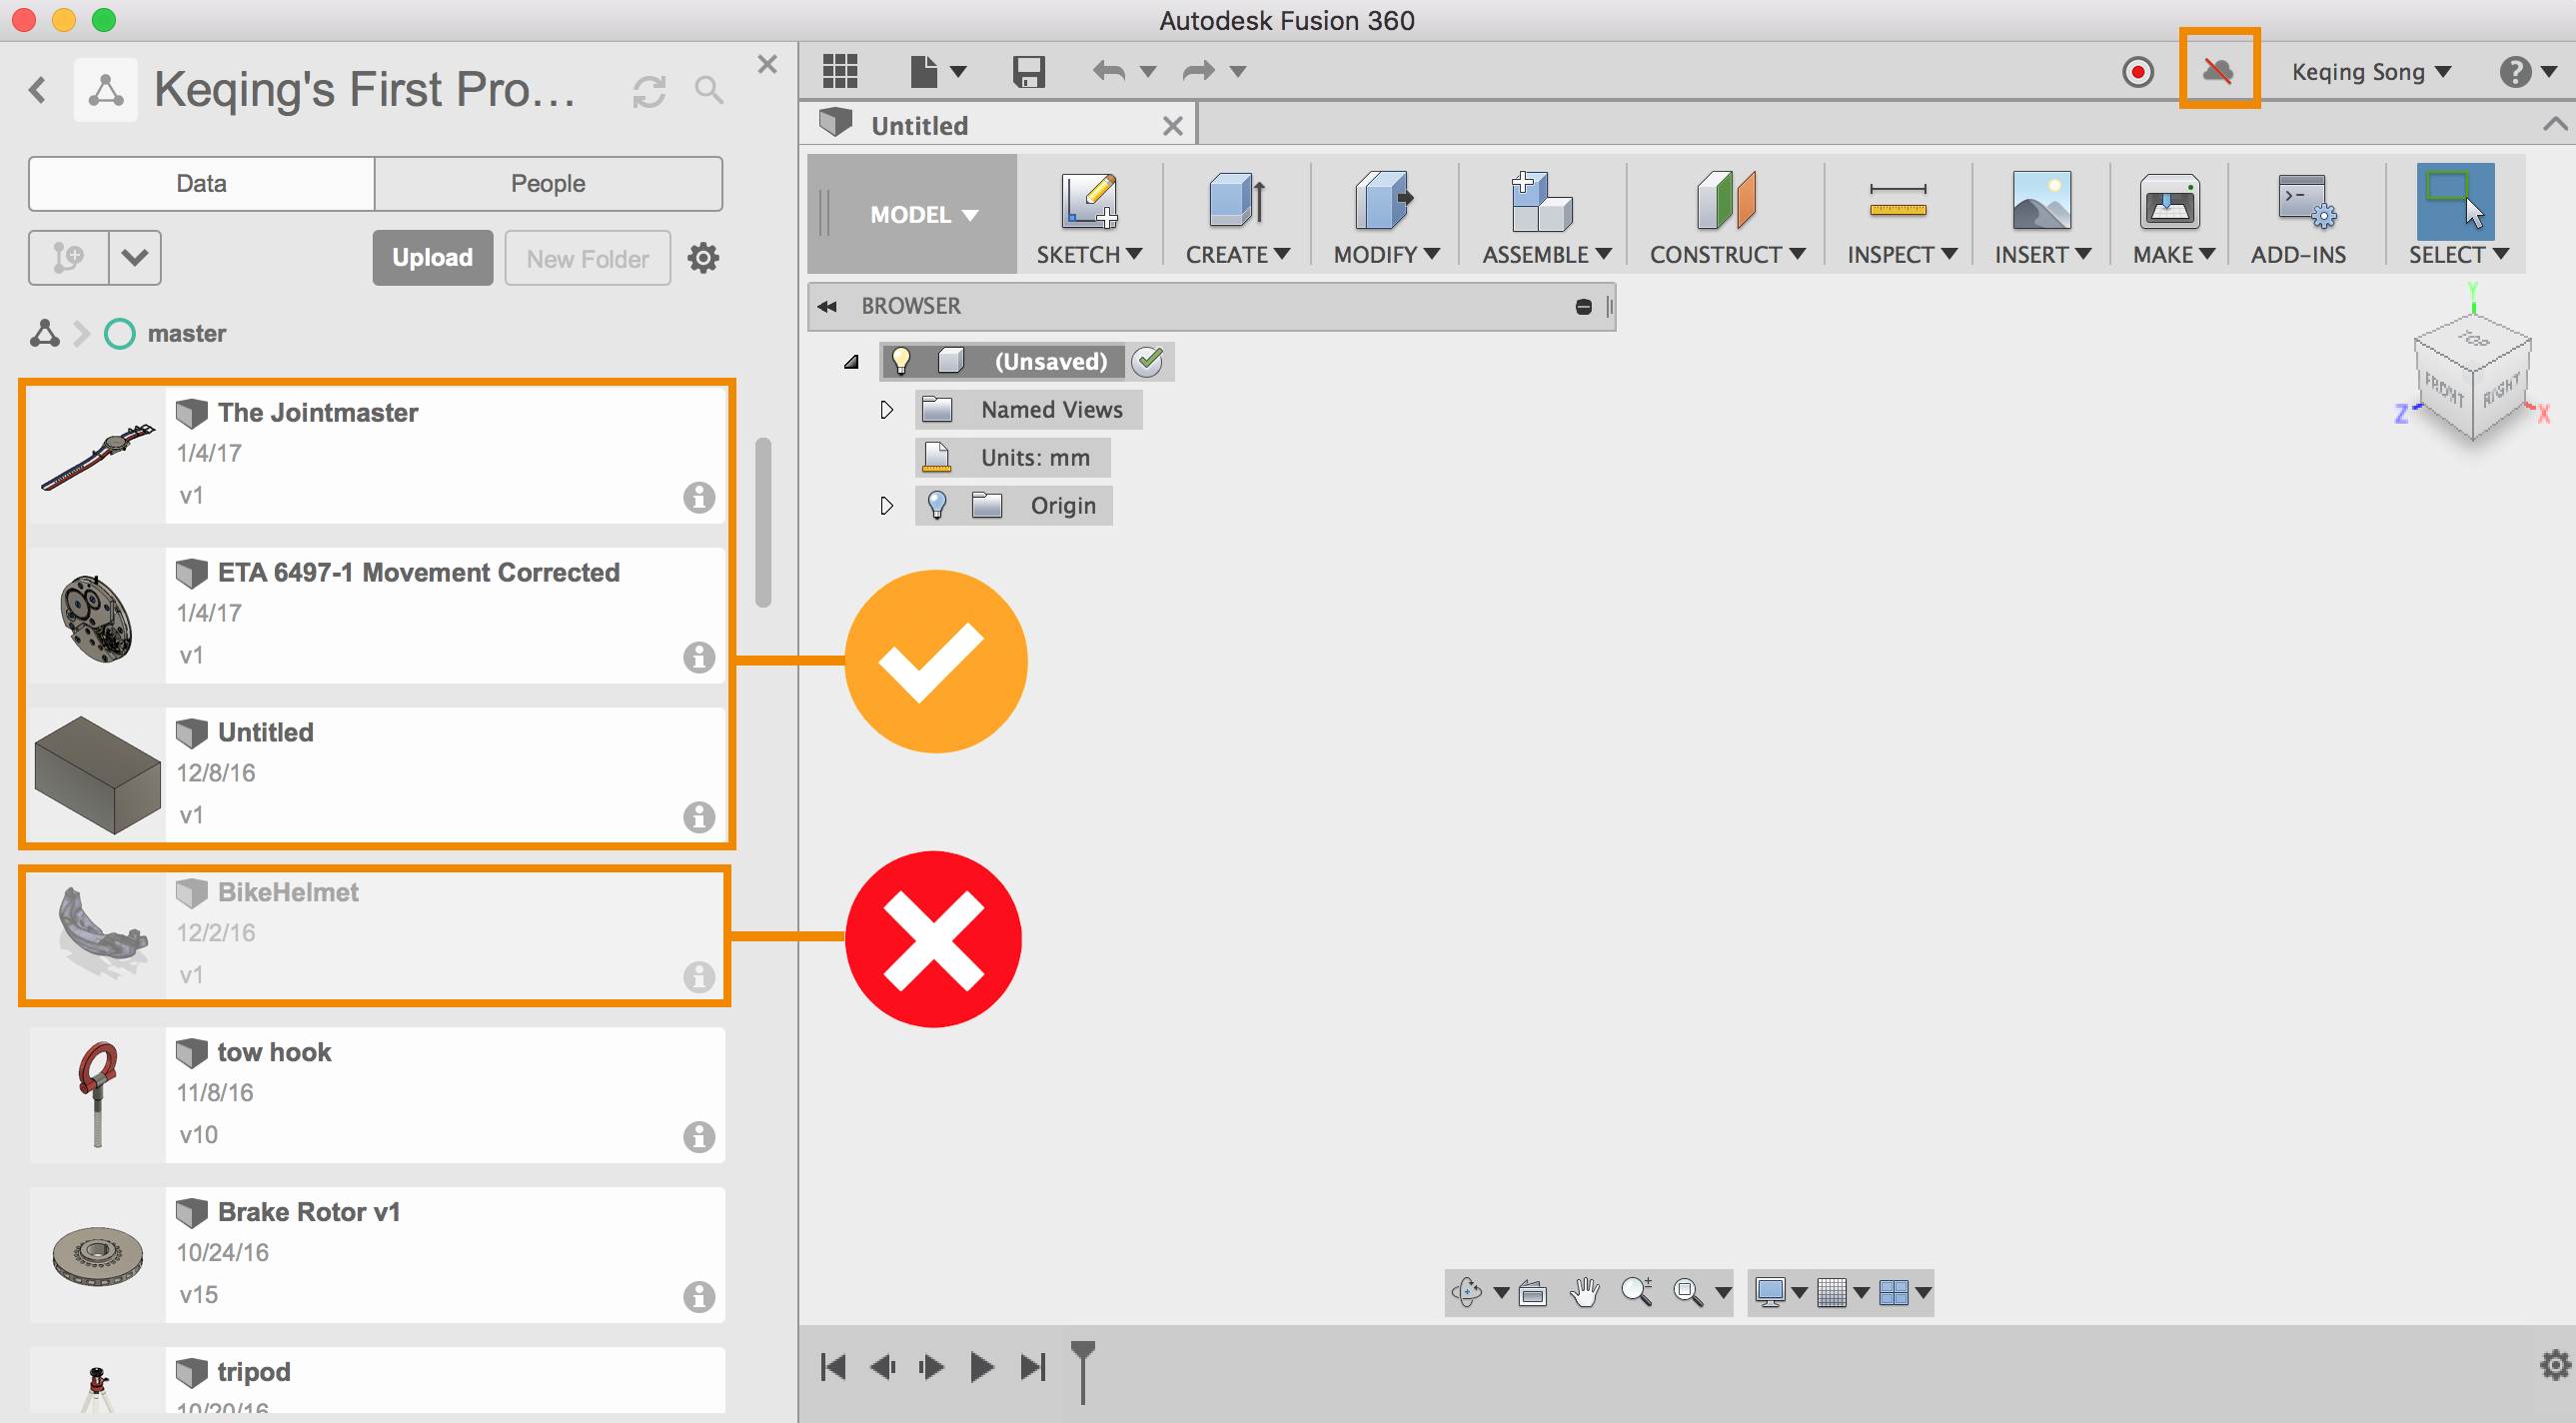
Resiliency and any time data access is our number one priority. Previously when Fusion 360 went into offline mode, the data panel collapsed into a flat structure where your designs were no longer organized within folders, making it hard for you to find where things are. Based on your feedback (forum and IdeaStation) We’ve made two noticeable improvements to this experience:
-
Maintain folder structure when in offline mode
-
Uncached designs are grayed out whereas cached designs are active, ready for access
I assure you we are taking the recent outages very seriously. Delivering what Prabakar mentioned in the forum around data resiliency and access is our number one priority, and projects like allowing you to pick which designs you want to make available offline are currently in the works.
Here’s what we’re doing for Phase 2 and Phase 3
Aaron showed us an interim solution to make your data available offline in his recent quick tip video, and Bryce just published this detailed plan of phase 2 and 3 on our blog, so make sure to check it out!
Modeling & Sketching
New and shiny toys are always exciting and fun to play with, but we can’t lose focus on the mainstays that got us where we are today. Modeling and sketching continues to be one our primary areas of focus, and we are making good progress on beefing up its core functionality.
Global X, Y, Z axes now visible on ViewCube

Many of you have asked (IdeaStation here, here) for some visual indication of the world coordinate system so you know where in the world you’re spinning around and where you are designing. Now you’ll see the XYZ axes on the ViewCube.
Move command overhauled
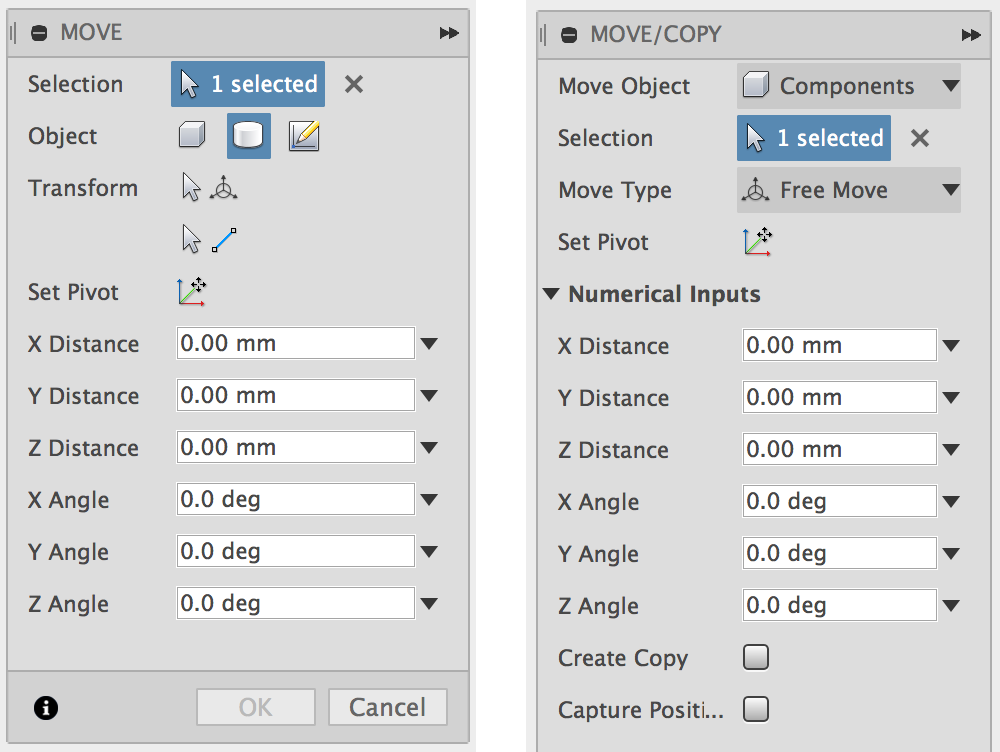
Old Move UI vs new Move UI. Notice any differences?
This improvement alone is worth the update. Based on all your feedback, forum posts and issue reports, we’ve drastically improved the command’s behavior and capabilities. Much of its dirty laundry has been washed clean, so let’s run through some new key features.
Move Faces and Sketch Objects
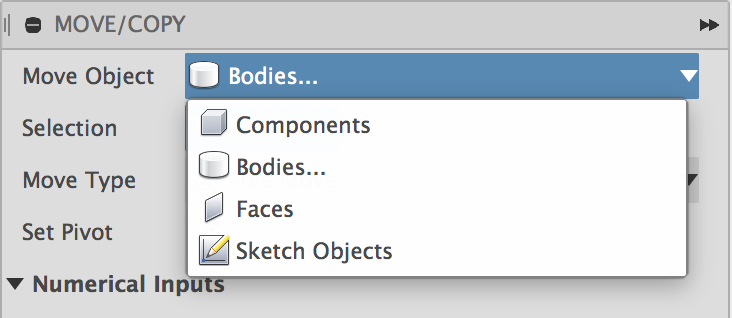
Remember how in direct modeling mode you can pick a face of a solid and use the Move command to move it or give it an angle? Well now you can do it in timeline/history mode too! The Move command now lets you move sketch objects, faces, in addition to bodies, and components.

top shows move > face in direct modeling, whereas bottom shows the same in history modeling. Woohoo!
New parametric Move Types

Previously you only had 2 Move types: Free Move and Point to Point. Now you have Translate, Rotate, and Point to Position. Translate and Rotate do exactly what they sound like they do. They are limited to their own move type and declutters the manipulators so you have a more specific set of controls. Point to Position lets you pick a point on your model and move it to a certain position based on the design’s coordinate space or a component’s coordinate space. These are all parametric too, so if you make changes to your design, the moves will keep their places.
Make a copy and capture position of what you’re moving (IdeaStation here, here, here, and here)
You can now also make a copy of the body or component you’re moving. Just make sure you have the “Create Copy” checkbox checked before you start moving your model. Oh yeah, you can also capture the position of your move if have that box checked as well.
Center of Mass now under Inspect (IdeaStation here, here)
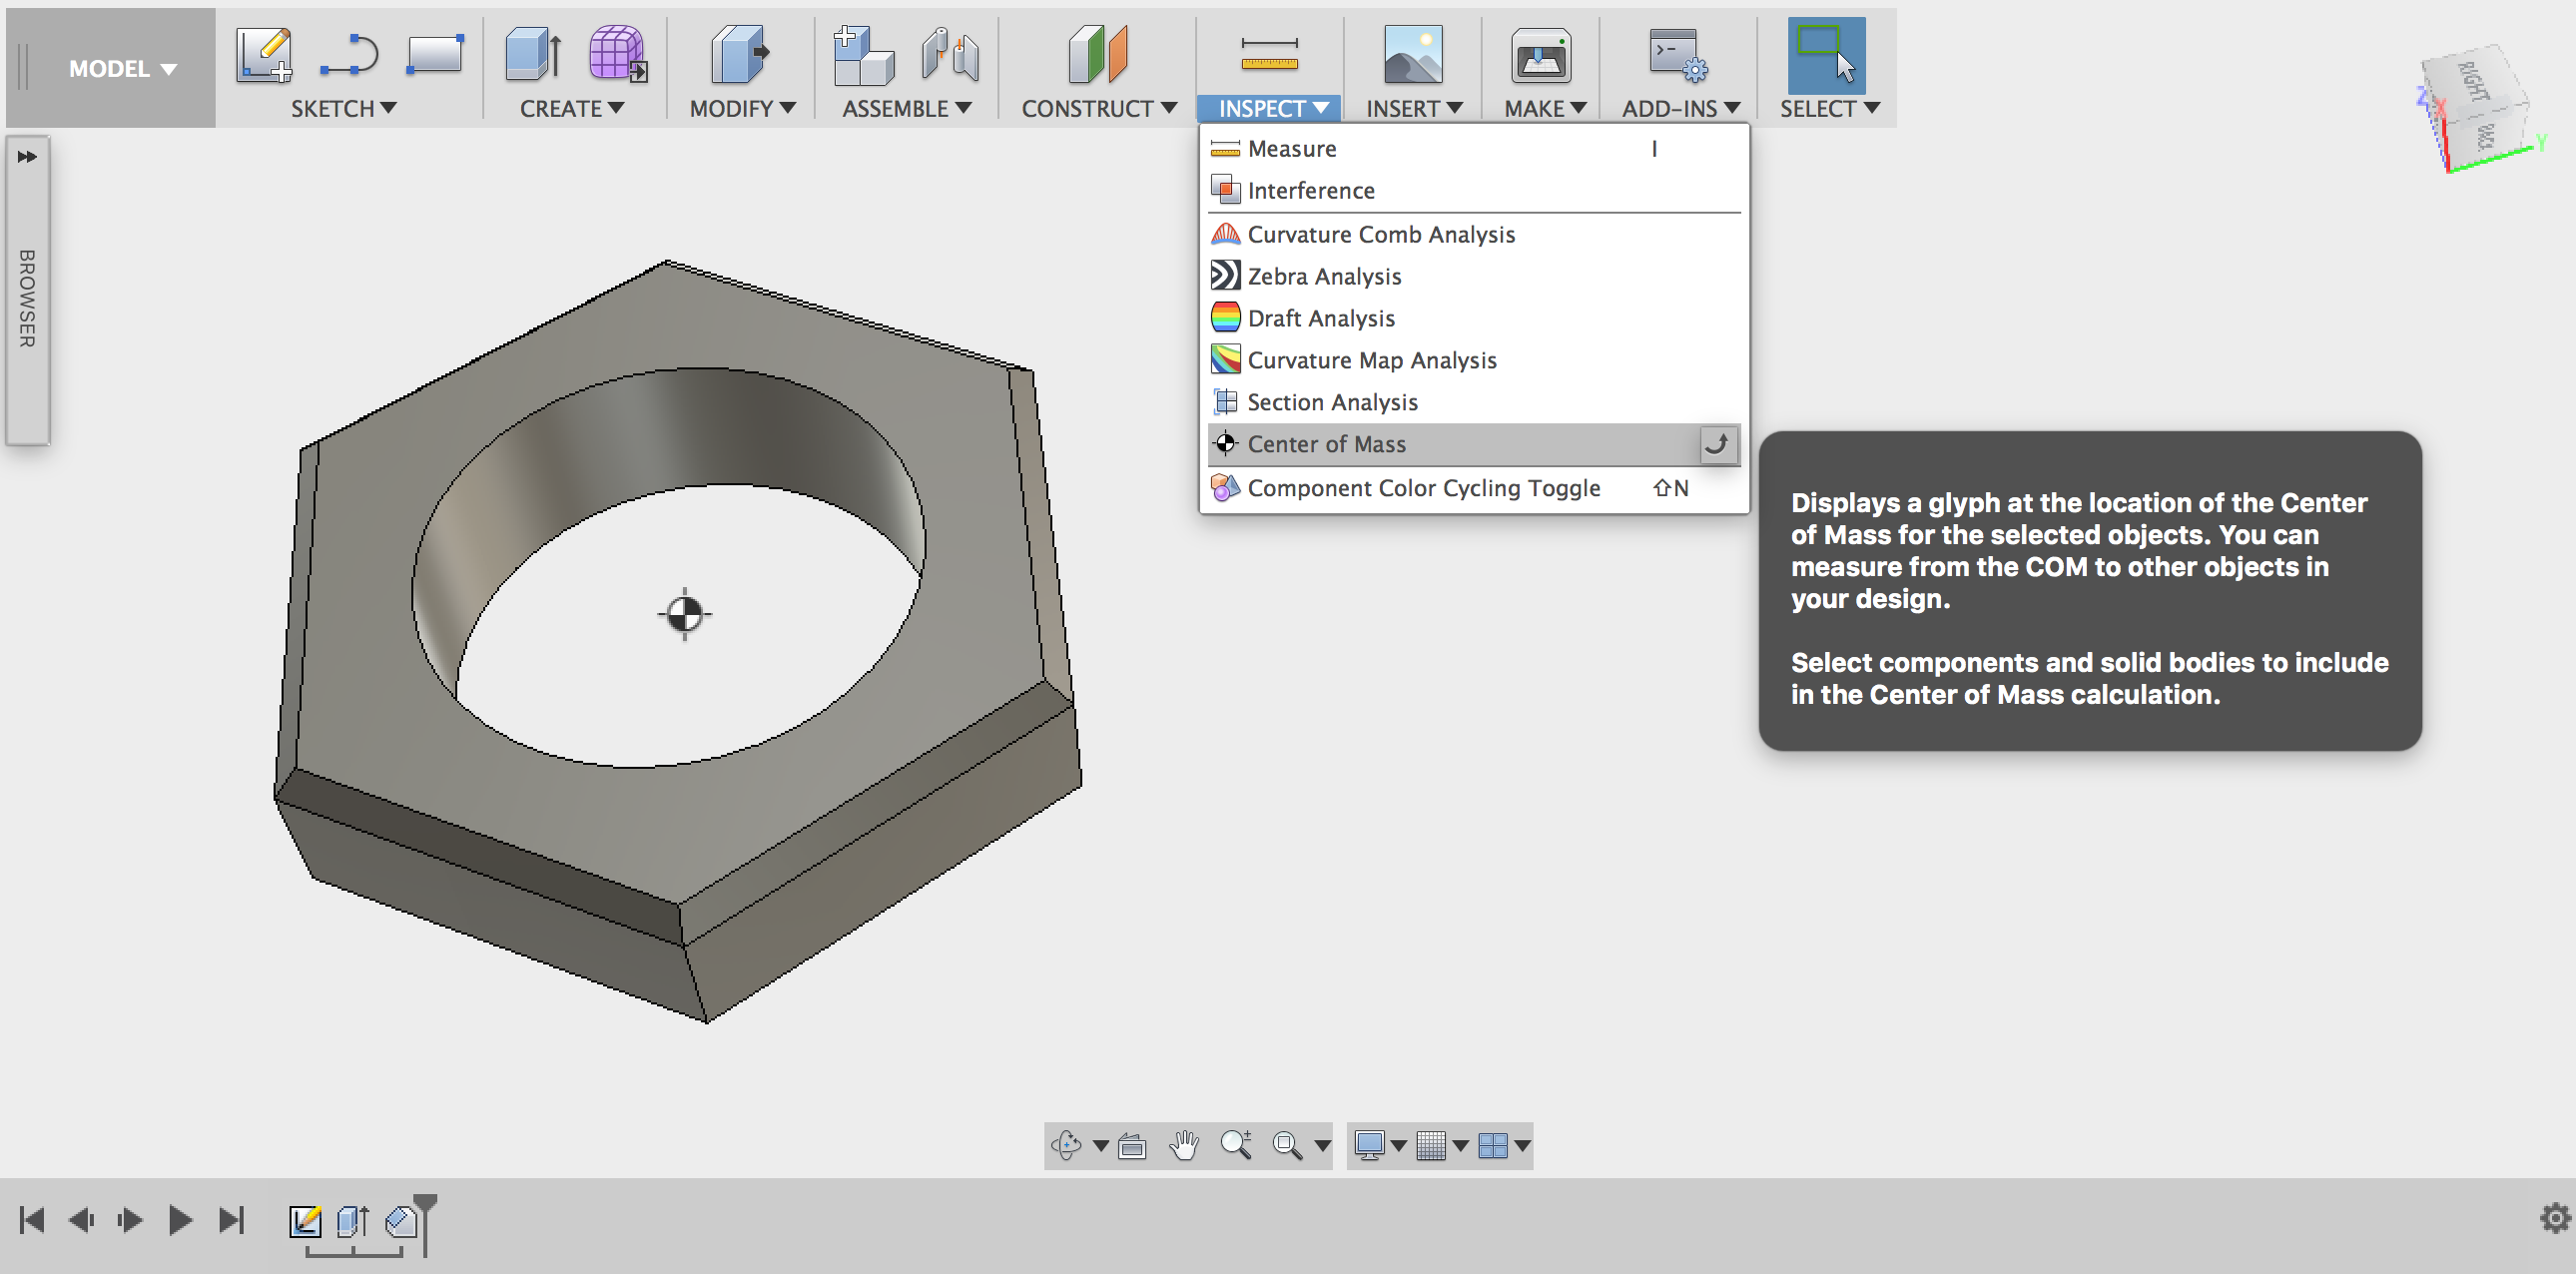
Good news! You can now see the center of mass of your model with the Center of Mass tool under the Inspect drop-down menu (a popular IdeaStation request). Now that Fusion 360 has this, you can measure distances from edges to it.
And yes, this center of mass is also associative, so if you change the geometry of your model, the center of mass will update accordingly. Keep in mind that Center of Mass is an Analysis type, so you can turn it and off under the Analysis folder in the browser.
Convert command improved
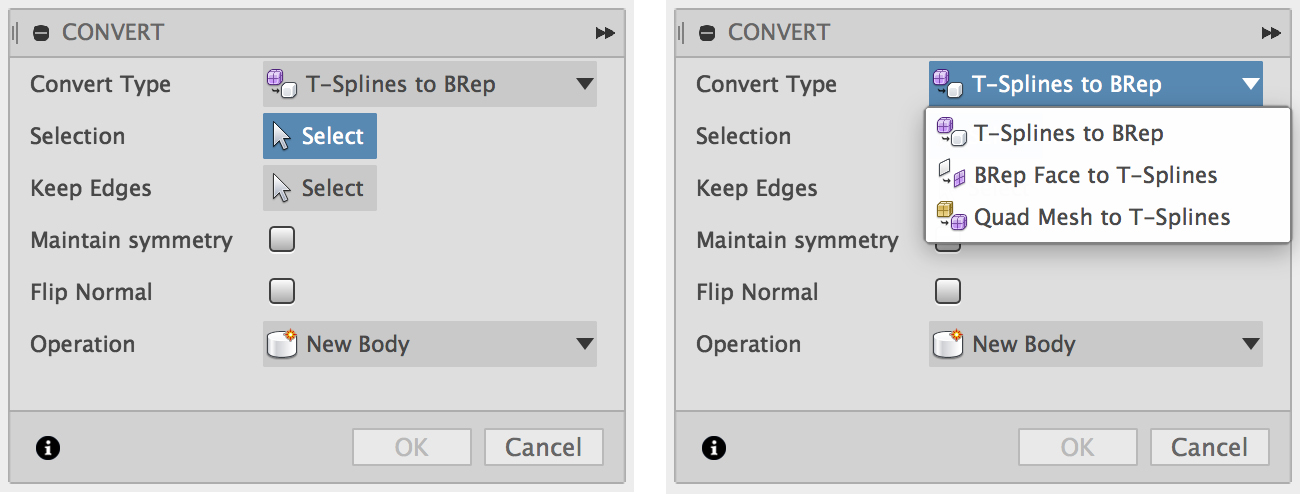
Instead of selecting the entity and the picking the confusing selection filter of what you’re trying to convert to, you now have clear options of what you’re trying to convert. Here’s an old and new comparison of the UI.
Measure now has snap points turned off by default
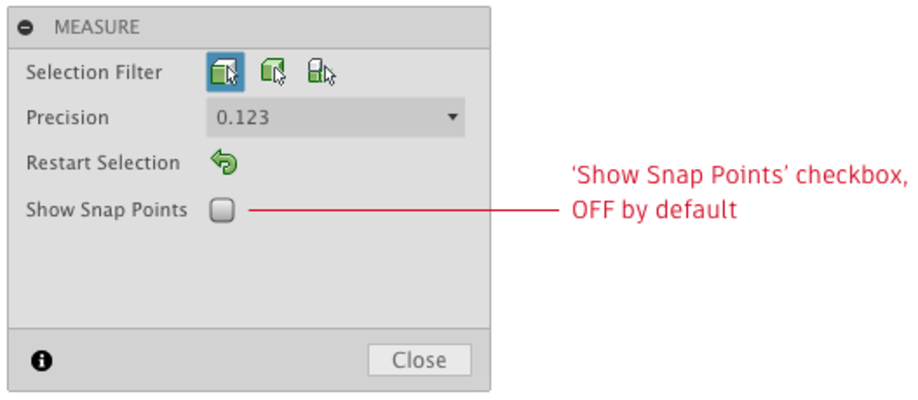
Previously, snap points have been visible by default and will show up as soon as you hover over your model with the Measure tool activated. If your model was complex, then it got cluttered. Fast. That’s why now Snap Points are turned off by default.
New Option to turn off projected sketches
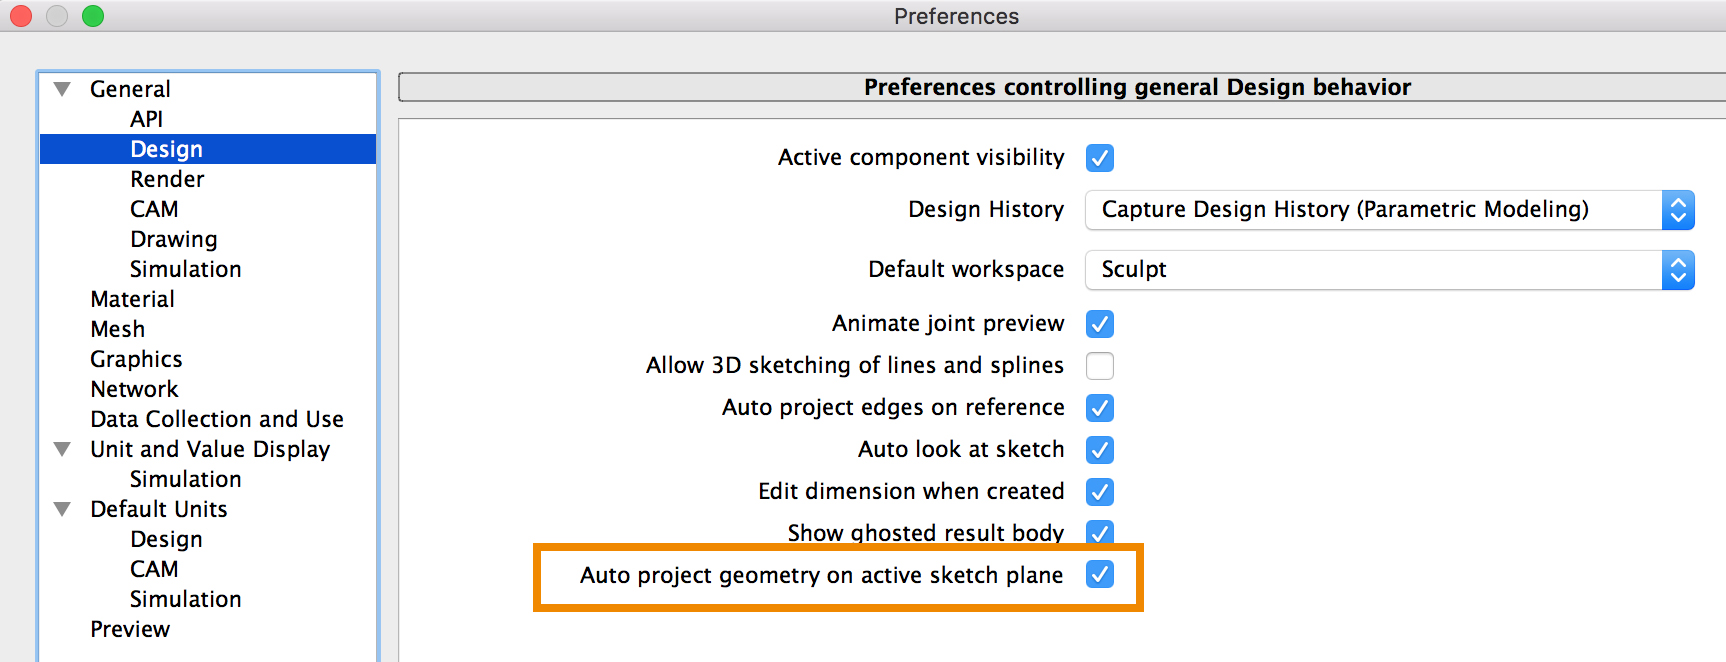
Previously when you projected sketches, Fusion 360 would create a bunch of sketch profiles, thinking that it’d be useful for you. This could get messy, and could get you in situations where it was hard to select profiles for extrusions. Now there’s an option to disable Auto project geometry in the preferences, so you can be more surgical on what you want to be active and select.
New selection filters for Sketch (IdeaStation here, here)

This has been frustrating for many of us: when you window select a sketch, the selection also picks up 3D geometry. Now we’ve added 4 new selection filters specific to sketch entities, so when you window select a sketch and only have them checked, the selection will only pick up sketch entities.
Dimensions now align better with lines
You know how when you wanted to align a dimension parallel to the line you’re dimensioning? Yeah, it was pretty tricky to do. We improved the behavior so that it’s easier to align dimensions without needing to do the whole right-click sorcery. Hooray!
Center of Origin remains visible when Sketch grid is turned off

Previously when you turned the sketch grid off from the sketch palette, the sketch origin would also disappear, dumping you into a state of sketch purgatory. Now the Sketch origin remains visible.
Loft command now remembers whether chaining option is turned on or not
Now when you un-check the chaining option in the Loft command, it’ll remember that so the next time you use loft, chaining will stay unchecked.
Surface Loft command now has chaining off by default
Based on your feedback and playing around with the tool, we realized that it is more common to want Chaining OFF rather than ON for Surface Loft. Now the Chaining checkbox is unchecked by default for Surface and Sculpt loft.
Keyboard hotkeys for switching workspaces
You can now switch workspaces with CTRL (command for Mac) + Leftbracket and CTRL (command for Mac) + Rightbracket key combos. This will take you through the next and previous workspace in the order it is listed in the workspace switcher.
Here are some notable fixes
- PhilProcarioJr reported this issue where triming an area of his sketch using the trim tool completely broke the entire sketch. We quickly jumped on this issue and found that there was a bug in the sketch code that was causing some serious compute errors in how constraints and offsets behaved. This bug has been permanently squashed.
- We fixed an issue where invoking the move command and then selecting “Set Pivot” unchecked the “Select Through” selection filter for no reason. Silly us – must have slipped through the cracks.
- Macmanpb reported an issue around how after running a Compute All, he was still getting joint errors, even though he had already deleted the components and joints associated with them. It was as if the ghosts of joints past were lingering around, haunting his model. Our community jumped in and was able to reproduce the issue, and now it’s fixed!
- Macmanpb also pointed out a weird behavior where breaking the link of a referenced design made a bunch of his other components to unexpectedly move position. Our support guru Nathan dug into this with the development team and found the issue to be rooted in Mirror + distributed design workflows. We got this all tidied up.
- Beyondforce reported more ghost sightings this past October where the circular pattern would preview patterned instances that were completely out of position, yet if he pressed OK, the pattern executed just fine. Spooky. Turns out the preview was confused by the component’s position and started freaking out. We got this sorted out.
- Fahraynk found a fillet bug related to how the tool always wanted to fillet 2 edges of his model whereas he explicitly only wanted it to fillet one. We traced the issue back to how Fusion solves for geometry, and untangled some cords. Now it should work correctly.
Back to the top
Branch & merge available for preview*
Holy moly. We’ve been talking about this for a while (even all the way back in November of 2014, IdeaStation here and here), and we’re glad to announce that it has finally landed. The concept of branch and merge is common in the software development world, but is pretty new when it comes to product design. Before I dive into how to do it, let’s level-set a bit.
Why do all this? Because of two awesome reasons.
1. You can explore design variations without consequence
We’ve all been there. You’re working on a project and you’re on version 85 and you think to yourself: “man…I really shoulda sketched that circle instead of using the cylinder tool…”, and you’re too lazy to go back and find the right version to promote so you stick through it and suffer the consequences. Hours later your eyes are bloodshot and you need a drink.
Branch and merge gets rid of all that because you can create multiple branches and explore different workflows, without the side-effects! If you screw up on one branch, go back to a milestone that you had set, or ditch the branch and move on to another. The master will remain untouched until you decide to merge to it. This introduces levels of stability to your designs, where you can multiple branches as multiple levels of stability (master, pre-production, prototype, sandbox).
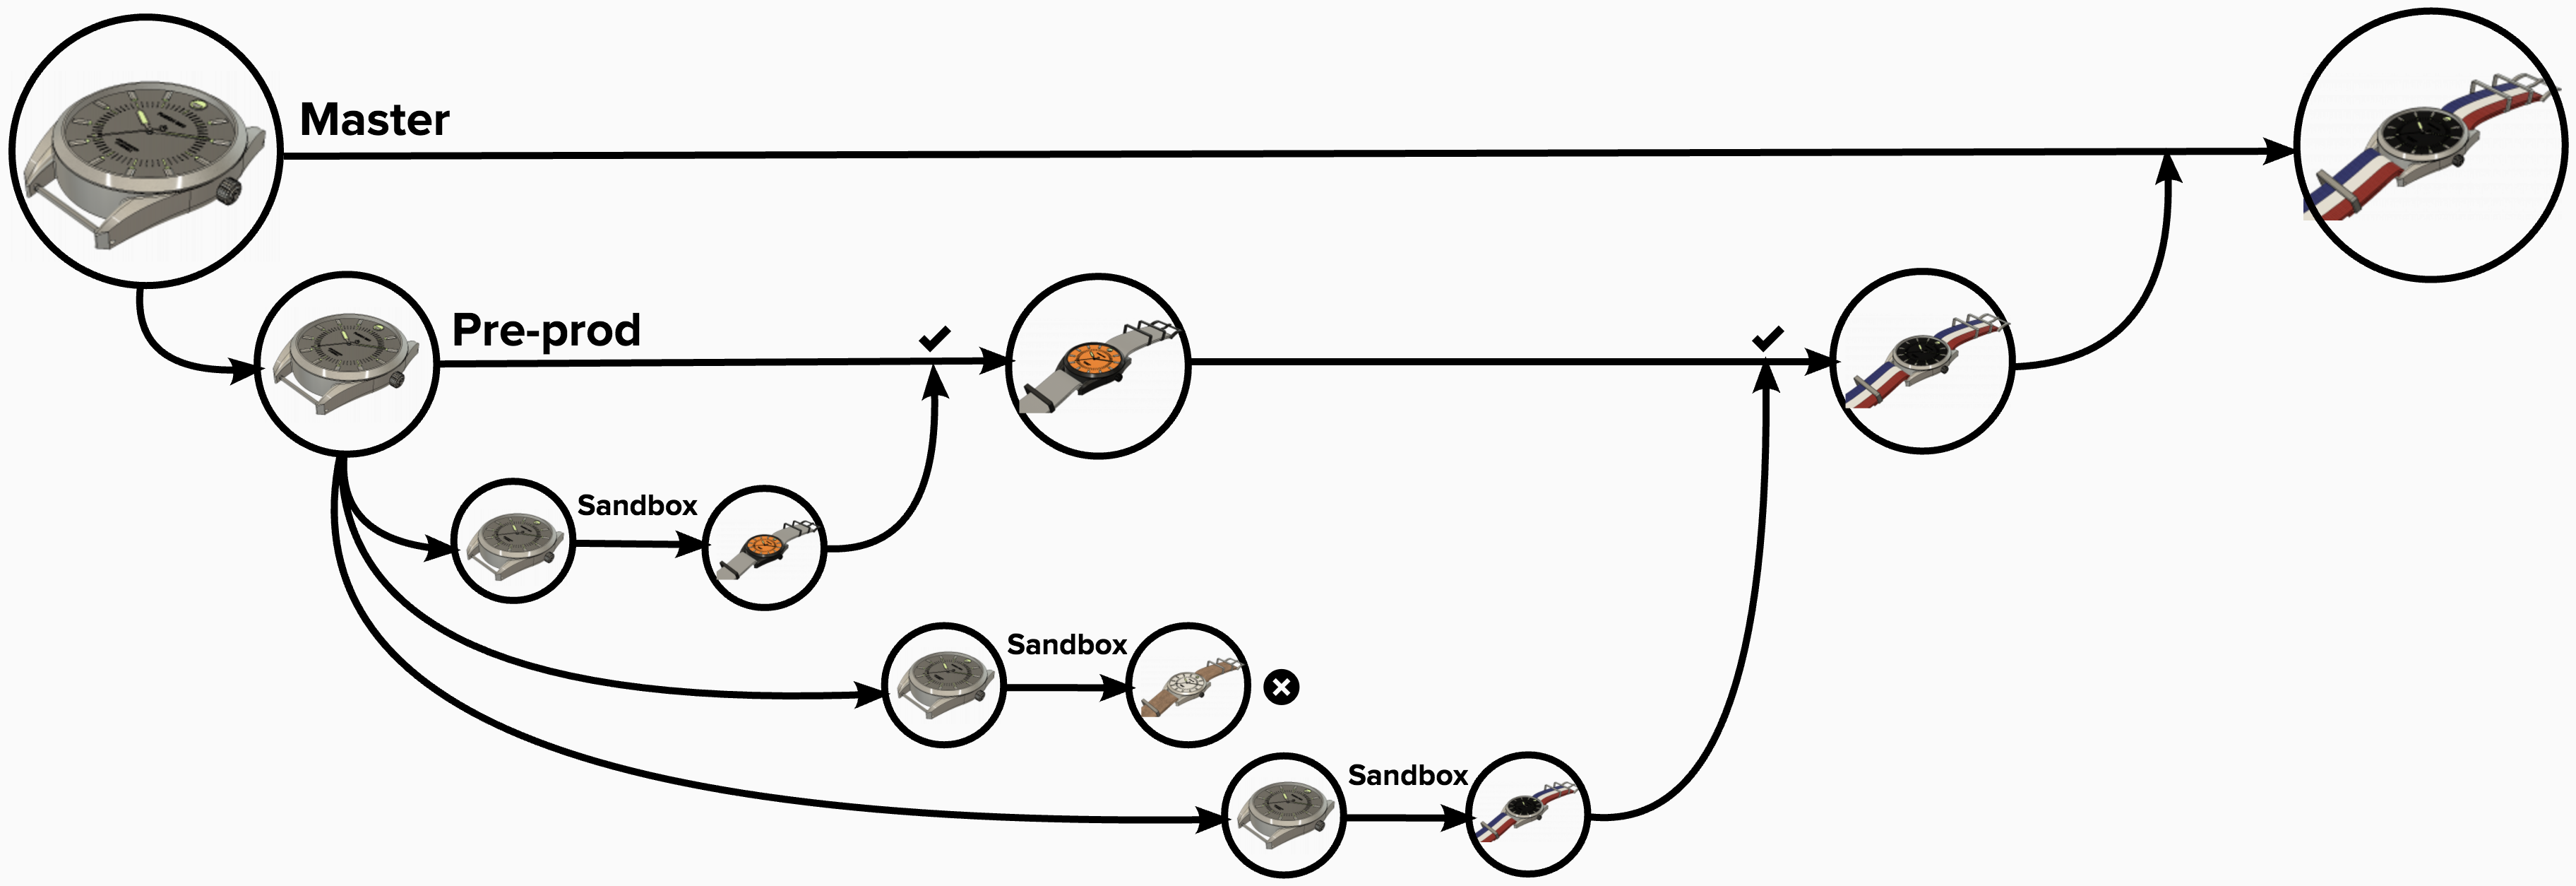
For example, we need to explore dial, case, and strap color options for this watch. The master branch is most stable, production ready, or public facing. Pre-prod branch is a clone of the master branch, but with the latest stable changes. Sandbox is constantly evolving, and is the least stable.
2. You can manage changes like a pro
It’s true. The only thing that is constant in this world is change, especially in the world of design. Whether you’re on your own or working a global design team, the last thing you want is seeing changes being made to designs where you have no idea what they are, what they replaced, and who is doing it.
Branch and merge let’s you not only create branches, but you can also create milestones for significant events that have taken place, worthy of capturing. Give them code names. Include details that are meaningful for you and your team. Every milestone made captures a snapshot of the entire project and everything related to it (subassemblies, related drawings, etc). Showing a visual tree of all your design decisions to your customers can take your project and relationship to with your customers to the next level.
Makes sense? Of course it does. Now let’s run through how you actually do this in Fusion 360.
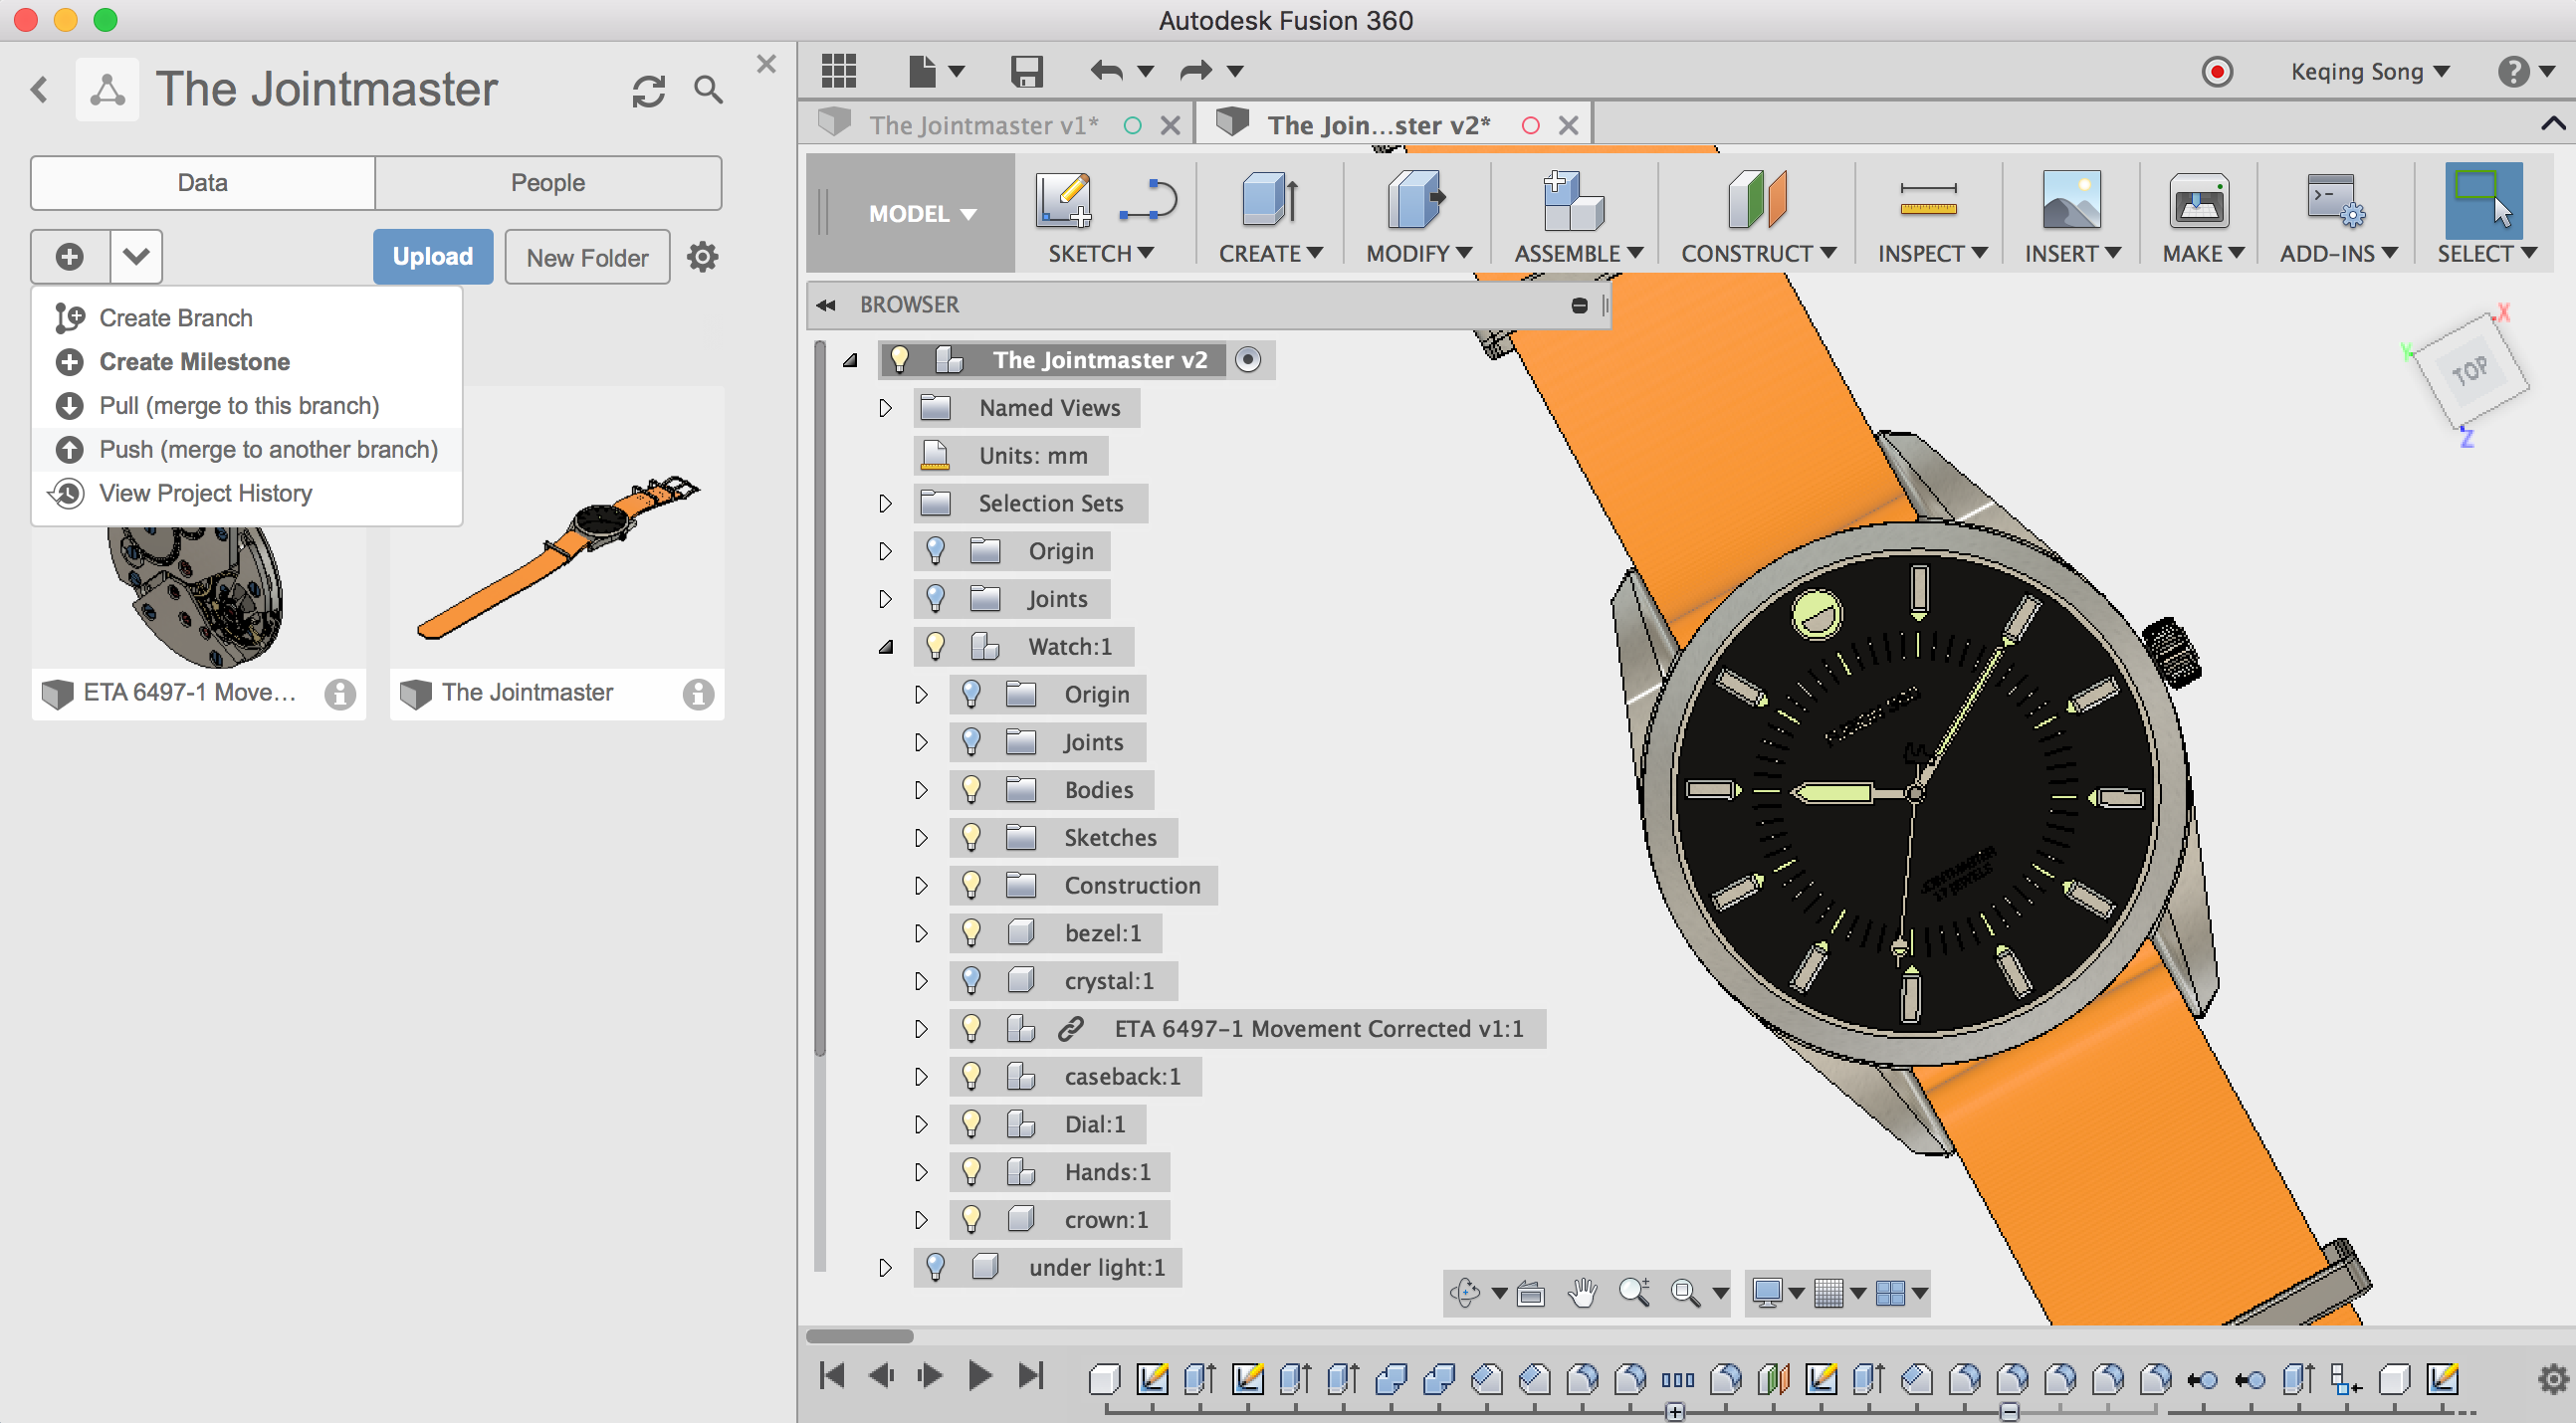
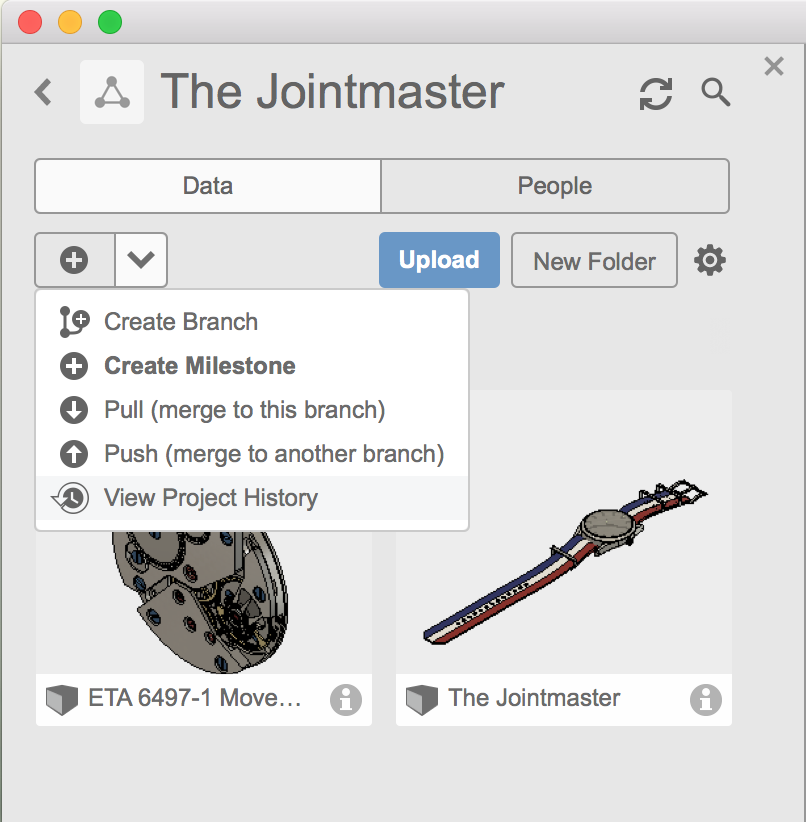
How to create a branch of your project
There are some new icons in your data panel. This example shows that I’m in a project called “The Jointmaster” and am going to create a branch.
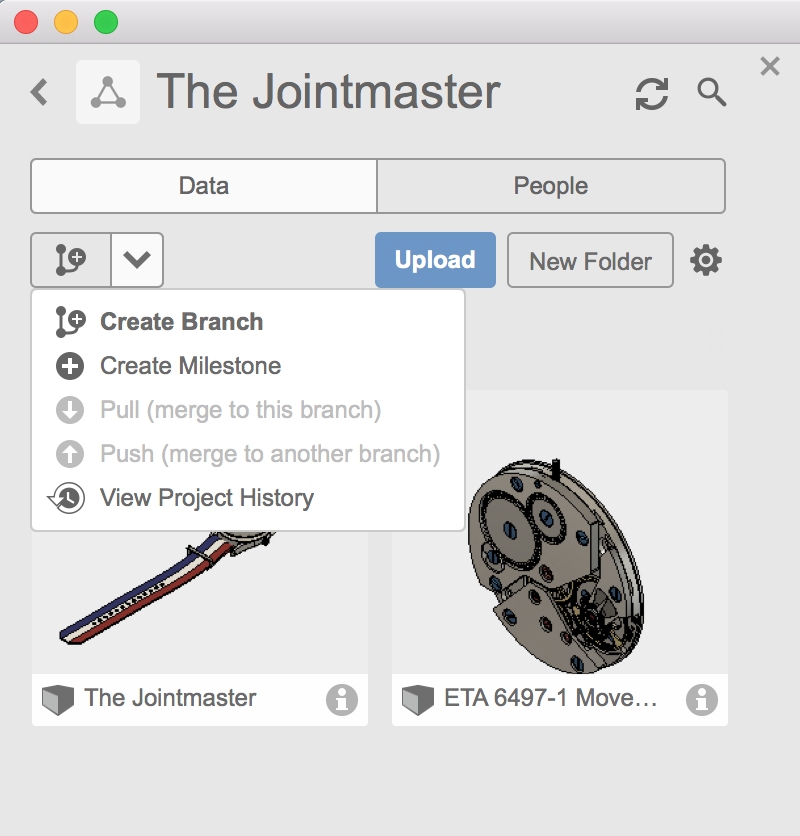
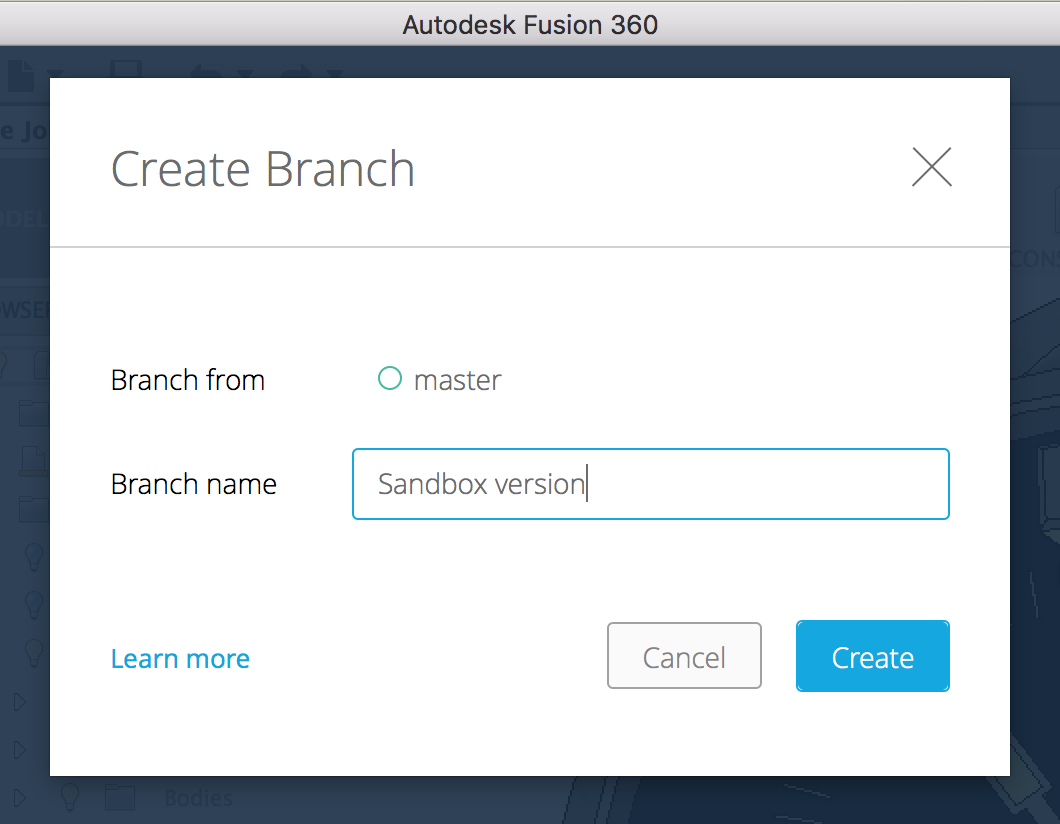
All your existing projects are deemed as master branches by default. You’ll notice that within every project, there is a project icon > master with a green circle. Click on the > and you’ll see the option “Create Branch”. This allows you to branch off from the master project and create your own sandbox project, independent from the master project.
How to navigate between master and branches
Once the branch is created, the branch project will be shown with a different color circle next to the title. Click the project icon to switch between branches. The data panel will load all the designs to your own branch, ready for you to access. Opening a design in a branch project will open a new tab.
How to create milestones
I changed the color and geometry of the strap (because I was feeling orangey) and would like that capture this change as a milestone.
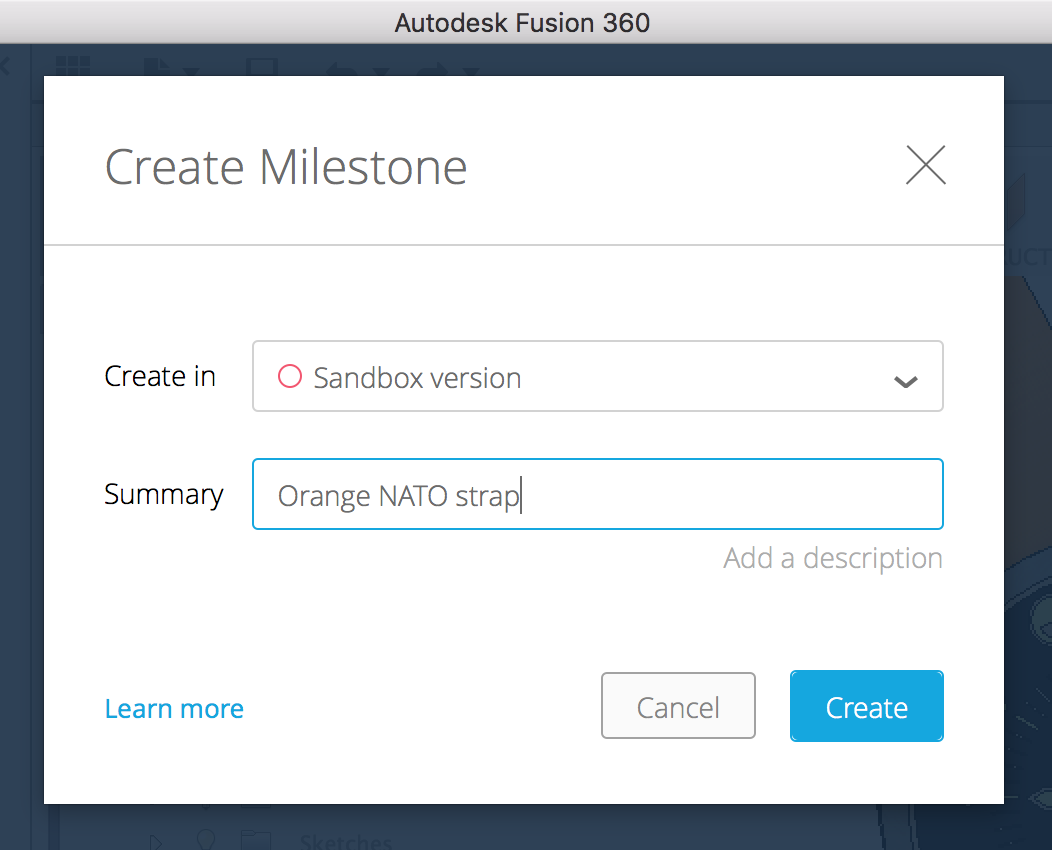
Once you create a milestone, Fusion 360 sees that as an event on your branch. The main difference between a branch and a milestone is that a branch branches out, whereas a milestone stays on your branch.
Milestones allow you to capture major changes in your design so that if you ever need to revisit one, you can easily find it.
How to merge changes
Okay, so you made some changes to one branch and you like what you’re seeing. Now you want to merge the changes to your master branch as the shiny new benchmark.
There are 2 ways to merge your changes. This is pretty important to understand, so hear me out.
1 – Push a merge
A Push merge means that you can be on the branch that has the latest changes, and push them to a desired destination, either to master or to any other branch.
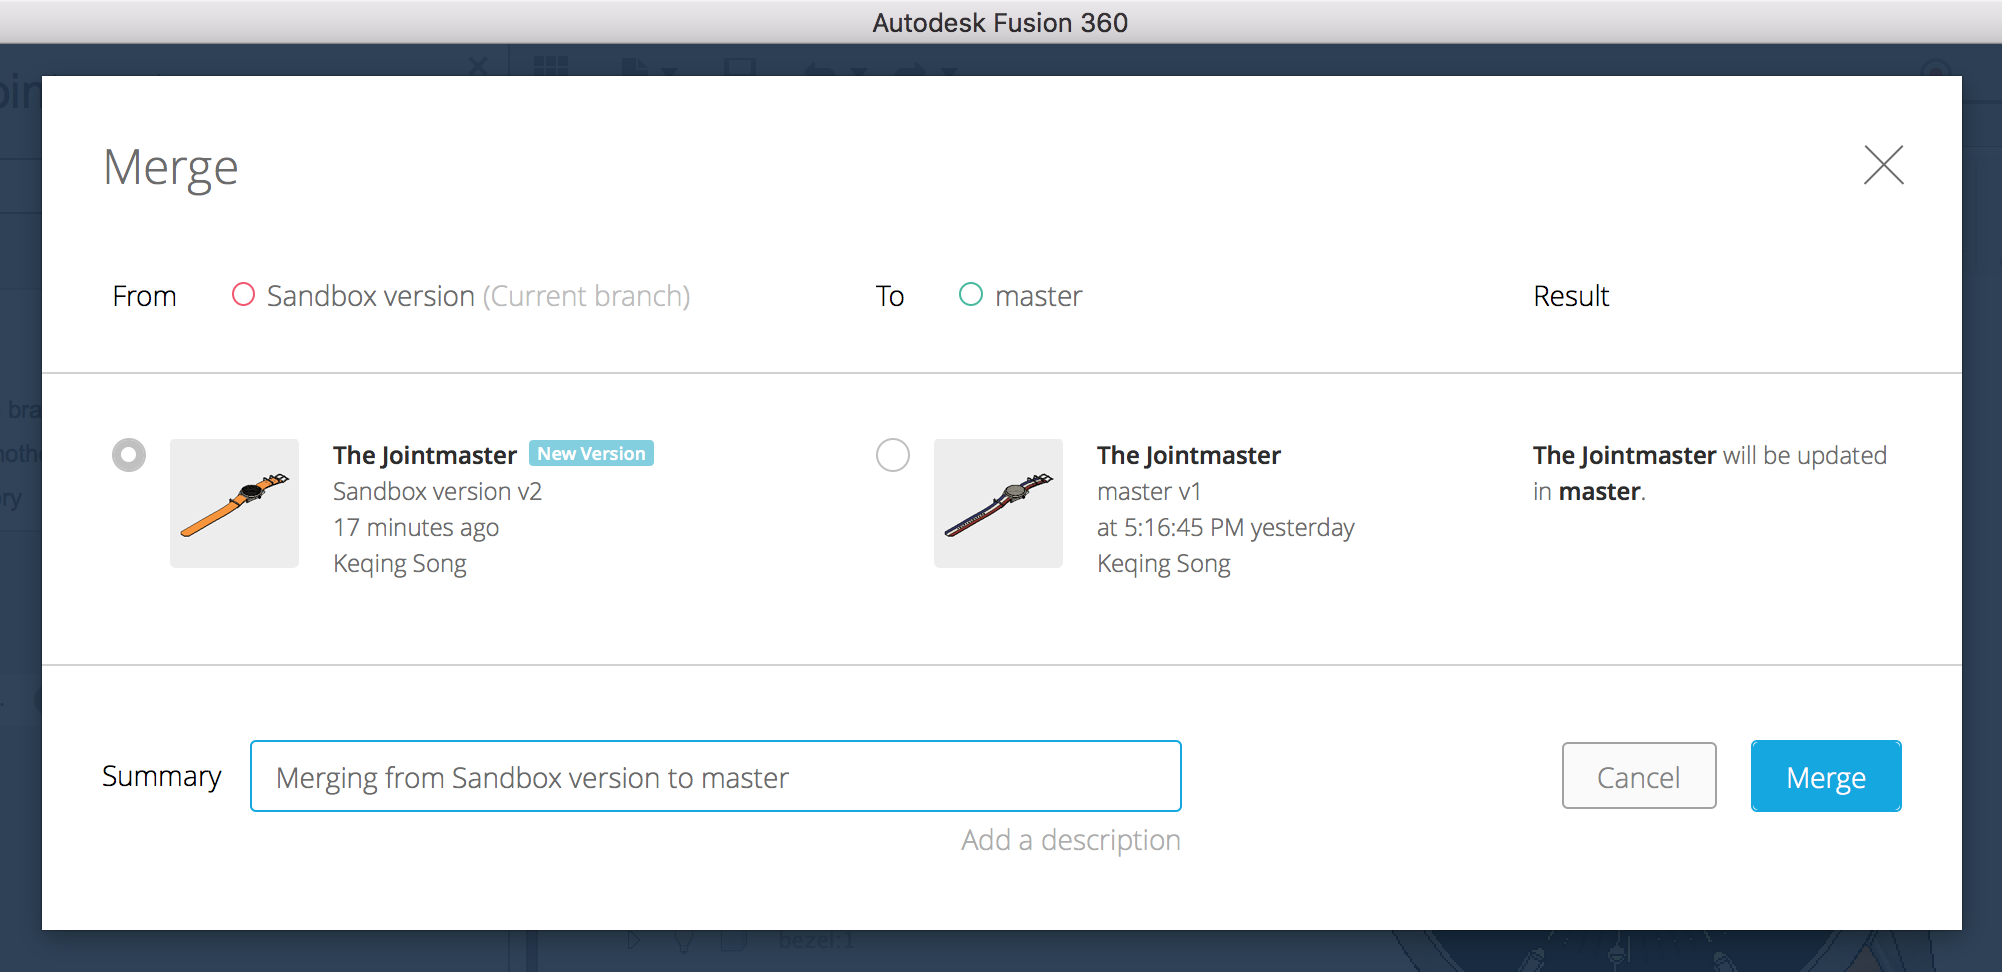
Since we are in the sandbox branch, you get to select where you want to push the strap color changes (or other changes that Fusion 360 has found) to. Notice that pushing the change to Master only shows the most recent change to the strap, whereas pushing the change to the other branch will reveal other changes that have not been pushed to that branch.
2 – Pull a merge
A Pull merge means that you want to “pull” the changes from another branch to the one you’re currently on (in this case, the master). Pick and choose the changes you want and then you’ll have the edits pulled to where are you are at. Now we’re in the master branch, pulling the strap color changes from the sandbox branch.
Pull a merge by going to the branch selector in the data panel. Fusion 360 will be smart enough to find where the change was made and give you options to choose from.
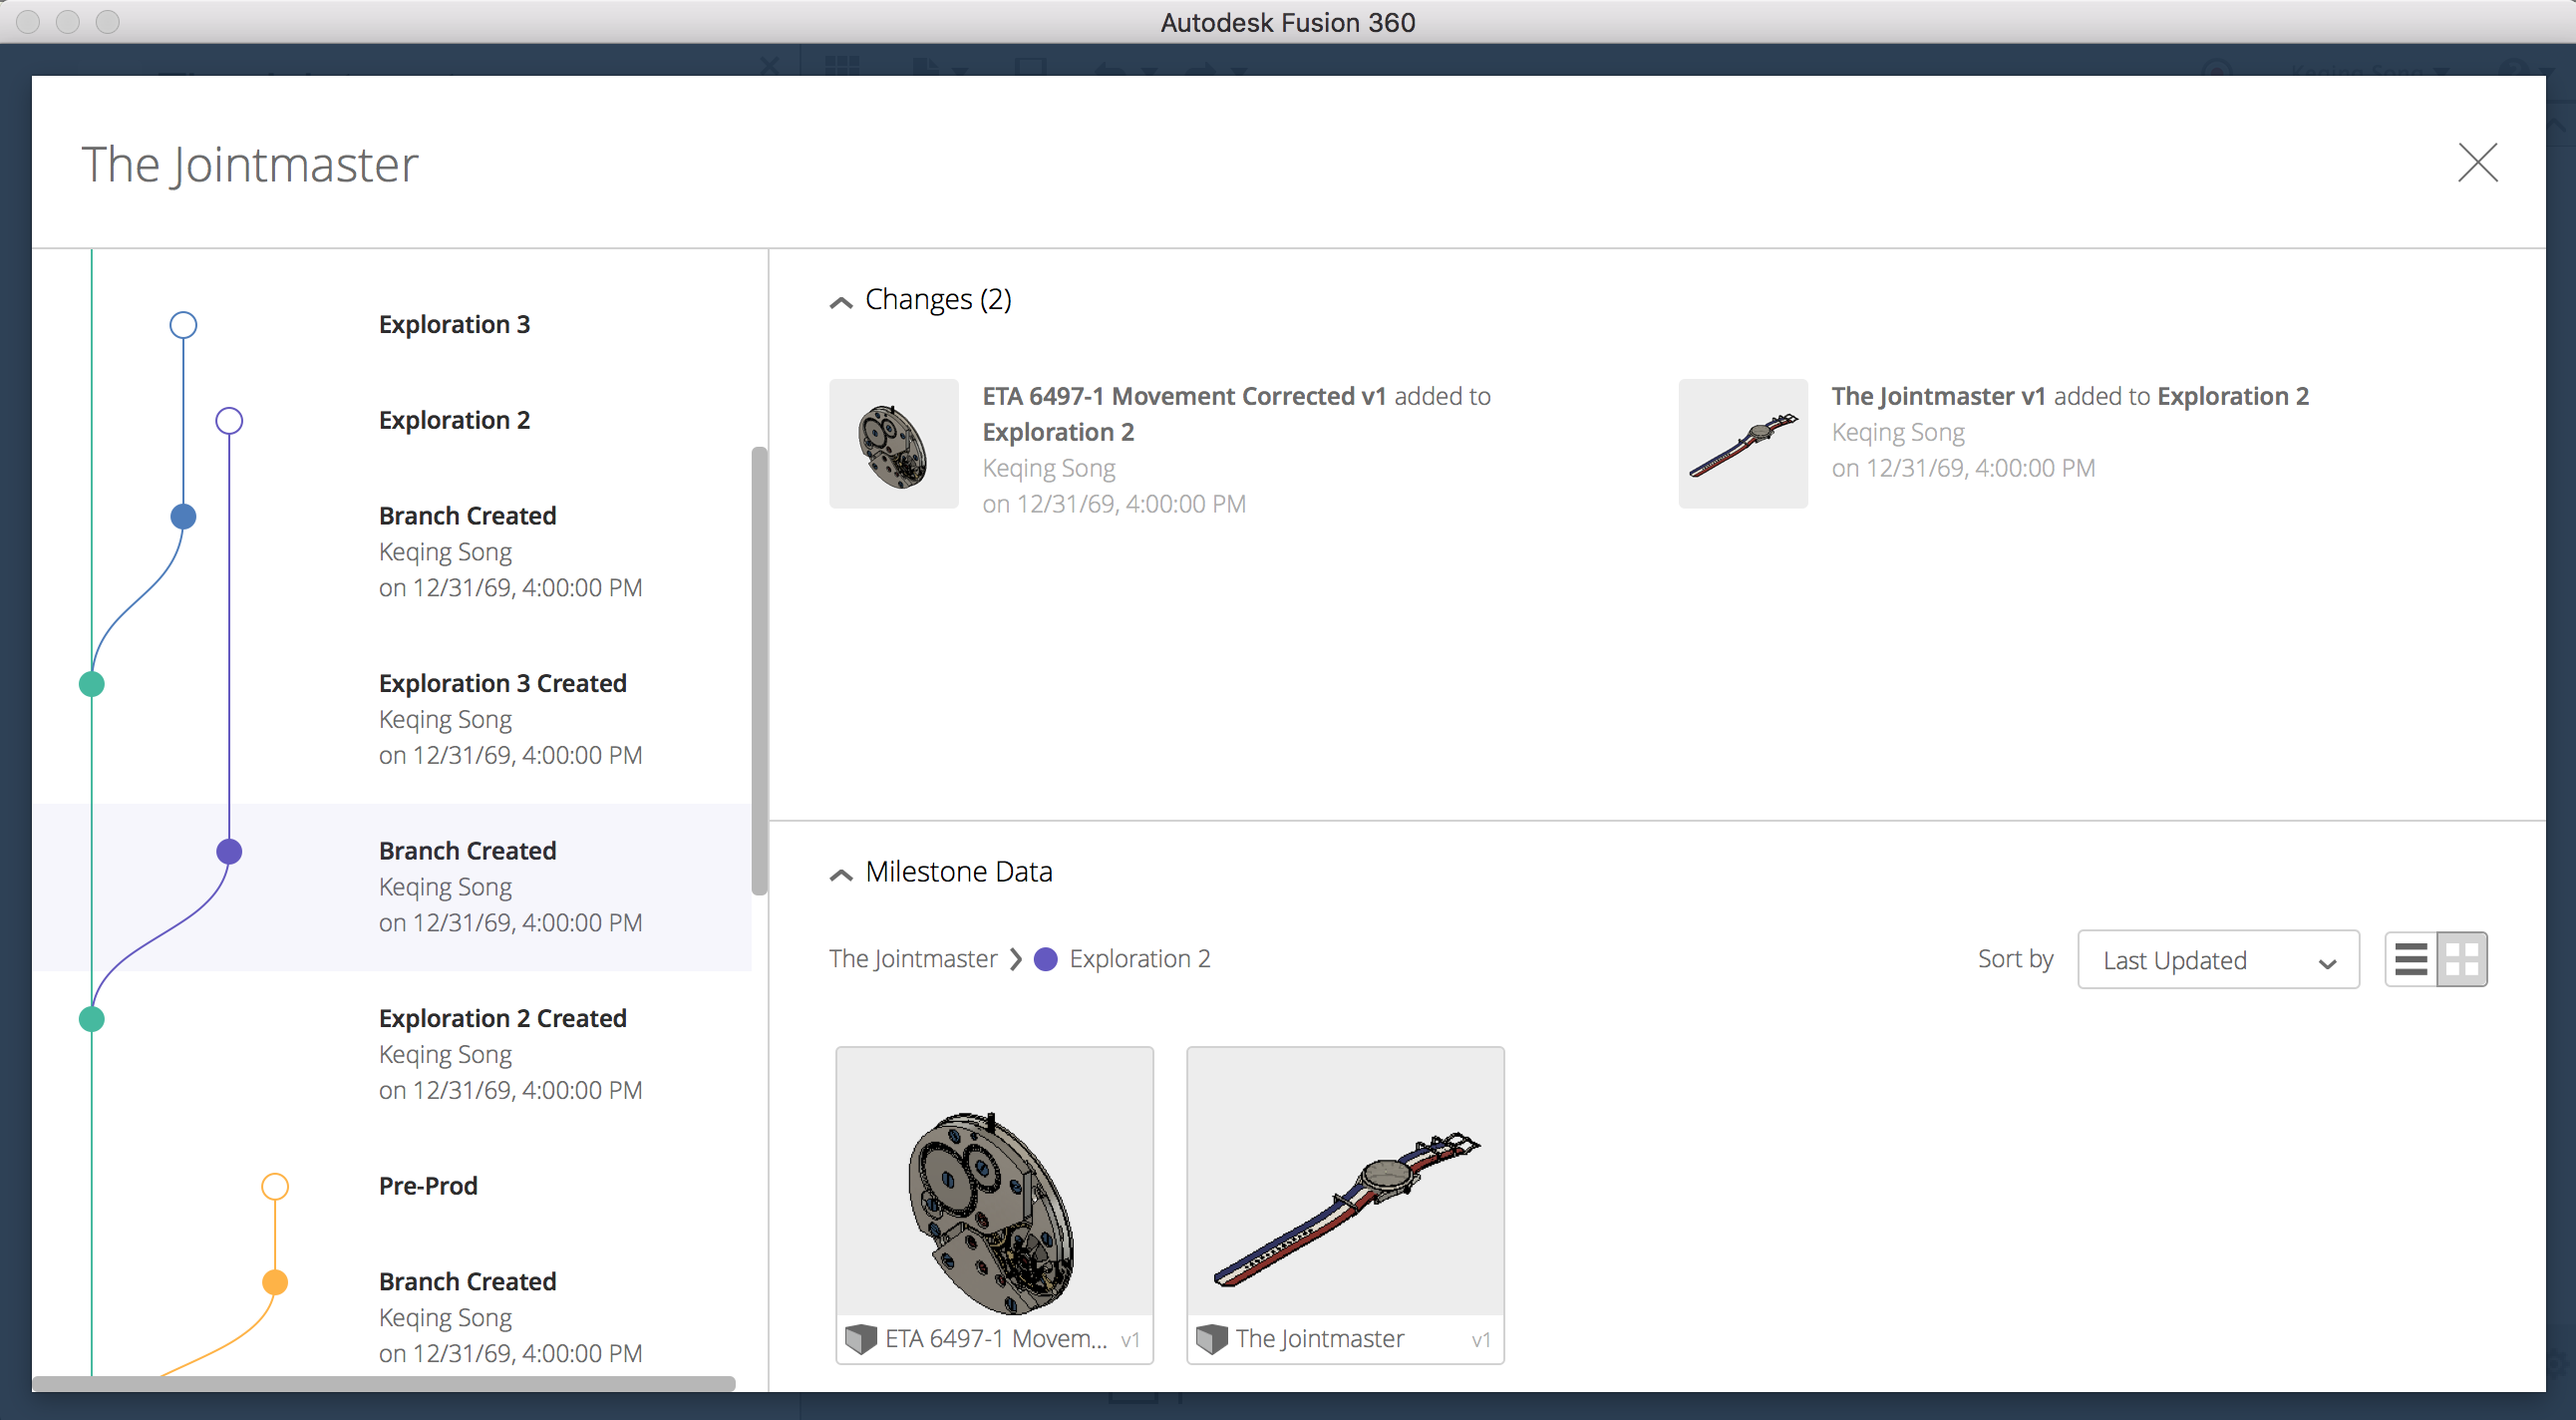
How to view your design history
With all of the branching and merging going on, you’ll need a good way to keep track of everything. That’s why there is a View design history option that shows you a timeline of every instance of branch creation, milestones, and merges that have happened throughout the life of your project.

In this view, you can also create a branch from another branch by selecting the branch you want to branch from, and then right clicking to create another branch (yeah, you just read the word branch 5 times in one sentence).
To summarize, here are some good tips to know:
- Branch & merge only works on a project level, not per design.
- Once a branch is created, the rest of your team will get a notification if they are also working within the same project.
- Hovering over the design tab will show you which branch and project this design belongs in.
- You can right click on a solid circle in the design history view and get access to the same options seen in the branch selector.
- Milestones wrap up the entire state of your project (with sub assemblies and referenced parts with different versions).
- You can have multiple branches going at the same time.
Still eager to learn more? We are also building our learning content to support branch & merge workflows, so feel free to check out our learning site and new preview functionality forum for more info, and let us know what you think about the whole experience there or in the comment section below.
Back to the top
Rendering & Graphics
Appearance Material library now has search
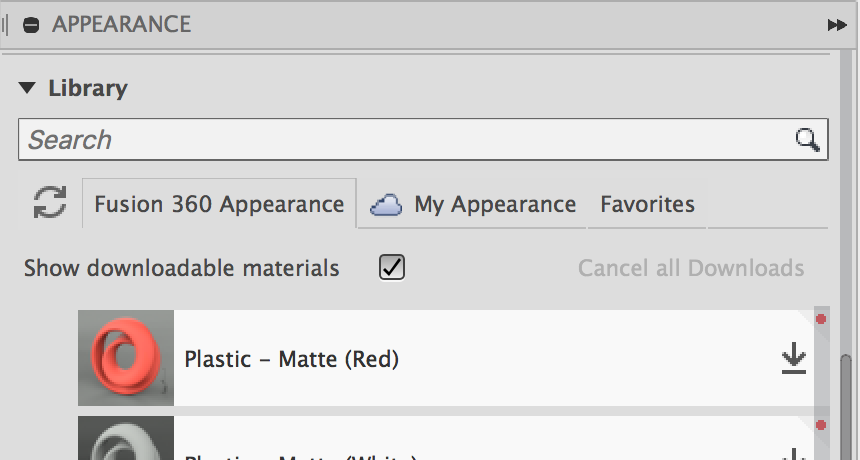
We search for everything these days, so why not search for your favorite materials in the Appearance Library? Now you can (this makes me soooo happy). All those seconds spent digging through folders add up, and now you longer have to do it!
Personal material library is now synced
Notice that new tab in the middle with a little cloud icon? That’s your very own cloud-synced material library (IdeaStation). Add your favorite or custom materials there and they will be automatically synced to the cloud so that it is with you where-ever you log into. Woohoo!
In-canvas rendering Improvements
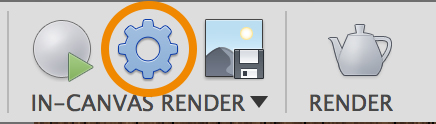
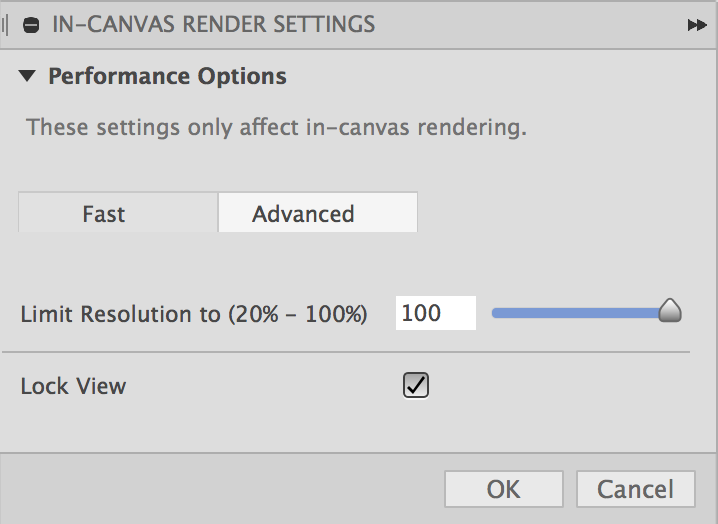
New Settings icon – Now there is a Settings icon in the toolbar, which will allow you to determine the quality of your renderings via the settings dialog. Click it and you’ll get a dialog where you can adjust the level of quality of your local render. Fast will simplified materials and lighting, whereas Advanced will give you a more detailed result. You can also lock your view now with Lock View (IdeaStation), so you don’t accidentally do a mouse click and start your rendering all over again. Score!
New Rendering Controls UI – Once you start the in-canvas rendering, you’ll notice a new set of controls at the bottom right corner of the window. This will show you the time elapsed, number of iterations, the quality you’ve set this rendering to achieve, and a pause/resume button on the far left.
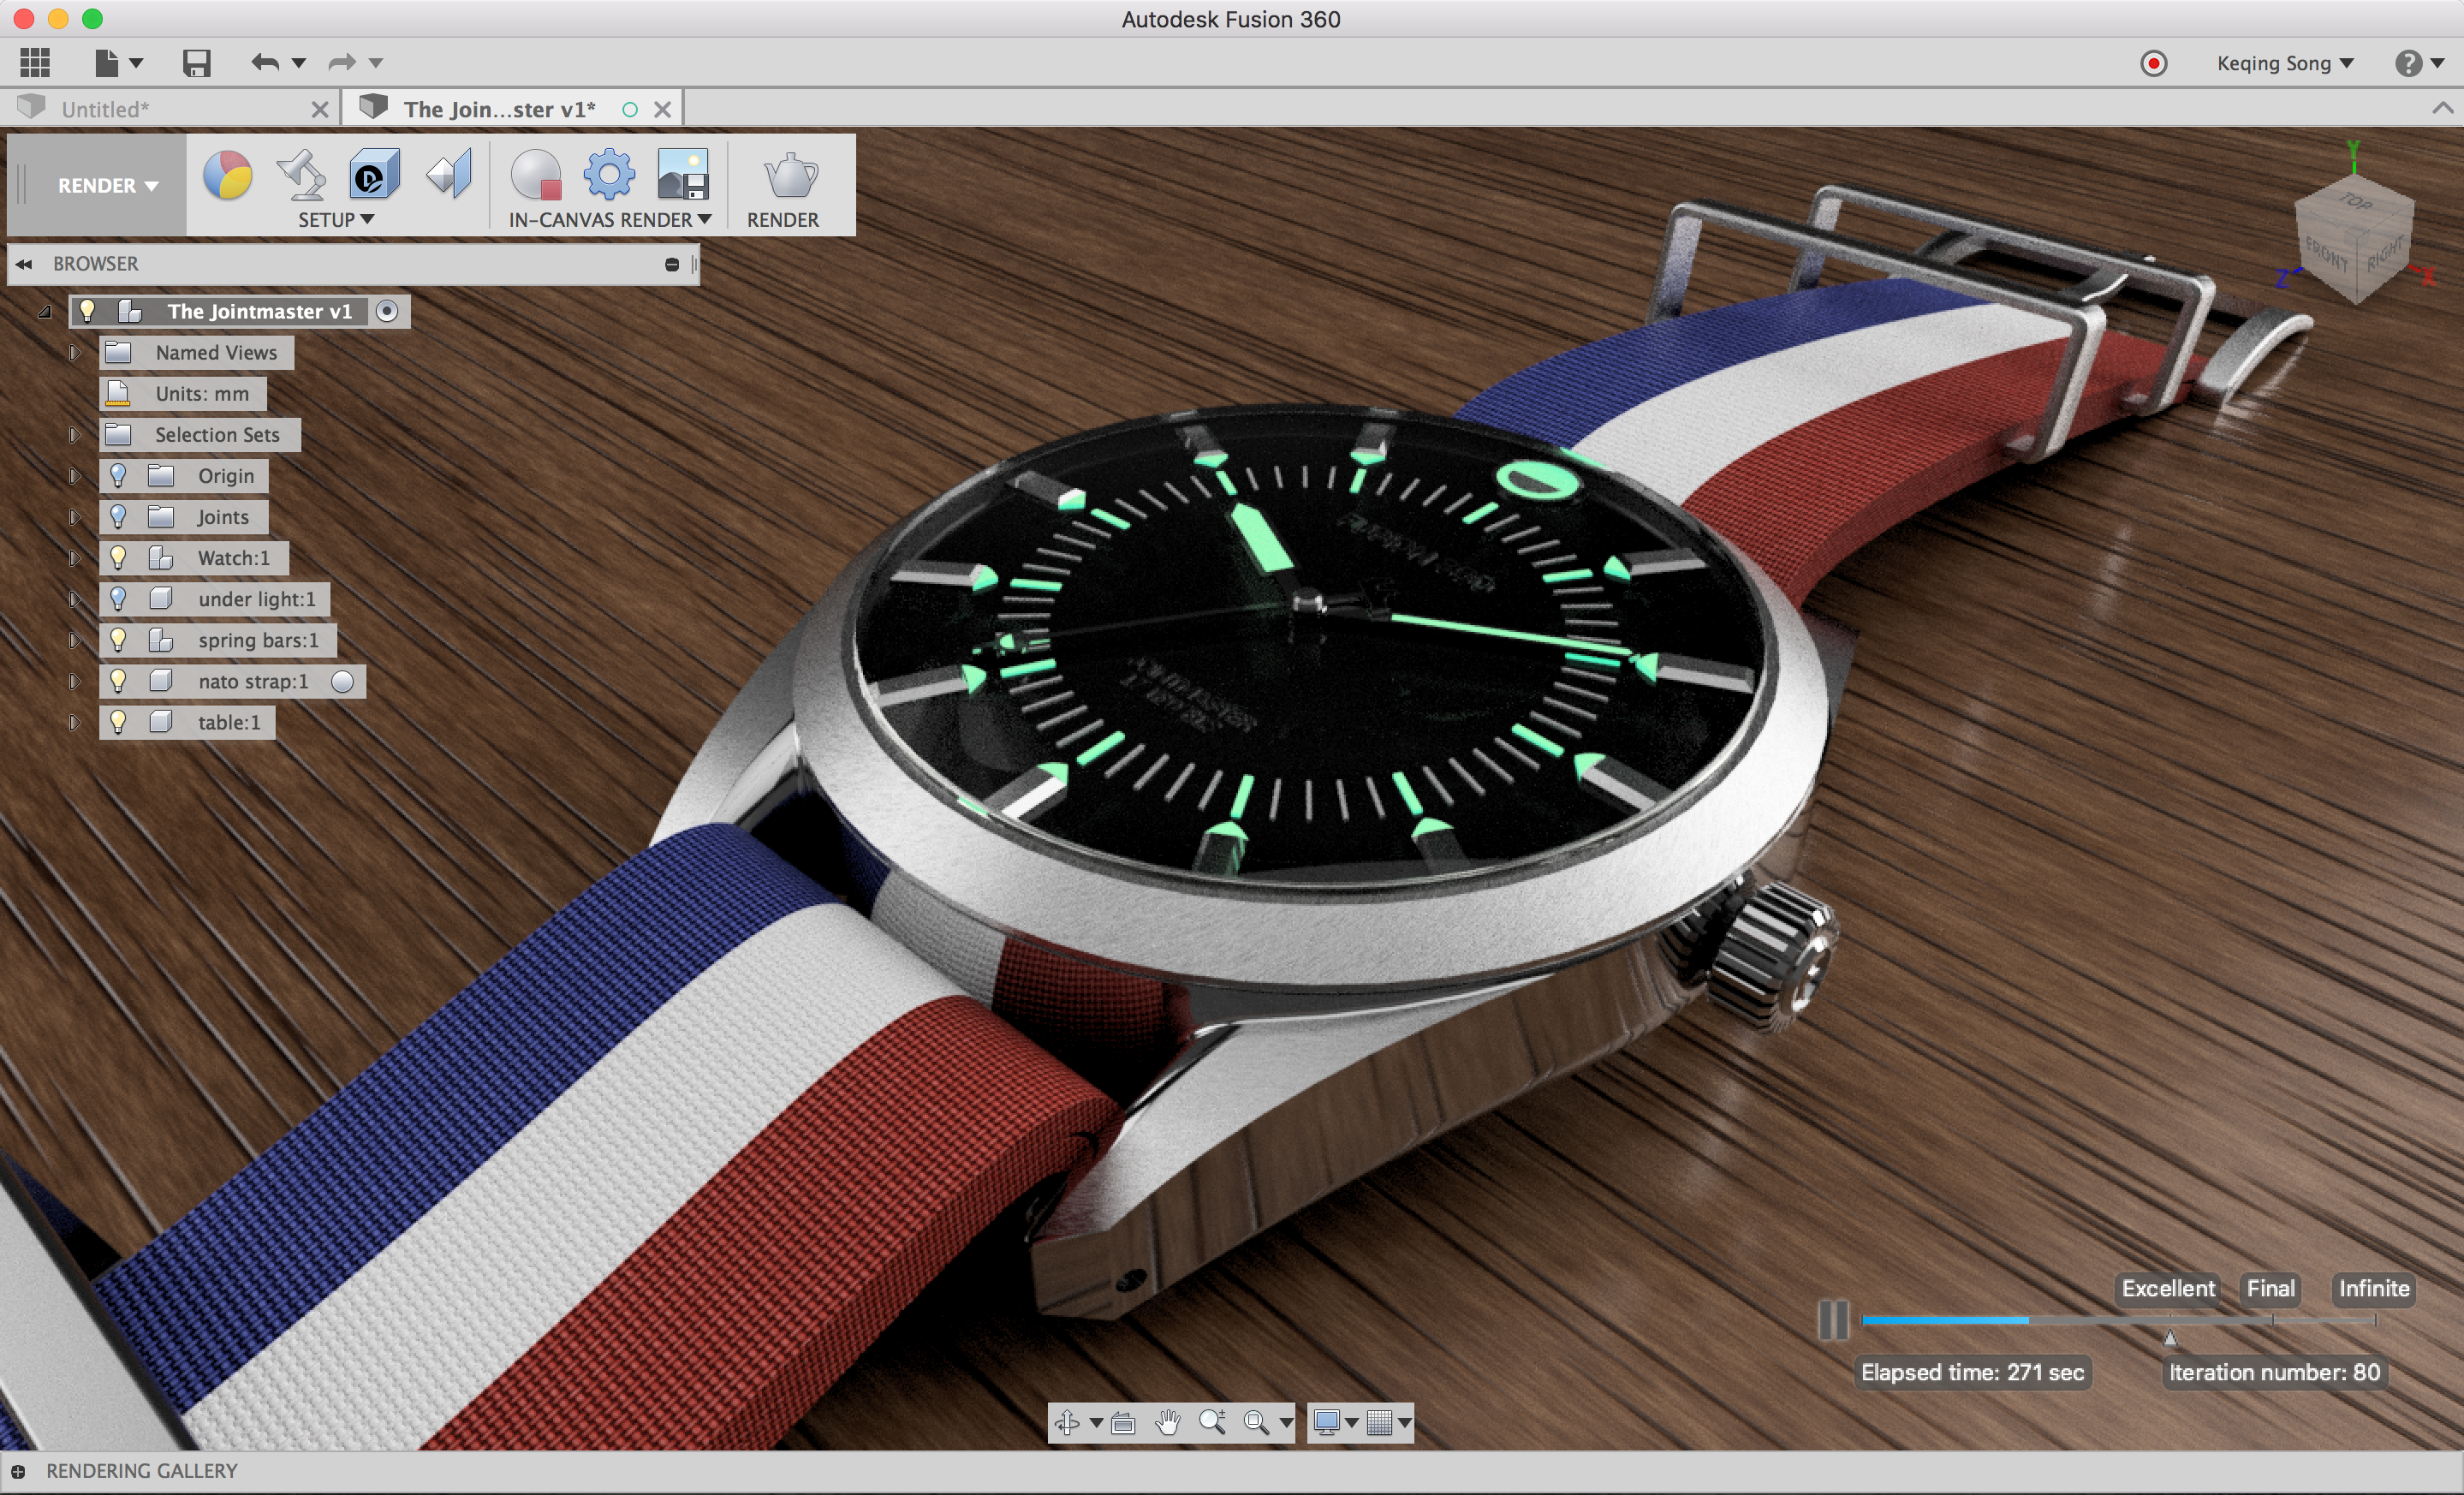
 Once the blue bar reaches Excellent, the rendering will stop. You can toggle the triangle to Final, Infinite, or anywhere in between and the rendering will resume until it reaches that mark (unless you have it set to Infinite, in which case it’ll just keep going, and going, and going).
Here are some notable fixes for rendering and graphics:
- Robduarte found a weird graphics issue where when he had shaded with hidden edges visual style turned on and looked at his design in specific views, he saw edges and shading that were just wack. We got this sorted out.
- We fixed a graphics issue where in some instances, if you went had a solid model in the design environment and went into the Sculpt environment, the solid model remained opaque. It should have been faded/semi transparent. Now it is.
- There was a graphics bug where if you were working on a complex sketch and were zoomed all the way out in space, some sketch arcs and lines were not revealed until you zoomed in closer and closer. Yeah, it seemed like they didn’t even exist until you got closer and poof – they appeared outta nowhere. That ain’t right, so we got it squared away.
- Speaking of zooming in and out, apparently there was an issue where if you were zoomed out after a certain specific range, you weren’t able to select fillets by window selecting. What is this, “Can’t Touch This” by MC Hammer? We weren’t having it, so we fixed it.
- We fixed a regression issue where models with legacy materials applied lost their correct textures. Turns out there were some texture maps missing. Oops. Done.
- This one was a funny bug – there was a case where if you had a section analysis applied to a model with a curved surface and then went on to apply a decal on that surface, the manipulators that allowed you to move and adjust the decal were cut off by section analysis, as if they were part of the decal. The manipulators had an entity crisis, but now they know exactly what their purposes are.
Back to the top
HSM
CAM cloud libraries are now available
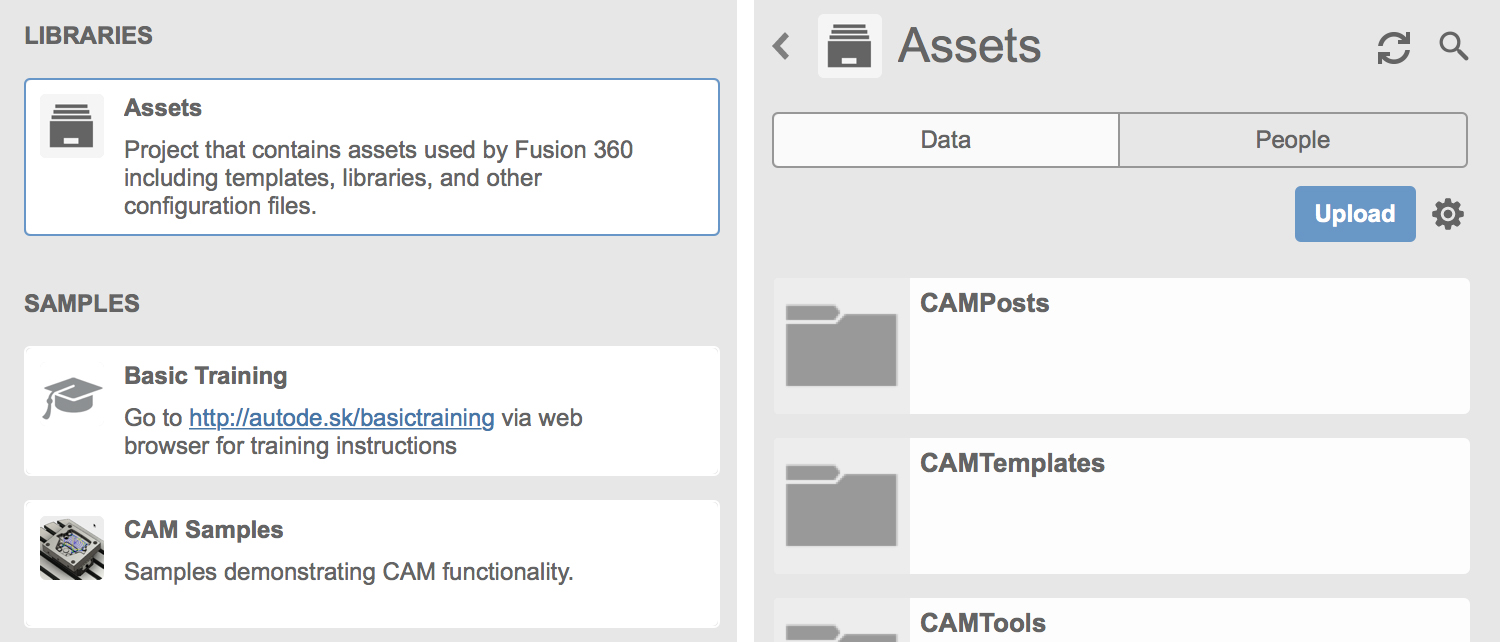
Machinists rejoice! Now you can save custom templates, posts, and tools to their respective folders in the data panel, and have it synced to your account so that they are available wherever you are signed into.
Previously you could only access your saved posts, templates, and tools via A360 Drive. Now there’s a new option in your preferences > General > CAM called Enable Cloud Libraries.

Check it (if not already checked), apply it, refresh your data panel and you’ll see your existing posts, templates, and tools appear in a new folder called Assets will appear under Libraries. Bryce and Aaron did a great job showing how this all works in their latest What’s New video.
Probing enhancements
Stock probing now out of beta – Now you can probe on both box and cylinder stock in a given setup, which supports X/Y/Z-surface, X/Y wall and XY rectangular/circular boss probing. So you know, you can probe a boss like a boss.
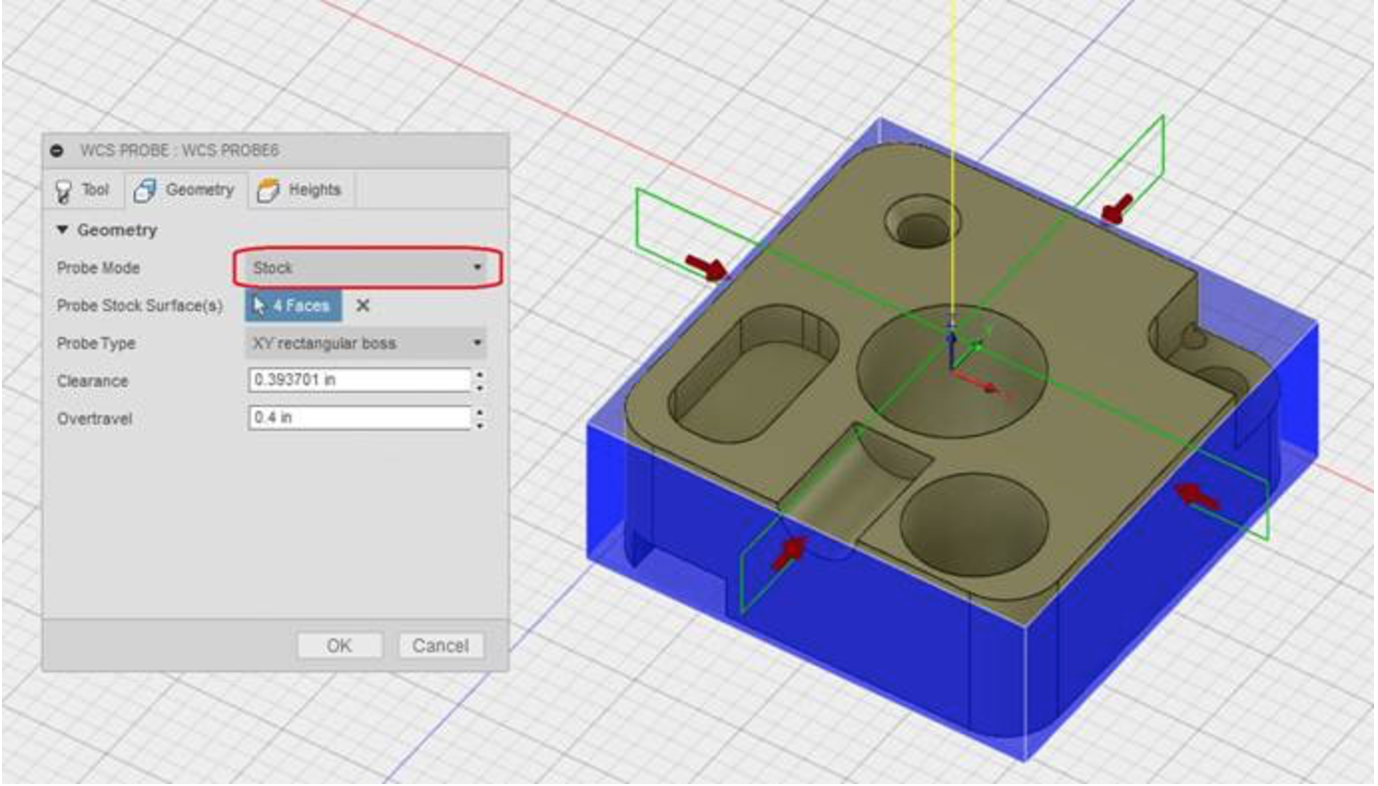
Use Selection Point function for Probing – For XYZ surface probing types, you can now use the “Use Selection Point” function to define the probing touch point on the selected surface accurately. Neat!

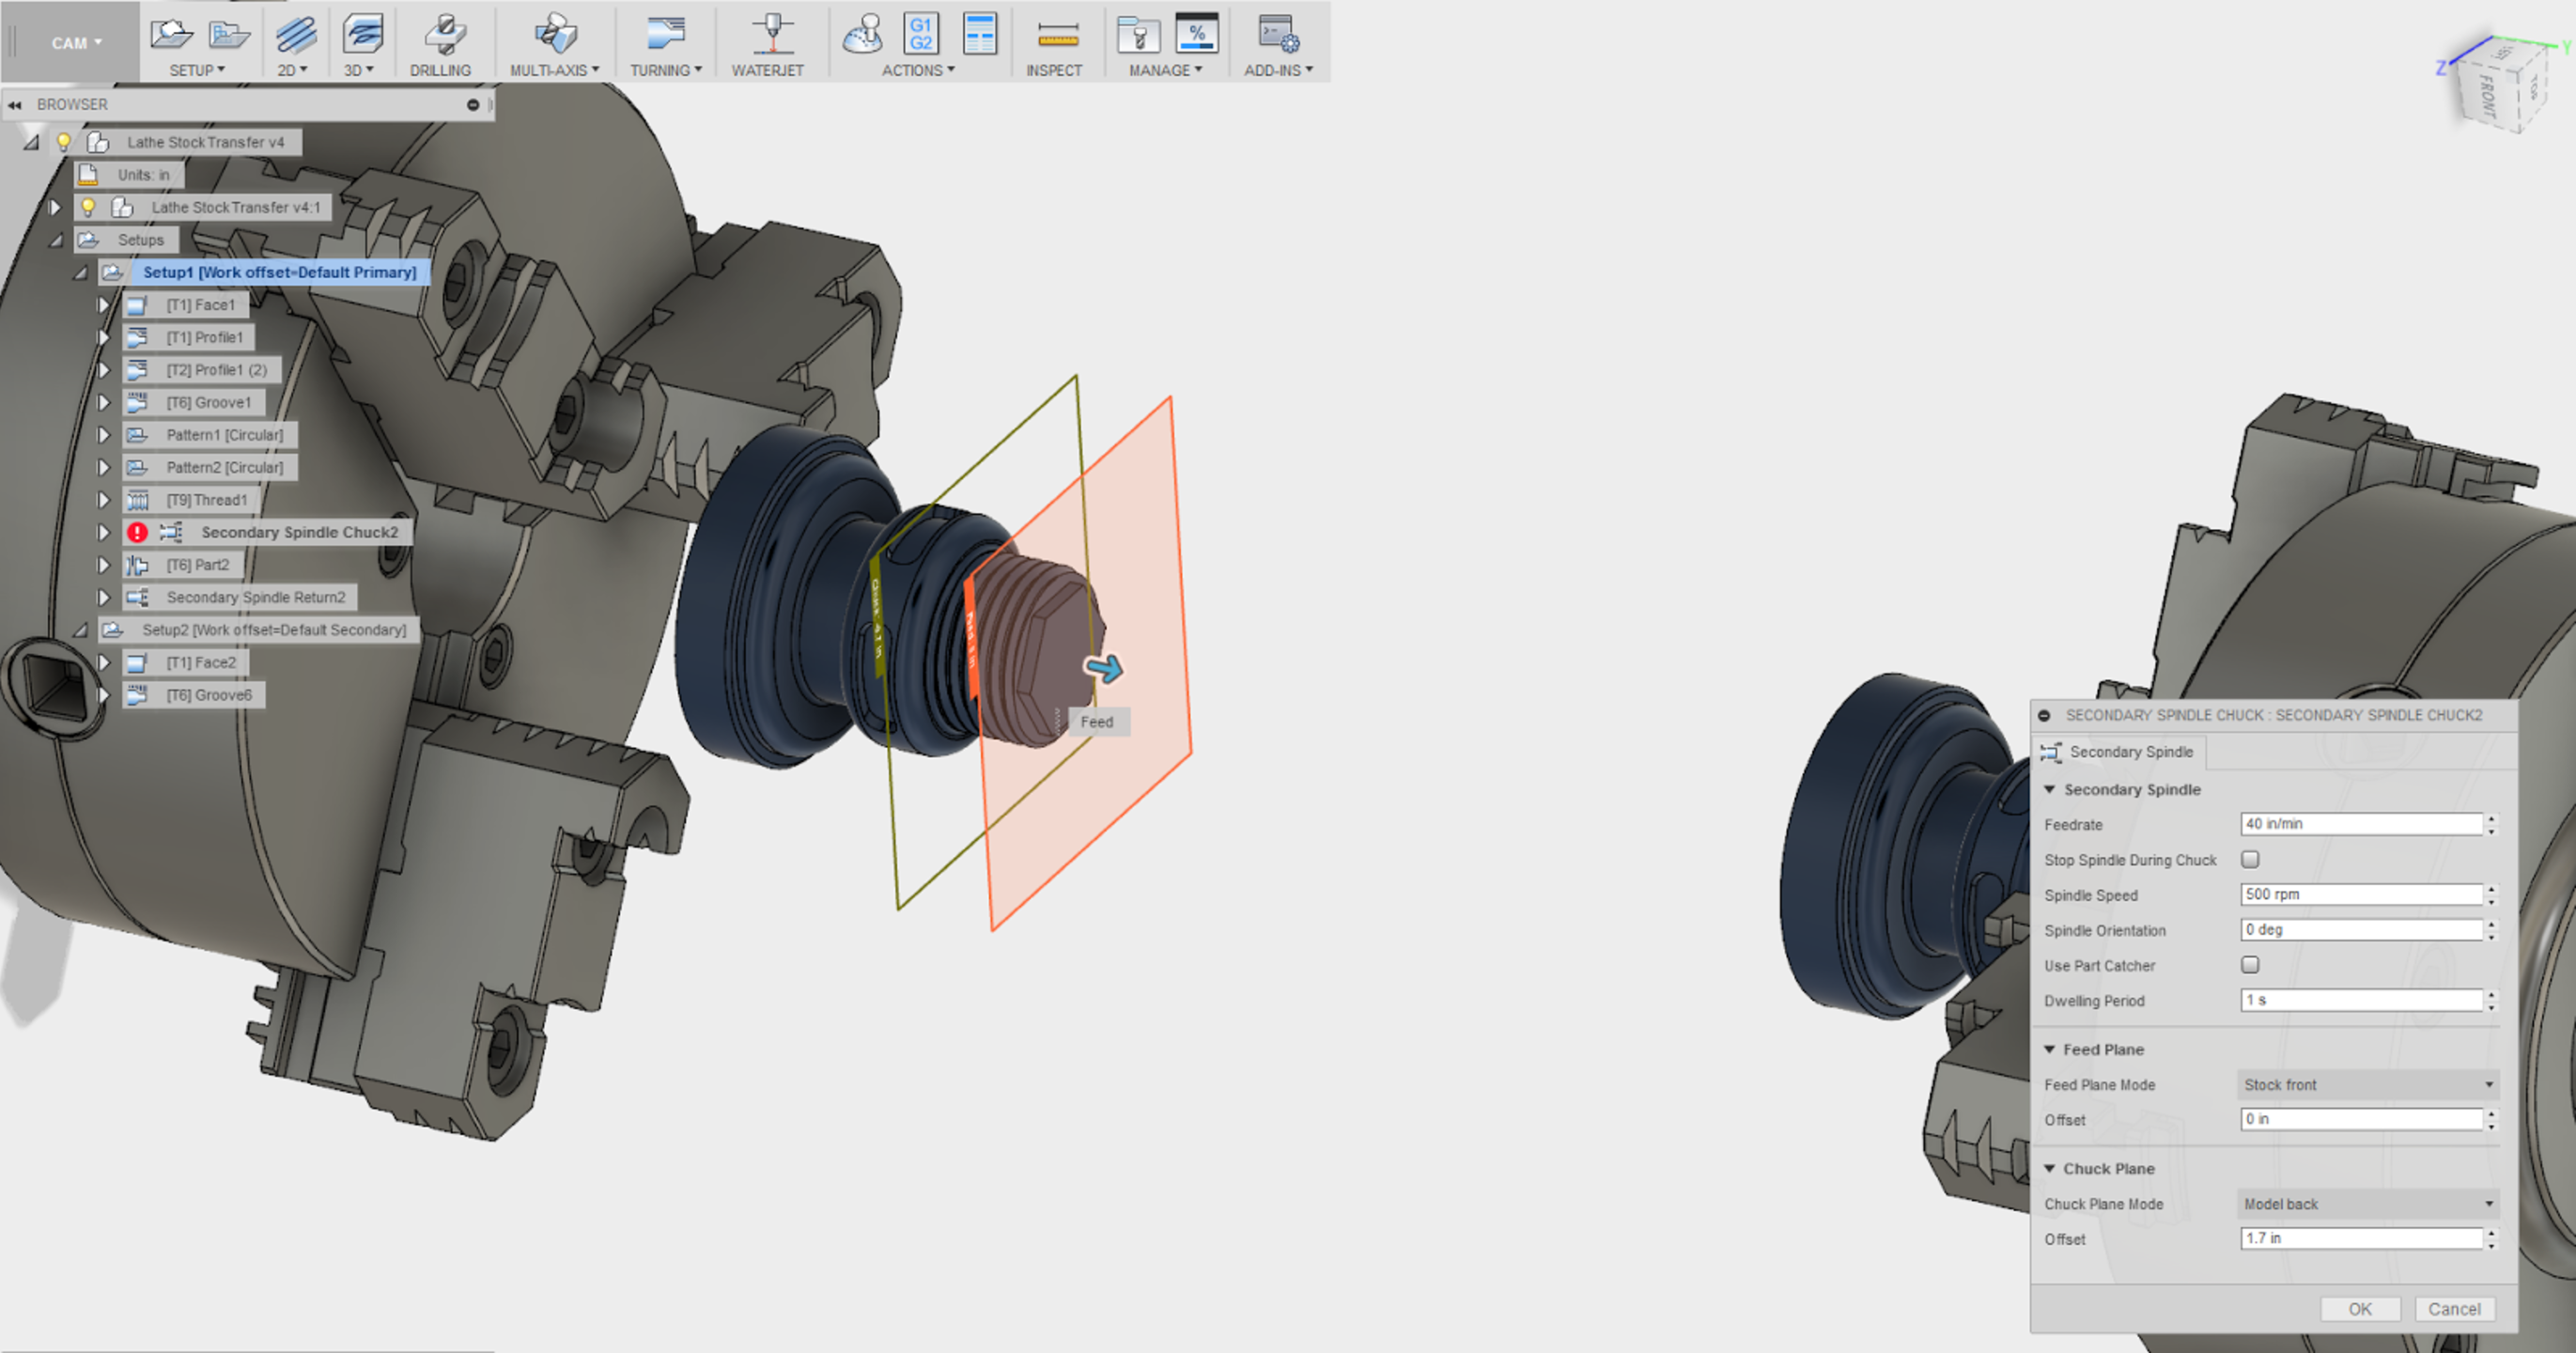
New Turning Secondary Spindle Chuck and Return
Now under the Turning drop-down menu, you’ll find Turning Secondary Spindle Chuck and Turning Secondary Spindle Return. This allows you control the process of Passing a between the primary spindle on a lath to the secondary spindle. To fully leverage this you will need to ensure you are using a post processor with Dual spindle support.
Optimize Order option for Bore, Thread, Circular operation
Wouldn’t it be great if there was an option where you could have Fusion 360 optimize the bore, thread, or circular operation toolpath order under the Geometry tab, after you’ve selected the faces you want to machine? Oh wait, now there is :). Thanks for the IdeaStation submission HatfieldIndustr!

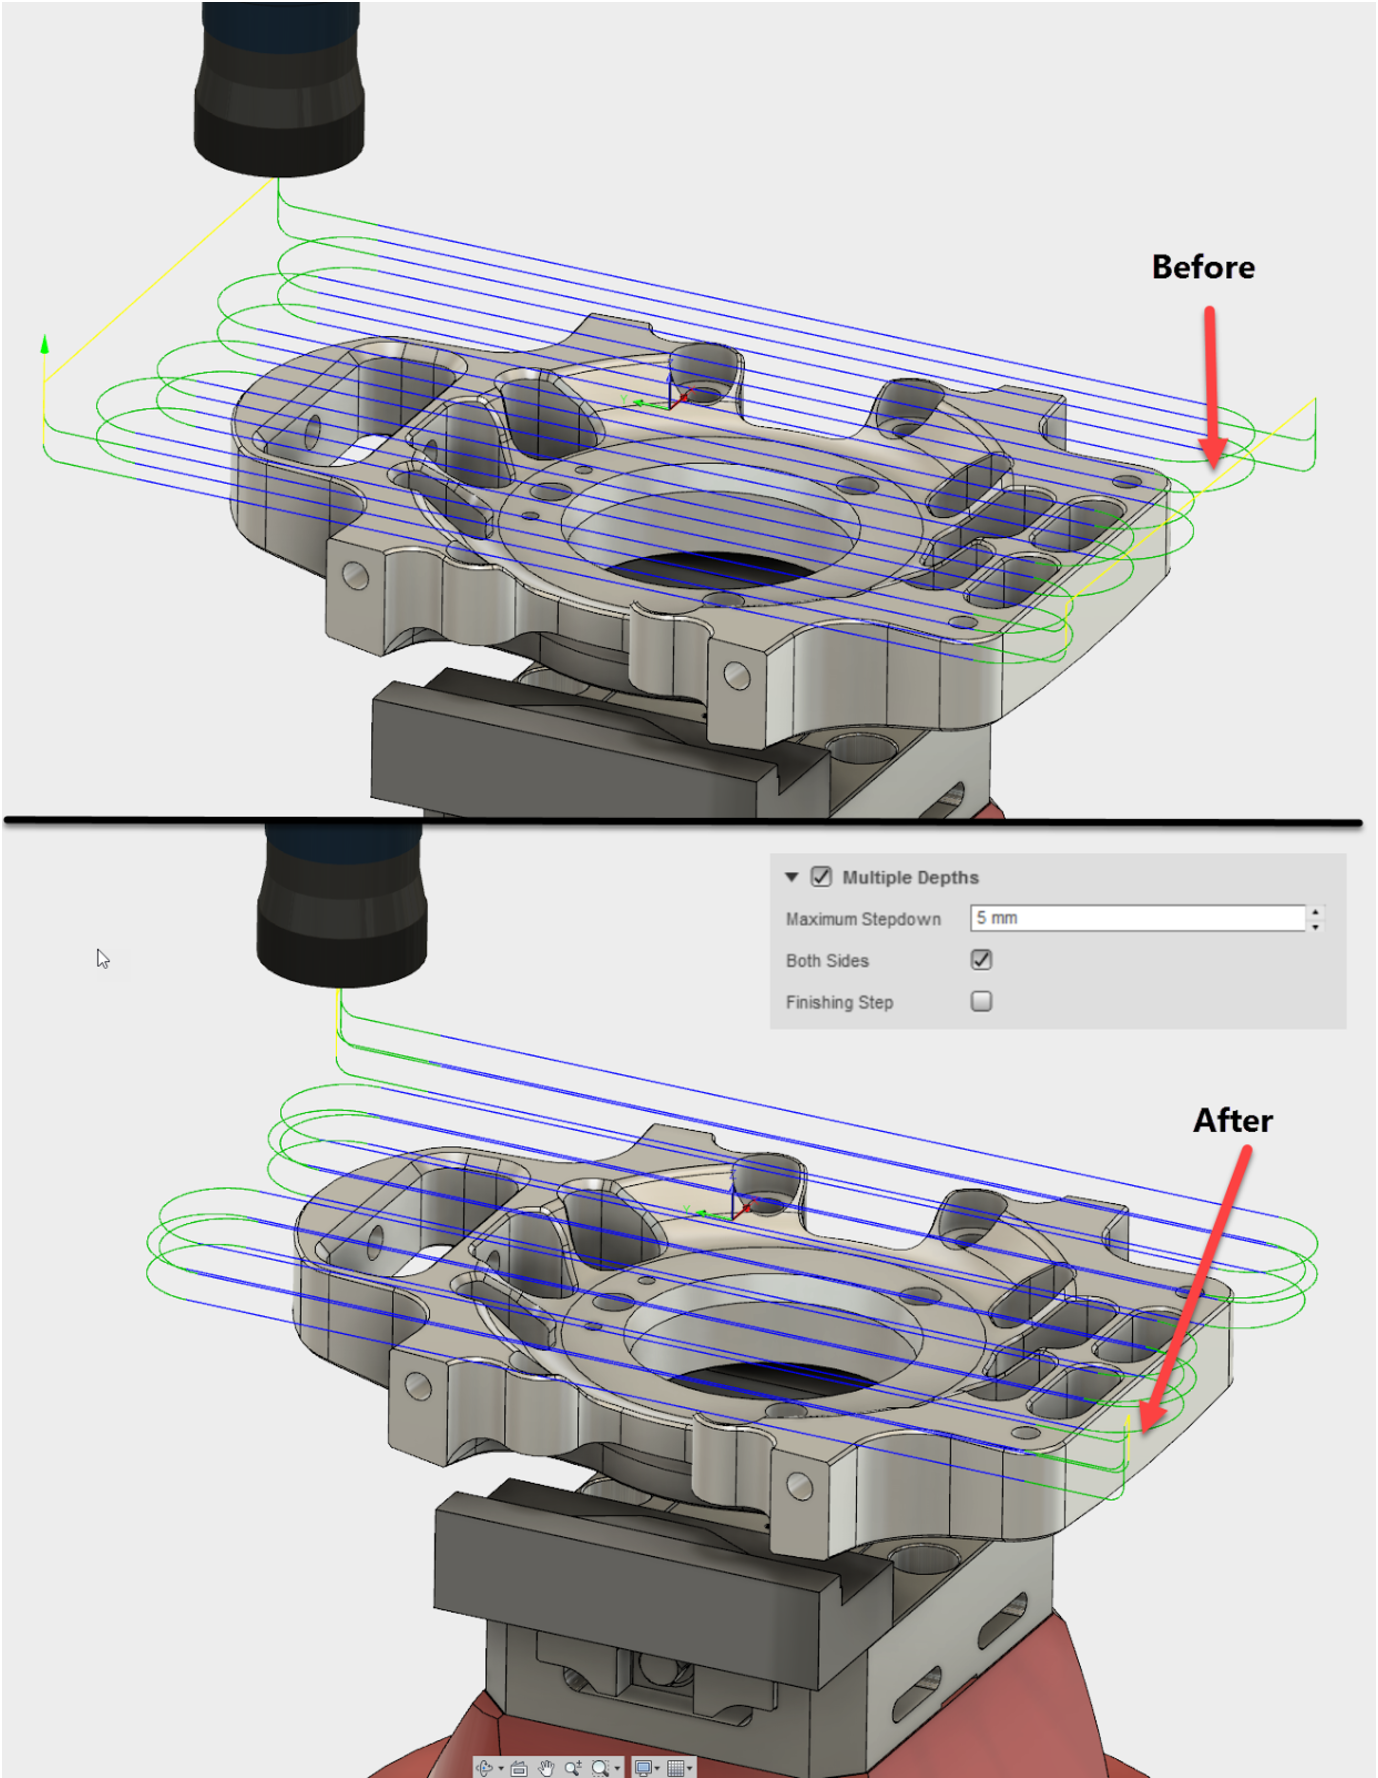
Start where it ends with Both Sides Option
And because of the new HSM kernel, Fusion 360 tool-paths are now more efficient at where they start and end. Instead of always starting a cut from the same side of a part, tool-paths can now start to cut the next z depth from the that it finished on. Woot woot!
HSM Kernel updated
HSM Kernel updated
The new kernel now supports Water/Laser/Plasma Cutting preview functionality even better. Previously with the old kernel, when you made a model change, the toolpaths regenerated without issues, but there were instances where it gouged/went straight through your part with no warnings. Now when you make a model change, the new kernel prevents regenerated toolpaths to gouge your part, or will give you a warning that they need attention.
Waterjet – New Keep Nozzle Down & Maximum Stay-Down Distance Options
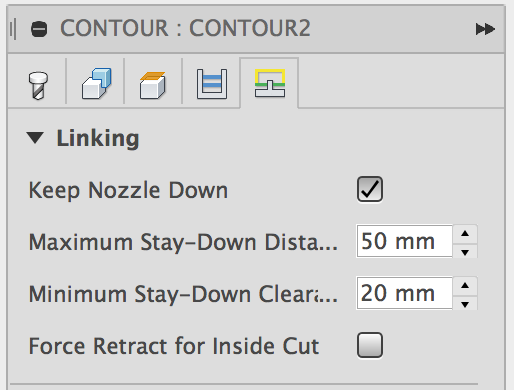
This lets you force the head to stay down, by setting a distance as the condition to eliminate retracts.
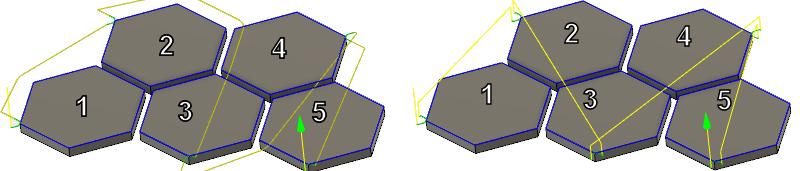
In the example on the left, you can see how the rapid movement avoids any previously cut profiles, unlike the one on the right, where it goes right over the parts. Smaller parts can tilt, which might cause a collision with the head. Moving around previously cut profiles eliminates the possibility of a crash.
Waterjet – New Piercing Clearance and Tabs Option
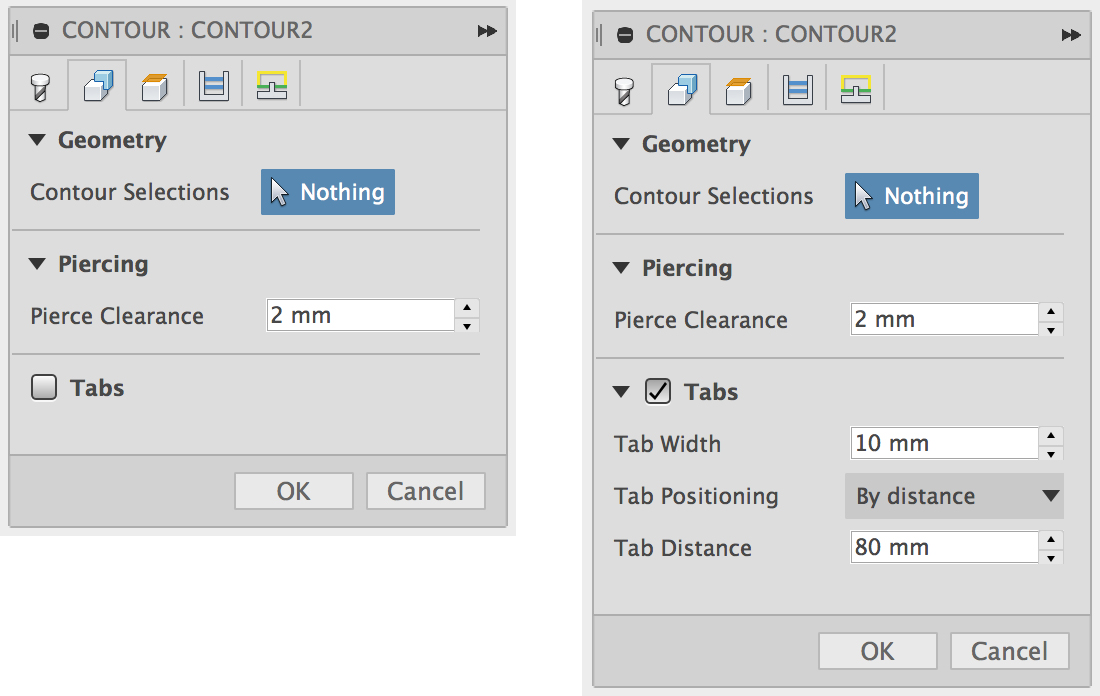
Pierce Clearance ensures that point piercing takes place away from any contours being cut. This feature ensures that the part is not damaged due to too close piercing.
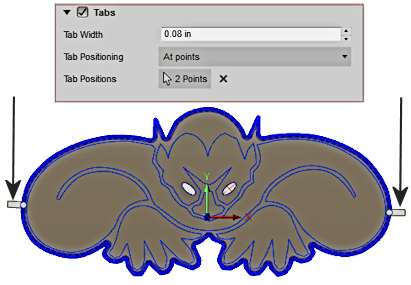
The Tabs option supports leads at tabs which is required to avoid piercing on the contours themselves.
There are a few other enhancements made to Waterjet preview, and if you want to learn more, head over to our learning page.
We also made 50+ fixes related to HSM and our CAM workspace, which include kshea9RNL8’s report of this tool library issue where under the “Feeds & Speeds” tab, Cutting, Lead In, Lead Out and Ramp feed rate input fields for drills were missing for some odd reason. Apparently those options weren’t available for drills at all, but the dialog made it seem like they were missing. We cleaned up the dialog so it makes more sense.
Back to the top
Simulation
Multiple load case issues fixed
There were a number of issues around multiple load cases generating the wrong results. Miano.s reported a related issue, and we’re glad to report that these have all be addressed.
Local solve errors resolved
We had some strange issues where local solves were failing, but cloud solves were working. Ah but it gets even weirder. The issue was apparently related to you having a space in your username. If you have a space in your username, then too bad, you couldn’t do local solves. Oh yeah, an INI file was missing from Mac machines too. That probably did it as well.
Simulation results are now cached
Previously Simulation results were cached separately from your designs. Now they follow the standard Fusion 360 cache settings, and are cached along with your designs. This should free up some disk space.
Compare now shows up under the Simulation workspace
When you had multiple load cases and wanted to compare them, the Compare environment appeared at the very bottom of the workspace switcher. It doesn’t really qualify as a “workspace” per se, but it definitely appeared as one. Now when you want to compare load cases, Compare will appear right under the Simulation workspace. Because you know, it’s more clear on what it is and isn’t.
Back to the top
API
What’s New? A ton.
I know what I’m talking about most of the time, but when it comes to API, I’ll admit that I’m a complete noob. So instead of boring you with what I think is new, here’s the direct link to the API What’s New page, meticulously written by the father of our API, Brian Ekins.
And that’s a wrap!
Hope you enjoyed reading this edition of the What’s New! What a great way to start the new year. We were able to mark 19 ideas from IdeaStation as Implemented, which carries us over the 400 implemented ideas mark  We’re always interested in what you think, so be sure to comment below. Now go forth and play!
Cheers,
Keqing and the Fusion 360 Team
What is Preview functionality?
* Preview functionality means that it is currently available in the product, but is not the final implementation, the UI and tools may change, and you may have to explicitly turn it on in your Preferences. Previews let you try out new functionality at it’s current state and give us feedback on the experience so we can react and improve it before it becomes fully implemented as production functionality. To learn more about new preview functionality, keep an eye on our preview forum.
Note: Sample files issues should now be fixed!


