
Mac users: macOS X 10.11 El Capitan is no longer supported. Please upgrade to the latest OS version to continue using Fusion 360.
v.2.0.5338 fixes:
Generative Design
- Fixed the issue where only one export job per Generative Design study was shown in the Job Status dialog, even if you had multiple export jobs running.
- Fixed an issue where Fusion 360 showed an error message saying that the starting shape was not connected to the keep-ins, even though they are correctly connected.
Manufacture
- Fixed the issue where cloud libraries disappeared when you cleared cache data.
- Fixed the issue reported by niekBVEL6 where manual NC pass-through text field wasn’t showing up.
- Fixed the issue reported by roman_Sholiak where machining time showed as zero when editing the tool-path.
2D Drawings
- Fixed a crash issue when trying to export a PDF.
V2.0.5331 fixes:
- We fixed an issue related to creating Construction Plane at Angle. As soon as you selected the reference edge on a sketch for the Construction Plane to be one, everything disappears.
- We sorted out an issue regarding how some of your designs have been causing the latest version of Fusion 360 to freeze up.
- If you had “Automatic Version of Close” turned on in the preferences, you ran into an issue where you weren’t able to close unsaved documents without saving. The Don’t Save button didn’t actually work. That was embarrassing, but we’re glad that its now fixed.
- If you’re on a Team hub and have Desktop Connector installed, you can now open IPTs and SLDPRTs from the File > Open dialog. Browse to the appropriate project and you should see them appear.
V.2.0.5278 Highlights:
New Learning Panel
– New essential tasks for how to get started, as well as pro-tips for specific workflows
Generative Design
– New getting started videos, outcome previewer, Connector Obstacle Tool, Additive Material Library
2D Drawings
– Improved diameter detection on side view
CAM
– Improved Sharp corner turning, Boring bar holder visual, facing during groove finishing
UI Preview
– Improved Sketch constraints, contextual toolbar treatment, add-ins support
👇 Jump to the following areas for a more comprehensive what’s new.
[toc]
Usability & Performance
🎁 New! Learning Panel
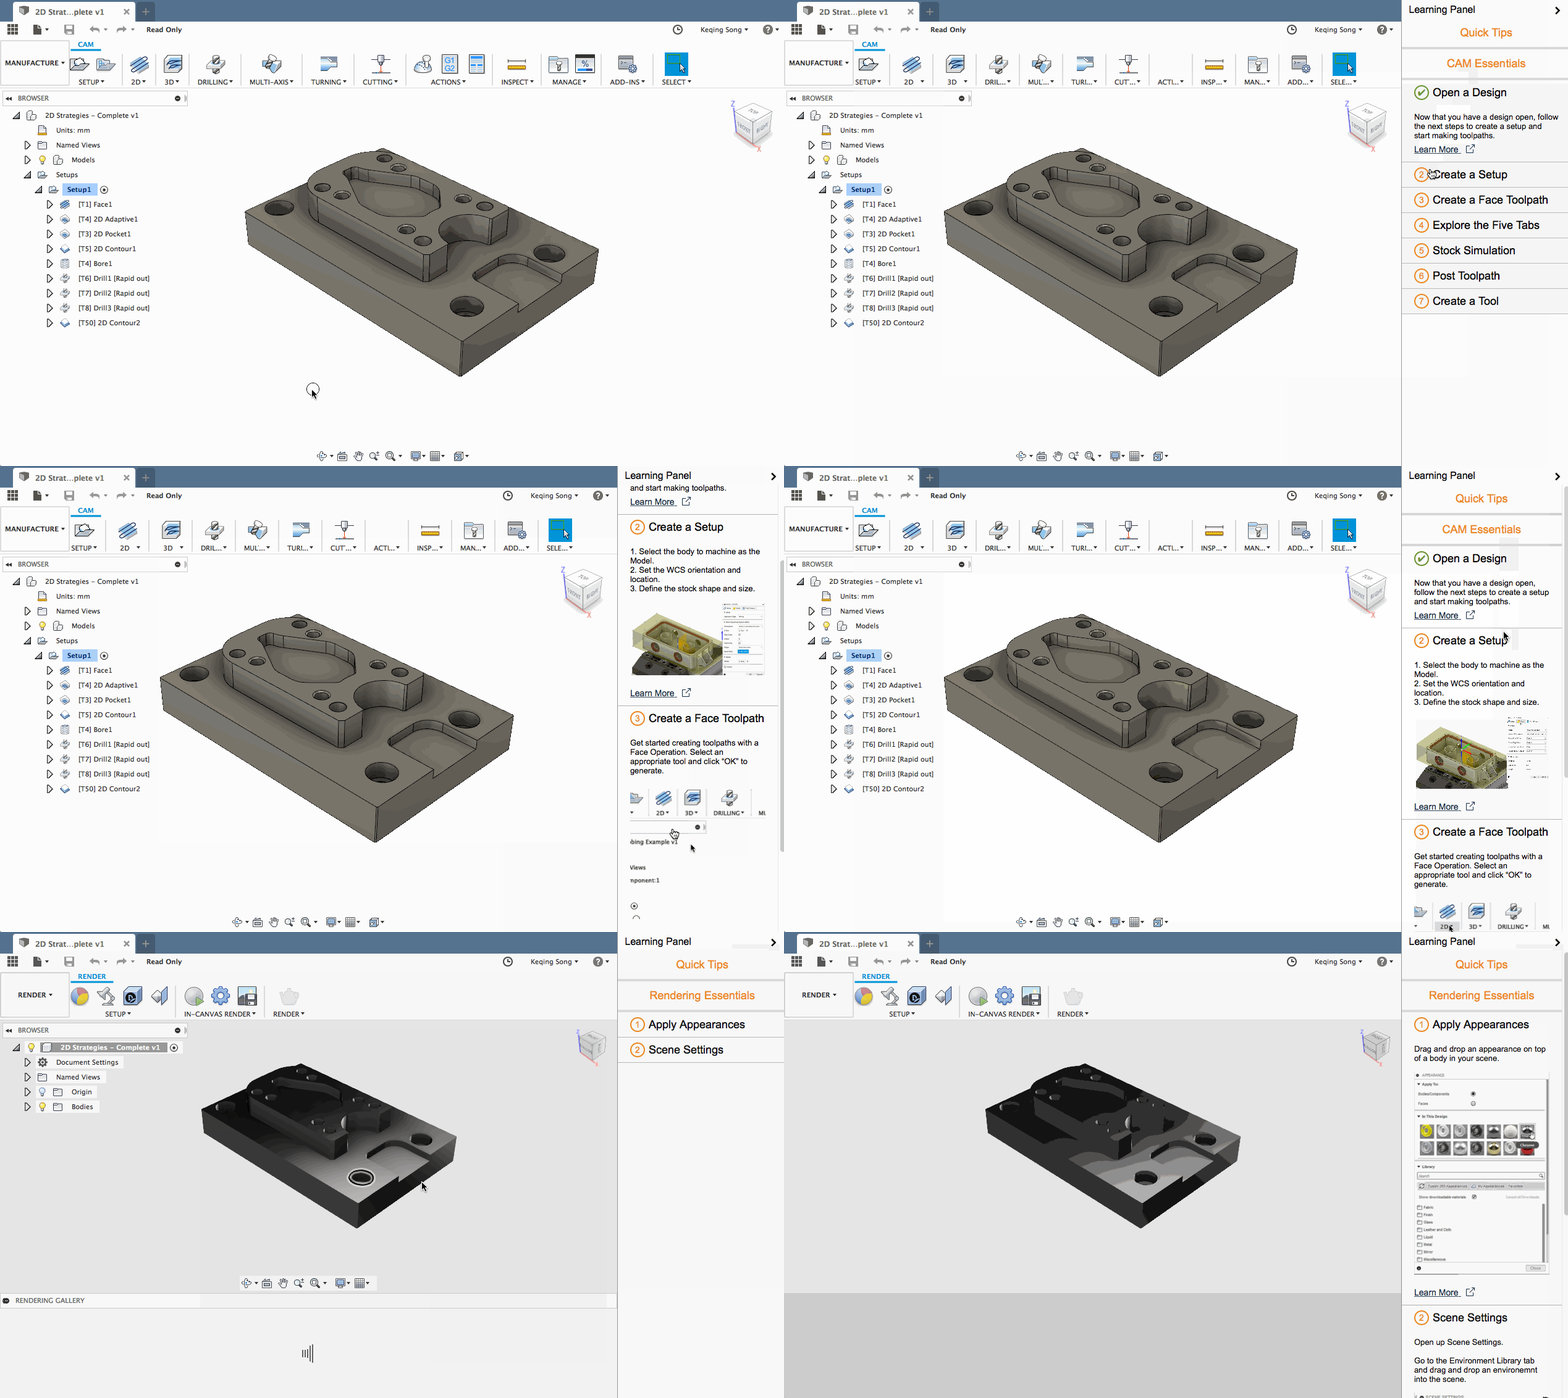
We’re introducing a new learning experience inside Fusion 360 that is aimed to help you get up-to-speed with the ins and outs of the software so you can get productive as fast as possible. This experience is still early in its lifecycle, but we just couldn’t wait to get it out to you all to try.
Now when you log into Fusion 360 for the first time, you’ll be greeted with a learning panel after you close your initial quick setup. There, you’ll find the first set of essential tasks, enough to get you going in the right direction. You can keep the panel open or close it by clicking on the right arrow button. To bring it back up, go to the help menu and select Learning Panel.
We’ve sprinkled essential tasks in multiple areas of the software, including different workspaces, as well as quick tips for certain workflows. The learning panel is an ever-growing, ever-evolving experience, and will only get smarter and more comprehensive from this point on. Think of it as having one of our experts sitting right next to you, showing you the best way to go about do something in Fusion 360.
👍 Improved! Better contextual tab highlighting in UI Preview
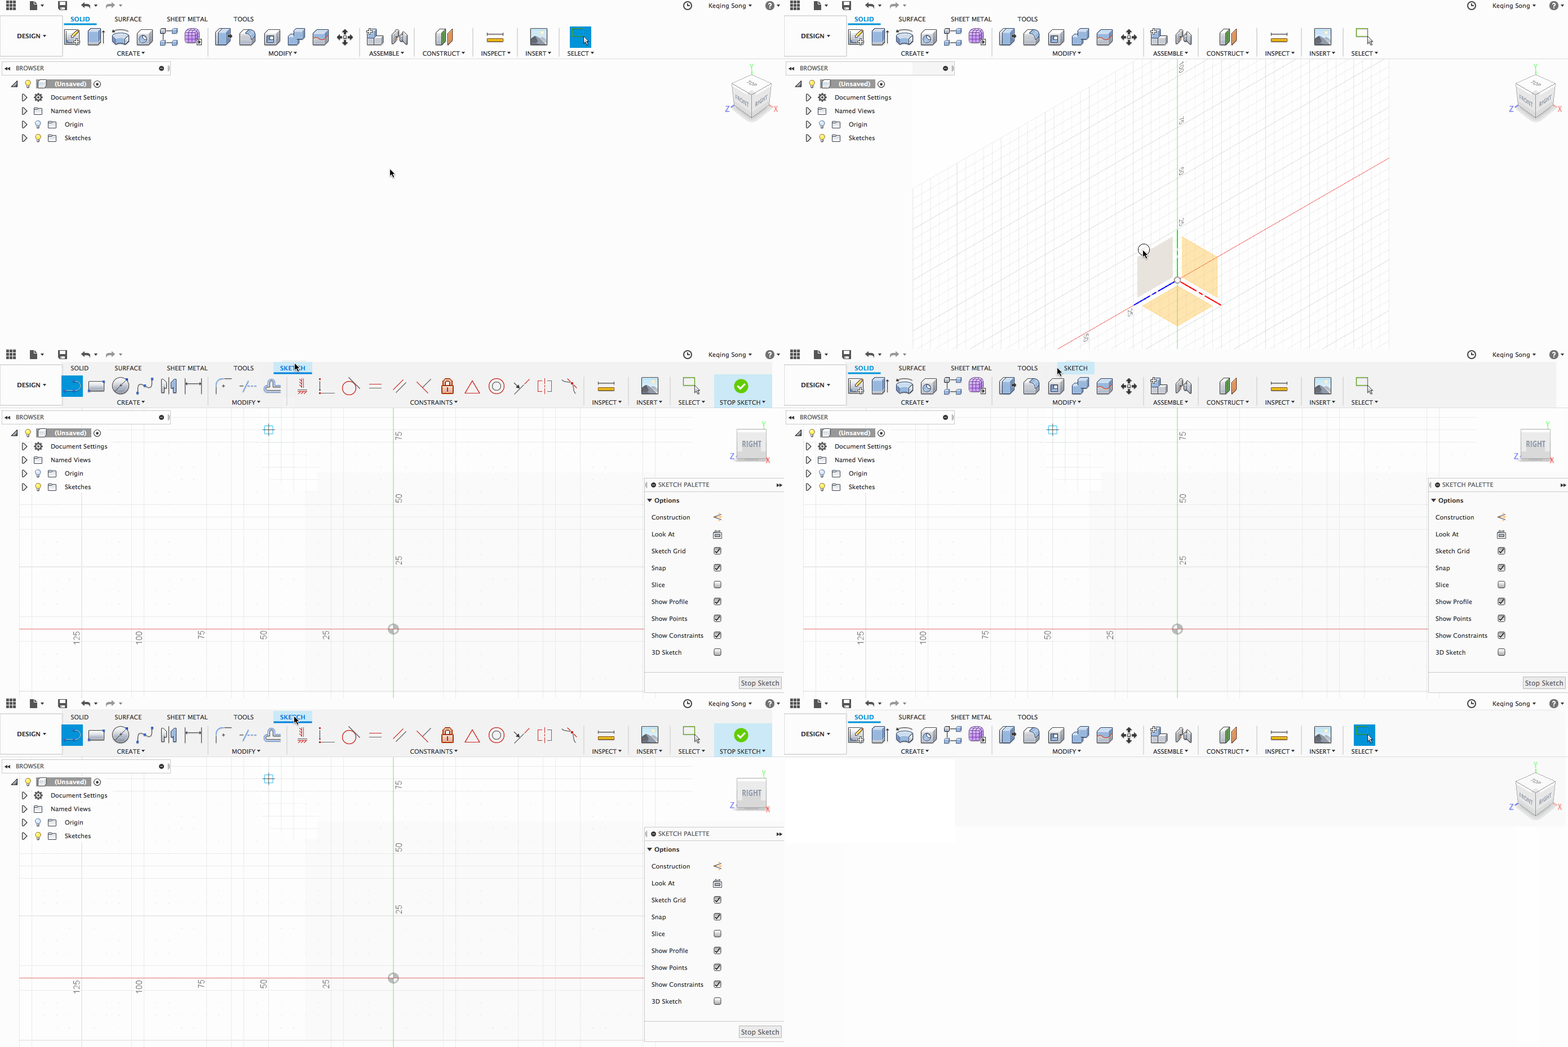
Previously when you started a Sketch in the UI preview, the entire toolbar was highlighted blue, letting you know that the Sketching was a contextual mode within the Design workspace. If you decided to toggle back to the solid tab with the sketch tab still active, there wasn’t a clear indication of whether the sketch tab was contextual or not. It also looked like the entire toolbar was selected, as if you did a “select all”. Now when you start a sketch, the Sketch tab is highlighted, instead of the whole Sketch toolbar.
👍 Improved! Sketch Constraints behavior in UI preview

Based on your feedback, we’ve improved how Sketch Constraints behave in when you’re sketching with the UI Preview turned on. The obvious change here is that now, all the constraints are visible in the toolbar by default. No more digging through the drop-down menu to find the one you need.
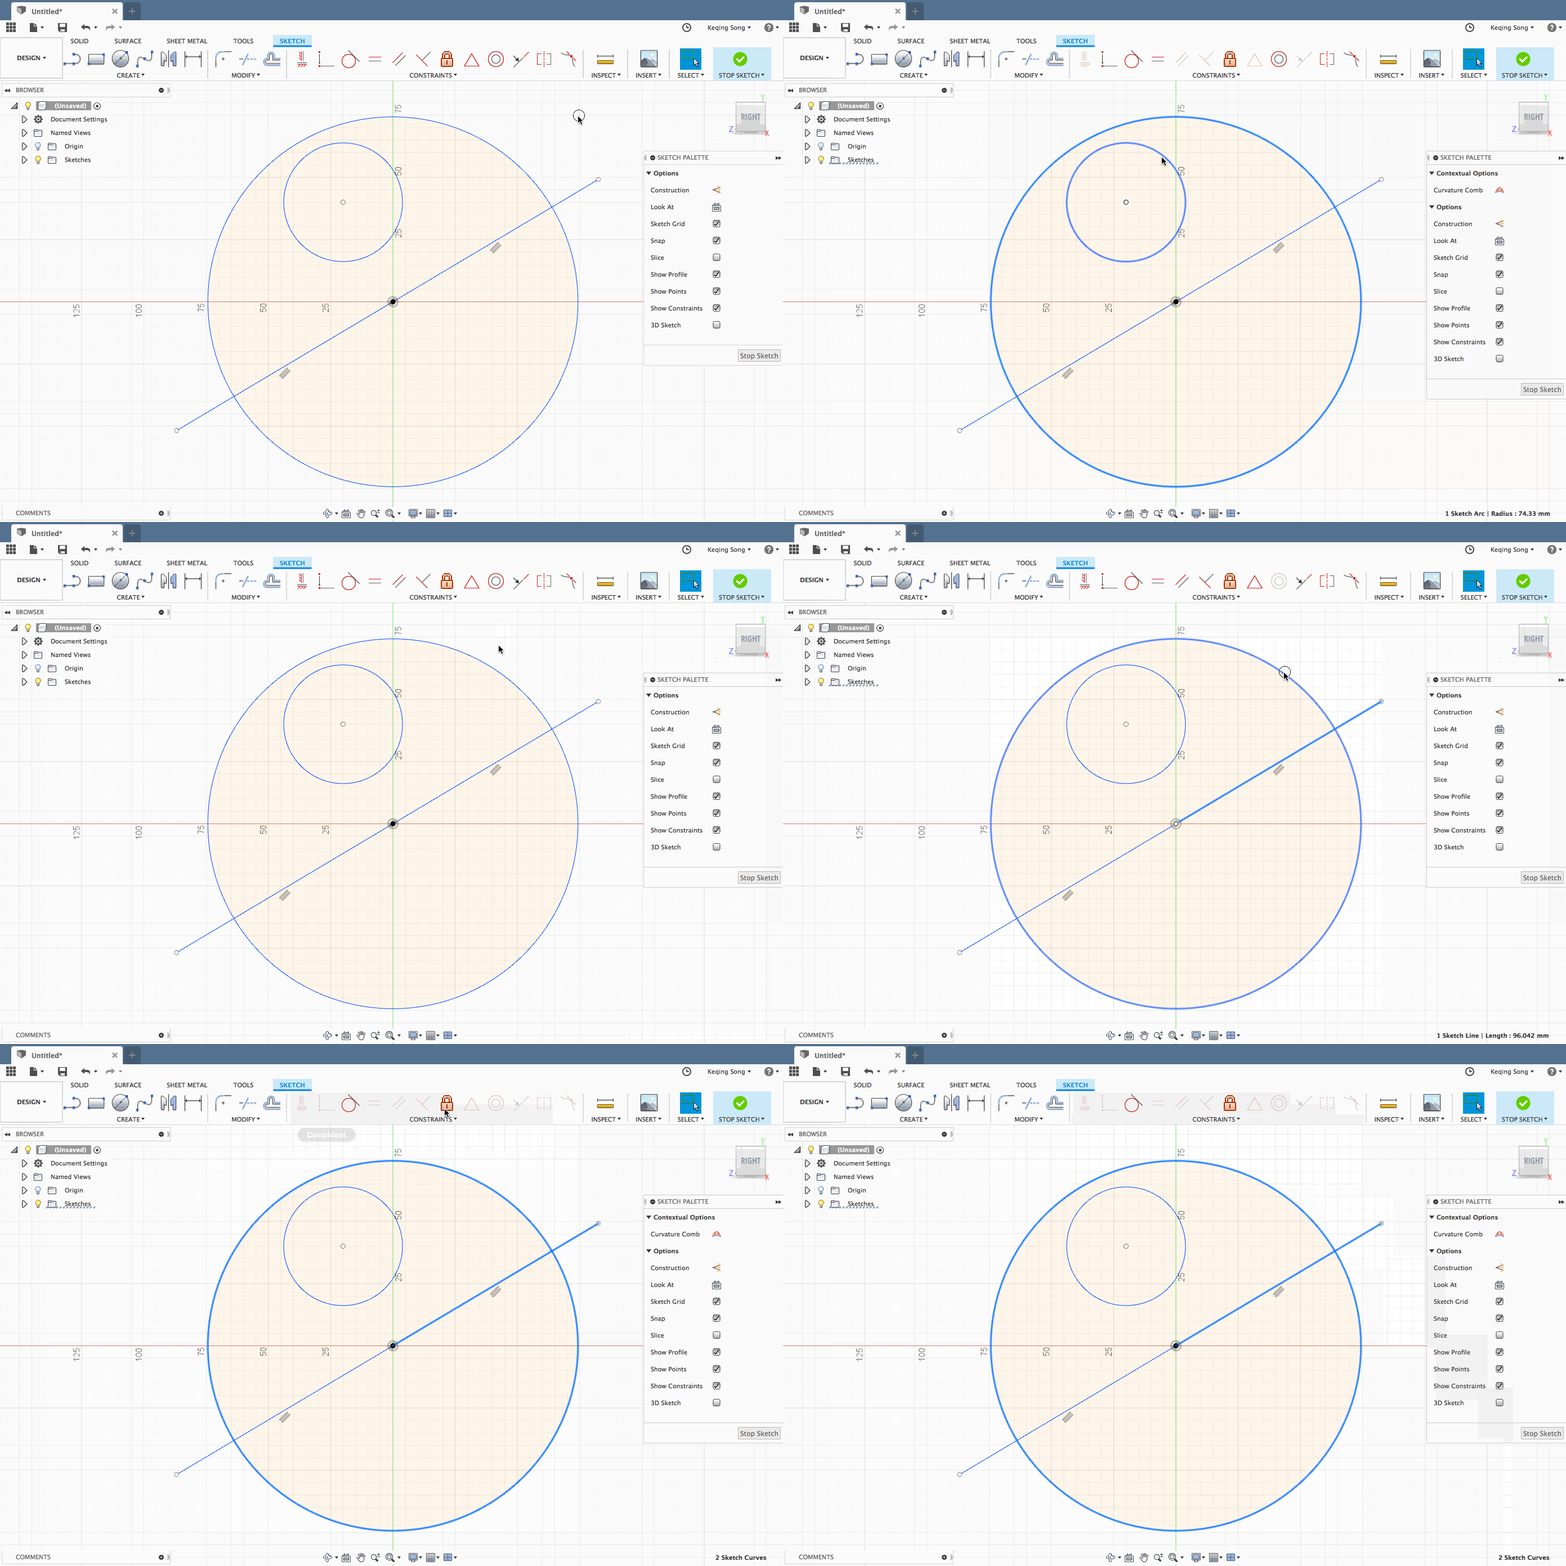
We also brought back the contextual behavior it was missing previously. Now when you select sketch geometry, constraints that don’t apply to your selection will grey out, and the ones that do apply will remain active. Just like the good ol’ days.
We have some great updates in the works around the UI in general (and a lot of it was based on feedback you gave us), so stay tuned to the blog as we will be updating you on what we’ve been working on there soon.
👍 Improved! Less clicks when working with assemblies in UI Preview

Previously, the assembly tools were organized in it’s own Assemble tab in the UI Preview. We thought this was a good idea, but after using it for a while, we agree that the interaction between Solid and Assemble became “clicky”. That’s why we’ve brought the assemble tools back into the Solid, Surface, and Sheet Metal tabs as it’s own Assemble panel.
👍 Improved! Document tab cycling shortcuts with Ctrl+Tab, Ctrl+Shift+Tab
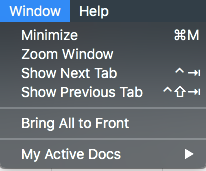
We updated the shortcuts for cycling through your open document tabs. Now when you want to move to the next tab to the right, press CTRL + TAB. To move to the tab to the left, press CTRL+SHIFT+TAB. Also, once you’ve reached the right-most tab, pressing CTRL+TAB will bring you back to your first tab. This is now the same for Mac and PC.
👍 Improved! De-select Chaining option in Plane Along Path
Now when you create a Plane Along Path, you have the option to deselect chaining if you have multiple edges chained together in the selected path and want to split them up for better control. Simply uncheck the checkbox, and click on the selected path edges to remove them from the selection.
👍Improved! Add/remove selections for Rectangular Pattern and Circular Pattern in Sketch
Previously when you wanted to edit a Rectangular Pattern or Circular Pattern, you weren’t able to add or remove selections. Now when you go back and edit them, you can de-select existing sketch geometry, or select new ones to be included in the pattern creation.
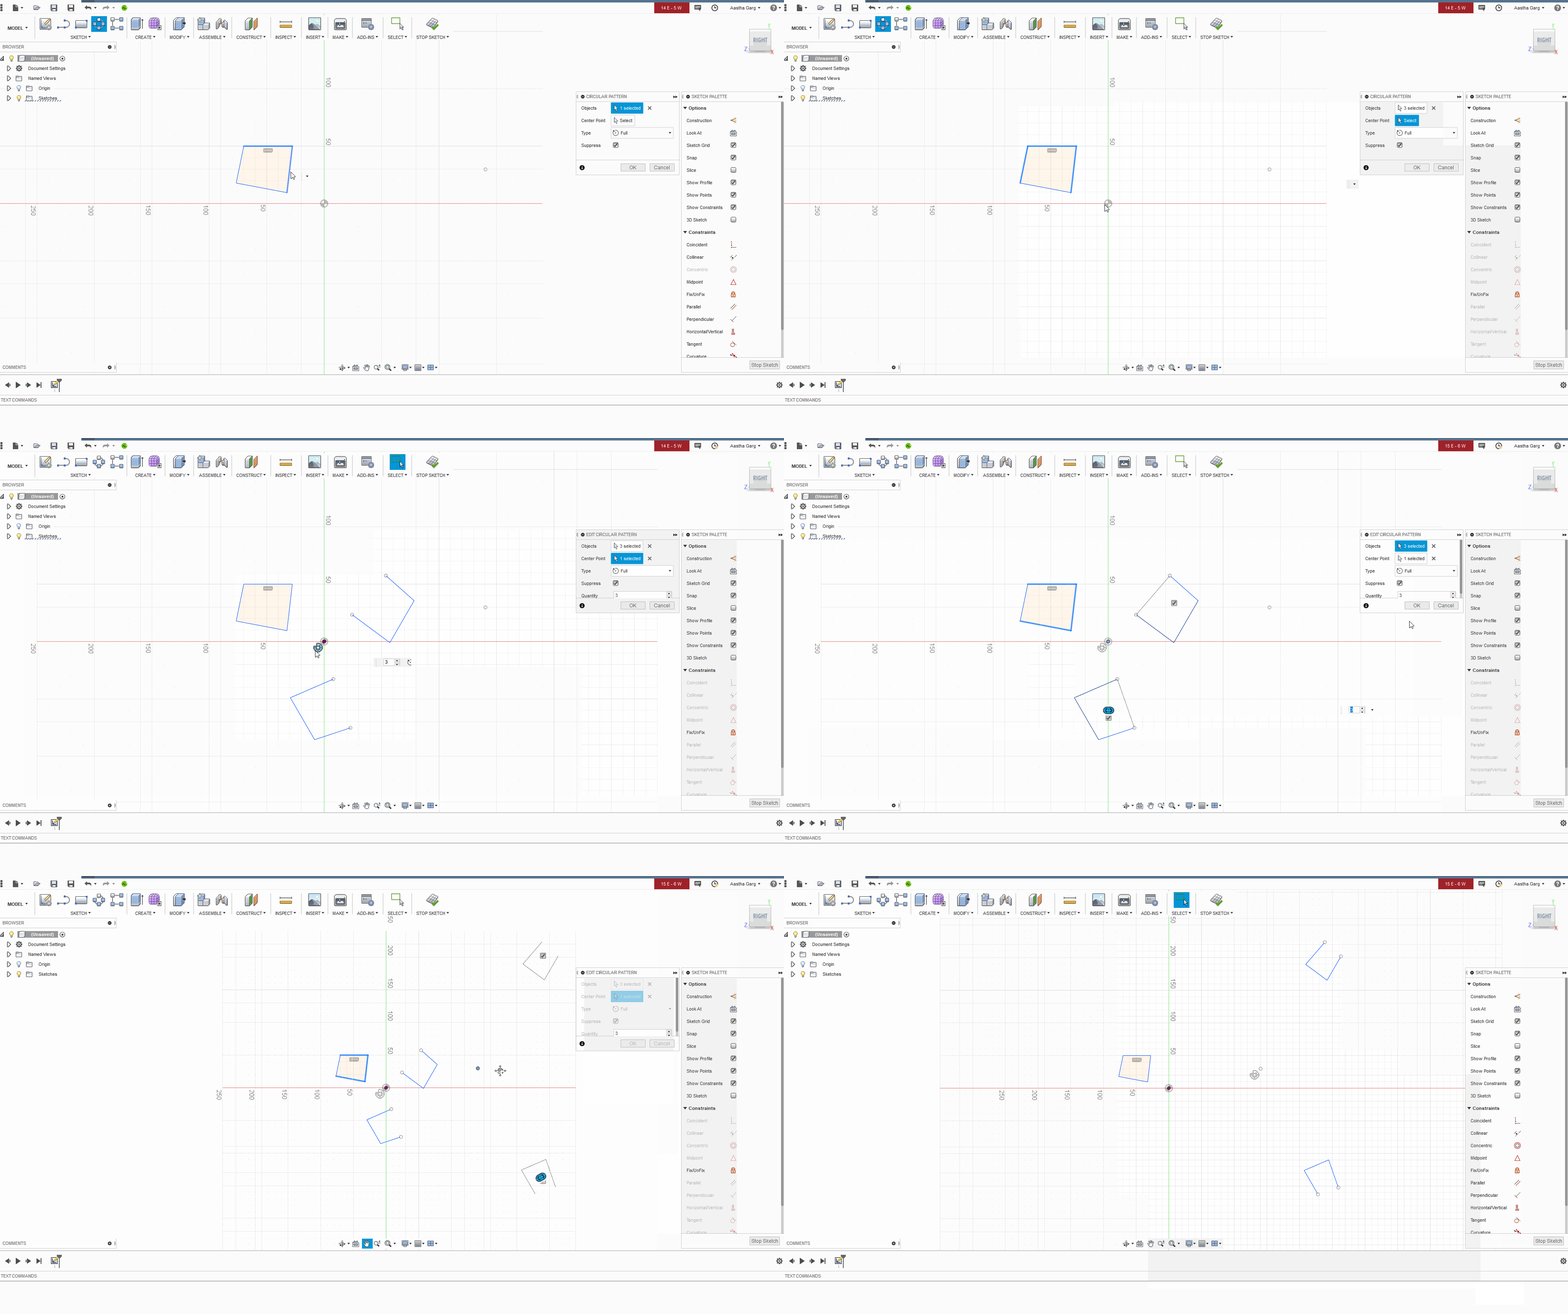 In Rectangular Pattern, you’re now also able to update the direction of the pattern. For Circular Pattern, you can now select a new center of rotation.
Fixed: Cura now launches correctly from 3D Print Dialog
With Cura installed, you should be able to go to the 3D Print dialog in Fusion 360, and select the Cura print utility in the print utility drop-down, and click OK to launch Cura with the model you want to print loaded and ready to go. Apparently there were cases where Cura wasn’t launching. We tidied this up and now the integration works fine.
Fixed: Plane At Angle using Origin Axes now scales dynamically
When you create a Plane at Angle (under the Construct drop-down menu) and place it on the Origin axis, the size of the plane should scale appropriately depending on how far out/far in you’re zooming so that it is easy to spot. This wasn’t the case, but now it will scale dynamically.
Other notable fixes:
- While keySAWRC was going through a tutorial, he uncovered an issue where invoking Compute All make Fusion 360 lock up. We dug into the code and untied the knot. Now it should Compute All just fine.
- We found a crash issue after dragging an symmetric edge sheet metal flange. Based on the reports you’ve sent, we were able to pinpoint the issue and got it all sorted out.
- There was a snag between the Coil command and the timeline feature it created. Apparently clicking on the timeline feature caused Fusion 360 to freeze. We hit it with some anti-freeze and voila, problem solved.
- jiarkoCAD reported an issue where he wasn’t able to extrude a profile and create new bodies in the modeling workspace. Furthermore, some bodies that were clearly visible disappeared when he ran a Compute All. We noodled on this issue for quite some time, and finally were able to nip this in the bud.
- Apparently when you changed display environments from Photo-booth to Grey Room and you had sketch dimensions visible, the color of the dimensions didn’t change to the appropriate colors as they should have. Black dimensions on Grey Room grey looked…bad. This is now fixed.
- HughesTooling Reported a bug where if you input an equation for Twist or Taper option in the Sweep command, Fusion 360 calculates the equation for you. That’s all fine and dandy, that is until you went to the Parameters dialog and tried to edit that equation. Apparently Fusion 360 doesn’t remember the equation, making it hard for you to remember how it got that number. Now it remembers.
- josef.lang3GXD4 told us about a spooky instance where the new model body he created was not shown in the browser, even though the action was captured in the timeline. We flushed out some bugs in the pipes and now these computes should work without a hitch.
- We straightened out some kinks around how reordering features in the timeline caused some wonky behavior pertaining to legacy designs.
- We made parameters more robust. Apparently it was allowing you delete other referenced parameters, and that’s not cool.
Generative Design
🎁 New! Getting Started Videos
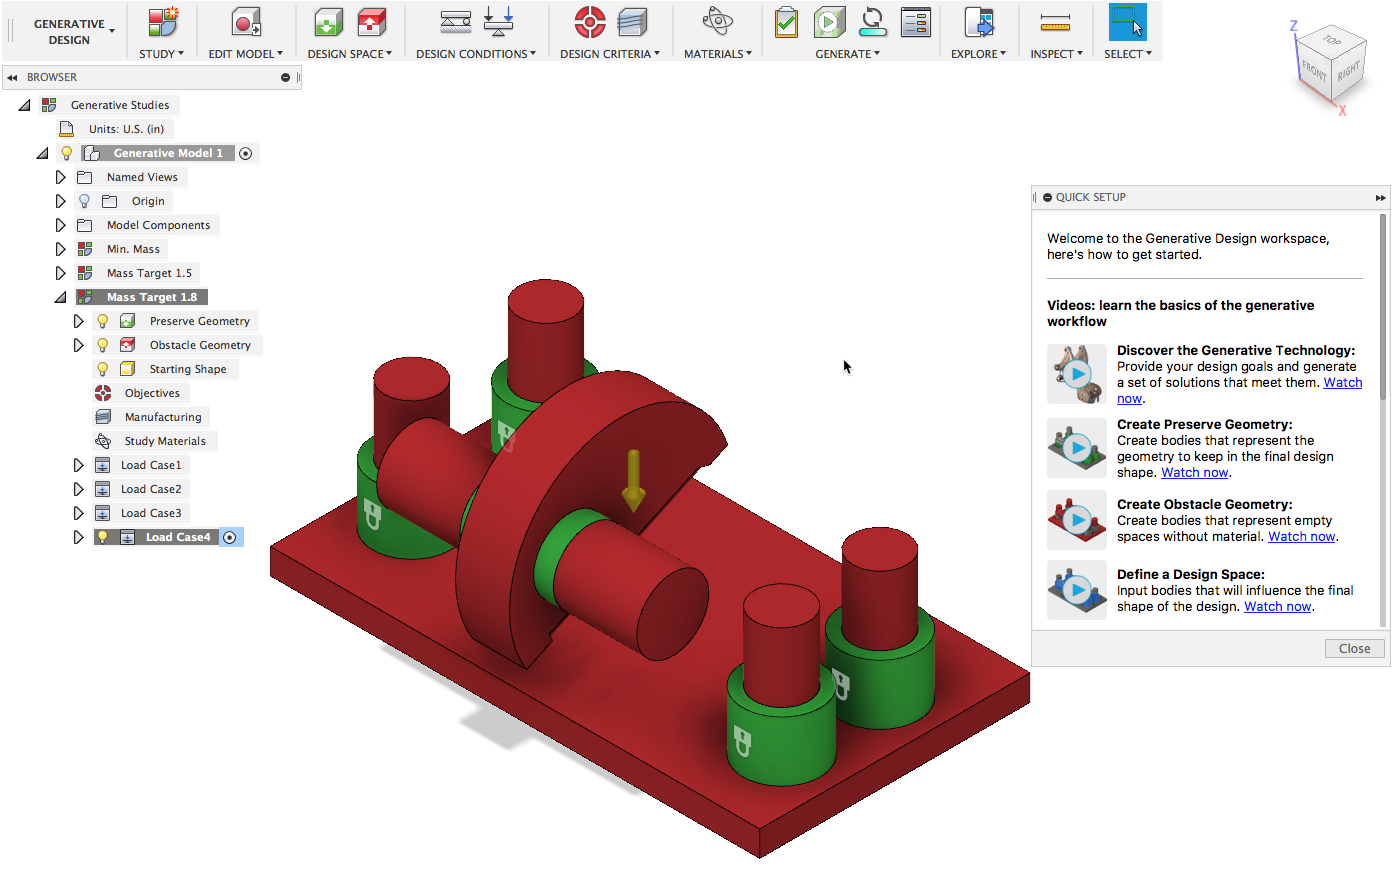
We want to help you get up and running as fast as possible, so we had added a new getting started videos for you to check out. For first time users, you will see this as soon you open the workspace. For our Generative Design veterans, you can easily access this great content from the Help Menu by selecting Quick Start.
🎁 New! Outcome Previewer
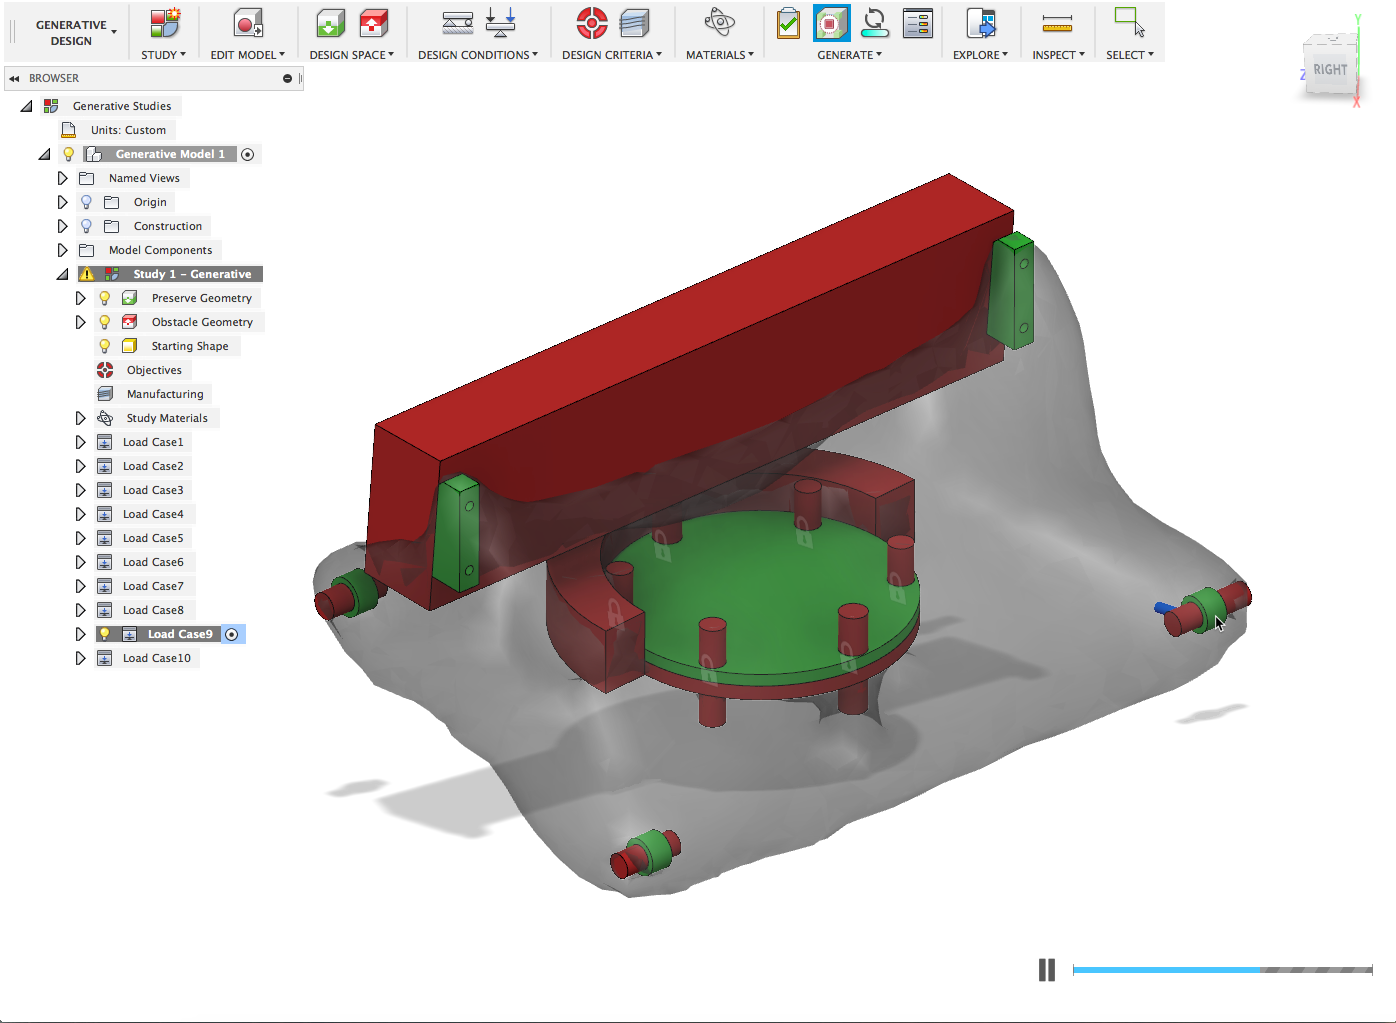
We heard a lot feedback from you that Generative Design had a pretty steep learning curve. With Outcome Previewer (under the Generate Panel), you can now quickly preview what an outcome will look like for their setup prior to submitting the job, giving you the confidence you need to leverage Generative Design to its fullest potential.
🎁 New! Connector Obstacle Tool
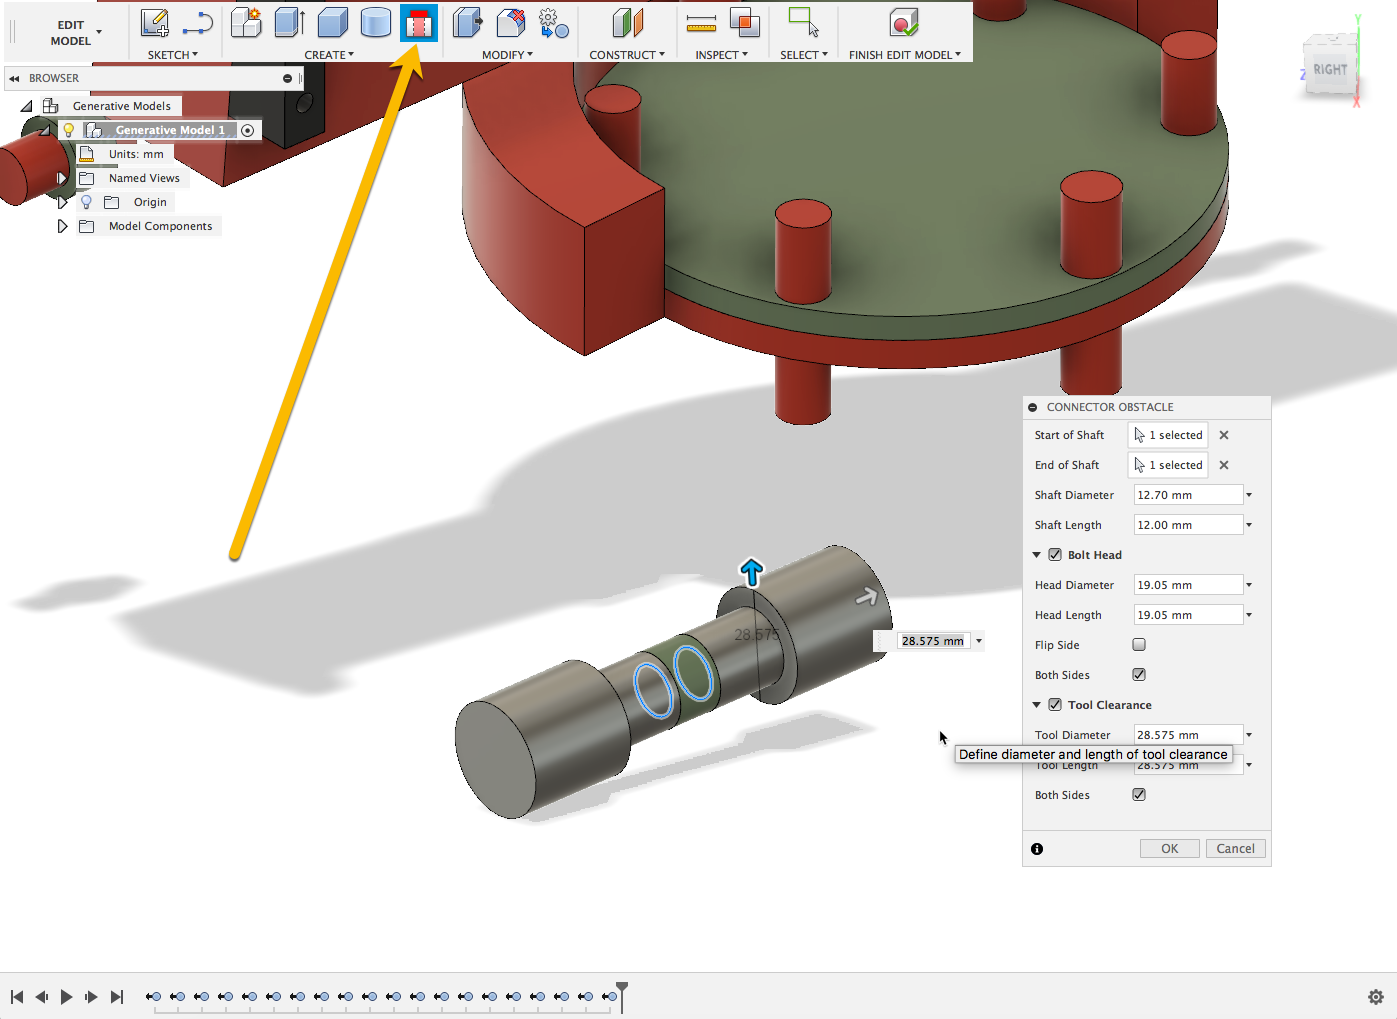
In the Edit Model workspace, using the Connector Obstacle tool, you will now be able to model these types obstacles by simply selecting edges on the model where you want a connector. The tool will allow you to define size properties for the connector itself, as well as tool clearance dimensions. You can leave all of those combinations of sketches, extrudes and mirrors to create these types of obstacles in the past.
This feature should help you quickly populate obstacles for various types of connectors, i.e. bolts, screws, pins, etc, so you can better define your design space.
🎁 New! Fusion 360 Additive Material library
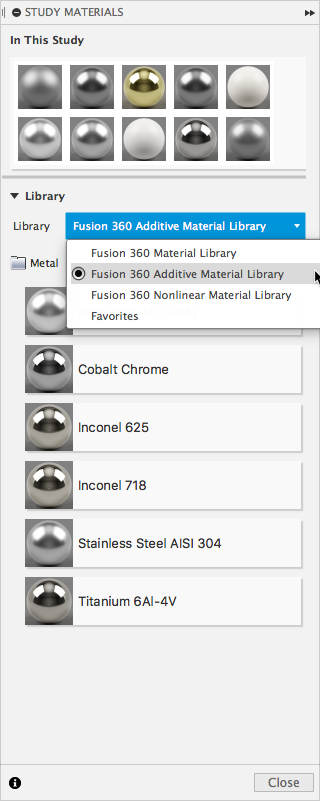
Generative Design allows you to defined Additive as a Manufacturing constraint, so it made sense for you to have a place to save specific materials commonly used for Additive Manufacturing. These materials can now be found in the Fusion 360 Additive Material library within the Study Materials dialog.
👍 Improved! Generative Design job status
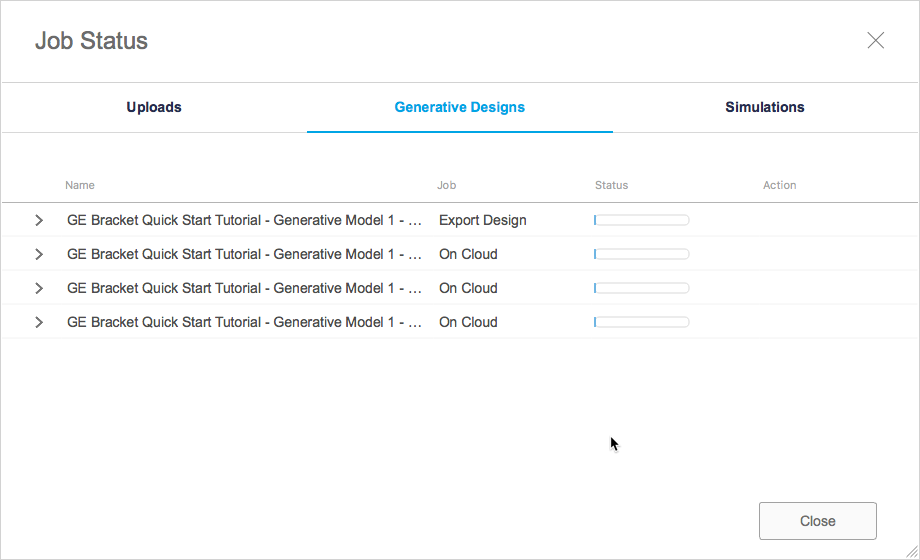
Generative Design jobs now have their own home on the Job Status dialog. In addition to a new home, exporting of outcomes is now being tracked in the Job Status dialog as well. This makes it much easier to keep track of all of your precious Generative Design work in a single view.
👍 Improved! Smarter Pre-check mechanism
We want you to be successful with Generative Design, so we made our pre-check mechanism even smarter. This will further ensure that users are not submitting jobs that could fail.
👍 Improved! results-out-of-date reporting
Generative Design studies were not on their best behavior when it came to telling you if the results were out of date or if something in your setup was sick or incomplete. We cleaned this up and things are looking a lot better.
2D Drawings
🎁 New! Diameter detection on side view for circular geometry
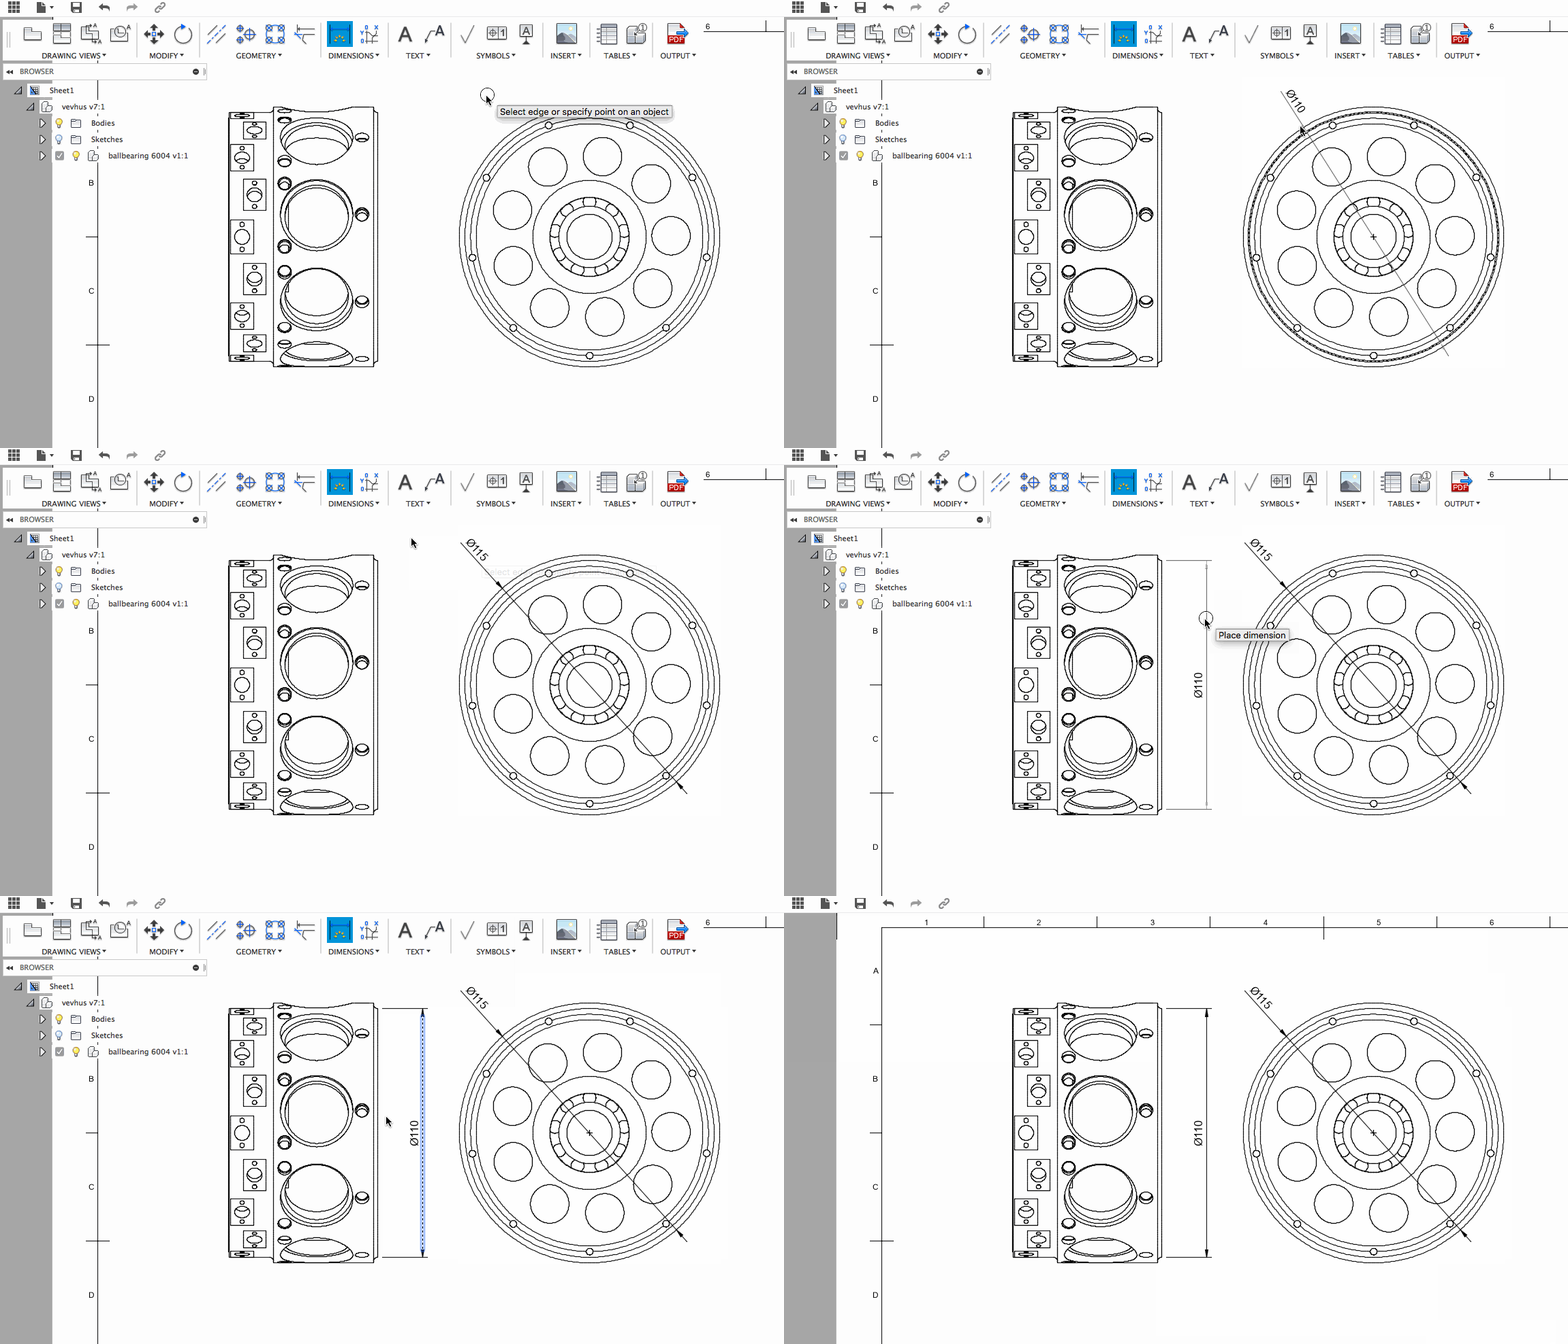
We updated the Smart Dimension tool to recognize circular geometry even if the view is a side view. Previously when you wanted to dimension a cylinder in side view, it would only give you the linear dimension. Now when you select the edge, it’ll know that it is a cylinder and apply the diameter symbol next to the correct diameter dimension value. Dandy!
👍 Improved! Block Edit Measure tool annotations are now easier to read
We’ve thickened the annotation lines for Measure in the Block Editing environment because they were really thin, which made it difficult to interpret what measurements the annotation lines are referring to.
👍 Improved! Right corner anchored tables will expand/shrink to the left instead of to the right
When you placed a parts list table in your drawing, the orientation of the table flipped Up/Down and Left/Right. Once you actually place the table, typically to a corner of the border, you’d expect the table to remain anchored to that point when you added or removed columns, but when you changed the column settings, the table always expanded/shrunk to the right. This behavior was annoying for tables placed using a right attachment point, since you’d have to re-position the table back to where you want it every time. Now right-attachment tables will expand/shrink left, so the insertion point remains fixed.
Fixed: Default scroll wheel zoom direction is no longer reversed from the model environment
JohnLF told us about a peculiar instance where the zoom direction in the 2D Drawings workspace seemed to have been accidentally reversed for no reason. Playing with the “reverse zoom direction” option the Preferences only fixed the zoom direction for designs that were open at the time, but any new 2D Drawings created after that point still suffered from this issue. We’ve seen this bug before, and thought we’ve crushed it before. This time we double tapped and made sure of it.
Fixed: Hitting Tab key brings focus back on the next table cell
bcouchVDH63 reported a bug lurking in the tables command. After he entered a value in one cell and pressed tab to move into the next cell over, the bug bit Fusion 360 so hard that it ignored the action, as well as any further keyboard inputs from then on. We healed the area and made sure that something like this doesn’t appear again.
Other notable fixes:
- Tphan ran into this error message when he tried to open his 2D Drawing: “the file has been damaged and may have limited functionality”. Apparently if you made a change to the design file and proceeded to close Fusion 360 without doing a “Get Latest” on the 2D Drawing associated with that design, trying to reopen that drawing would throw up this message. Now this workflow should not give you any errors.
- We received multiple reports around how Adobe Illustrator 22.0.0 was having a hard time reading PDF files exported from the 2D Drawings workspaces. Some of the text appeared to be missing from dimensions, so we optimized the output results and now there shouldn’t be any problems.
- There was a wonky scenario where the row height of a parts list doesn’t always update accordingly after you’ve resized the column width. Now it updates every time.
Manufacture
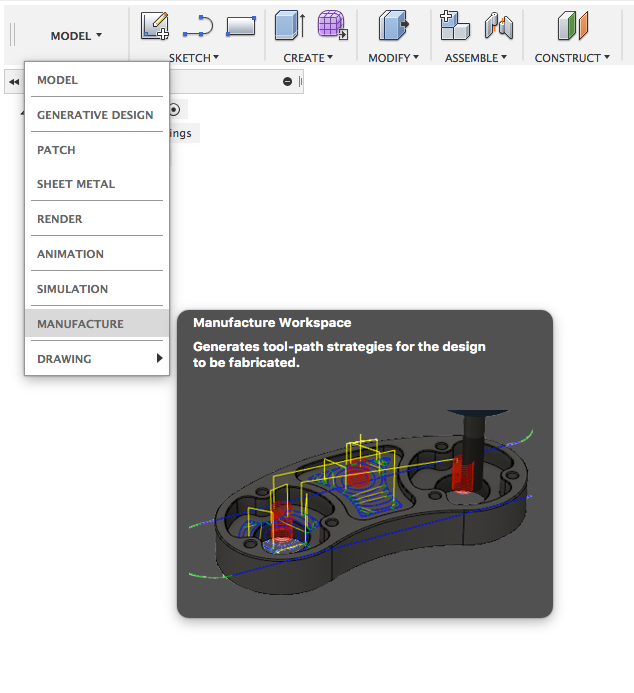
The CAM workspace under the the workspace switcher is now called Manufacture. You’ll still find all your CAM related tools here, as well as a number of additive manufacturing tools (which can be enabled in the preview section of your preferences).
🎁 New! Make Sharp Corners Option in Turning
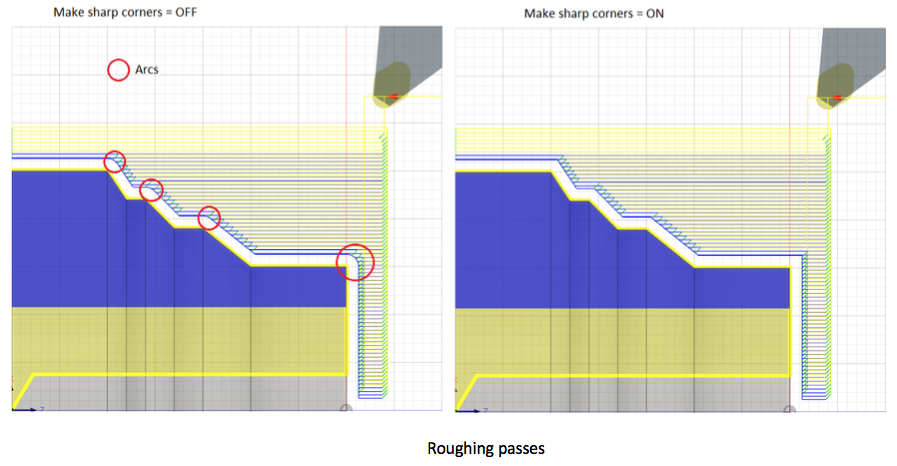
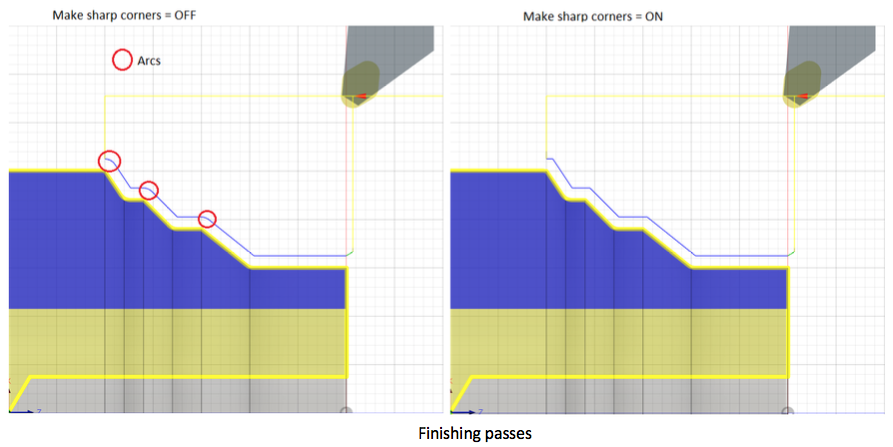
You can now control the shape of the profile turning tool-path at convex corners using the parameter “Make sharp corners” in the Passes tab. When this parameter is checked off, convex corners in the tool-path are smoothed with arc moves. When this parameter is checked on, convex corners in the tool-path are machined without arcs and ensures that outside corners are sharp and not rounded.
👍 Improved! Boring bar holder is now round
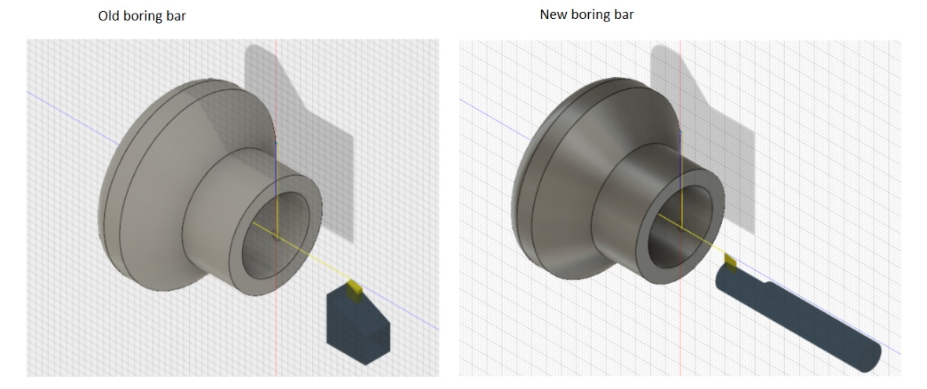
Previously, the boring bar was incorrectly modeled with a square holder. Now we model a boring bar with a round holder which allows you to correctly visualize it in simulation as well as eliminate false collision reports with the stock.
👍 Improved! Facing during groove finishing
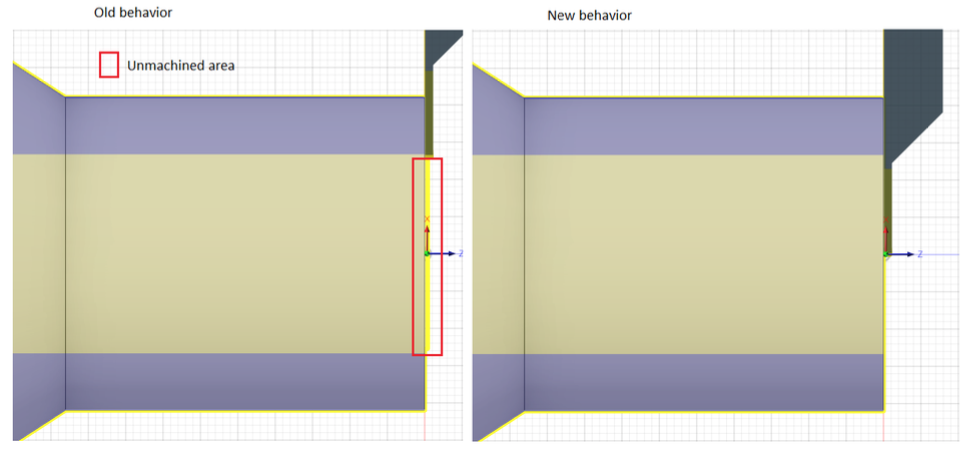
When the groove finishing operation contained a facing move in the beginning, there was an issue where machining models containing an axial hole where the tool only faced down up to the hole. This resulted in unfinished stock remaining on the hole portion of the part. Now the facing portion of the tool-path was modified so that the tool would machine right down up to the inner radius of the grooving operation and not terminate at the hole.
👍 Improved! New option in Groove > Radii tab
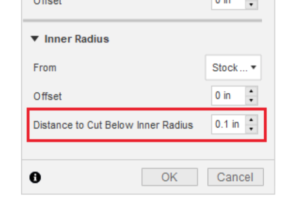
A new parameter called “Distance to Cut Below Inner Radius” is now available within the “Radii” tab. This parameter allows your grooving tool to go a certain distance below the inner radius in addition to the tool nose radius to remove any micro nubs resulting from the facing portion of the groove finishing operation.
👍 Improved! Right-click in browser to edit tool in tool library
Previously when you right-clicked a tool in the browser and selected “Edit”, you had to then click “Select”, then right-click that tool in the tool library to actually edit it. We figured it’d be easier to just open the tool edit dialog directly in the tool library after you selected “Edit” from your first right-click.
👍 Improved! Changing parameter invalidations no longer require toolpath recalculations
Changing tool library tool numbers, feeds & speeds parameters for probing, WCS number used in a setup, or coolant mode no longer require toolpath recalculations since they do not affect cutting passes. Woohoo!
Other Notable Fixes:
- Apparently the turning tool holder was displayed at different size in simulation/toolpathing than in the tool library.
- Gouge checking for profile turning leads was incorrectly being done for the tool nose center instead of the tool contact point.
- We fixed an issue in the Manufacture Preview > Additive workflows where you got an error if you tried to create a new setup with the Operation Type set to Milling, Turning or Mill/Turn, or Cutting. Fusion 360 forced you to select a machine first. Now you can create a setup with no machine selected if you’re not doing additive.
- Invoking the ‘Minimize Build Height’ command moved the part outside the build plate for certain cases. Oops, our bad.
- Sometimes when you ran stock simulations, the colors applied to the part being visualized were dull, as opposed to being bright and colorful.
- There were cases where not all the same diameter holes were being drilled, even if the Select Same Diameter holes option was selection.
- We’ve fixed the scrolling lag issue that occured with larger tool libraries.
- When ‘All’ view was selected in tool library, there was a bug that prevented you to right-click and edit the selected tool.
- The Tool Preview disappeared for no reason when you selected a round insert in a neutral holder.
- There was an issue where the Description content for new Turning tools wasn’t being displayed in Tool’s name like milling tools.
- Tools used in Patterns were missing from the list of tools used in a Setup within the Tool Library.
- Form Mill was missing from Manage dropdown in Manufacture workspace…now it should be back.
- KRoser_12 brought up a good point so we made it happen. View orientation commands are now non-stacking so as to not terminate active commands.
Previews
👍 Improved! Existing add-ins and scripts now work with the UI Preview
Yes – existing add-ins for Fusion 360 should now work in the UI Preview. There are a few caveats to be aware of, so here’s the scoop.
Add-ins written for the production UI refer to panel names that exist in the production UI. With the UI Preview, the locations of these panels have changed, since they are now under their own tabs. Furthermore, some of the panel names have also changed. We’ve come up with a 1:1 match between the existing production UI panel names to the UI Preview panel names. They are as follows:
{ “SketchPanel”, “SketchCreatePanel” }
{ “SurfaceScriptsAddinsPanel”, “SolidScriptsAddinsPanel” },
{ “SolidMakePanel”, “MakePanel” },
{ “SurfaceMakePanel”, “MakePanel” },
{ “SurfaceInspectPanel”, “InspectPanel” },
{ “DisplaysPanel”, “DisplayPanel” },
{ “ResultsPanel”, “ResultToolsPanel” },
{ “SimplifyCreatePanel”, “SolidCreatePanel” },
{ “SimplifyModifyPanel”,”SolidModifyPanel” },
{ “SurfaceIdealizePanel”, “ShellsPanel” },
{ “InspectPanel”, “SketchInspectPanel” },
{ “MeshPanel”, “DisplayPanel” },
{ “SimManagePanel”, “ManagePanel” },
{ “SimInspectPanel”, “InspectPanel” },
{ “AssembleJointsPanel”, “AssemblePanel” }
If you’re add-in us referring to one of these panel names on the left, you can find it under the panel name on the right. This is an intermediate solution between now and when we have new API written to fully support the UI Preview, which we are currently working on. We’ll keep you posted on our progress, so that you can have a longer runway to update your add-ins and make sure that they are working the way you want them to work in the UI preview.