V2.0.6045
We fixed an issue where if you purchased Manufacturing Extensions; some of you saw a dialog telling you that you’ve hit your 3-days-remaining mark, and for some weird reason, caused Fusion 360 to hang. Sorry about that – we got this sorted out.
July 19, 2019 Product Update – What’s New
V.2.0.6041
Careless_told us that he was seeing stability issues while inserting McMaster-Carr parts from the Insert McMaster-Carr access point. We’ve fixed the crash issues, and you can now insert McMaster-Carr parts into your designs again. If you’d like to learn more about how to do this, NYCCNC has a great page around this.
July 12, 2019 Product Update – What’s New
V.2.0.6037
Sketching
A few of you have reported issues around changing sketch parameters, where if you edited the dimension value of certain sketch entities, Fusion 360 took a long time to compute, consuming more and more memory. This issue is now fixed.
Simulation
We resolved a snap in the Simulation workspace where if you had generated Automatic Contacts and opened the Contacts Manager to see it, it showed that they did not exist. Apparently Fusion 360 decided to hide them from you, and that’s not okay. Now they will reappear in the Contacts Manager.
Manufacture
When using the Hole Recognition feature in the Manufacture workspace, editing the selected tool in the Tool Library had no effect. Fusion 360 rejected the input. We beefed up some back-end code related to the tool library, and now you can edit the tools once again.
July 3, 2019 Product Update – What’s New
v.2.0.6032
We fixed three issues in this update:
Manufacture
There was a Manufacture workspace issue where either your model just vanished for no reason or the World Coordinate System (WCS) become enormous and very pixelated. We got this sorted out.
Sketch
When you were editing sketch parameters in the Parameters dialog, some of you experienced an unexpected crash. Sorry about that – this won’t happen anymore.
Modeling
Some of you have been experiencing issues with your assemblies where saving, closing, and reopening an assembly gave you a bunch of invalid joint occurrences in your timeline, followed by a dreadful crash. We fixed this crash, but unfortunately are not able to fix the affects joints in your assemblies without you doing some of the work as well. To bring your assembly joints back to a healthy state, you can do 1 of 2 things:
1. The quick and dirty
Promote a previously saved version before the June 27 Update from the data panel and continue working from that one.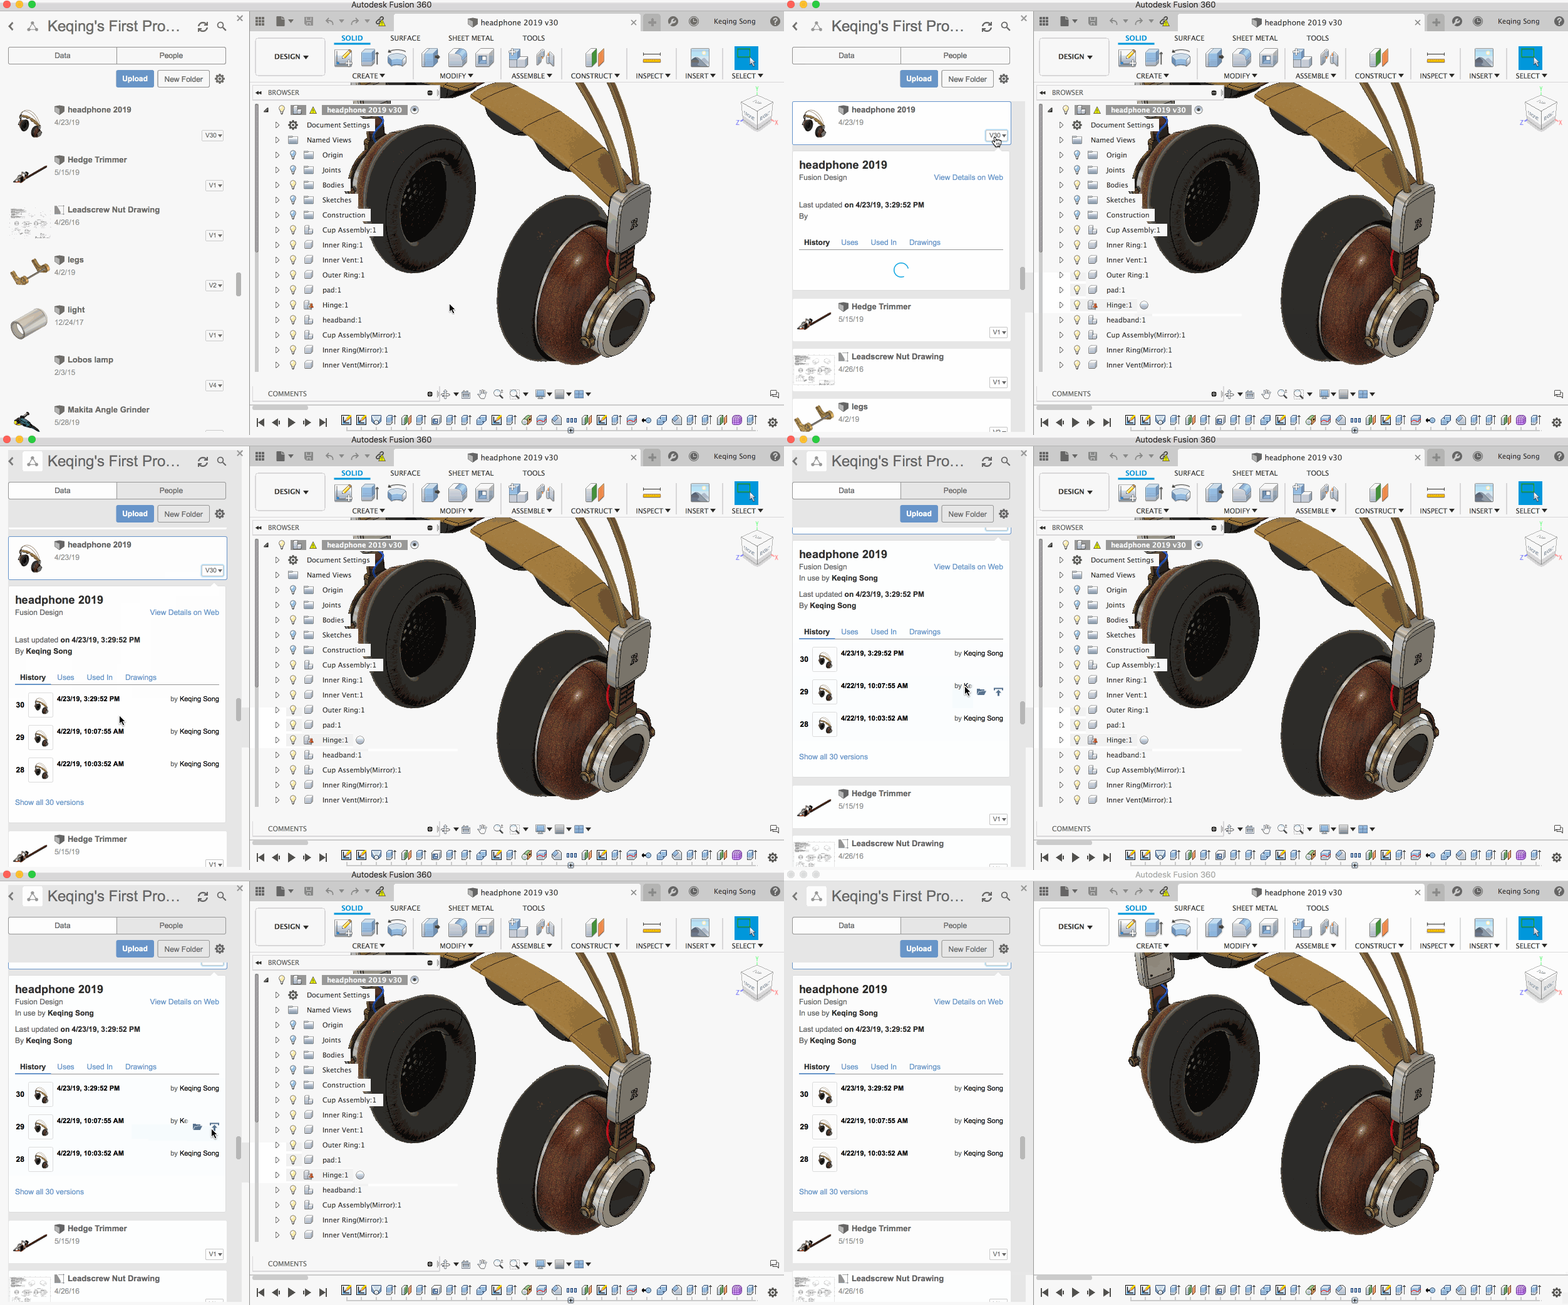
[icon name=”asterisk” class=”” unprefixed_class=””]OR[icon name=”asterisk” class=”” unprefixed_class=””]
2. The slow but effective
Go to your timeline, locate the joints that have been affected, delete, them, and re-create them.
There is a third way, but will require you to know about text commands. We made a post in the forum with more details and discussions going. Check it out if you want to pursue that path.
June 27, 2019 Product Update – What’s New
V.2.0.6026
A few fixes dropped:
- There was dark mode issue where if you are running macOS Mojave in dark mode and using Fusion 360, some dialogs appeared to have black text on dark background, making it really hard to read. This is now fixed.
- We fixed a crash issue that some of you have reported on our forum.
- Apparently Camplete post was only outputting an APT file and was missing the PROJ, TDB, and stock, fixture, part STL files after posting from Fusion 360. Now it posts all the necessary files.
June 24, 2019 Product Update – What’s New
V2.0.5966
[toc]
Updates come and go, but this one is a heavy hitter. We’re kicking off the summer with some great functionality, now available for you to check out. We’ve made it easier to switch from an individual account to a Fusion Team account and we’re introducing manufacturing extensions to further your machining capabilities. Along with a myriad of modeling, sketching, Generative Design, 2D drawings, and manufacturing improvements, we’ve also made great progress of a number of usability and toolbar UI enhancements.
[icon name=”bookmark” class=”” unprefixed_class=””] Data Management
New! Data Management and Collaboration with Fusion Team
Up to this release, the data environment for Fusion 360 has been a individual environment. We have offered an optional team environment (called Fusion Team) available but not easily accessible for all users. While the current personal environment is fine for simple ad-hoc collaboration, it doesn’t scale for bigger teams who are now adopting Fusion 360. Now we’ve made it easier existing users to switch over to a Team account, as well as new users to get a team account right off the bat during account creation.
Switch from Individual to Fusion Team in no time
To make the switch from an individual account to a Fusion Team account, go to this website or click on the screenshot below. Follow the steps and you’ll be good to go.
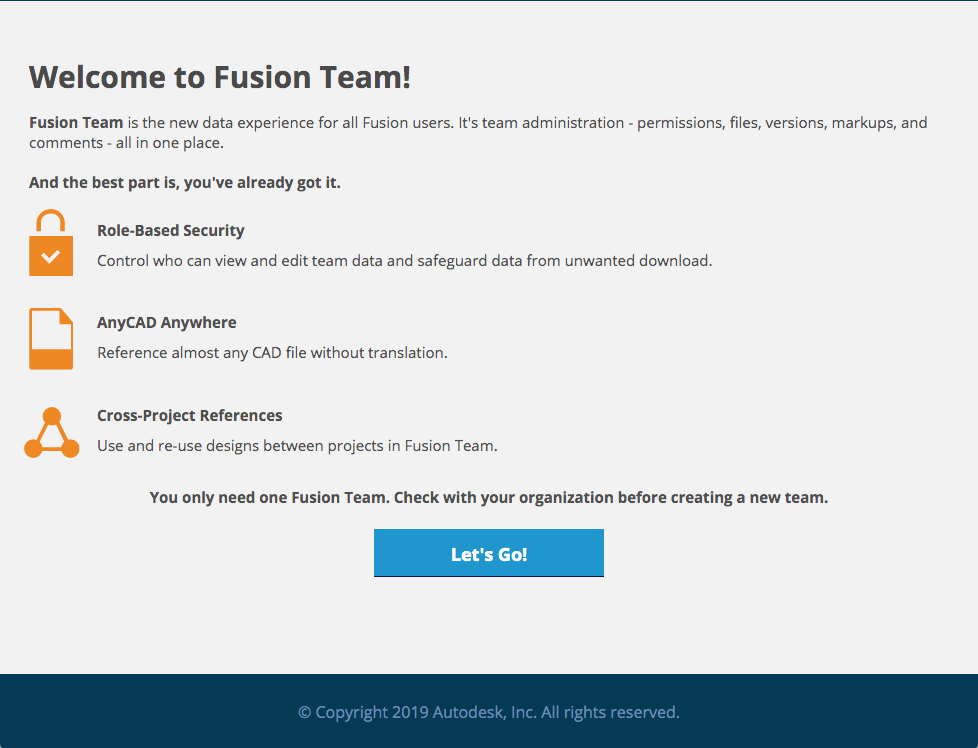
If you need help with getting it set up, check out these support articles.
- How to transfer Fusion 360 projects, folders and designs from a Personal Account to a Fusion Team Account
- How to transfer Fusion 360 projects from one account to another
How do you know what you have?
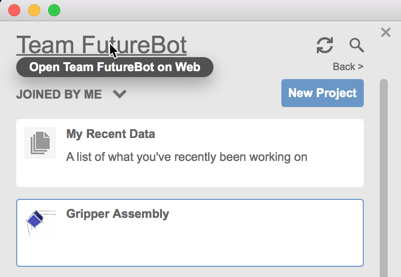
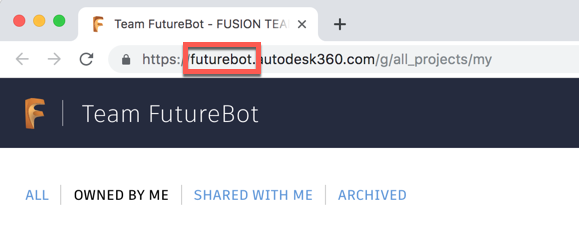
If you click on the name at the top of the Data Panel, it will take you to the web view of your data. If the URL starts with https://Myhub.autodesk360.com, then you are using a personal Env. If it starts with a Team name instead of “Myhub” then you are already using a Team.
Should you switch over?
Yes. Even if you’re just working by yourself? Yes. It’s better to be on a Team account because it opens the door to more functionality that is not available for individual accounts. Also, it sets you up to for easier team collaboration if you decide to add other people in your team or join another team. Fusion Team is like a company owned team site where all your Fusion 360 data lives and is shared. Your company’s Fusion Team can have multiple admins so that one individual leaving the company or going on vacation doesn’t cause road-blocks in your work. Fusion Team also offers more core data management functionality that many of you have been asking for like project milestones, cross-project referenced designs, multiple project types, viewer roles on projects, and AnyCAD.
New! Projects Filter in Data Panel

In a team environment, shared data needs to be discoverable; you can now filter projects in the data panel based on pinned projects, ones you have created or ones you have been invited to. There’s also an ‘All Projects’ filter that enables you to see all the projects in the team, so that you could discover new projects and request to join them.
New! Set Milestones for your designs (Fusion Team Only)
If you’ve been using Fusion 360 for awhile, then you know that when you save your design, you save a version of that current state. This is good, but we didn’t have a nice way for you to differentiate a specific version as a milestone, until now.
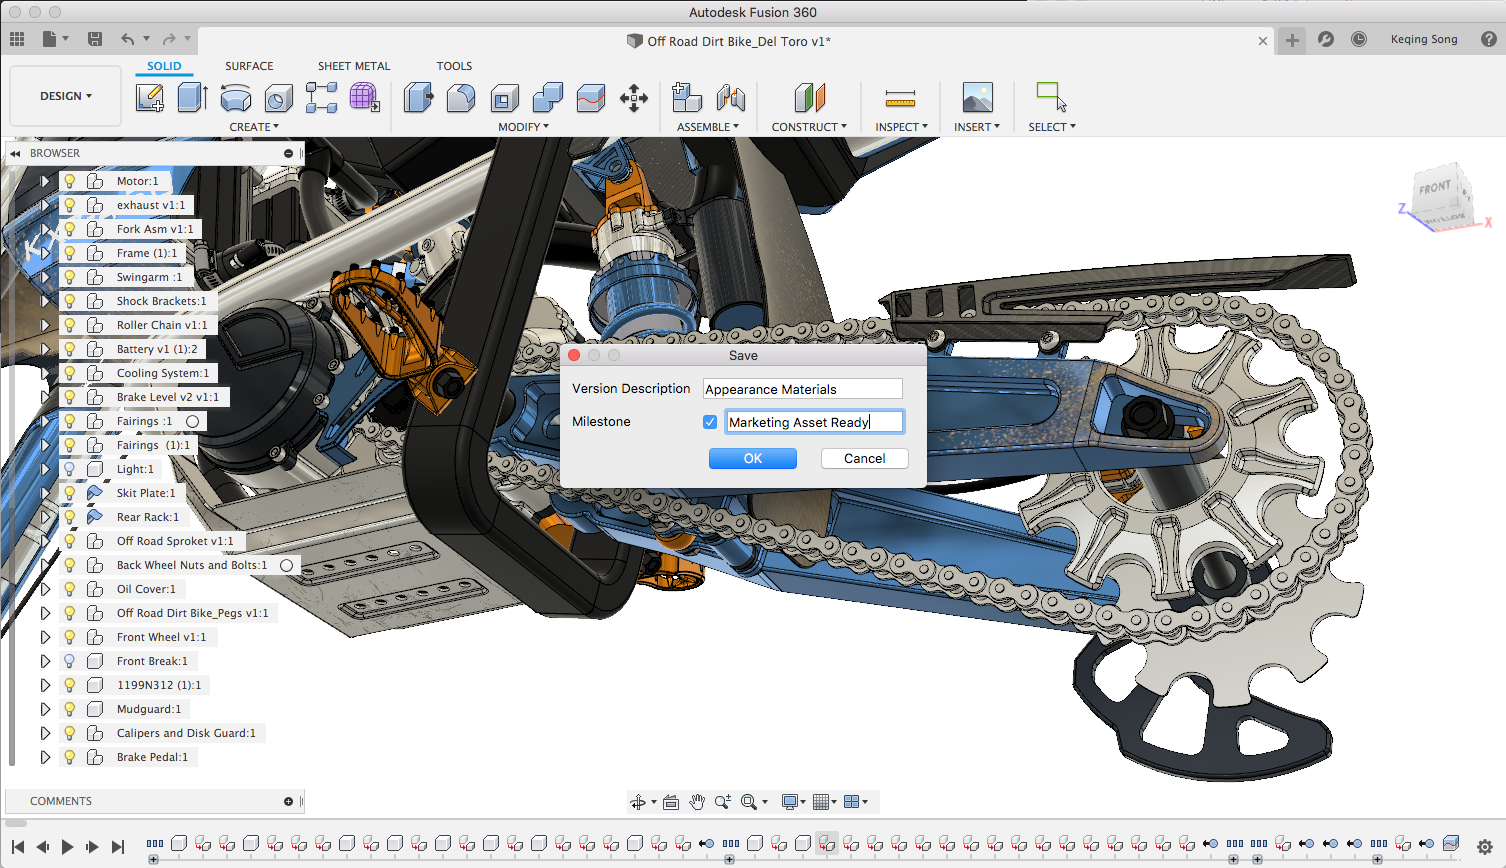
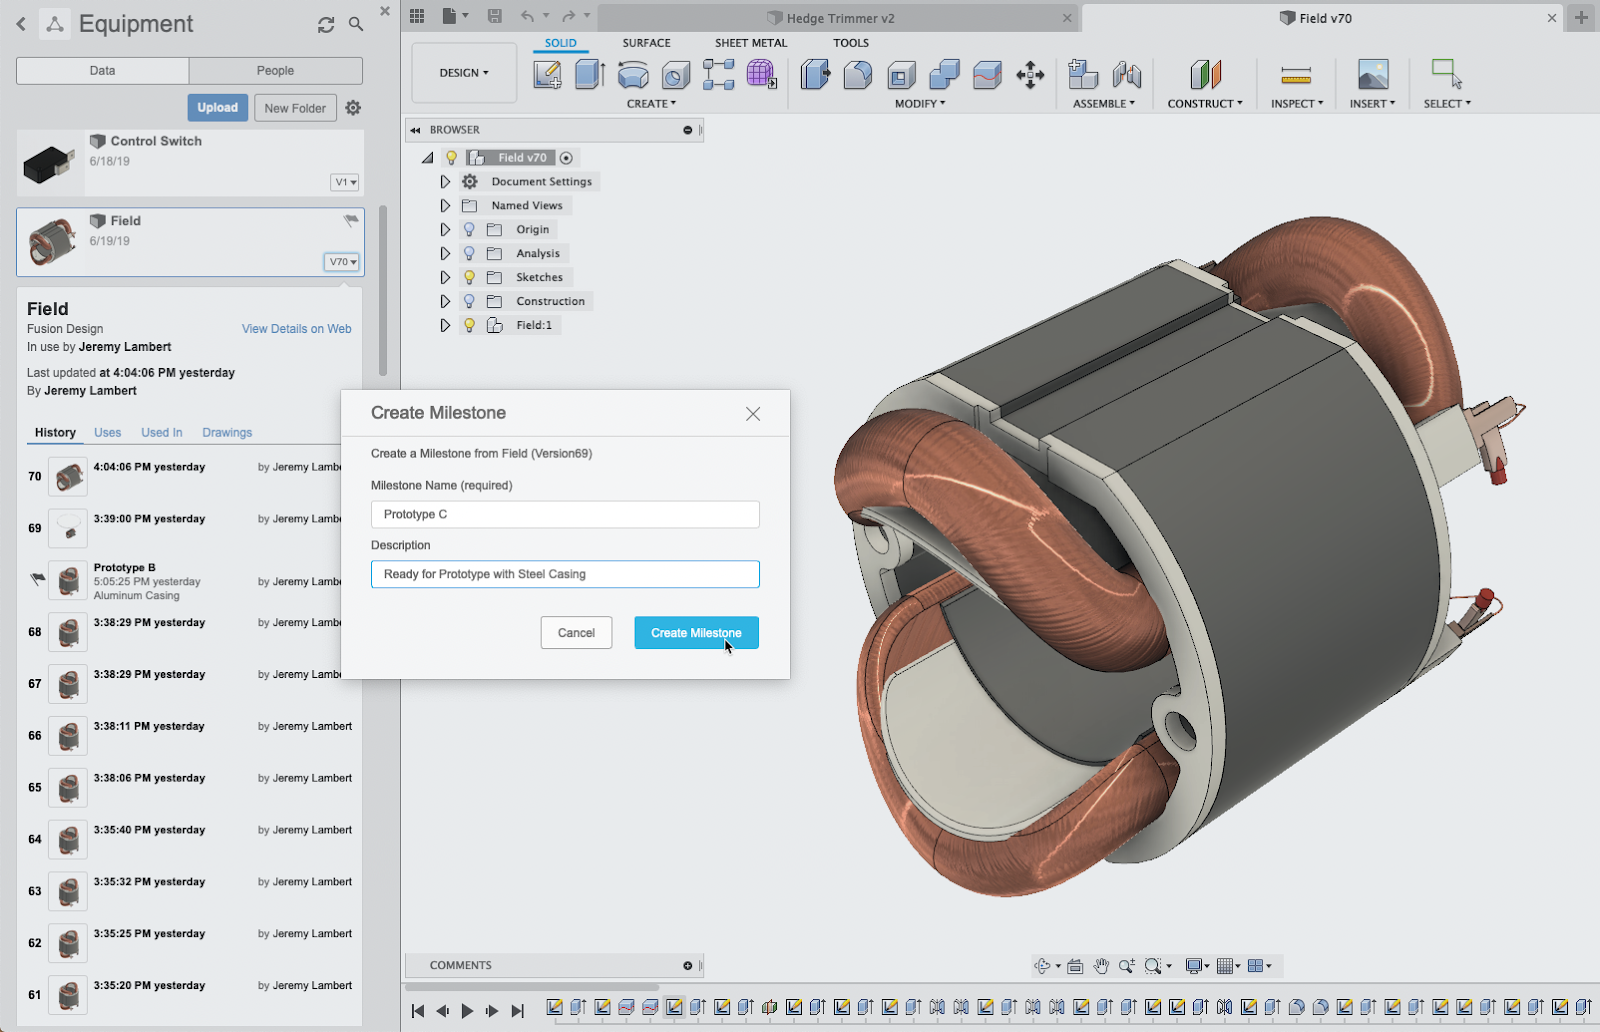
You are now able to tag a version as a Milestone, making it easier to identify and go back to if needed. You can create a Milestone either at the time of save, or afterwards, by selecting an older version to create the Milestone from. Milestones are fairly simple to create, all you need to do is give them a name and description. Once created, you’ll be able to find the Milestones in the history of your design, just look for the flag icon.
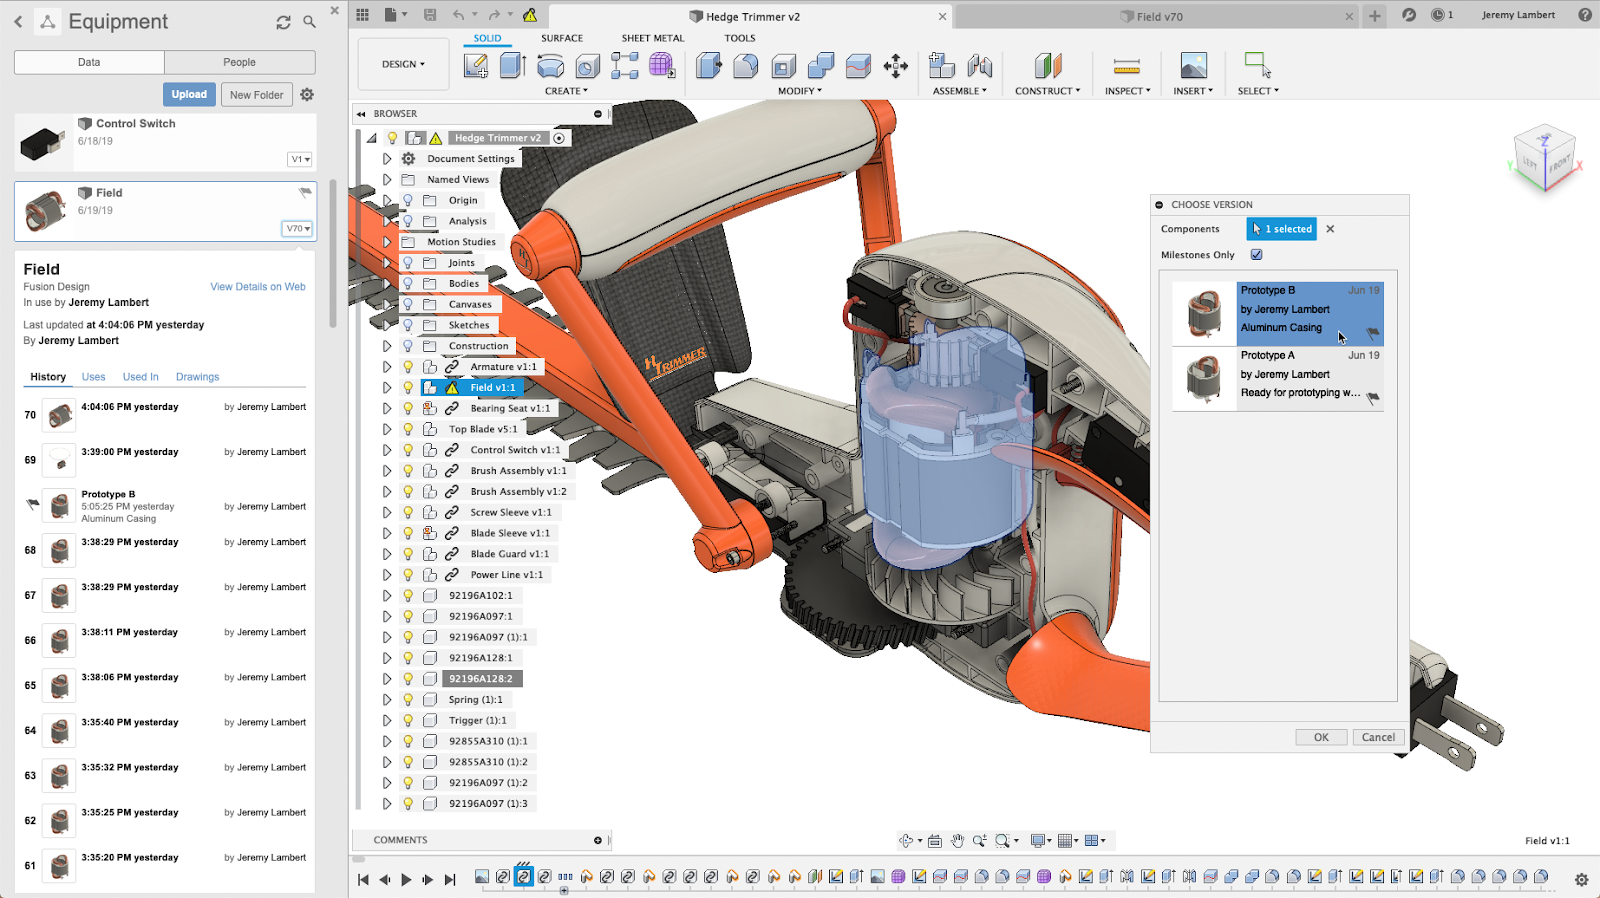
Milestones will make it easier to manage your references as well. The Choose Version command has been enhanced with a filter to only show Milestones, so you can quickly find those important points in time to reference. Milestones allow you to work on a design in isolation now and assemblies or drawings that link to the design will only prompt you to update once there are newer milestones. This works with derived designs and AnyCAD designs, too.
[icon name=”bookmark” class=”” unprefixed_class=””] Usability
New! Quick guide to the new toolbar UI
If you haven’t tried the new toolbar yet, you totally should. We’ve been continually refining the experience, and are gearing up to make the new toolbar UI the official toolbar experience for Fusion 360 in the near future.

To help you make a smooth transition, we’ve created this quick guide to the new toolbar UI, which includes the top 5 things to know, as well as a few FAQs we’ve heard along the way.
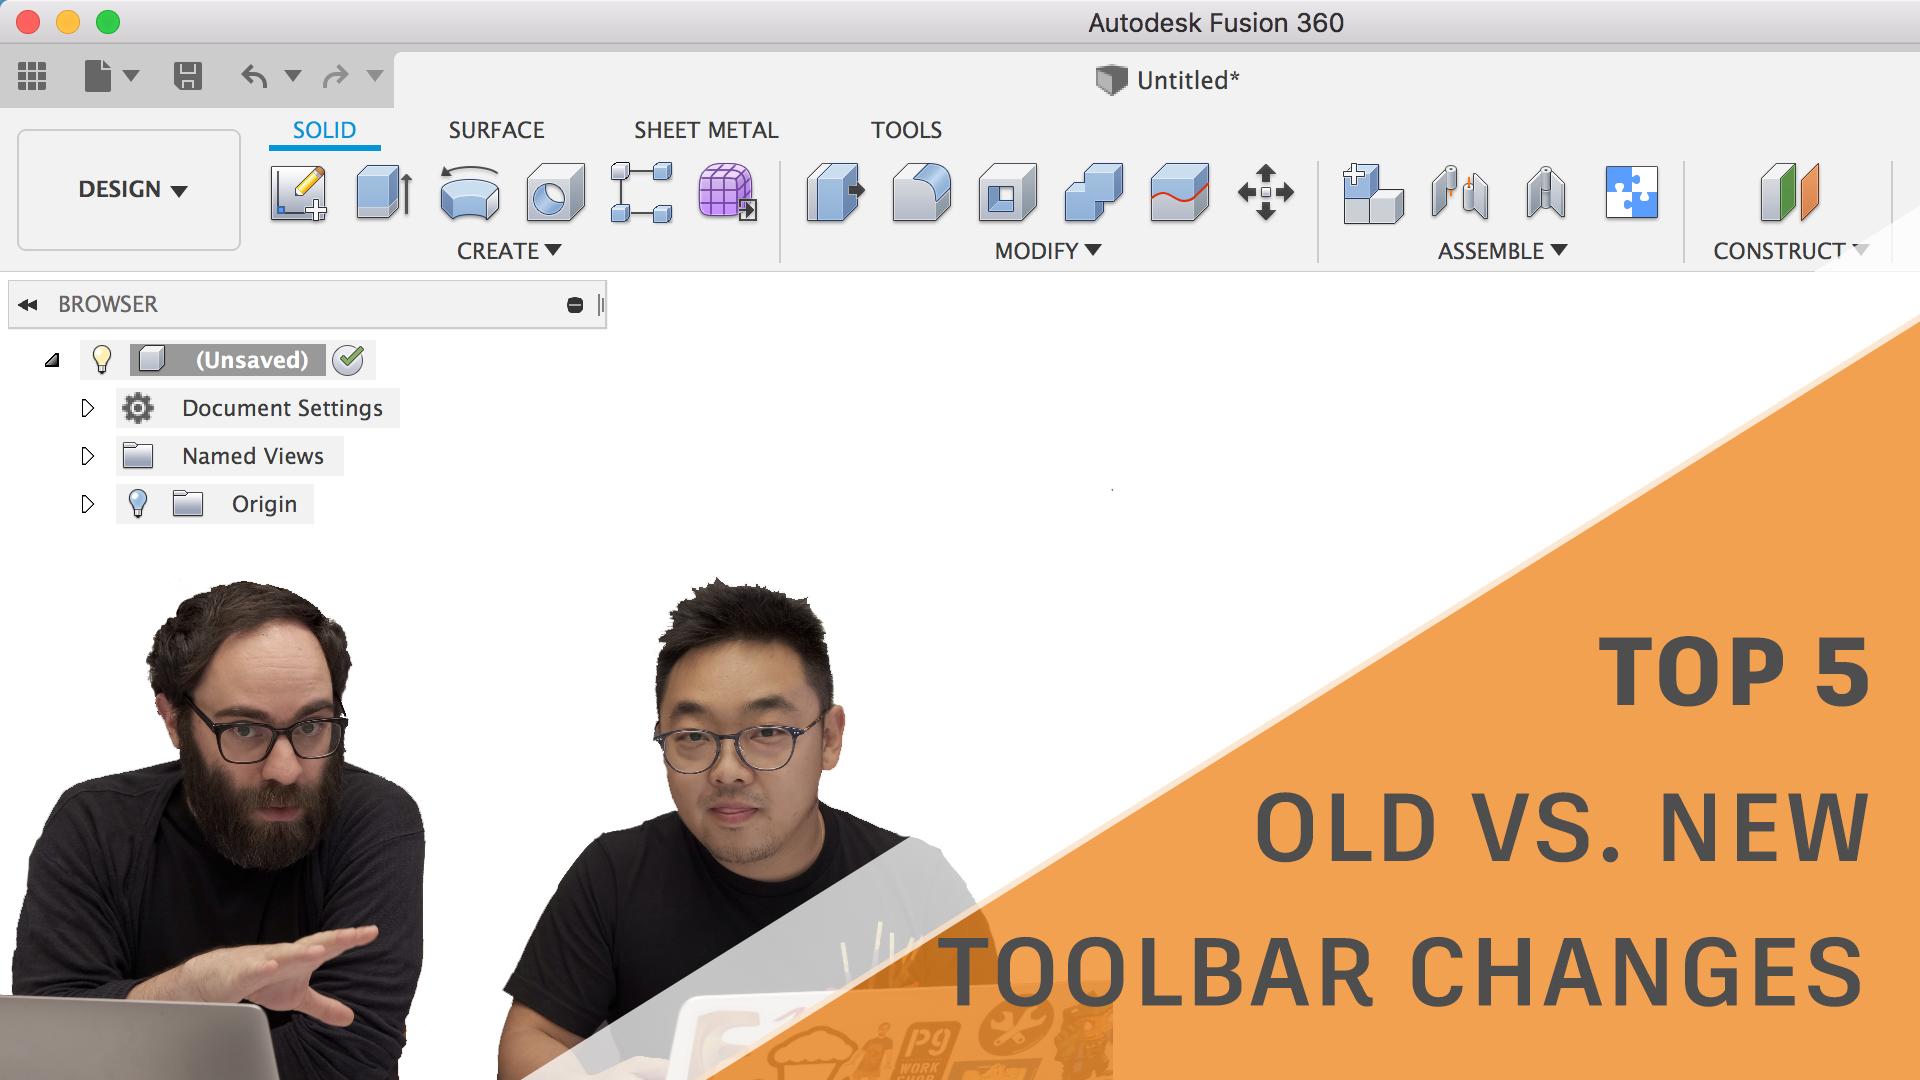
If video is more your speed, Jake Fowler and I dropped a video on our Fusion 360 YouTube channel where we went over the same top 5 things to look for when you switch over to the new toolbar, as well as some reasoning behind these changes. Oh and as a bonus, we include our outtakes for some laughs at the end :).
Get familiar with it now
How soon are we making it official? We are planning to flip the switch and make the new toolbar UI the default experience for everyone towards the end of summer 2019. When that happens, you’ll still have the ability to revert back to the old toolbar for a limited period of time, however we will eventually make the full transition (and retire the old toolbar) a few updates after that. We’ll be keeping you up-to-date with our progress, as well as more specific dates on when the switch will happen.
Improved! Insert of decals and canvas images Phase 1
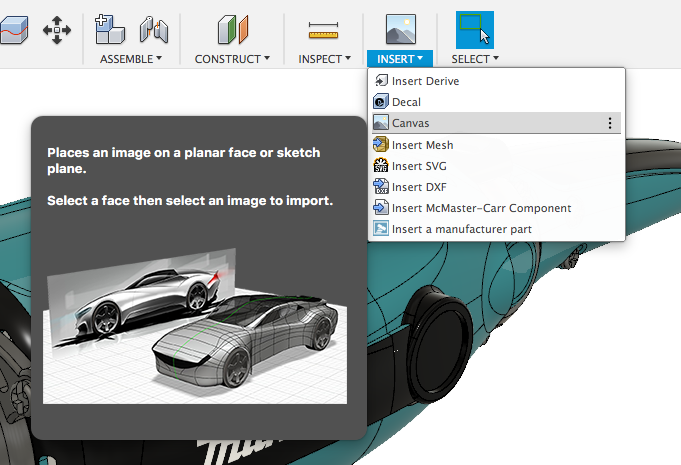
We’re enhancing how you can insert decals and canvas images to your designs, and in the update we’ve made a few minor tweaks. Attached Canvas has always come off as a bit confusing, so we dropped the word “Attached” and now it’s just called “Canvas”.
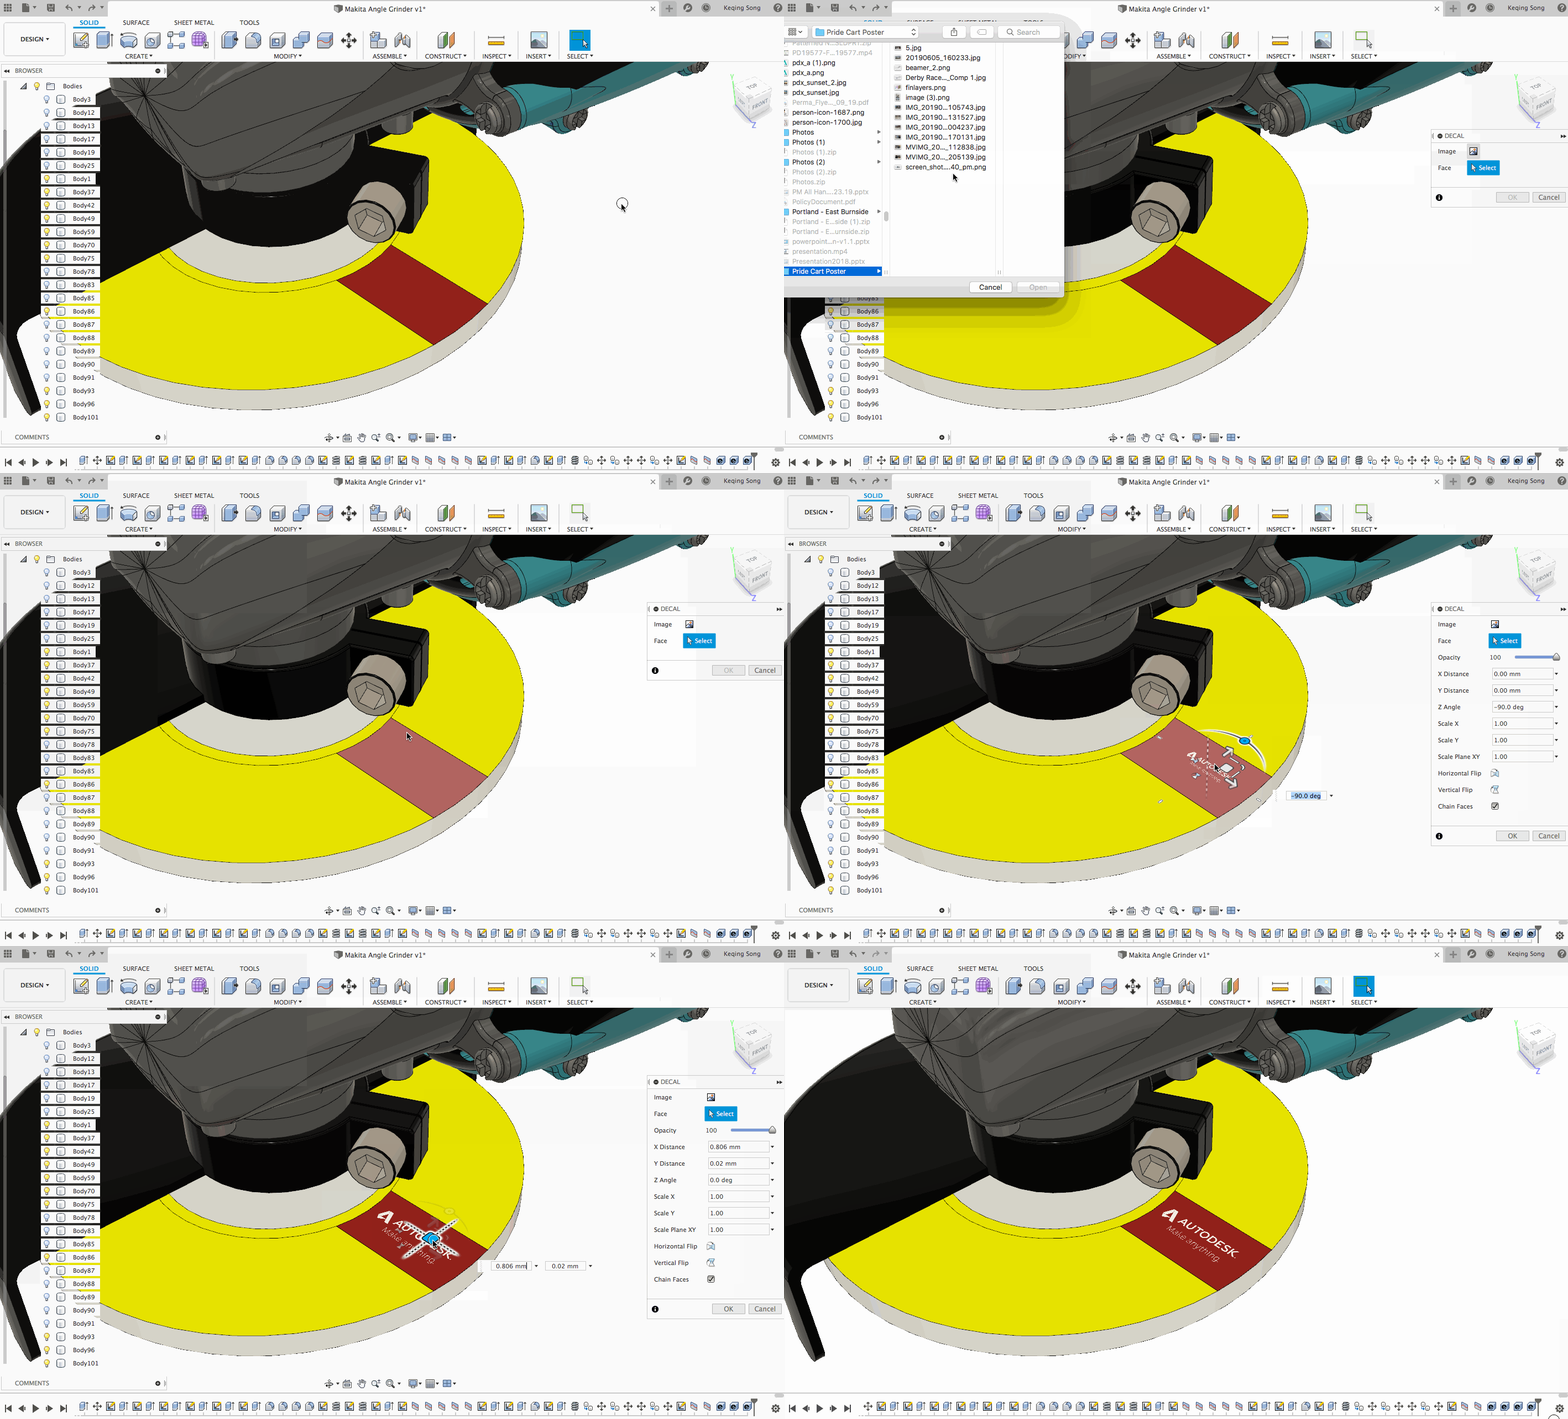
We’ve also streamlined the order in which tool options appear in the dialog. Previously all the options were visible upfront, which can be a bit overbearing. Now when you use Insert Decal or Insert Canvas, you’ll get 2 options: select the image and then select where it’s going. That’s it. Once you’ve completed these 2 options, the rest of the options will appear.
Phase 2 of this workflow will allow you to pick your file from a project in your account, meaning soon you’ll be able to upload all your decals and images to your project and insert them directly into the design without retrieving them locally from your machine.
Improved! Share to Autodesk Gallery
A couple updates ago we made a change to how you share designs from Fusion 360 to the online gallery of projects. Instead of sharing to a Fusion 360 specific gallery that was silo’d to our own website, now when you share your design project to the gallery, it will be shared in the overall Autodesk Gallery, and coexist with projects created by users using other Autodesk products.
Fixed: The preferred units in a design will be consistent in modeling as well as machining workspaces
This issue caused quite a bit of confusion, and we’re glad we got this sorted out. Before this fix, if you uploaded design modeled in inches, the Manufacture workspace honored those units but the Model workspace didn’t. The beauty of Fusion 360 allows you jump between these two workspace and make adjustments to your design, so having inconsistent units was a major drag. Now the Model workspace honor those units.
[icon name=”bookmark” class=”” unprefixed_class=””] Modeling & Sketching
Improved! Invalid Fillet or Chamfer creation options are now highlighted
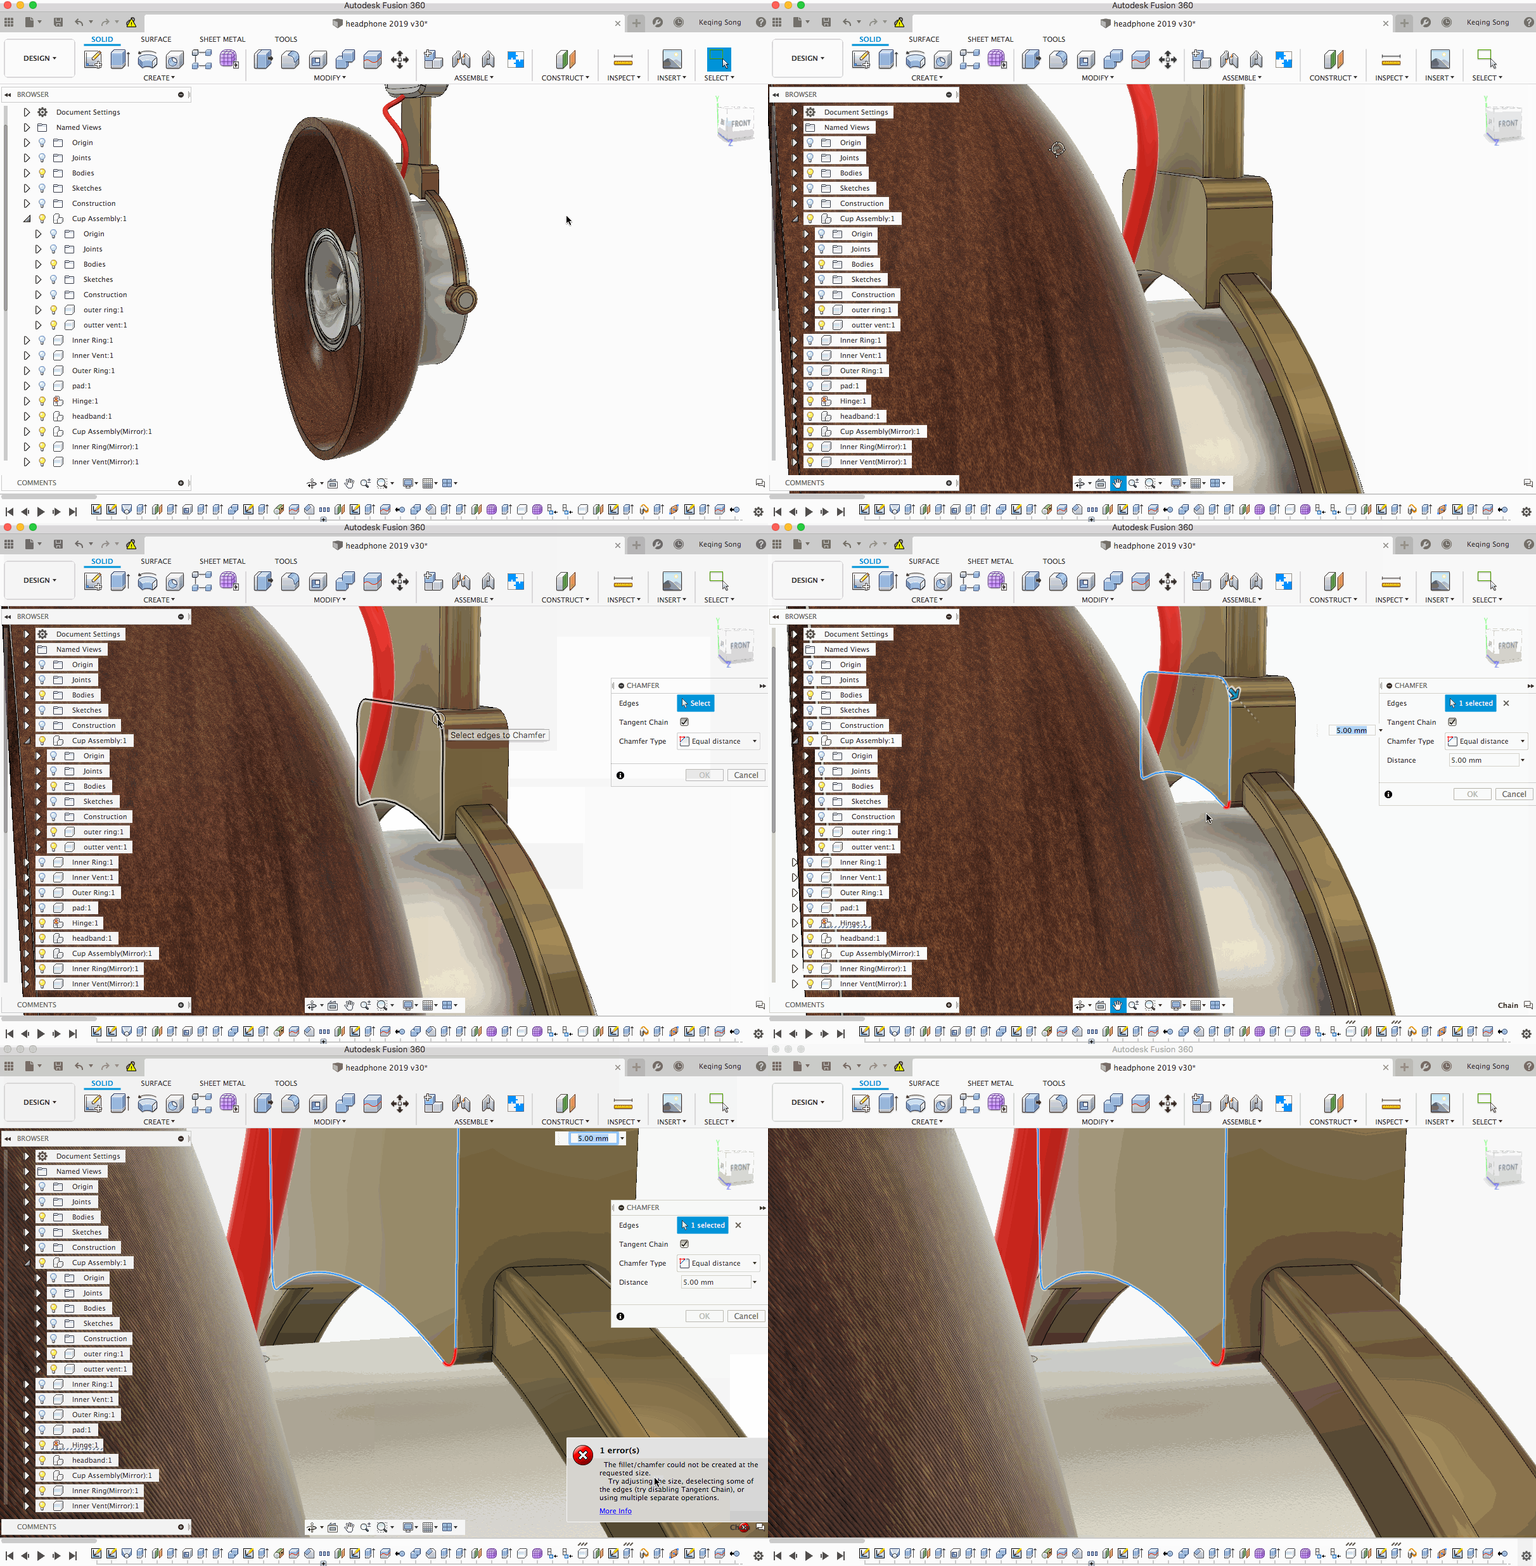
Previously if you tried to Fillet or Chamfer an edge and went beyond the boundaries of what is possible to fillet/chamfer, you got an edge message telling you that the action was invalid. This was expected, but Fusion 360 never made it clear what part of the edge was making the action invalid. Now when you do this, Fusion 360 will highlight the region in question, so you know exactly where to look.
Improved! Insert DXF now has option to Create/Not Create Control Frames
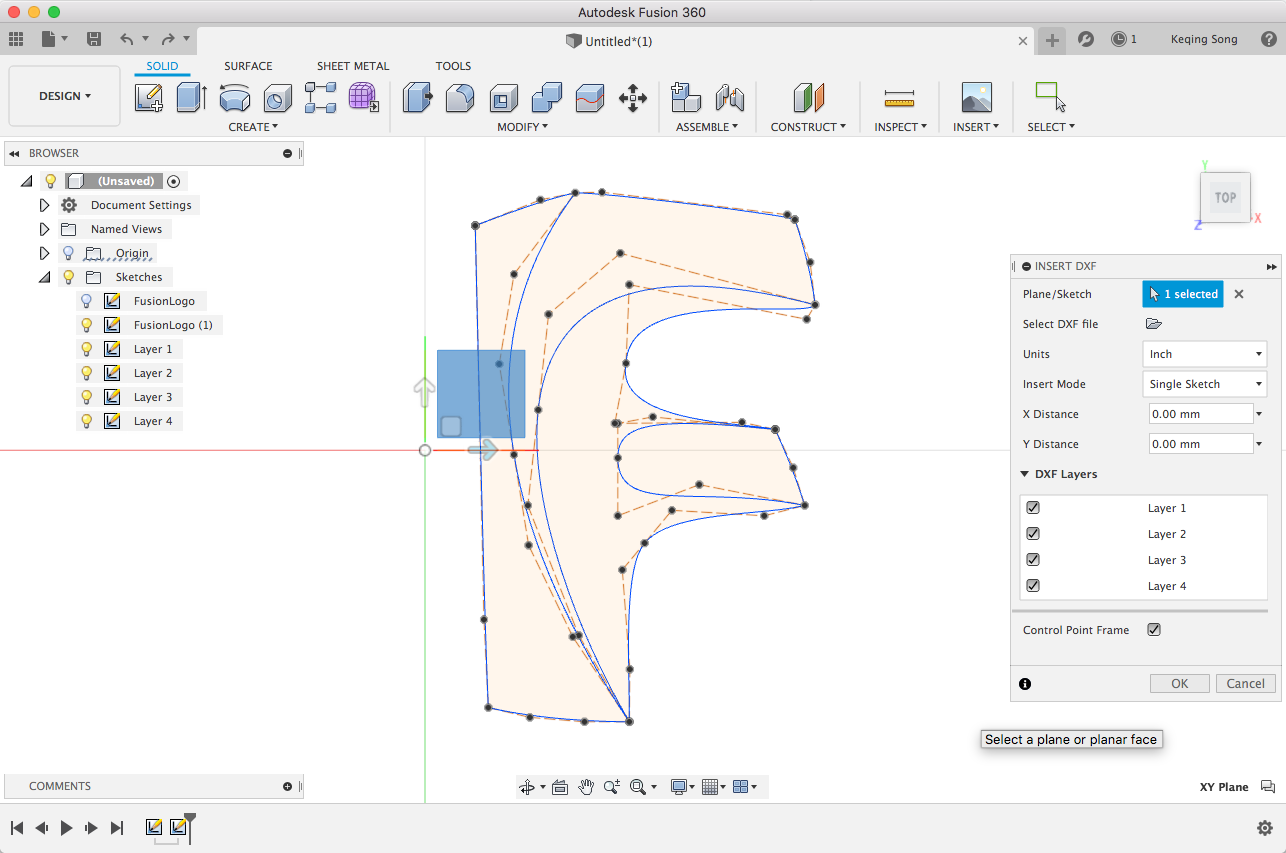
Similar to the option you now have for Insert SVG, now when you insert a DXF, you can turn on or off Control Frames for your DXFs that have splines. Note that if you have it turned on, you may just see the control frame but not the points. To see the points, edit the sketch and turn on points from the sketch palette.
New! Edit Sketch Offset
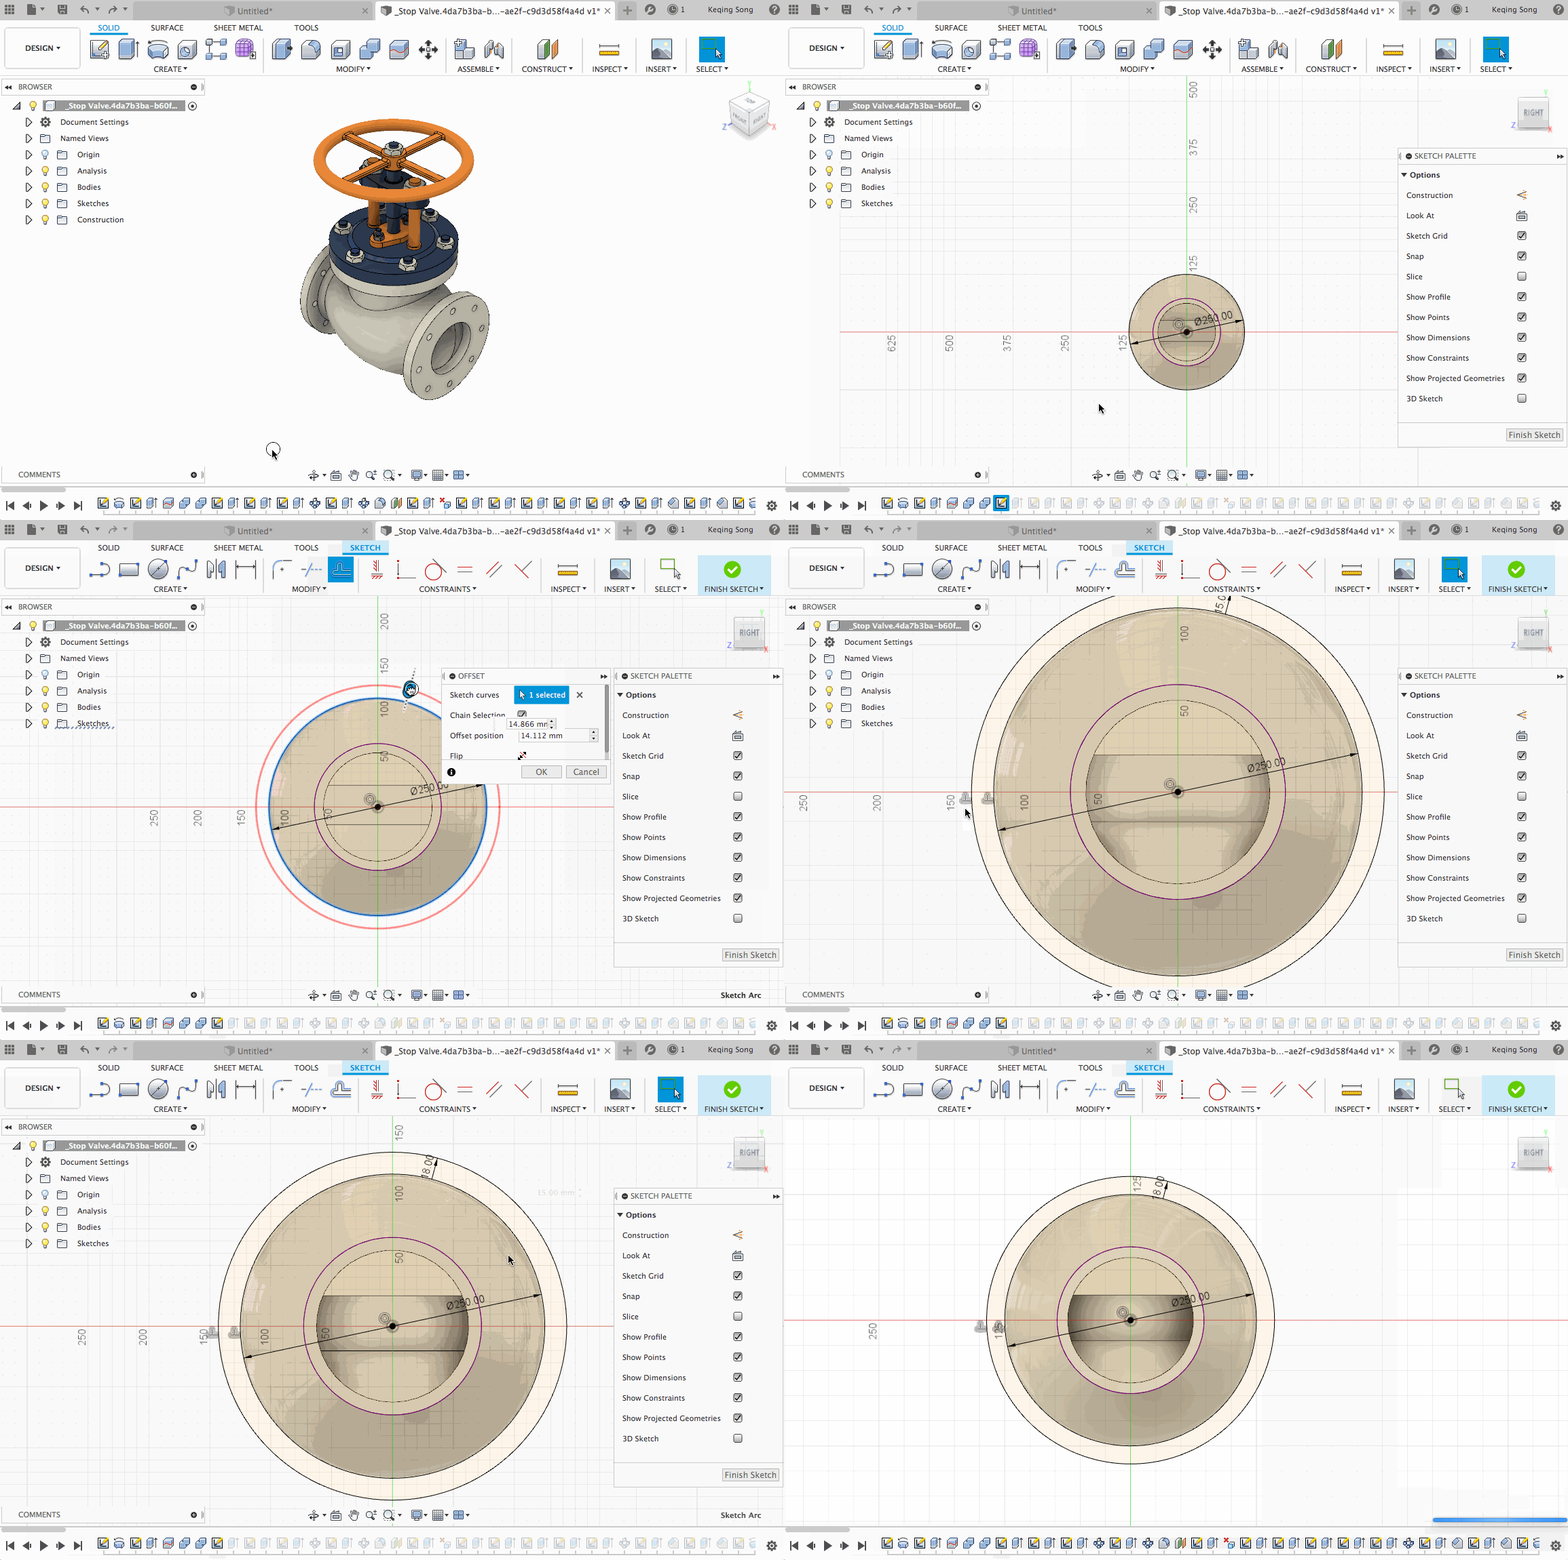
Good news! Now when you create a sketch offset, you’re also able to edit the offset afterwards by clicking on the offset glyph. A dialog will appear, allowing you to modify the offset you’ve previously created.
Improved! Change Parameters option is now under Sketch > Modify panel
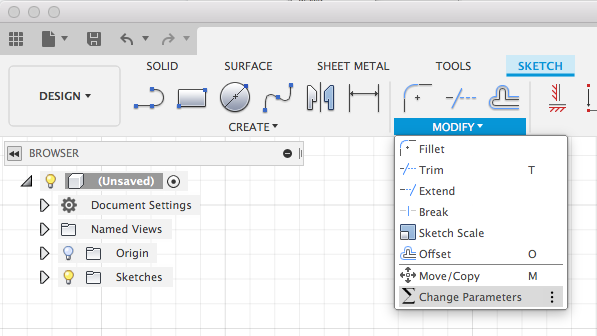
Some of you trying the new toolbar UI told us that you weren’t able to access the Parameters dialog within the Sketch contextual tab when you needed it. Yup, we heard you loud and clear, so we added it under the Modify drop-down menu within the Sketch tab. Now you no longer have to go in and out of Sketch to change your parameters.
Improved! Manage Lost Projections Phase II
We delivered the first phase of how to better manage lost projections after design changes; you can learn more about it here in our Quick Tip video. Now comes Phase II.
We’ve made Fusion 360 smarter at re-applying constraints that are valid to the design when you’ve made changes to the design.
Notable Fixes
- Joint options now update correctly when you change joint types
Apparently there was an issue with the Joints dialog where the options weren’t updating correctly when you changed joint types (from Ball joint to Pin-Slot joint to Slider joint). Sorry about that, sometimes Fusion 360 needs a good jolt to keep up with you. Now it updates correctly. - Joint icons now appear in the right places
There was this issue where the little joint icons that appear on your model (indicating what kind of joint is applied) can appear way off, sometimes in the middle of nowhere. We saw this happen when you’re working with externally referenced parts in your assembly. We looked under the hood and made a few tweaks, and now joint icons should appear in the correct places. - Grounded components remain grounded when moved inside a component
So you know how you can “Ground” a component so it doesn’t move in space? TrippyLighting discovered that when he moved a grounded component into another component from the browser (to re-organize), the grounded component became unexpectedly ungrounded. Good catch – we got this sorted out. - T-Spline Symmetry is maintained after Insert Edge
It’s been awhile since our T-Spline tools have gotten any love, and it showing since you’ve reported a number of issues related to mirroring commands in the Form (aka Sculpt) environment. We updated the T-Spline engine the latest version and that fixed this issue.\ - Coincident constraint is now applied correctly when you start dragging an arc
Claas Kuhnen reported to us that when he tried to add a Sketch Arc to an existing projected line (to get a tangent arc), the coincident constraint was not being properly applied once he started dragging the arc. Now it should. Thanks Claas for the heads up!
[icon name=”bookmark” class=”” unprefixed_class=””] Generative Design
New! Generative Design Step-by-step Guide
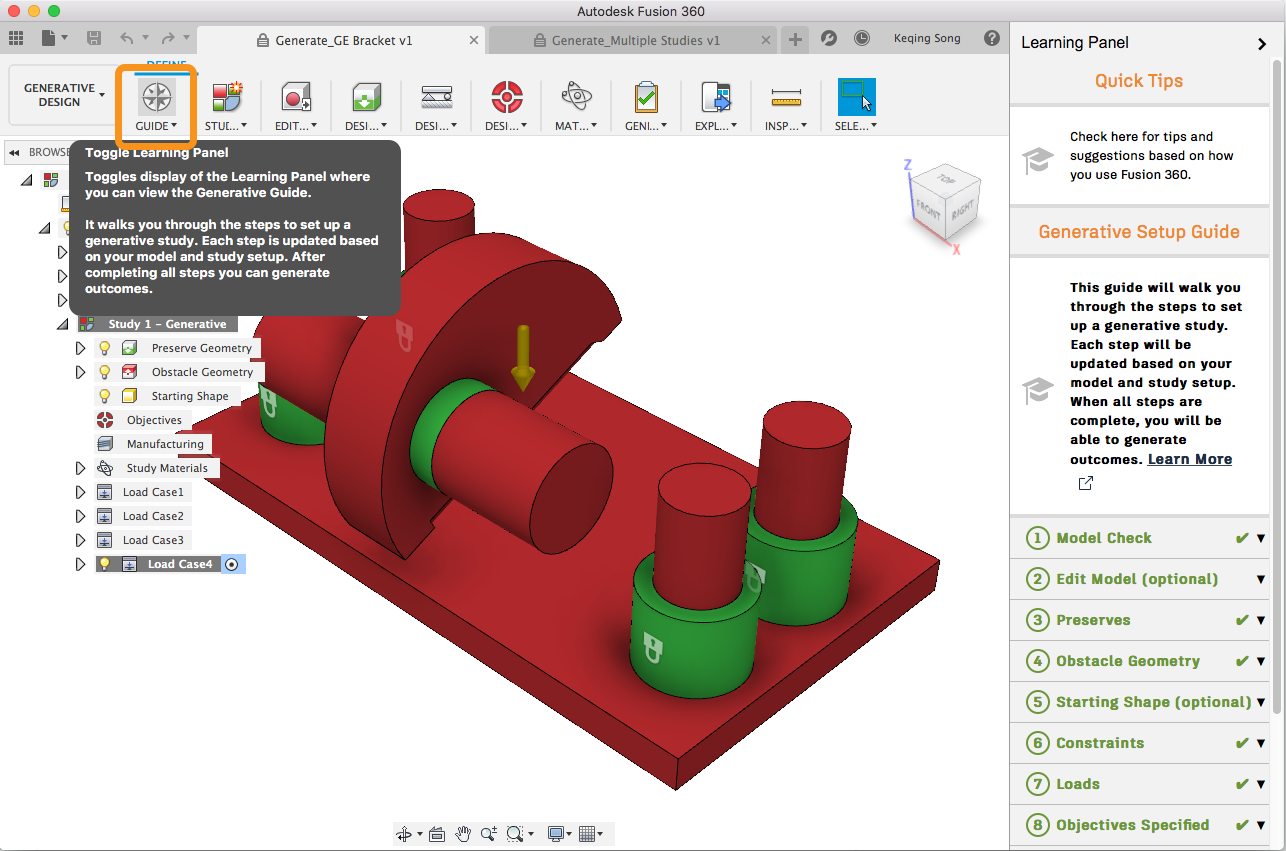
Generative Design can have a bit of a learning curve, so we made it easier for you to find our new Generative Setup Guide to help you get started with your radical designs. Click on the Guide button in the toolbar, and you’ll launch the Learning Panel with the step-by-step guide ready to go.
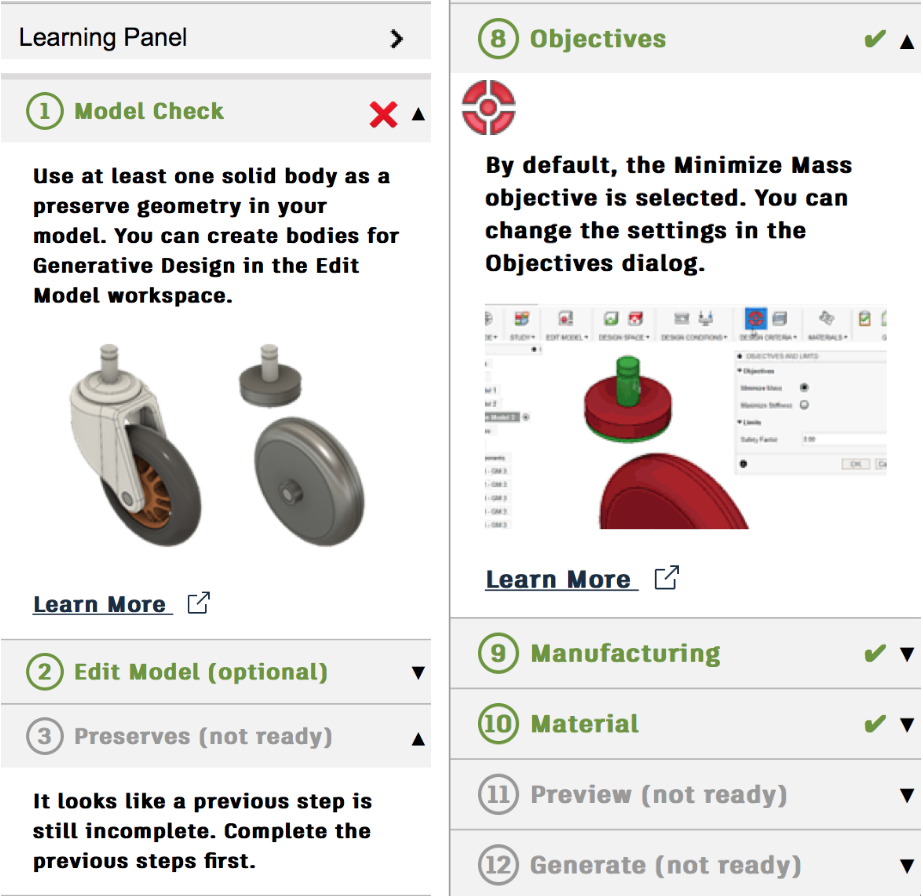
The guide is contextual too, so depending on the state of your design, it’ll let you know whether you’ve completed a specific step or not. Incomplete steps are marked with a red X, steps that are yet to be revealed will show as “not ready”, and those that are satisfied will be marked with a green checkmark.
New! Die Casting Manufacturing method in Preview
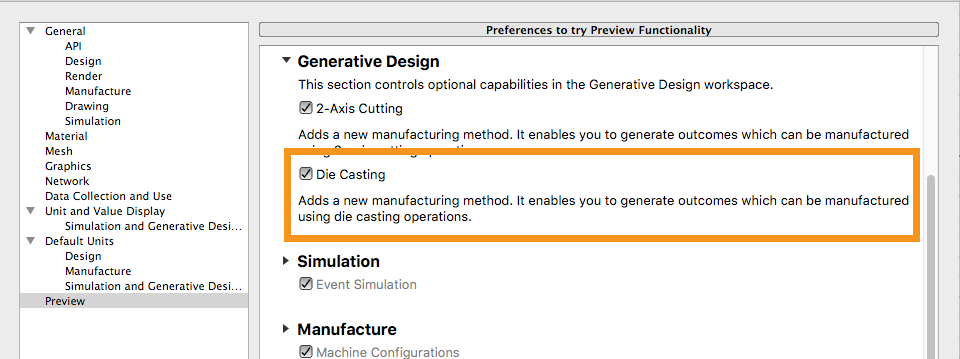
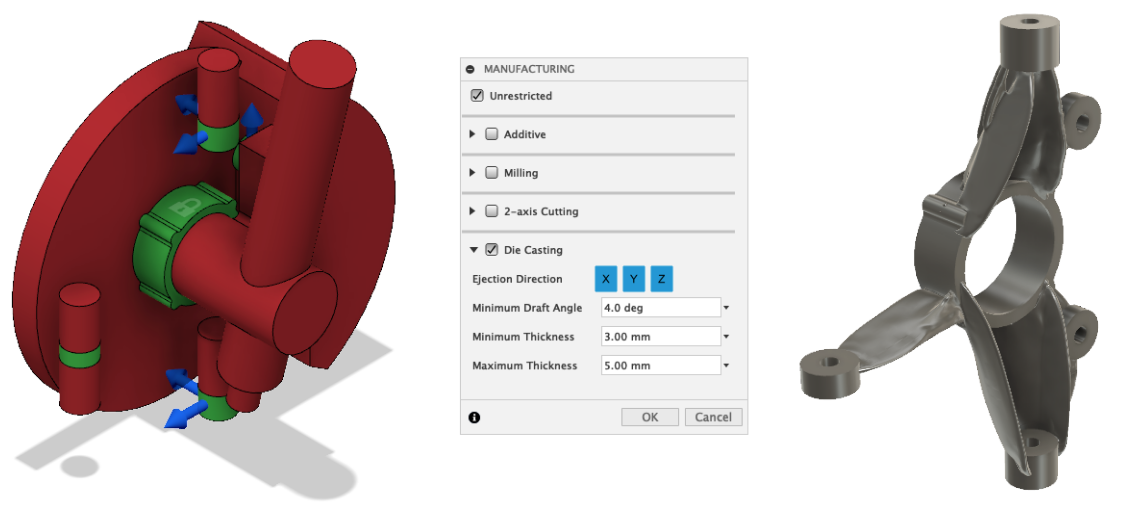
One of the most important solution aspects of generative design is its ability to produce outcomes that have manufacturability considerations built-in. In this update, we are expanding our portfolio of processes to include die casting. The die casting constraint will allow users to specify the ejection direction, minimum and maximum thicknesses, and a minimum draft angle to ensure the product can be ejected from the die.
Improved! Material Appearances in Explore
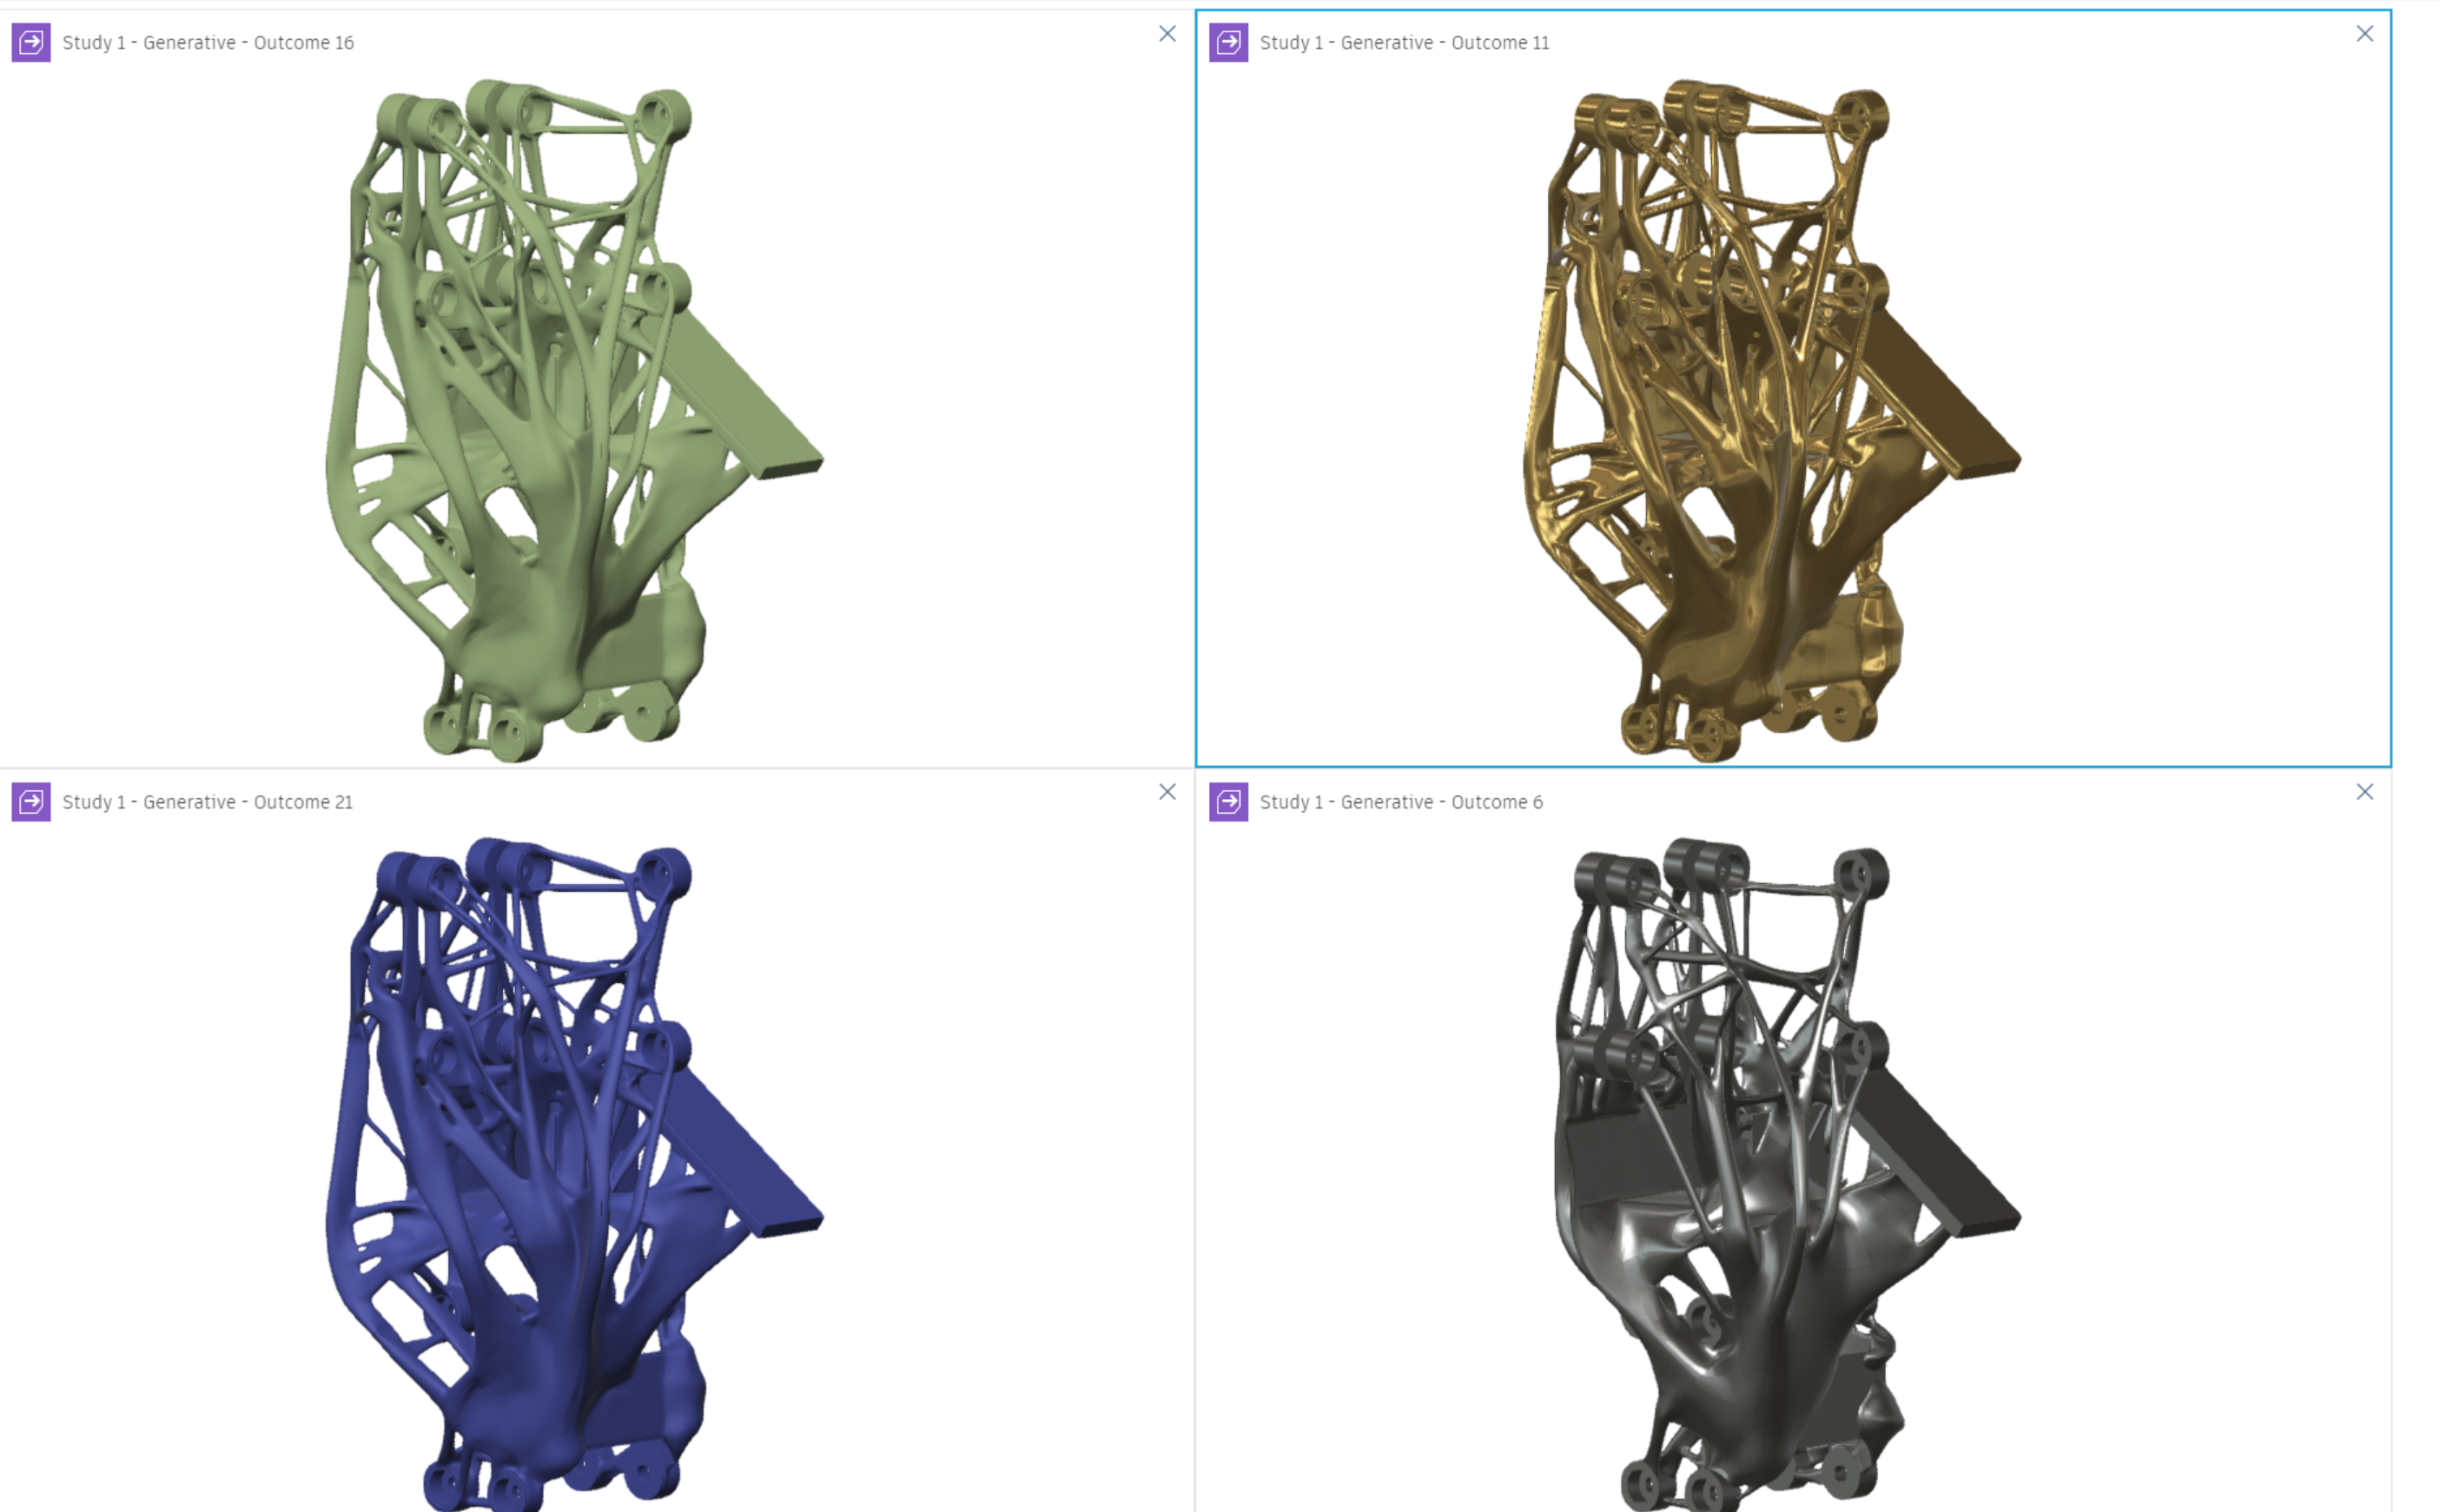
In our May update, we delivered the new Export Preview functionality in Explore to make it easier to see the quality of the outcome you would get when downloading by providing a rendered version of the converted outcome for the final iteration. To further help you evaluate and understand the differences between outcomes, we are now including the material appearance in the rendering. Now you will be able to visually see what material is used in each outcome.
Fixed: Generative jobs fail with a Windows username with Cyrillic letters
We had a scenario where generative design studies would fail for those of you running on Windows and had Cyrillic letters in your system username. We fixed this issue and now solves should work for you. Cheers!
[icon name=”bookmark” class=”” unprefixed_class=””] 2D Drawing & Animation
We fixed an issue where the geometric symbol in Feature Control Frame wasn’t updating correctly if you where running Fusion 360 in simplified Chinese. Now it does.
Fixed: There was an issue with the Angular Dimension tool where if you used it and double clicked on it to edit the dimension, Fusion 360 would pop up a bug alert. Luckily, only we noticed this, so we went ahead and fixed it.
Fixed: Apparently Fusion 360 was really excited to let you know about the Tables fly-out section in the right-click menu, so much so that it decided to show it in all caps as “TABLES”. We took it down a notch and now it appears as “Tables”.
Fixed: Title-blocks in a drawing are important, and the ability to create your own is even more so. We ran into a bug where if you created a title block from scratch and tried to zoom in to get a closer look, Fusion 360 zoomed in so much that you would see Antman in the Quantum Realm.
Fixed: The “Finish Border” button in the command dialog wasn’t working properly. Now clicking it will take you out of the border editing environment and back into the 2D Drawing.
Fixed: Animation storyboards leak visibility and position between them
There was a nasty bug in the Animation workspace where if you had multiple storyboards with different animation sequences in each, the result of one of these storyboards got carried over to the second one, which made the second storyboard incorrect. Sorry about this mix-up, there was some bad code that slipped through the cracks, so we remove it and now storyboard states will no longer be carried over.
In terms of meaty projects, the team is working on exploded DWGs and DXFs at the moment. We’re making progress, but there are still a number of tasks to accomplish for this becomes ready for all of you. We’re trekking along, and will keep you posted.
[icon name=”bookmark” class=”” unprefixed_class=””] Manufacture
New! Advanced Manufacturing Extension
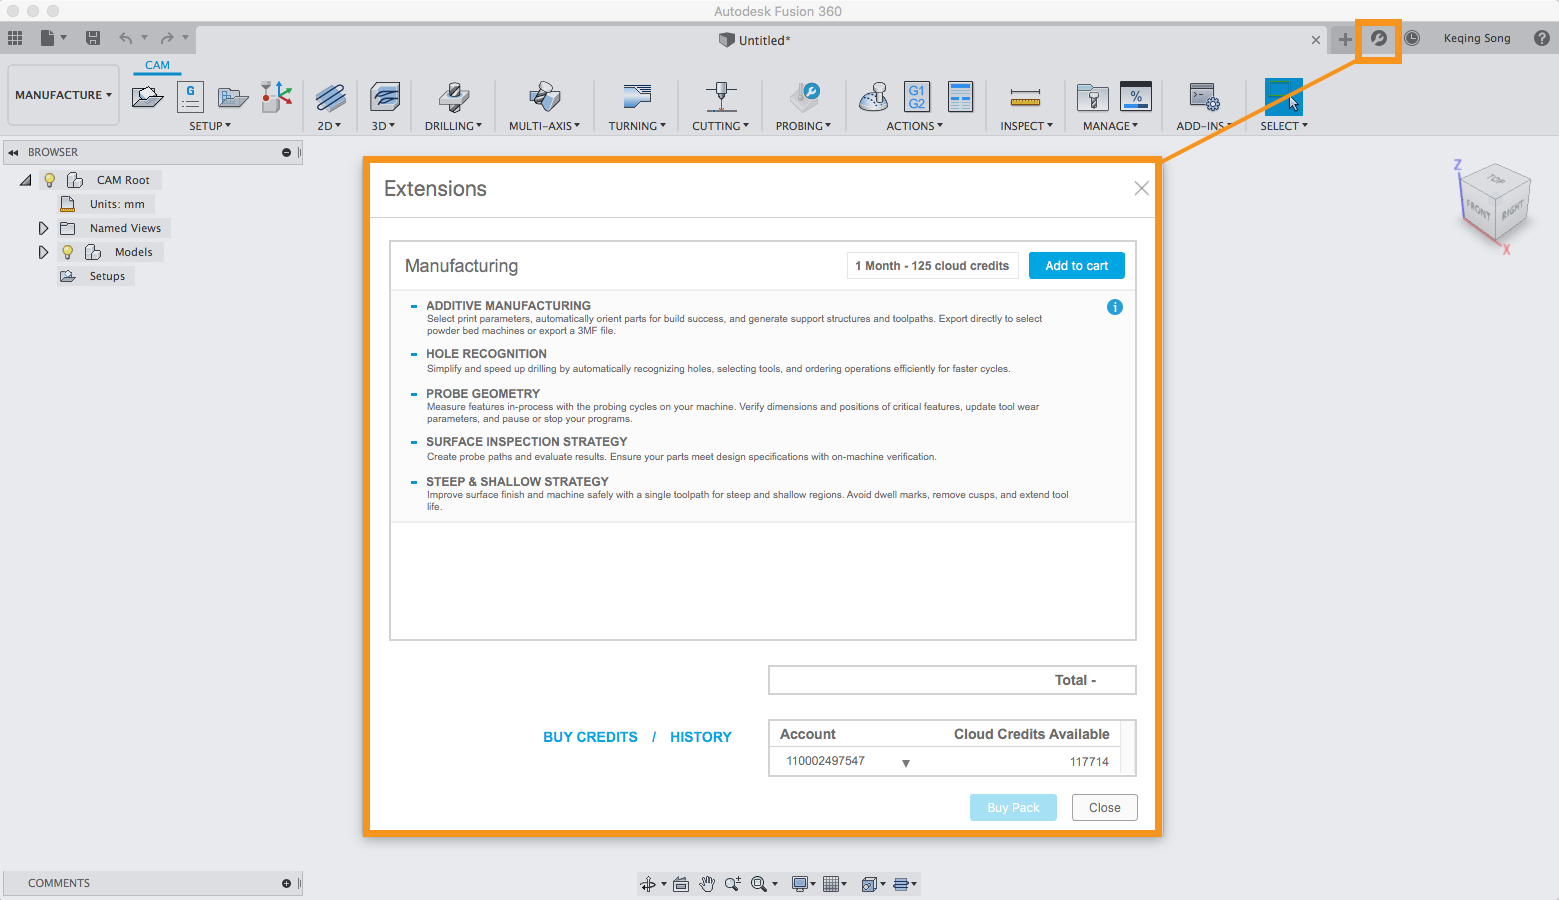
You might’ve noticed a new icon on the top right of the navigation bar. This is a new access point for the Advanced Manufacturing Extension. Purchase gets you access to some exciting new features, including the Steep and Shallow toolpath, Hole Recognition, Additive Manufacturing, Inspect Surface, and Probe Geometry.

Extension tools are differentiated through a small blue wrench icon on command icon. Learn more about the Extension and the individual features here and here. If you like videos, here some quick clips of them in action, narrated by our very own Marti Deans.
Additive Manufacturing
![]() Hole Recognition
Hole Recognition
![]() Surface Inspection Strategy
Surface Inspection Strategy
![]() Steep and Shallow is a 3D finish strategy that brings powerful automation to jobs that would have taken you multiple toolpaths to achieve. This extension functionality intelligently combines it all in one.
Steep and Shallow is a 3D finish strategy that brings powerful automation to jobs that would have taken you multiple toolpaths to achieve. This extension functionality intelligently combines it all in one.
New! Section Analysis now available in Manufacture Workspace
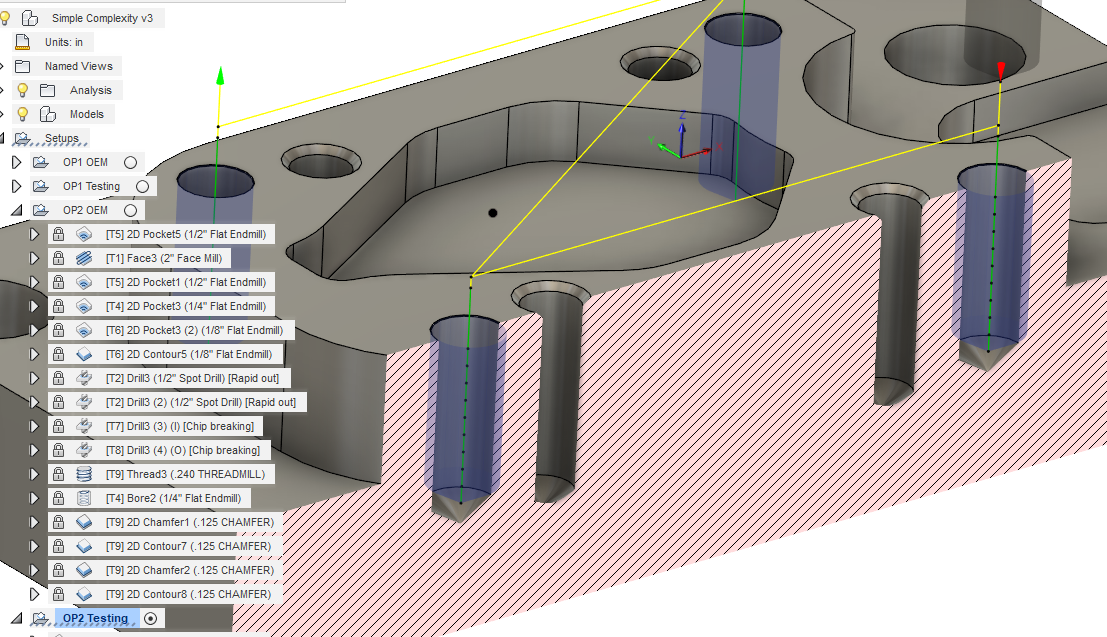
When you’re working on a model, it’s handy to have the section analysis around so you can see section views of the design and make critical decisions. We’re glad to say that the Section Analysis tool has made its way to the Manufacture workspace – you can create section analysis of the part for critical viewing.
New! Display toolpath points outside of simulation
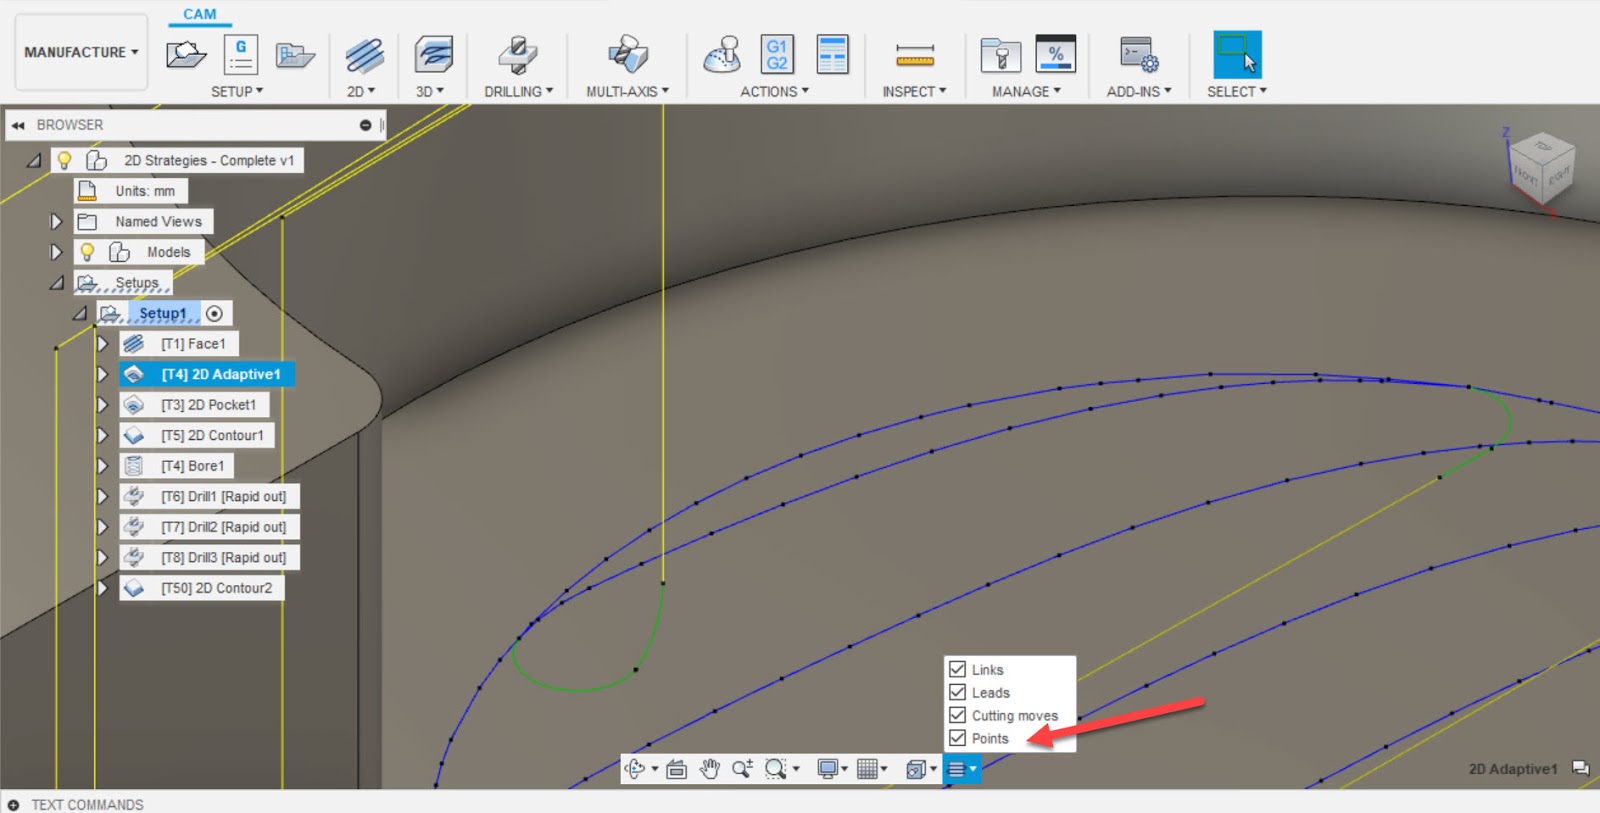
You can now toggle the display of toolpath points on and off without having to simulate! This checkbox is accessible through the navigation toolbar at the bottom of the screen, as shown below.
New! Import, Export, and Reset CAM parameter defaults
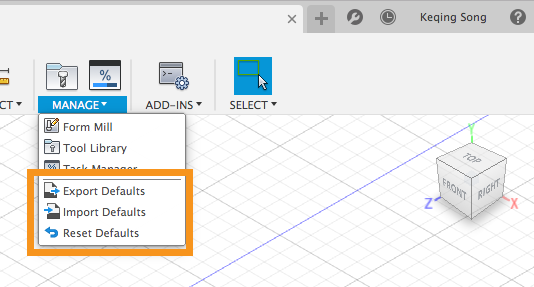
You now have the ability to import and export copies of their CAM parameter defaults – whether they want to maintain a local copy, share them with others inside or outside of their shop, or want to bring in someone else’s defaults, these new options found under ‘Manage’ will set them up for success. Ever want to reset all your CAM parameters back to the built in default values? Previously, you could only reset these one by one – this new option also under ‘Manage’ gives you the power to restore these parameters back to their ‘factory settings’.
Improved! Right-Click Copy Parameter Names on Operation Dialogs
Now parameter names can easily be placed on your clipboard via the right click menu, easing the use of the single parameter validator or the use of parameters in expressions.
Improved! Added Hole Diameter Parameter to Hole Operations
We’ve added a parameter, “holeTopDiameter”, that represents the “top” diameter of an entire hole. For example, for a counter-bore, this would represent the bigger diameter. You can use this in expressions in order to evaluate the top most diameter of the selected segments.
Improved! Check for Occlusions in Select Same Diameter for holes
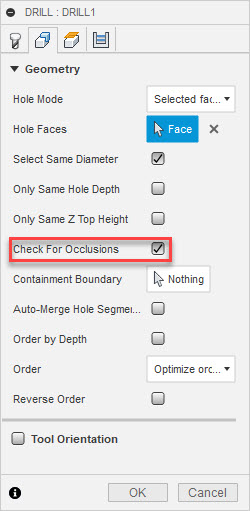
We’ve added a checkbox to “Check for Occlusions” when the “Select Same Diameter” option for drilling is checked. This will prevent the selection of ‘occluded’ holes – ones that cannot be “reached” from the tool orientation without gouging.
Improved! Control tool path direction between holes with multiple holes in an operation
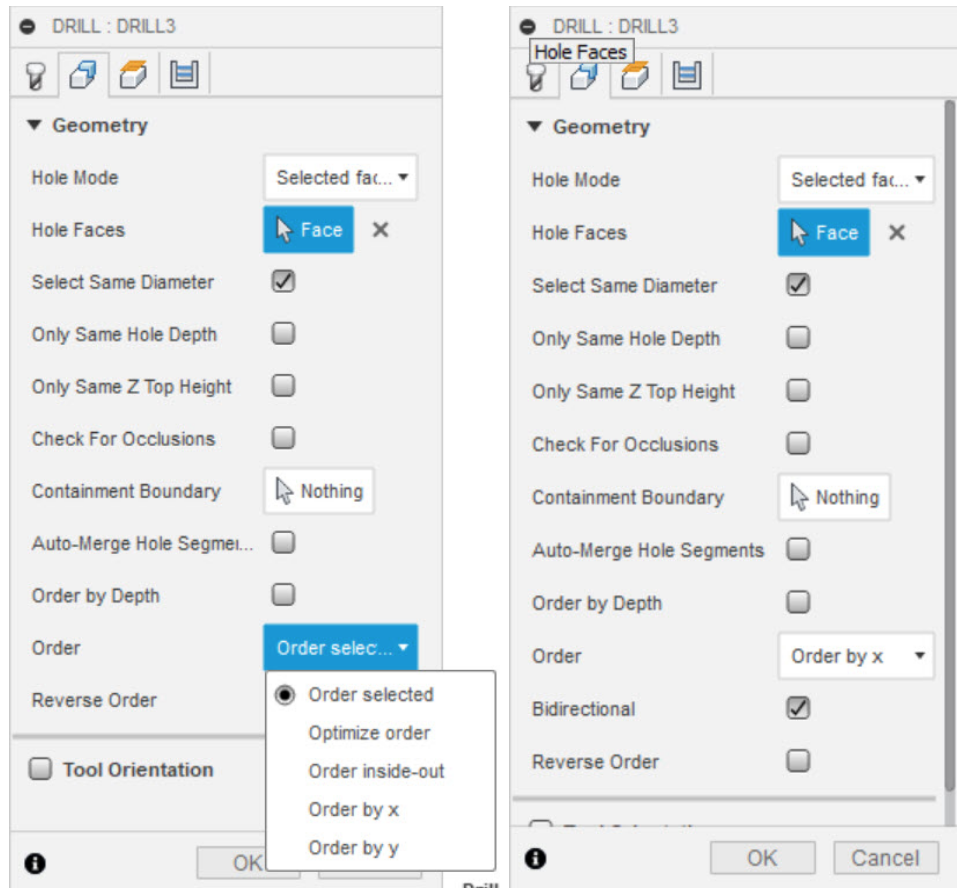
We’ve added additional options for hole ordering – in addition to “Optimize order,” you can now order by X and Y, both uni-directionally and bi-directionally.
Improved! Construction geometry selection
We’ve improved the selection algorithm for CAM toolpaths when working with chains that include construction geometry to reduce the likelihood of tedious accidental selections. While it is still possible to select a chain that includes construction geometry should it be desired, doing so requires an intentional hover to cut down on undesired selections.
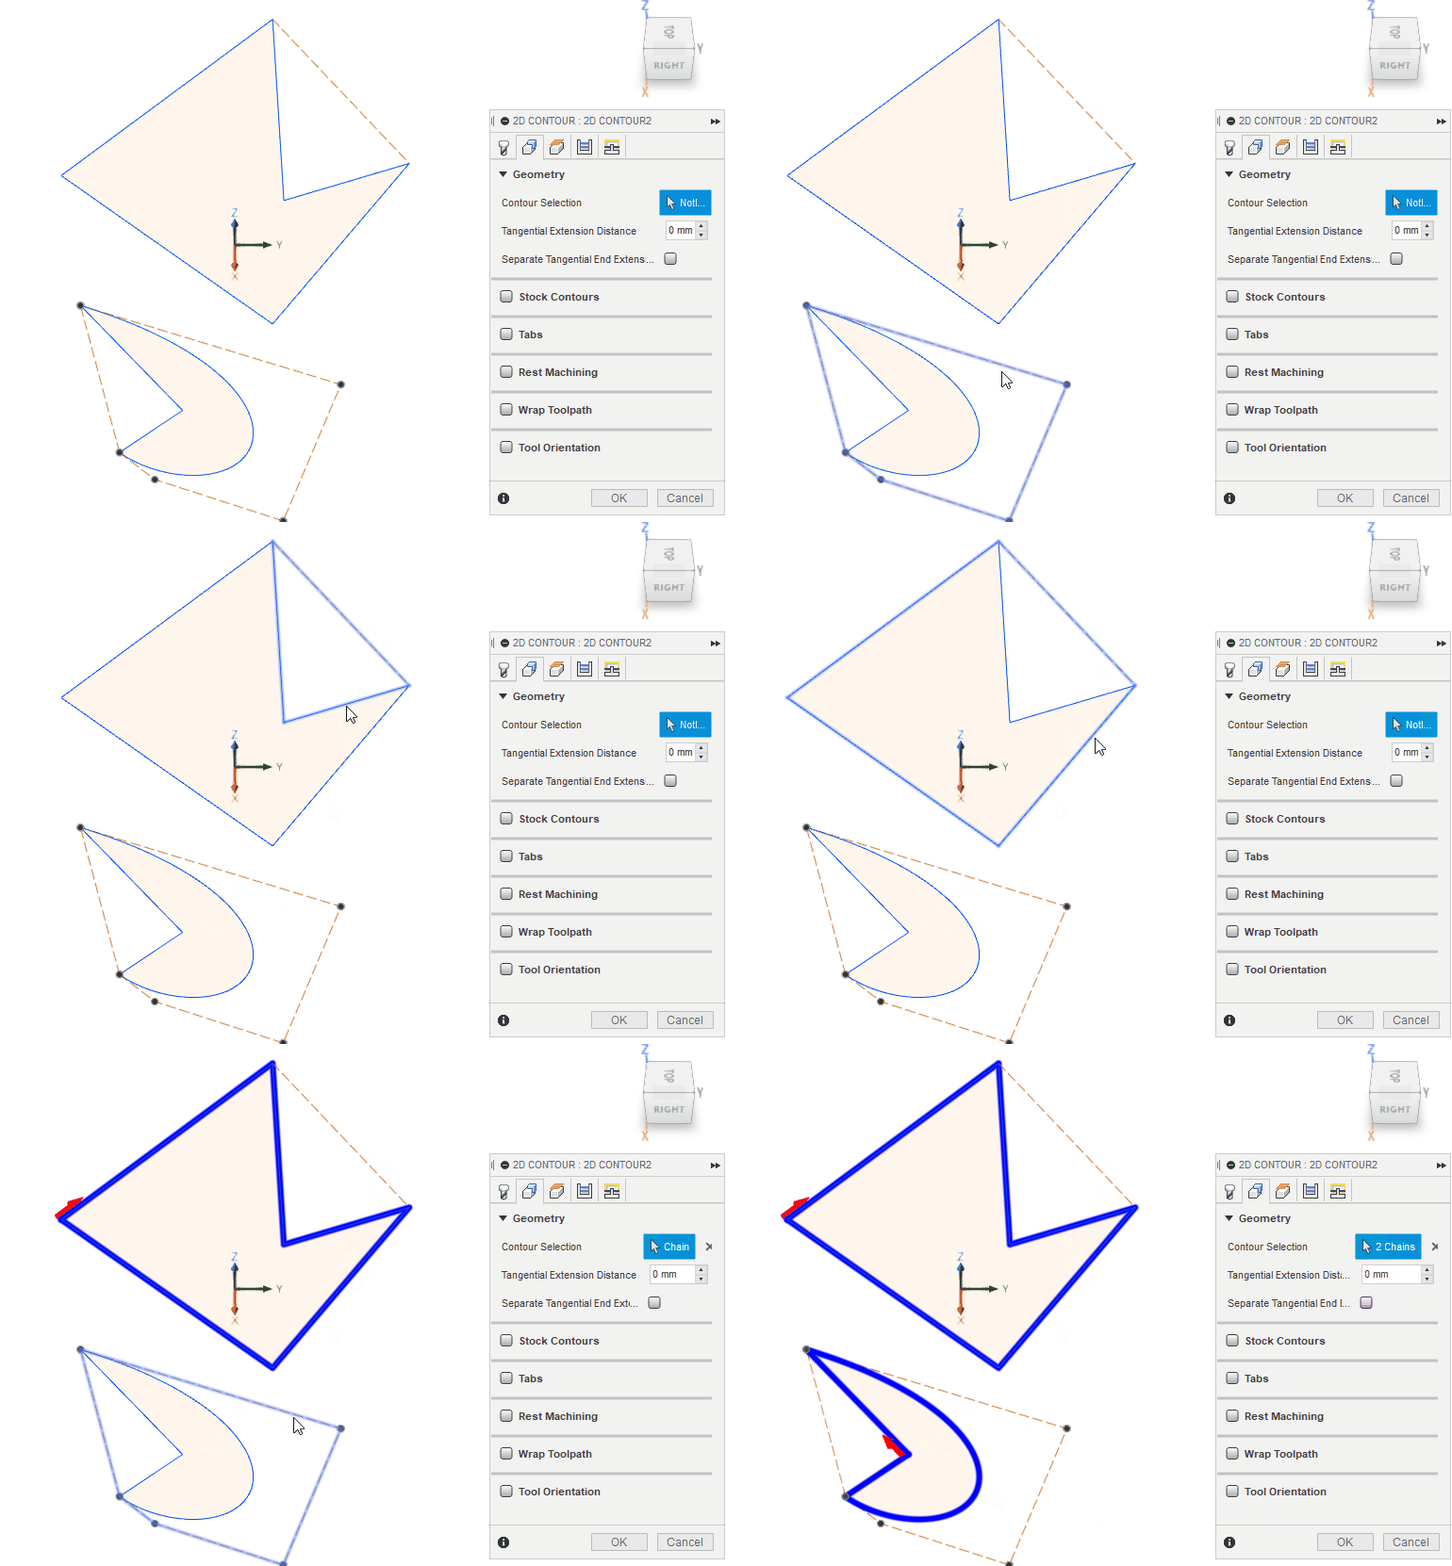
Before

After
That’s it for this update – thanks for all your feedback and continuous support in the community, we love hearing about what you guys are designing with Fusion 360 and how we can continue to evolve the product. Free to chat with us in the comment section below, and look out for the next product update!