
Elevate your design and manufacturing processes with Autodesk Fusion
V.2.0.2865
This quick update fixes 2 recent issues:
Issue with Move to Group in Direct Modeling fixed
We fixed an issue where if you right-clicked on a body inside a component and selected “move to group” when there was no group folder for the body to move to, Fusion 360 got very confused and crashed. We’re glad we caught it – now it no longer crashes and will bring up the Move to Group dialog.
Sketching solving issue fixed
We came across a design where if you tried to drag the bottom end of a fully constrained vertical sketch line within the Trim tool, Fusion 360 would lock up. Apparently this was related to an issue in our sketch solver, so we did our magic and made this problem go away.
March 1, 2017 Update – What’s New
V. 2.0.2862
Don’t feel like reading? Here’s our what’s new highlights video with Bryce and Aaron. You should read more though about this update. Just sayin’ :).
2D Drawings
Create multiple sheets in one 2D drawing
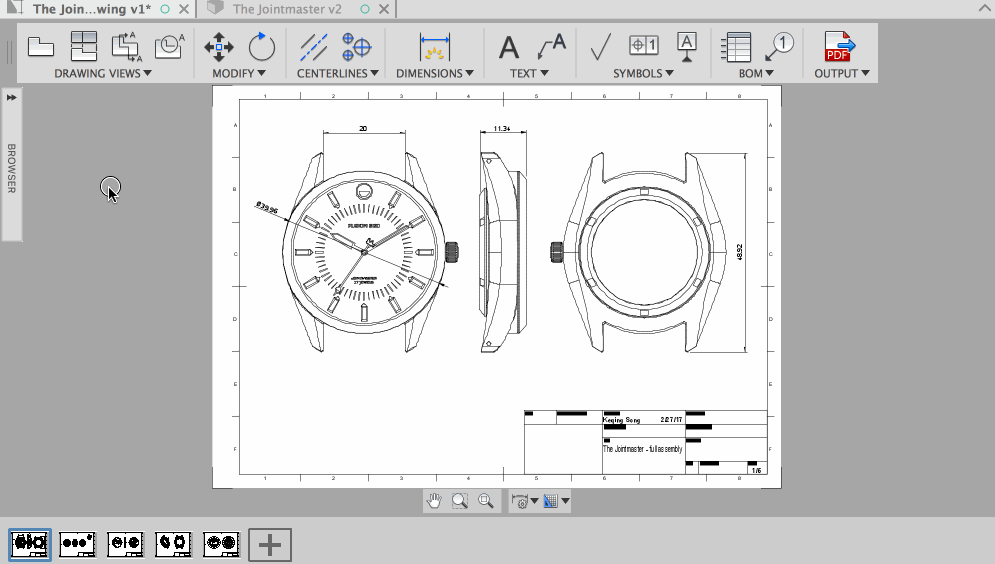
Aww yeah – multi-sheet functionality has finally landed! Now when you create a 2D drawing of your design, you can also create multiple sheets for that design, instead of creating multiple drawings like before. There are 2 ways to add new sheets – quick-n-easy, or with more options. Here’s how you can do both:
Quick-n-easy:
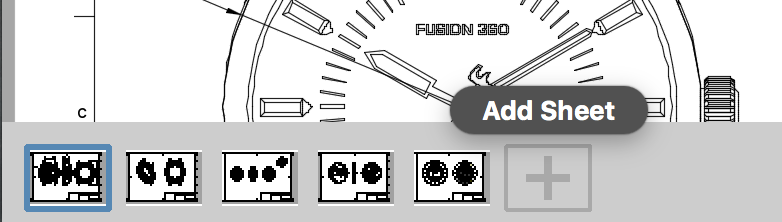
At the bottom of the screen you’ll see a new strip that contains the active sheet you’re on, additional sheets you have (if any), and a “+” button to add a new sheet. Clicking that will duplicate the previous sheet with the same size and template.
With more options:
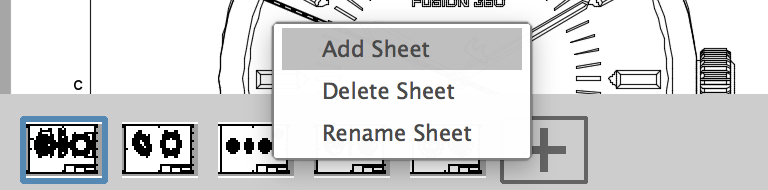
Another way you can add new sheets is by right-clicking on an existing sheet and selecting “add sheet”. This will give you more options in a dialog, allowing you to add a sheet from the existing drawing template or from another template that you’ve previously saved. If some of your sheets are sized differently, you can select the one you want your new sheet to duplicate.
Reorder sheets by dragging them to the left or right. Right-click on one and you can rename, delete, or add a new sheet. Oh wait, you didn’t mean to delete it? No worries, just undo that delete with CTRL/command + Z and you’re sheet is back.
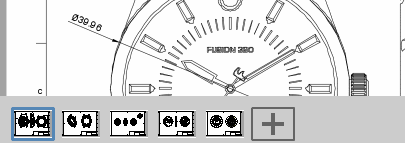
Sheets can be different sizes, and if you save your drawing as a template it will be saved as a multi-sheet template that respects the order and sheet sizes of your drawing.
If you output your drawing as PDF, your drawing will automatically open after it’s been saved as PDF. As a heads-up: this first implementation of multi-sheets will save each sheet as individual PDFs (yeah…I know). The next phase of this will combine all the sheets into one PDF (with each sheet being a page of the PDF) so that it’s more manageable. We are working towards delivering that functionality within the next couple of updates.
Ordinate dimensions now available
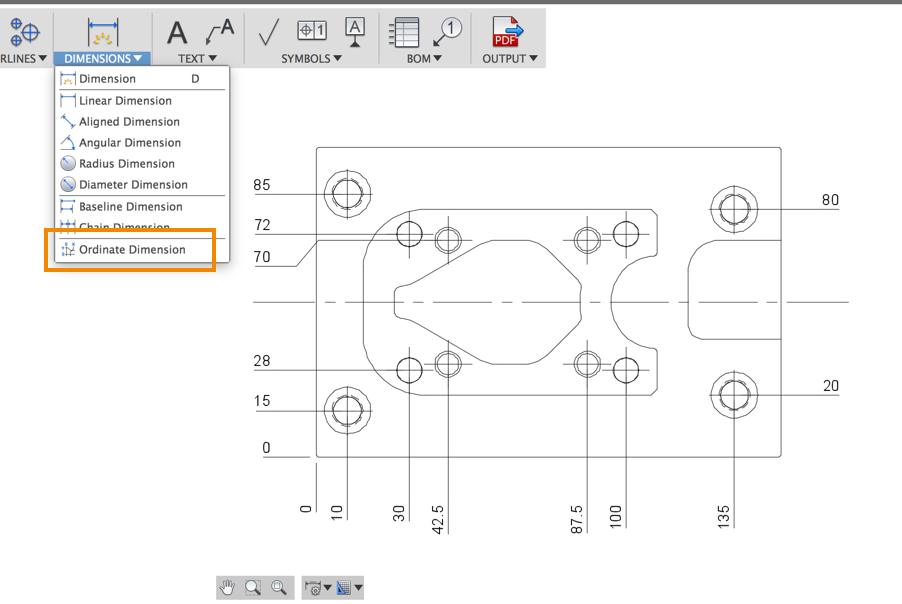
You can now create ordinate dimensions – it is located under the Dimensions drop-down menu. Ordinate dimensions allows you to set a specific area of your drawing as zero (as shown in the bottom left corner of this fixture), and dimension everything else based on that zero point. You can also chain your dimensions for easier dimensioning. Woohoo!
Create custom tables
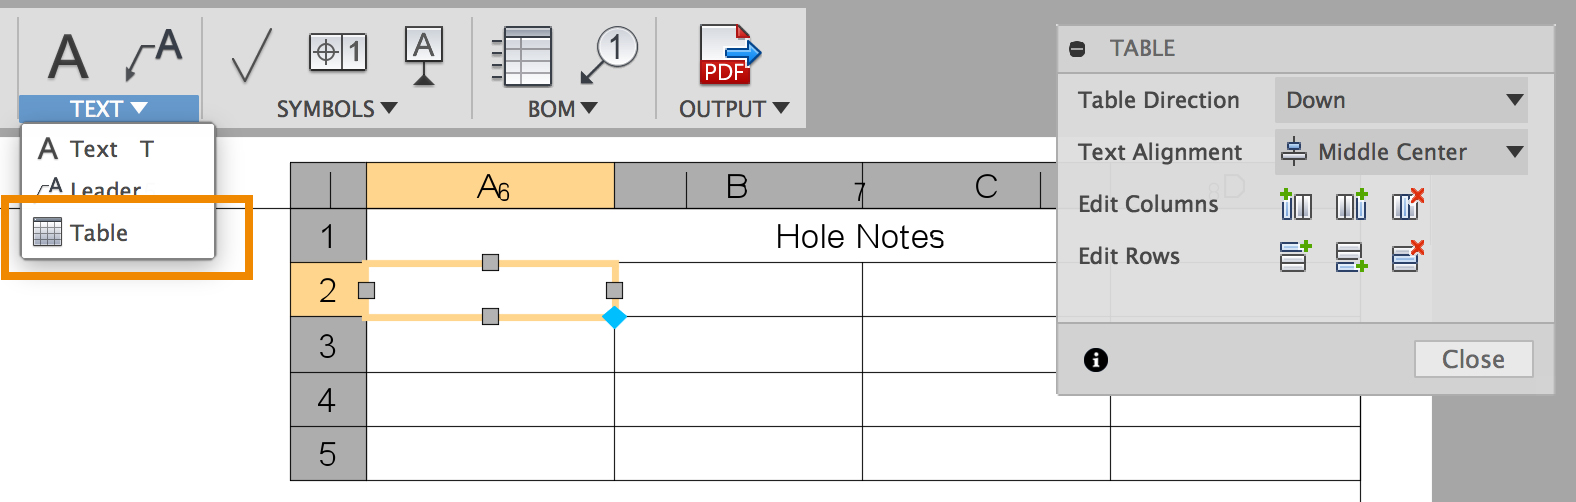
Good news! You can now also create custom tables in your drawing sheets! A Tables option now lives under the Text drop-down menu. When it’s active, hover over where the area you want the table to be and drop it on the sheet. Depending on the region you are hovering, it’ll automatically flip the title cell to follow typical drawing standards. If you prefer to keep the title cell to stay still, press SHIFT.

Once you’ve placed your table, you can edit it with common table editing options, just like editing an Excel sheet. Groovy.
Modeling
Timeline playback button updated
So remember how the play button in the timeline was non-intuitively placed in-between the step-forward and fast-forward buttons? Now it’s in the middle, standardizing on universal playback button layout that exists on every media player ever designed since the beginning of time.
Compute All progress bar on Mac OS
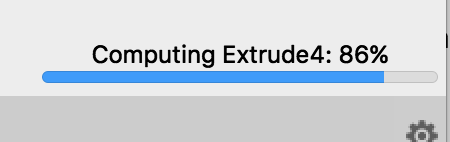
Previously when you performed a Compute All on your Mac, you had no indication that anything was happening until you saw yellow/red features appear in your timeline or the spinning beach ball of death. Now when you do it, a blue progress bar appears to indicate that Compute All is cranking away, with information on what it’s computing. That’s more like it.
Don’t worry – we didn’t forget about the ability to stop/abort a timeline playback or Compute All. It didn’t make this update, but should be ready for the next one.
Folder groups for bodies now available in browser
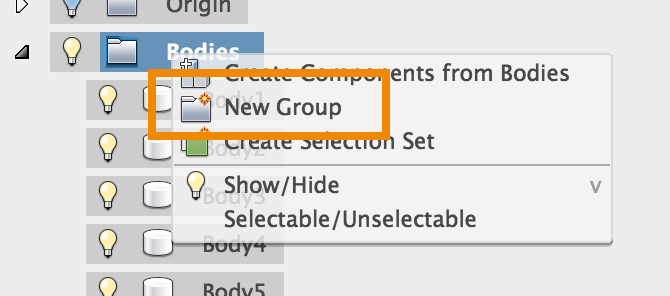
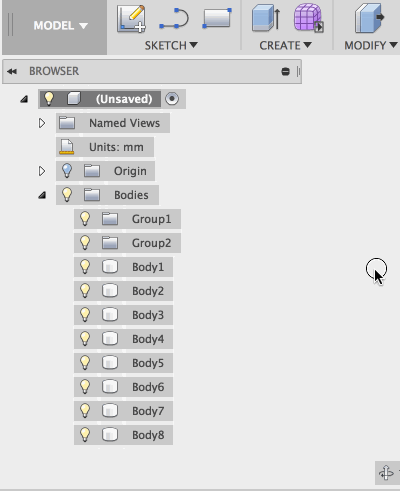 Yup – you read correctly. You can now create subfolders within the bodies folder and group your bodies into as many folders as you see fit. Select the bodies you want to group together and drag them into your newly created folders (and don’t forget to rename them).
Here are some good things to know:
1. When you create a new group folder, it’ll appear below all your bodies. We really intended it to appear at the top, so we’ll be fixing this behavior in the next update.
2. If you have bodies in numerical order and batch move them into a group folder, the order of the bodies may become scrambled after the move. This is also getting fixed in the next update.
Naturally, the next step is to make folders for components available. This is on the roadmap as the next phase of this project, but we don’t have a good sense of when that’ll be available yet. Obviously, we’ll keep you posted as we get a better sense of when our teams can get to it.
Here are some notable modeling fixes:
- Moving components with free move issue fixed
Previously when you tried to move a component so that it’s aligned with another component’s face with the free move arrows, selecting the target component selected the entire thing, as opposed to selecting that face you want to align with. Now only the target face will be selected and the component will move correctly to align with the target face.
- Moving sketch objects with Move tool issue fixed
Josh.nelson pointed out this weird behavior where using the Move tool to move sketch objects became a cumulative action, where if he moved one sketch point and went to move another, it was adding the second one to the first one. Since Fusion 360 uses the SHIFT key as the modifying key to add selection, we’ve fixed this so that moving sketch objects now obey the same rule as everything else.
- Align tool now lets you align to Joint Origins
Yeah, apparently you couldn’t align two components to their joint origins before. Now you can since we made joint origins snap-able. This means you can throw some joint origins to your components, offset them to a custom location, and align other components to that joint origin! Hooray!
- Missing decals folder is back in the browser
When you have decals on your design, the browser organized them in a dedicated decals folder. There was an issue where the folder disappeared, even though your decals were clearly visible on your designs. We got a search party together and was able to dig it out of the rubble.
- Incorrect thread mirroring issue fixed
If you tried to mirror a cylinder with threads, then you were probably getting incorrect mirroring with the mirrored threads being completely off and not actually mirrored at all. Defeats the whole purpose of mirroring doesn’t it? Apparently someone thought it’d be funny to sneak in a carnival fun house mirror in Fusion 360. We didn’t think it was funny.
- Hole parameter issue fixed
Apparently when you made a hole and gave it a different diameter, it updated the hole visually but the change wasn’t reflected in the parameters table. Womp womp. Now this is fixed.
Sketching
Insert SVG now has Flip buttons
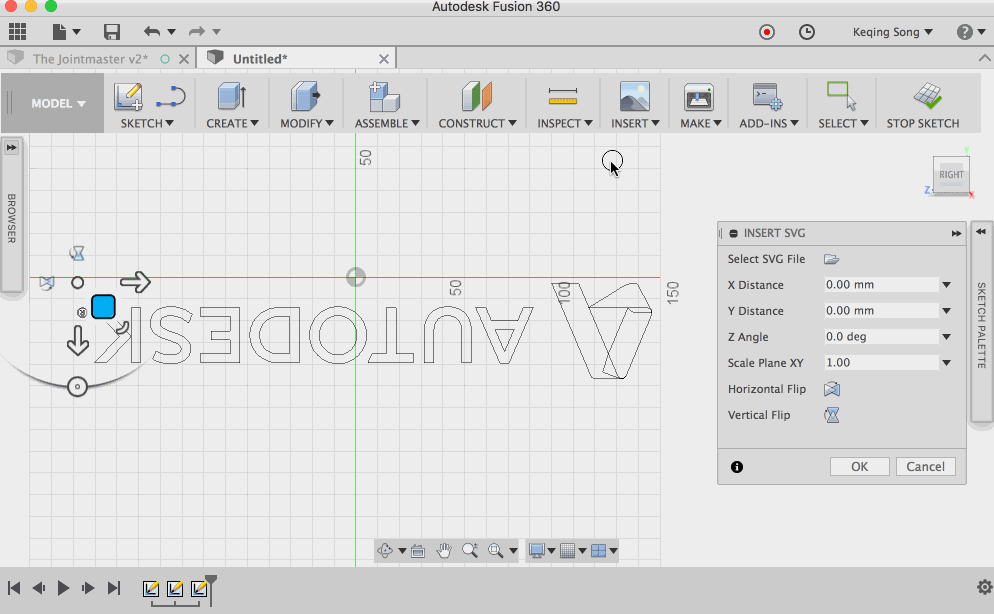
Sometimes when you inserted a SVG, it came in upside down or horizontally inverted. Side effects included excessive cursing, broken keyboards, and rage quitting. Now we’re introducing the cure to these side effects with Horizontal and Vertical Flip buttons, so you can orient your SVG and stay healthy!
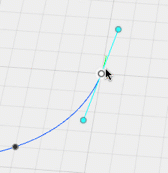
Right click on spline point to activate curvature handle
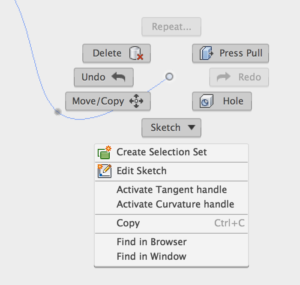
We really buried this one deep, making it practically undiscoverable. Now when you right click on a spline point, you can activate the curvature handle and tweak the curvature of that spline based on the point.
Dragging spline handles no longer creates constraints
 Previously when you dragged a spline handle into a horizontal/vertical orientation, Fusion 360 automatically created a constraint, which blocked further direction changes. This was very annoying if you didn’t mean to trigger it. Fusion 360 will no longer automatically create constraints unless you explicitly apply them yourself.
Window select will only pick up sketch objects in an active sketch
Now if you’re window select an active sketch with a bunch of 3D geometry also visible, it’ll no longer pick up unwanted 3D geometry and will only pick up sketch objects in that active sketch.
Sketch-related fixes
Scott Moyse pointed out an issue where the tangent arcs on his sketch would drastically change shapes even though the changes he was making were perfectly reasonable. It was a nasty bug. This issue, along with a bunch of other arc/tangency issues was affected by how our sketch solver tries to handle changes to a sketch, and we think that we’ve finally made a dent on ironing out the wrinkles.
Rendering & Graphics
New Display Detail Control option for bodies and components
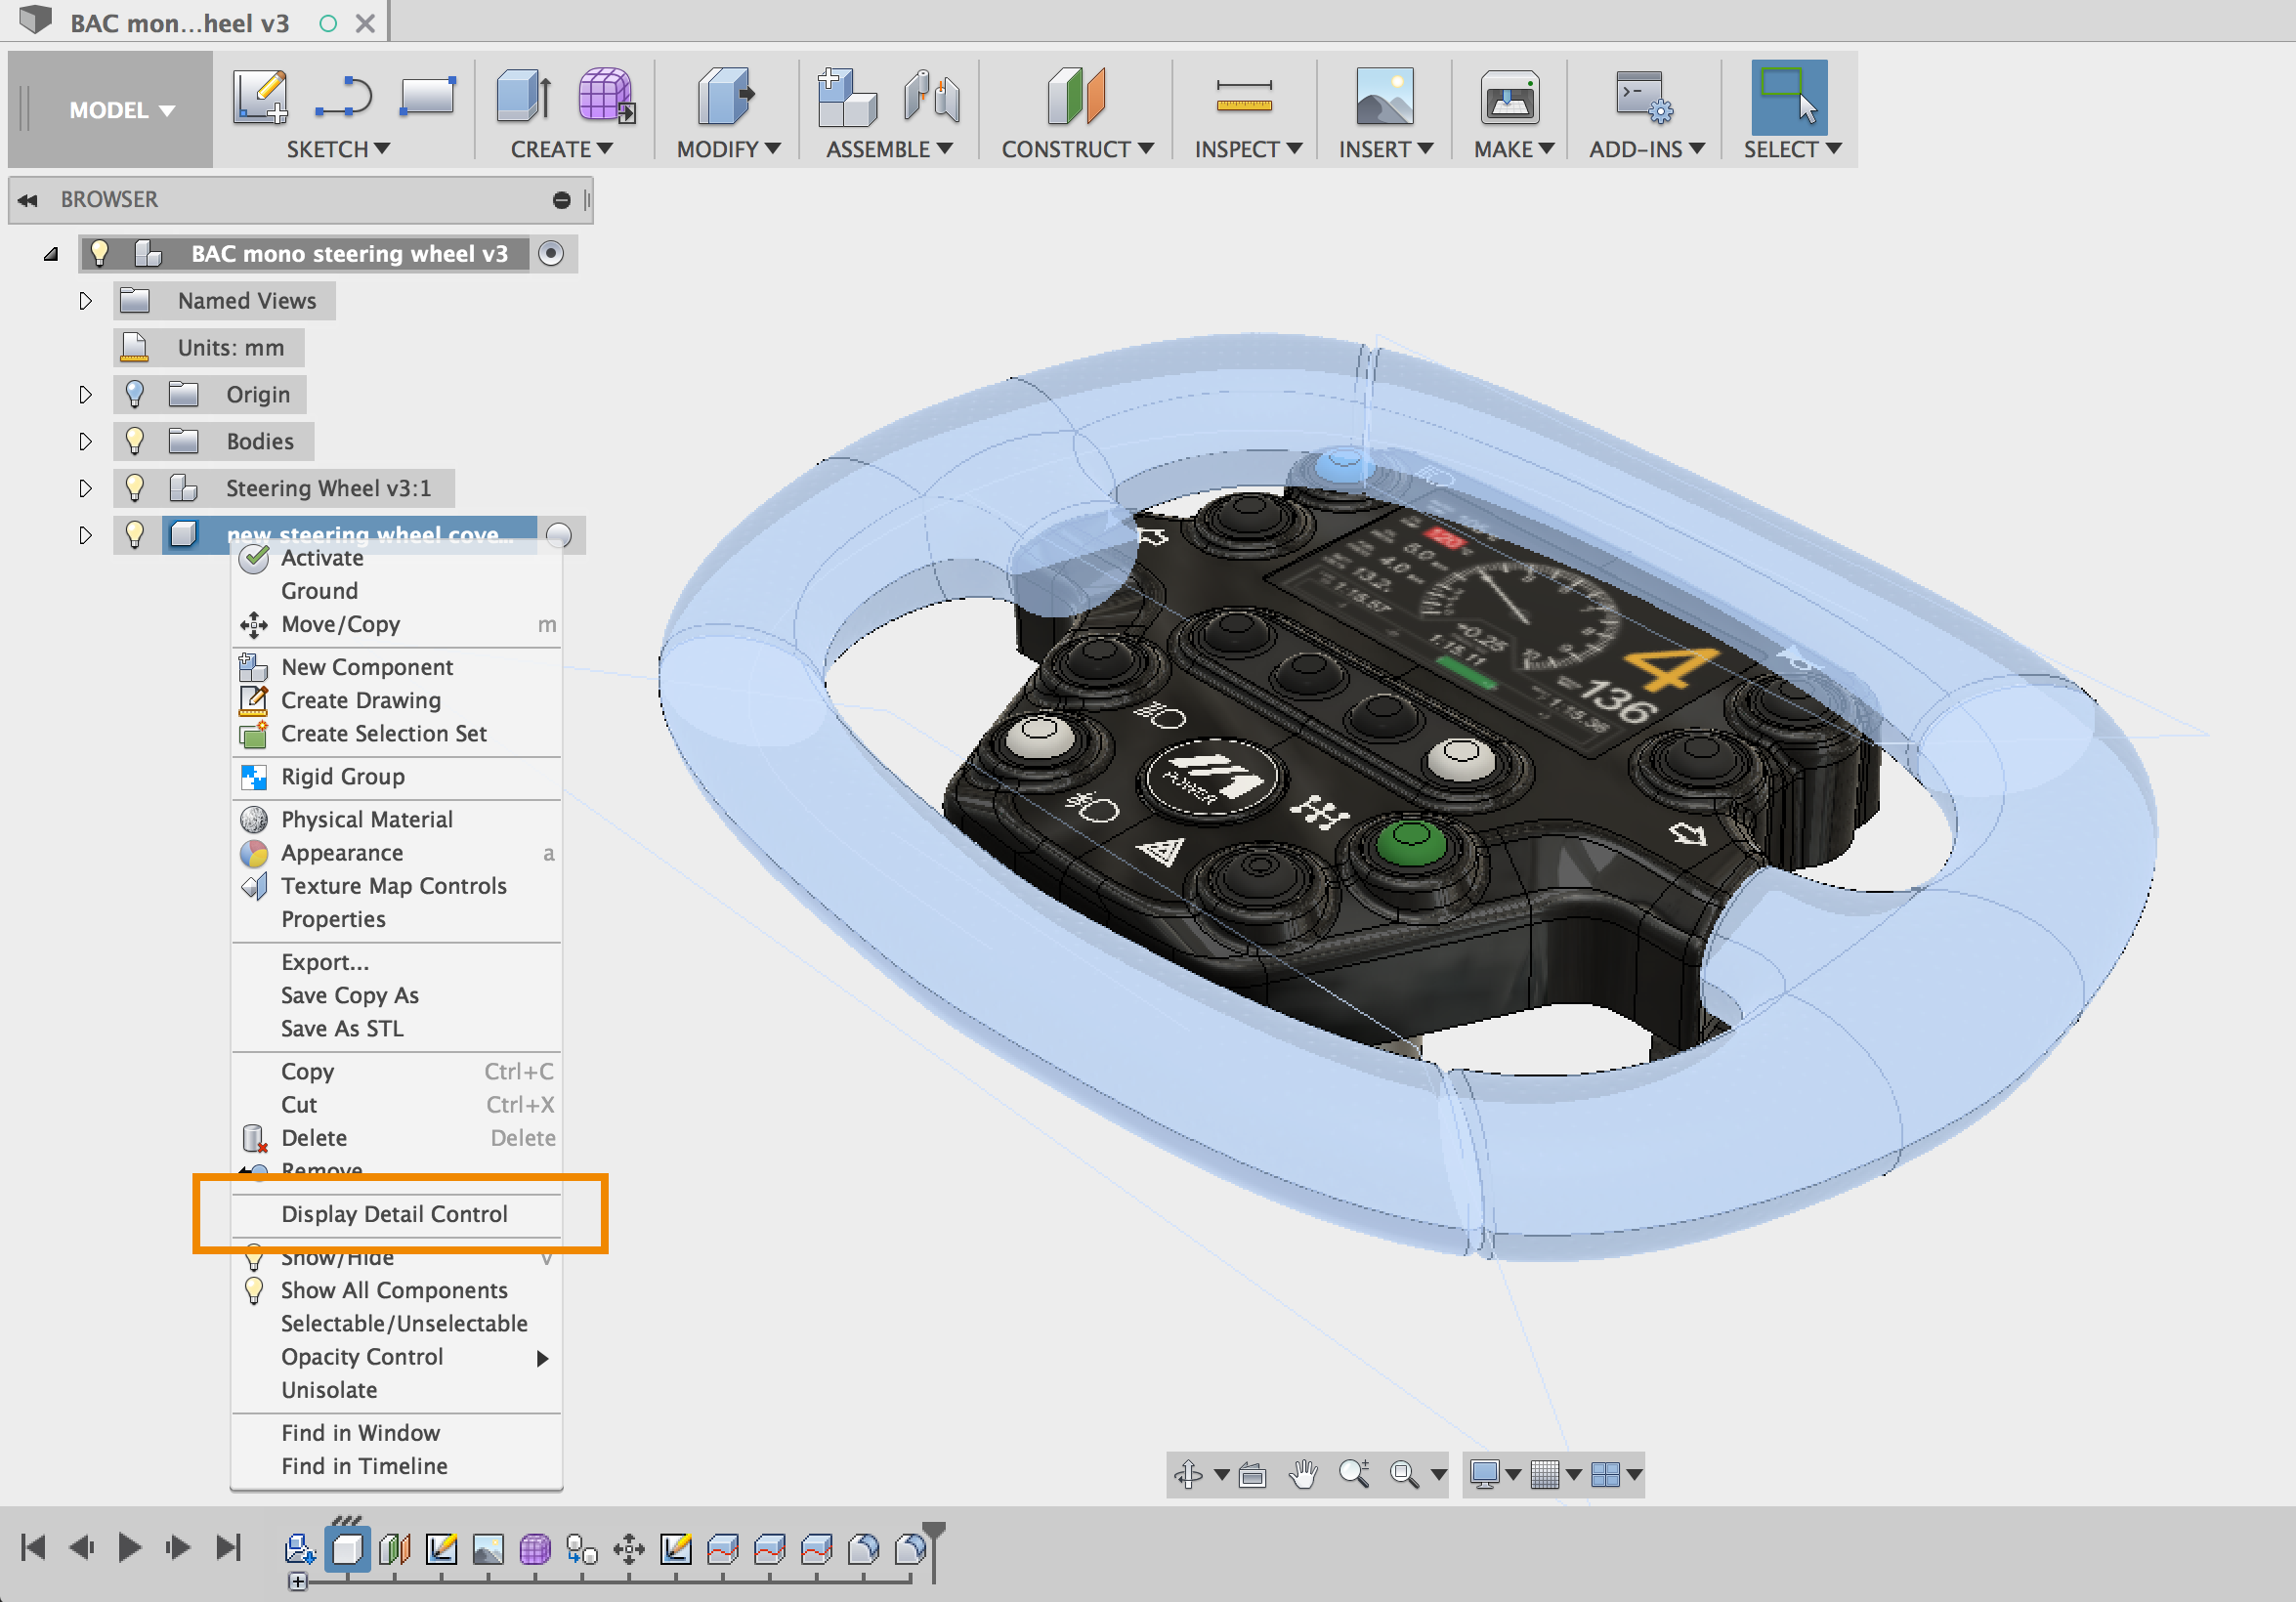
We’ve gotten some feedback around how Fusion 360 handled displays model complexity/detail vs. how close or far you were zoomed in. Sometimes the detail got all bunched up and became very hard to see, resulting in some pretty gnarly tessellation.
Now when you right-click on a body or component, you’ll see a new option called Display Detail Control. Select it and you’ll be able to change the detail level from adaptive to 3 levels of fixed (high, medium, low).

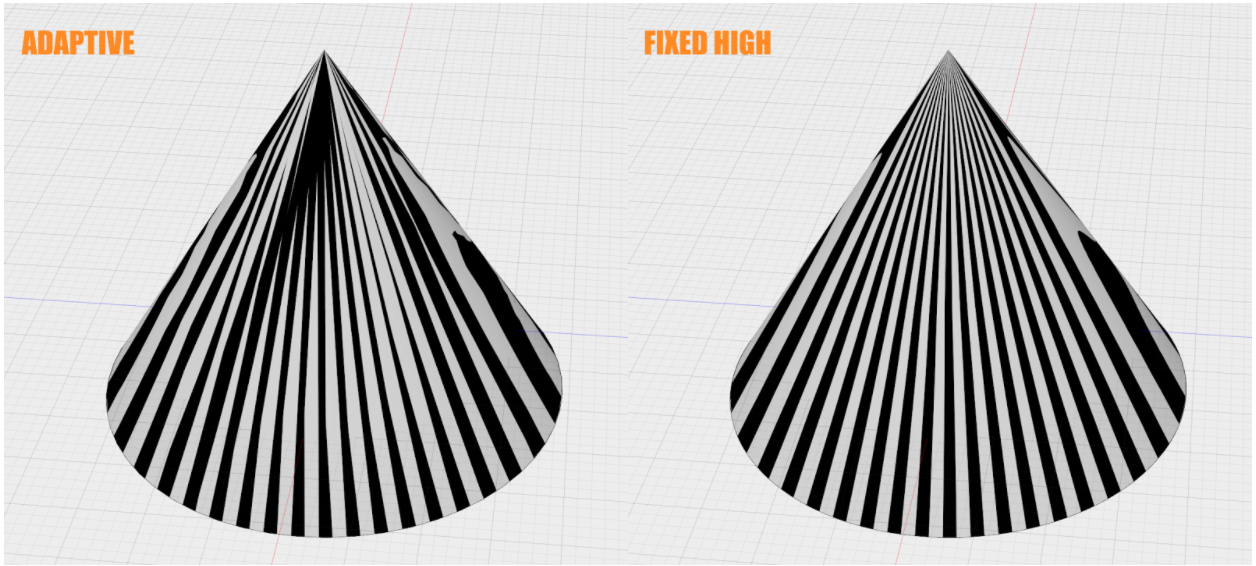
Here is a visual comparison between adaptive and fixed (high) using the Zebra analysis. Notice how adaptive would start to blend the zebra stripes towards the tip of the cone, whereas fixed (high) does a better job at keeping the individual stripes separate. It’s good to note that this works on a per-body/component basis, so you can control how much detail you want on different parts of your design.
Changing it to fixed should also work with local and cloud renderings and see some nice anti-aliasing improvements as well.
UV diagnostic texture display mode

Previously when you wanted to tweak the texture on your appearance materials, the only way you could see what direction your texture map was facing was by solely relying on the appearance itself. At least with wood materials you were able to judge the direction based on the wood grain, but with other materials, it was really kind of a guessing game.
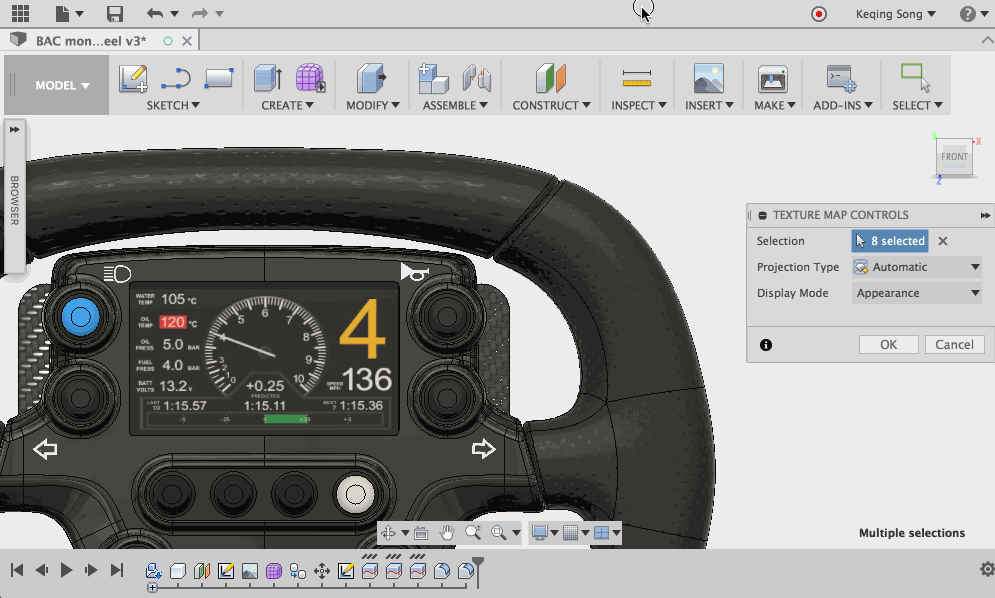
Now in the Texture Map Controls, changing the Display Mode from Appearance to UV Diagnostic Texture will reveal a grid and arrows, showing directionally how the texture is applied to the design. This should help you better align your material textures specifically at sharp edges of a design, so that it looks as realistic as possible.
Here are some graphics related fixes:
- Adam.molnar.1 reported this issue where the attached canvas he was using design from suddenly disappeared when moving around. Whoops, looks like it was a graphics-related issue. Now it’s fixed.
- We’ve run into cases where the task manager was showing outrageous amount of memory being allocated to a large design and continued to allocate memory as you zoomed in and navigated around the model. It got to a point where Fusion 360 was practically un-usable.
- We made some stability fixes so that there is a lesser chance of Fusion 360 crashing due to its graphics engine acting up.
- If you had a favorite material library created in an older version of Fusion 360, there were instances where the favorite library did not automatically carry over after an update. We made sure it does from now on.
- We fixed a navigation issue where orbit lagged when you tried to re-position your design during a local rendering session.
- We also fixed a bunch of weird tessellation and flickering issues occurring on sculpt bodies.
- When you had “use high resolution graphics” turned off and had transparency option set to “Better display”, decals with transparent backgrounds (typically in PNGs) became opaque all of a sudden. This is fixed too.
HSM CAM
Water-jet, plasma, laser now called 2D Profile
We’ve renamed this because all these workflows are essentially 2D profile cutting workflows, and it’s also a mouthful to say water-jet, plasma, laser over and over. We take the quality of our tool-paths seriously, and did not feel comfortable taking 2D Profile out of preview, but we are shooting for it to graduate preview and become full production by the next update.
New 2D Profile tool types

With 2D profile workflows becoming more and more stable and baked into the CAM workspace, you’ll now see a new cutting icon in the tool library, revealing 3 new tool types: water-jet, laser cutter, and plasma cutter. If you have existing tool-paths will need to select the correct tool type to regenerate the operation as the previous implementation didn’t have any tool selection and it is now required.
Chain selecting faces for 2D profiles updated
Al made a nice video of how you can better chain-select faces for a 2D profile operation such as waterjet cutting. Check it out, and let us know what you think!
We also updated a bunch of post processors
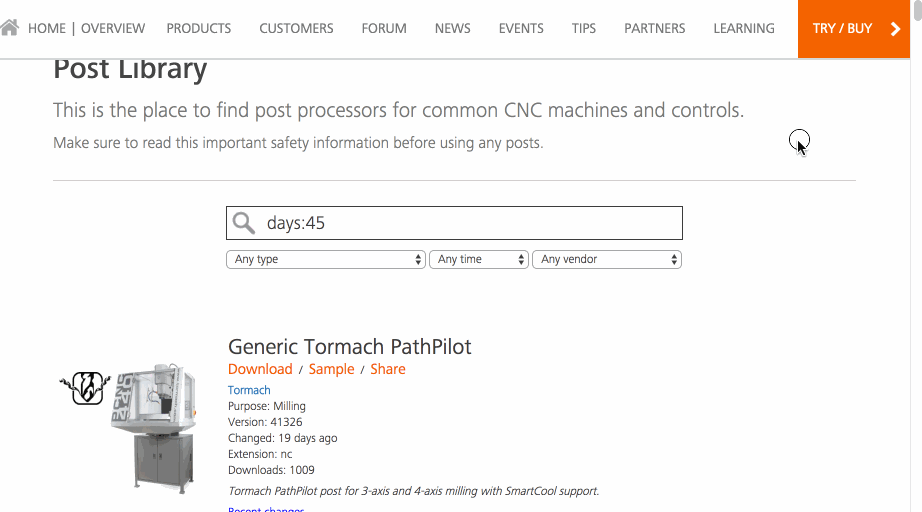
If you haven’t been to this site in awhile, it’ll be good to go back and check out some of the updated posts. Some have been updated in the past 14 days, and some in the past 4 days. Check it out here: https://cam.autodesk.com/posts/?search=days:45
Here are other noteworthy tool-path updates:
- Pre-drill entry method now uses plunge feedrate instead of cutting feedrate.
- Retracting in a internal profile operation no longer returns to home position for turning, which previously could cause crashes.
- We updated movements for no-drag turning.
- We added missing Lead-in/Lead-out feed-rates to Spot drill.
- Thread Mill tool type is now available in the drilling operation.
- We fixed incorrect ramping motion in 2D pocket with rest machining enabled.
- The getBoundingBox() now returns the correct result in post processors.
- Contours selected that were made with the “Text” tool now generate in the correct position if a component has been moved.
- We fixed the wrong depth issue when using 2D Chamfer to select contours at different Z levels.
- Previously when you tried to quick-view an operation with Tool Preview, it was opaque and could prevent viewing of the tool-path. Now it is properly transparent.
- Turning Chamfer operation no longer retracts the tool to center when cutting an ID chamfer.
- We added a checkbox to milling tools to declare them as “live” or “fixed”, which is important for lathes that support live tooling.
- Probing an outer XY corner from the stock corners now works great!
- Posting a program no longer ignores the specified output folder (Windows only).
- Geometry created using the “Text” tool can now be wrapped properly.
- We added Renishaw’s vendor library for probe tools.
- When creating a new milling tool, we modified the new default folder so that it looks more realistic.
Simulation
Improved Simulation Study selector
We’ve gotten some feedback around how wonky our old study selector can look on different sized monitors with different resolutions. We went back to the drawing board and whipped up a new and improved study selector:
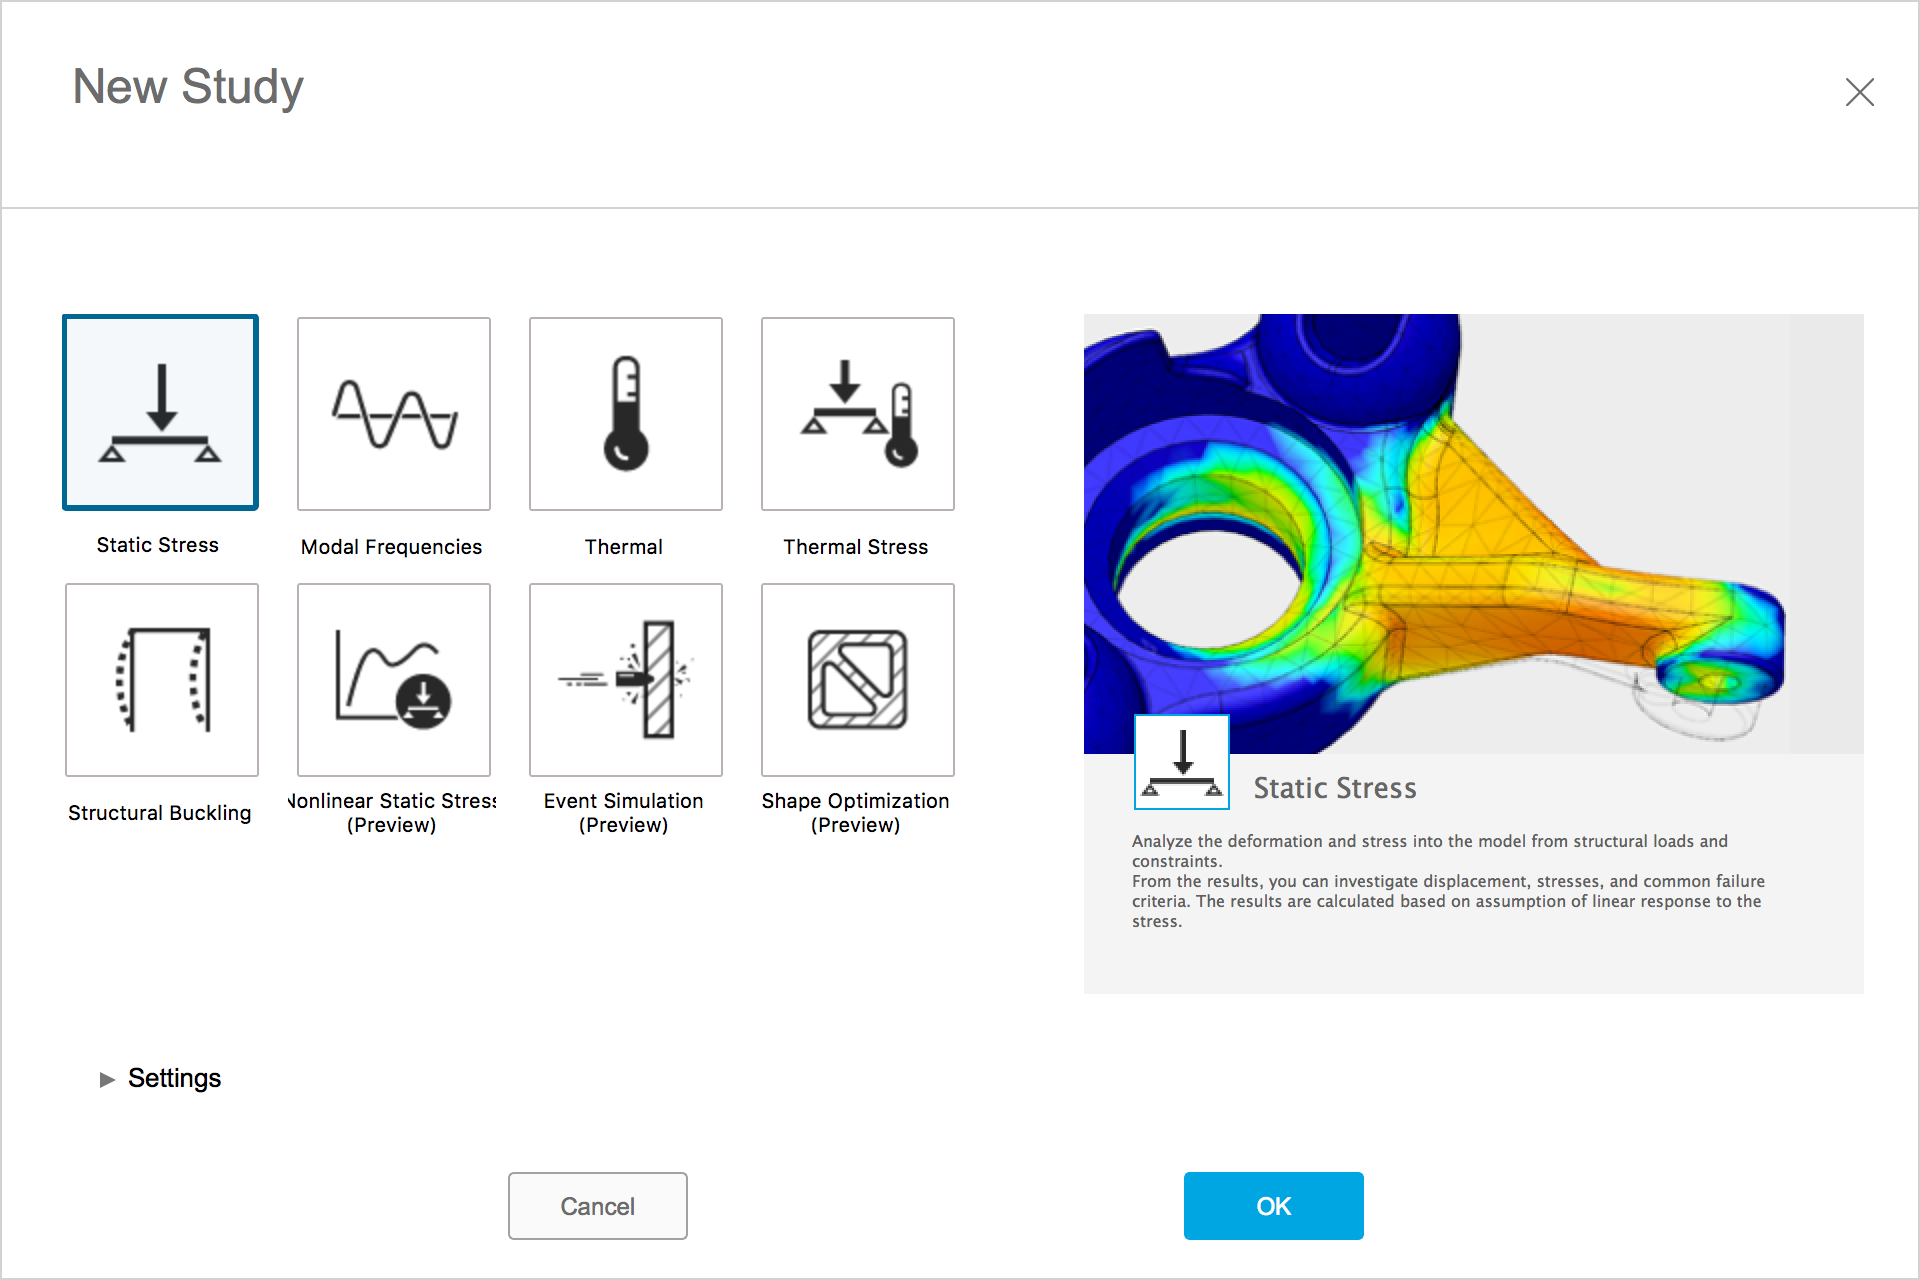
Now you won’t see any weird scrolling issues where the study type got cut off by screen resolution discrepancies. We have more usability improvements on the way for this selector in the near future, for example, more helpful information around what the study types are and help you decide which tests to use based on what you want to find out about your design.
Better way to see cloud credit usage
Previously when you did a cloud solve, trying to figure how much cloud credits you actually had and how much you’re actually using per solve was like trying to figure out how much gas you have in your car – you’re never really sure how much you’re using and how much there really is when the empty light comes on.
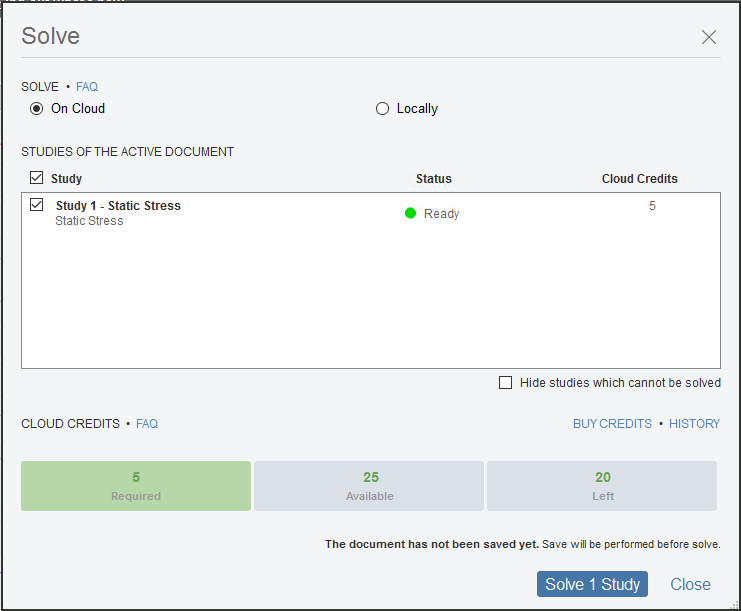
Now when you do a cloud solve, you’ll see exactly how many cloud credits are required (about to be used), how many are available (total), and how many are left if you choose to solve.
Factor of Safety now set as default result type
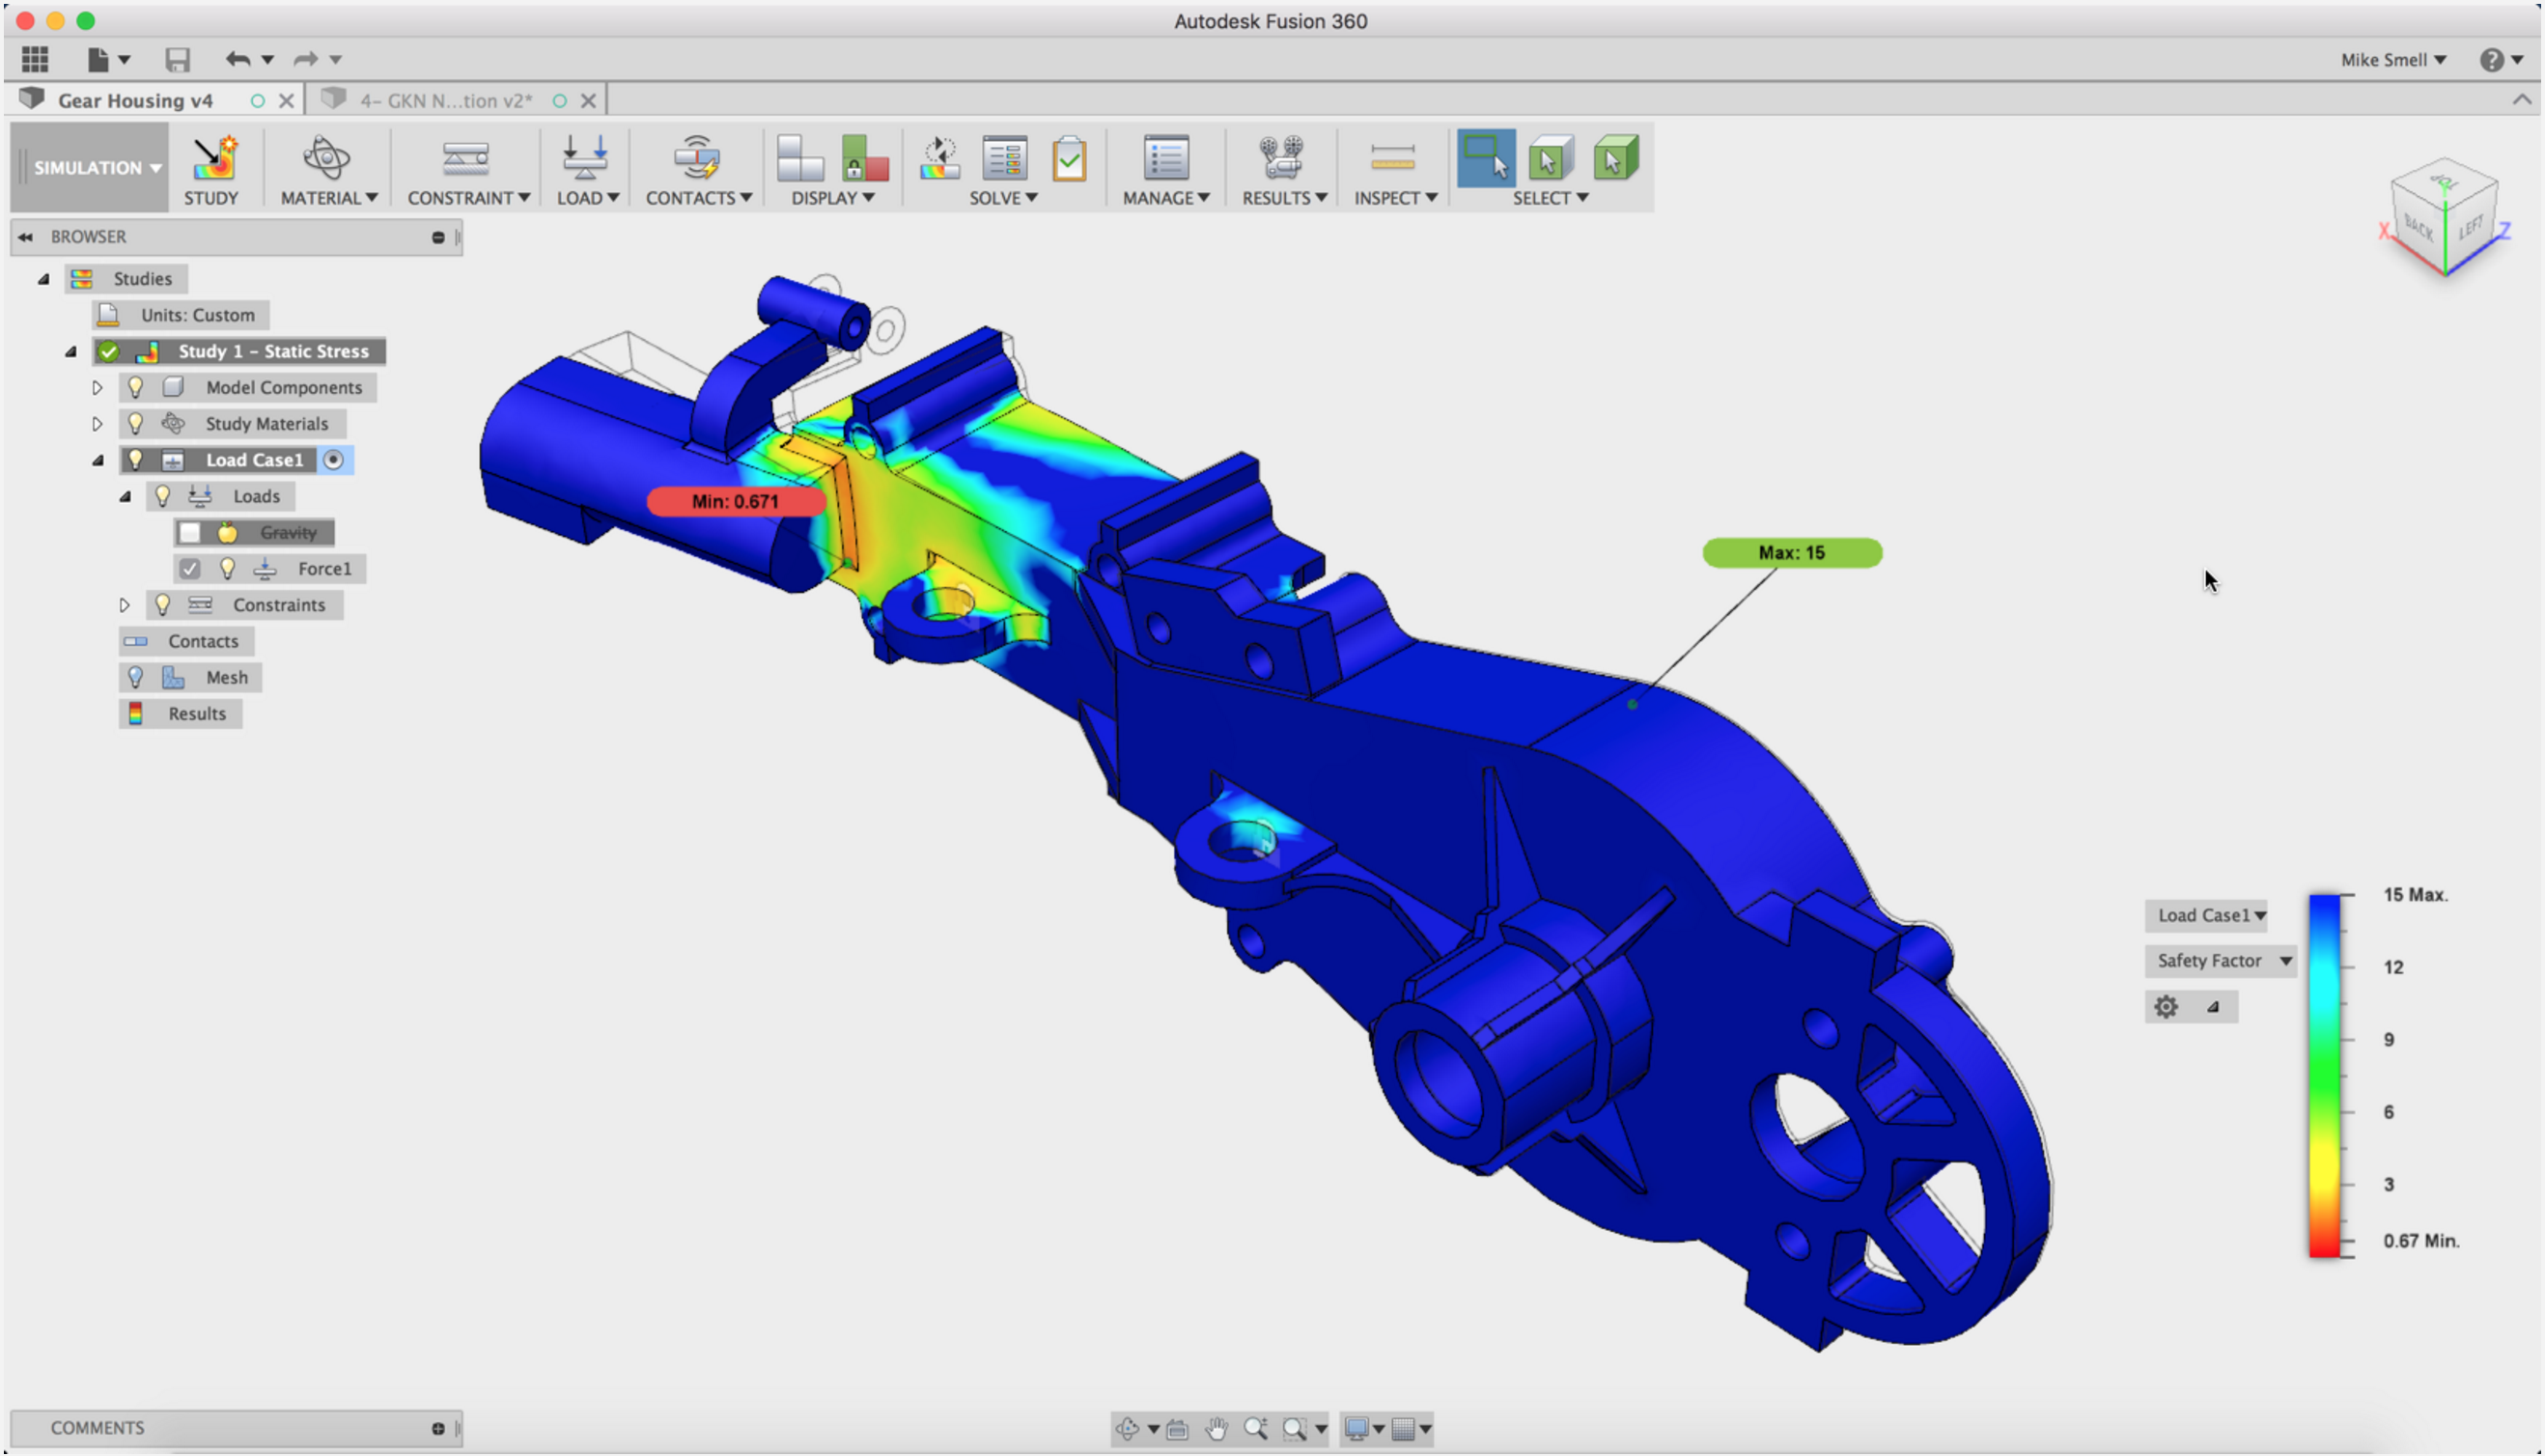
We’ve been hearing that the factor of safety (FOS) of your design is pretty darn important, so based on your feedback, we’ve made Factor of Safety as the result type to show up for by default when you’ve completed a solve. We’ve also added color coded minimum and maximum FOS indicators around the areas affected.
Nastran error messages have more helpful information
No. you don’t need to spend 5 years in Nastranesia to learn Nastran-ese so you can actually figure out what the Nastran error messages you’ve been getting are saying. It would just spit out an error code. We’ve made it more useful by adding a cause/solution section to the message so you can at least diagnose the issue. We’ll continue to improve our Nastranese so it become more humanese.
Shape optimization enhancements
Shape optimization results will now show up within Fusion Team on the browser so your team can stay in the loop on a variety of devices. They will also appear as a study results to include when you want to create a result report. The results will include:
- before and after optimization comparison
- Mass before and after, including the mass ratio
- Images of the model before and after
- Opposite camera view (if selected) images of model before and after
Linear Stress results issue fixed
We found issues around using multiple load cases in Linear Stress yielded the wrong results. We dug into the code and got the math straightened out.
API
Here are some other notable API updates:
- We’ve added a new method to create a sketch called addWithoutEdges. Interactively in Fusion 360, and with the current Sketches.add method, when you create a new sketch on a face it automatically projects all of the edges of the face into the sketch. When using the API, this is often unwanted because it’s difficult to make sense of this existing geometry and how it participates in the profile calculations. Typically, you will be drawing all of the geometry you want, and you won’t want extra geometry. The new addWithoutEdges method creates a new sketch on a face without projecting the edges, so the new sketch will completely empty.
- Viewport and viewportPosition properties have been added to the MouseEventArgs object so you can get viewport coordinates for mouse events.
- The ability to load and unload custom material libraries is now supported.
- A couple of problems have been reported relating to getting the correct appearance from a body. All known issues related to this have been fixed.
As always, you can learn more about what’s new with API on our API learning page.
More awesomesauce to come!
We’ve got some exciting things coming in the next couple of updates, including better offline data management, more 2D drawings goodness like Objects to cut (ability to select which components / bodies you want a section view to participate in a cut or not), View Chain Enhancements (Section of a section view, detail of a section view, projection of a section view), export PDF as 1 file, and text enhancements (bullets, lists and text justification).
That’s it for this what’s new – let us know what you think and we’ll keep you posted on news around the next update!
Cheers,
Keqing and the Fusion 360 team