
V.2.0.12670 (See the latest fixes here)
March. The month home to March Madness, International Women’s Day, St. Patrick’s Day, and in this case, one of our biggest Fusion 360 product updates of the year. Think of it as our spring-cleaning update. There are lots of updates to cover, spanning from Cloud Credits becoming Flex Tokens, to new Drawings functionality, to a change in the Manufacture Workspace & Machining Extension, as well as a whole bunch of features graduating out of preview and becoming production-ready tools at your disposal.
This update is also by far the most comprehensive release yet for those of you using Fusion 360 Electronics, with more on the way. From a completely new Library & Component Search / Placement Experience to seamless Migration of EAGLE content, huge improvements in Design Reuse with Design Blocks and Inserting the Contents of a Schematic into another file, new 3D Package Generators, and a much faster overall 3D PCB experience — we have been hard at work, and this is only the beginning of an unprecedented level of stability, performance & productivity-enhancing features to come. With that said, let’s go over the highlights.
Usability
NOTICE: We’re replacing Cloud Credits to Flex tokens
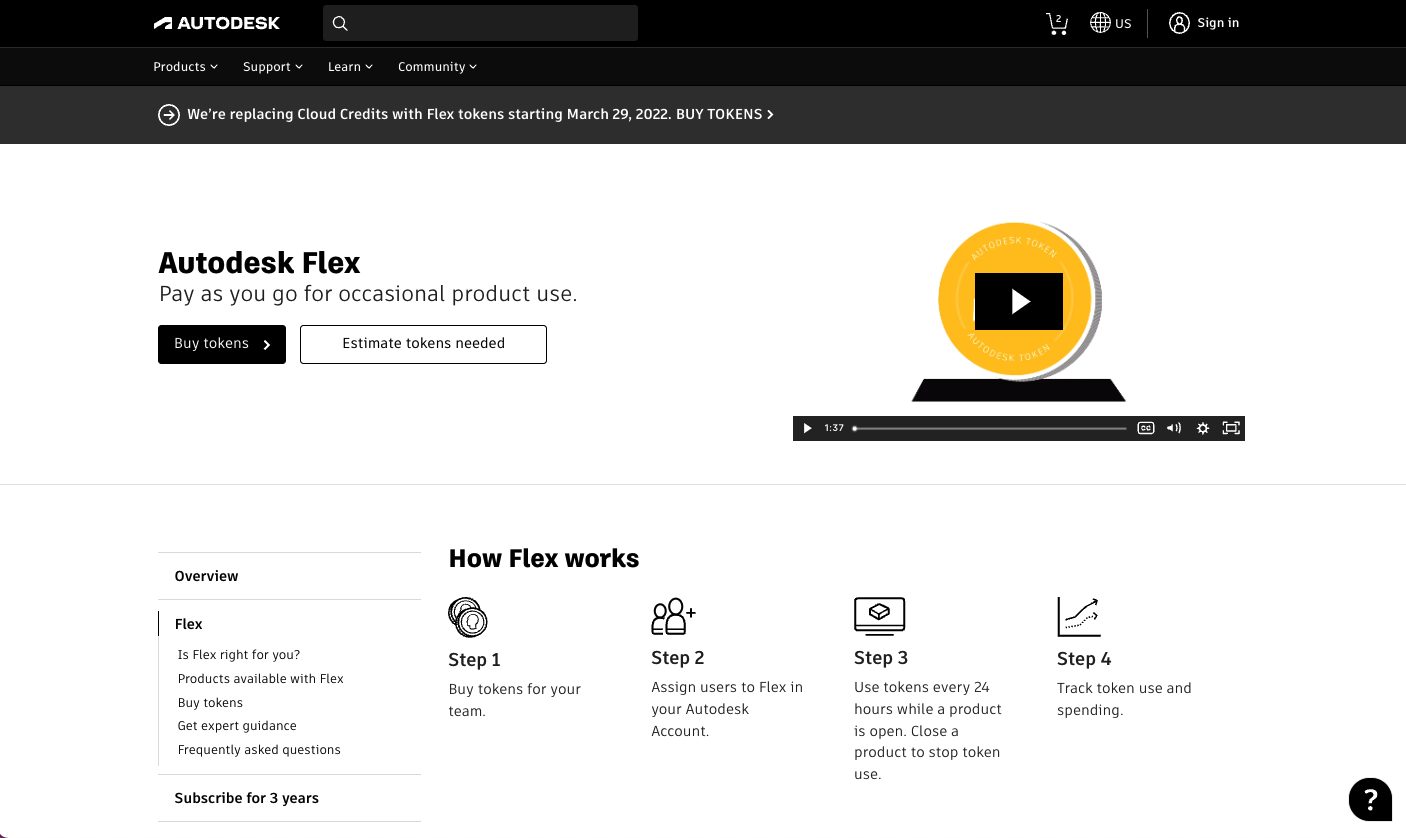
In this product update, we are in the process of replacing Cloud Credits to Autodesk Flex tokens. Don’t worry, if you currently have Cloud Credits associated with your account or have recently purchased Cloud Credits, you will still be able to use them on tasks like Generative Design solves, Simulation solves, and cloud rendering jobs. The only difference now is that you can no longer purchase additional Cloud Credits. Instead, you can buy Flex tokens moving forward and use both types of digital currency during this transitional timeframe.
Autodesk Flex is a new pay-as-you-go subscription service like Cloud Credits, but it has one major advantage: flexibility. Flex tokens are being adopted by many of our other Autodesk products, including Inventor, AutoCAD, Revit, 3ds Max, Maya, and many more. Not only are you able to spend Flex tokens on specific in-product functionality, but you’re also now able to spend it on the products themselves, and at a rate that makes for you and your team.
Learn more about Autodesk Flex
Learn more about what will happen to Cloud Credits
Learn more about tokens in Fusion 360
Repair issues without Uninstalling Fusion 360
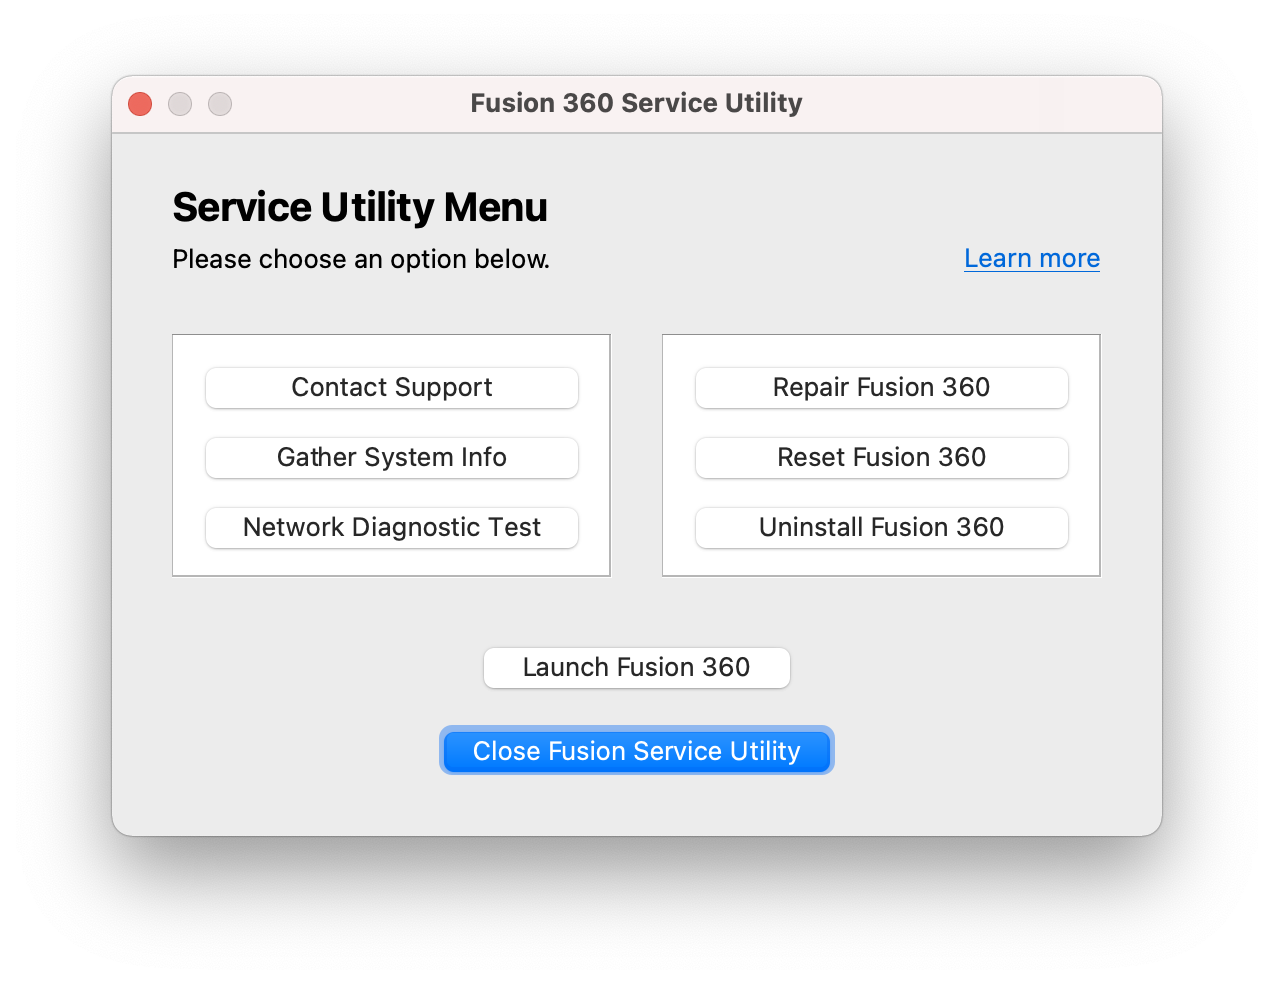
Fusion 360 now comes with a it’s own brand-new Service Utility. A common (yet many times unnecessary and troublesome) way of fixing an issue in Fusion 360 we see many of you follow is to un-install Fusion 360, run the Clean Uninstaller, and then re-install to see if continue working. While this method has worked in the past, it was counter-productive and time-consuming. The fact that you had to download a separate clean uninstaller was also clunky. With this Service Utility, you’ll be able to repair reset, or uninstall (if you really have to) Fusion 360, as well as gather system info, perform a network diagnostics test, or contact support. There are 2 ways the Service Utility can be invoked:
- Triggered automatically when 2 consecutive launch failures are detected.
- Triggered manually by holding CTRL + A (Windows) or Command + A (macOS) during the first 3 seconds launch of Fusion 360.
Learn more about what each option does in our dedicated support article.
Design
Design Advice helps you make better design decisions
Available in the Product Design Extension

Previously available to try as a preview feature to the Product Design Extension, Design Advice graduated out of preview and is now available for all Product Design Extension subscribers. Located under the Inspect Panel of the Plastic tab, Design Advice highlights areas of concern based on the material you select, and gives recommendations based on manufacturing best practices. This level of intelligence enables you to design better for manufacturing, and helps you take the guessing game out of your designs.
Learn more about Design Advice.
Generative Design
Select and Export multiple outcomes simultaneously
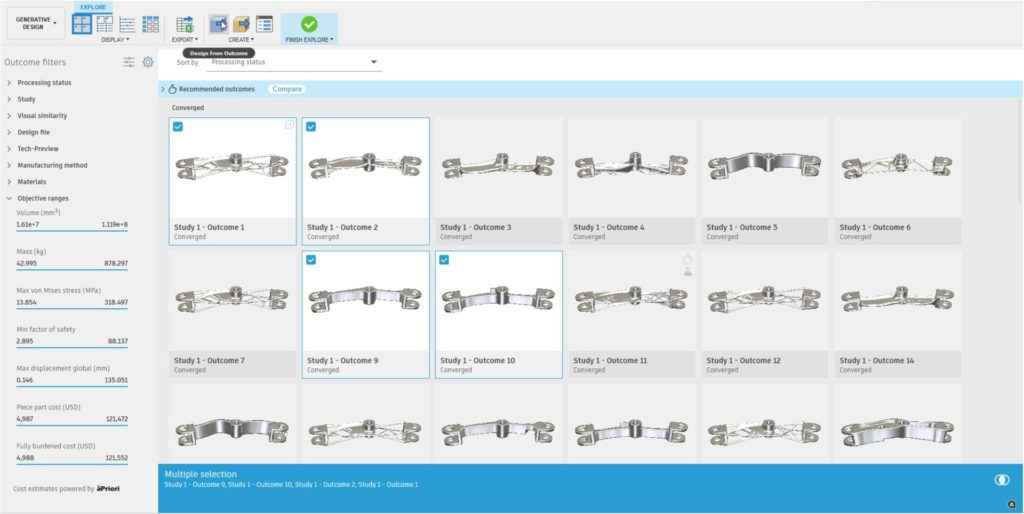
Now in the Generative Design > Explore tab, you’ll be able to select up to 4 study outcomes at once and export them simultaneously. This improvement removes the hassle of exporting your outcomes one at a time. Fusion 360 will notify you throughout the export progress, so you know exactly what it’s doing and when the export is complete.
Learn more about “Create designs and mesh designs from outcomes”
Faster Results in Generative Design Experimental Solver and Feature Preview
We have improved the technology stack that is powering our Experimental Solvers and Features preview as we push towards commercialization. While we are not ready to commercialize just yet, we wanted to pass along some of the progress we have been making. Our recent data shows that outcomes generated with our preview solvers are completing up to 2x faster than our production solver in many cases. If you haven’t checked out this preview yet, now is the time. You can turn on the Experimental Solvers and Features preview in your Fusion 360 Preferences under the Preview Features heading.
Learn more about “Experimental Generative Solvers and Features”
Electronics
Place Component Panel
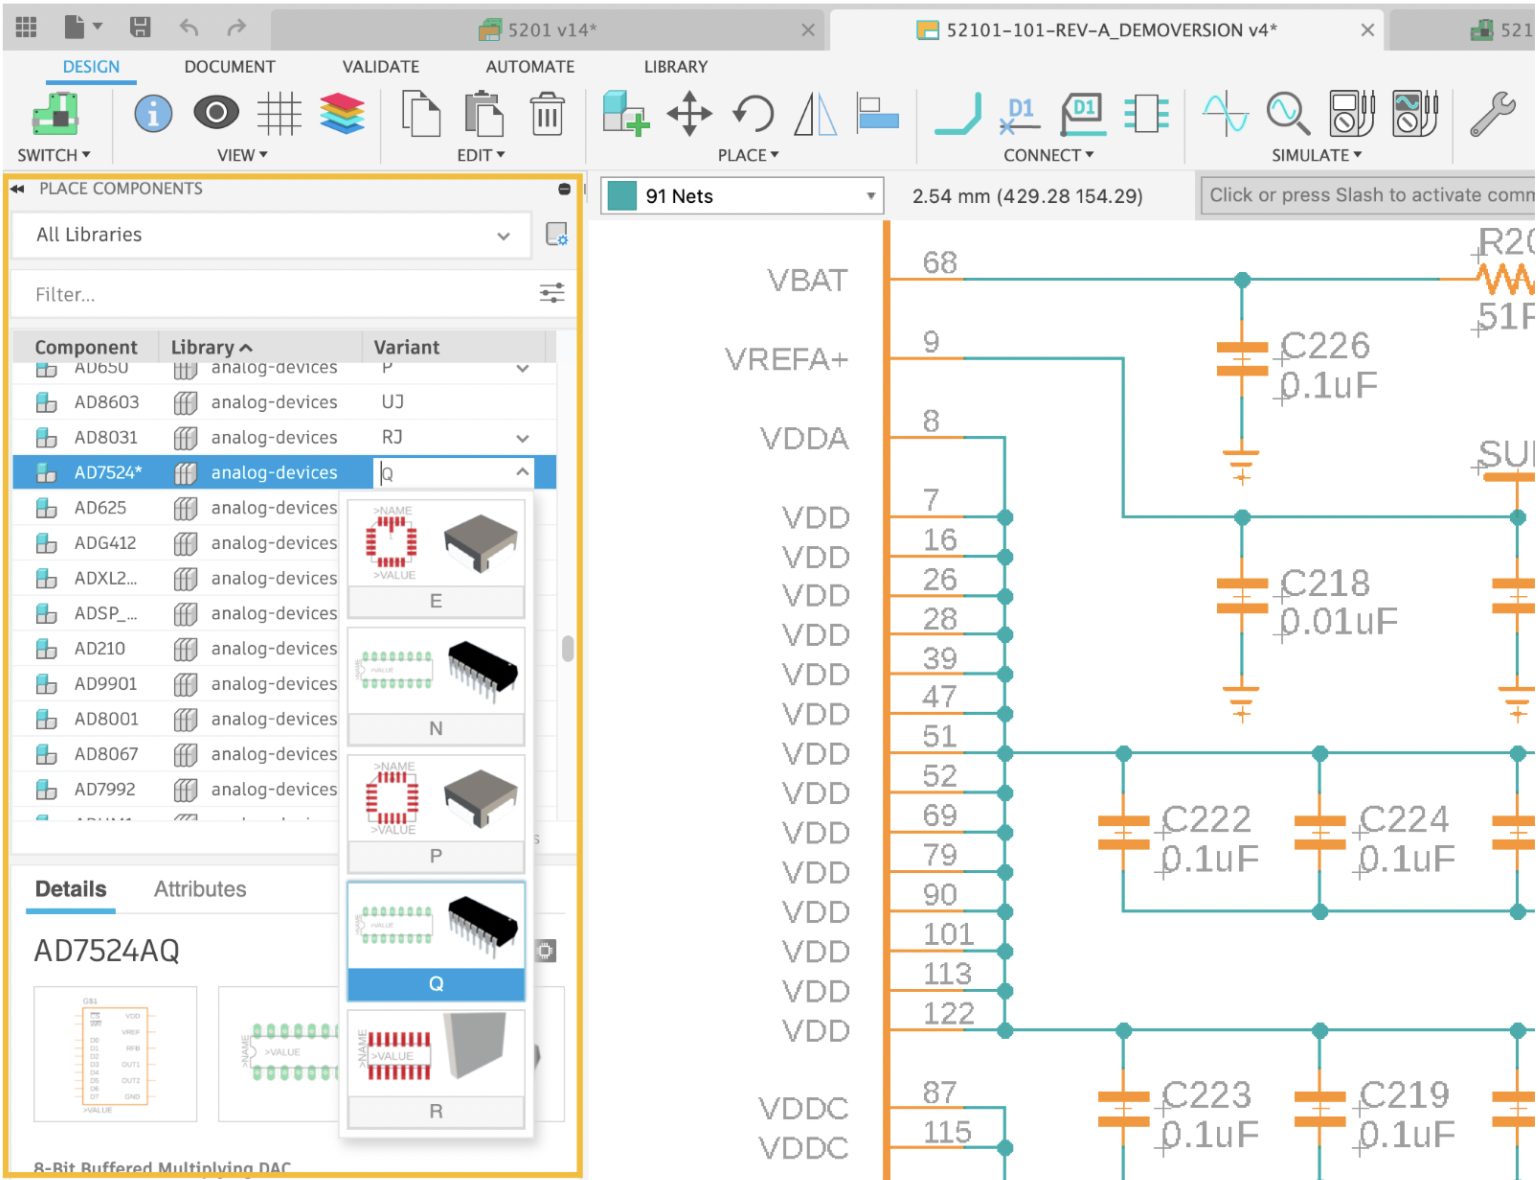
We have done away with the outdated, modal, add dialog and instead have introduced an entirely non-modal, always-on place component panel that consolidates multiple experiences into a single workflow you can feel confident using. With the new panel, better search and more flexibility in searching ensure you find what you need faster. Component previews and a deeper search into part metadata combine to deliver the search results you would expect without the limitations inherent in EAGLE. Search filters enable you to identify and switch between different content sources quickly. Components that include multiple footprint variants can be expanded and previewed, making choosing between packages more obvious. Combined with easier migration and management of your legacy local content and a complete overhaul of the Library Manager experience, we are delivering massive improvements to the #1 concerns expressed by our users!
Learn more about Place Component
Modular Design and Design Re-Use
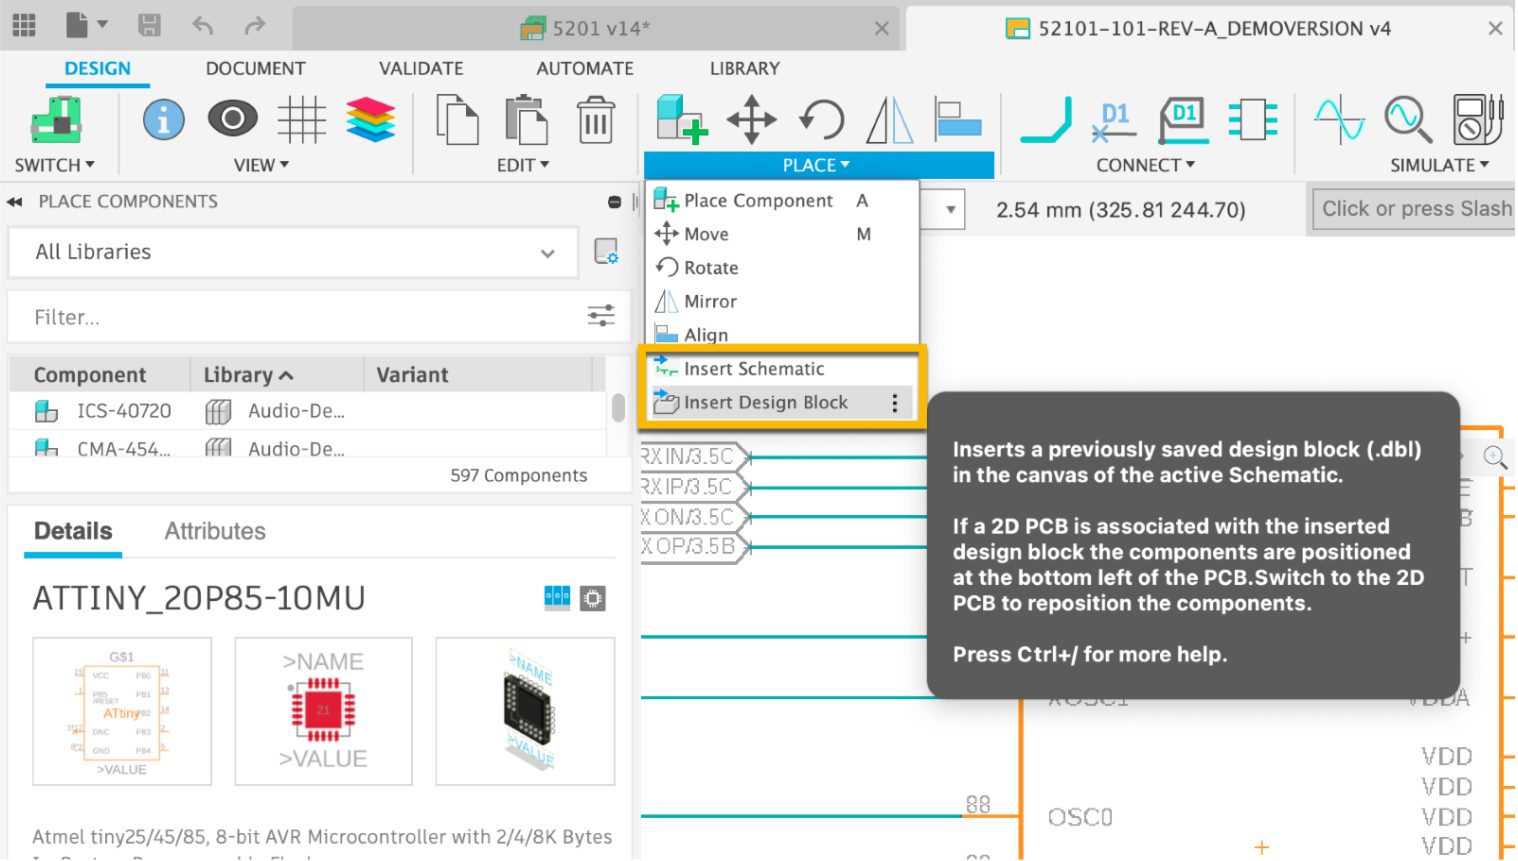
Design Blocks are finally coming to Electronics Design, and this release marks the first of several significant updates in delivering on the promise of intuitive Design Reuse. We have added the ability to source and place your Design Blocks created in EAGLE and bring those into Fusion 360. Coupled with adding a new Insert Schematic from file the file, there are multiple ways to leverage smaller, more reusable subcircuits or third-party reference designs with ease.
Merging the contents of one design into another could create a myriad of challenges with net naming and part name collisions. Rest assured, we have taken precautions to show you both the source and current net names and part names, even providing you with control over the merging of signals. So, whether you want to reuse that A/D converter, your favorite Buck / Boost Regulator, or even the mating connectors for your favorite Development Kit – Add your existing Design Blocks or insert that existing schematic into your current design to make short work of building a new design from existing assets and develop better circuits in less time than ever before.
Navigating Library Repositories
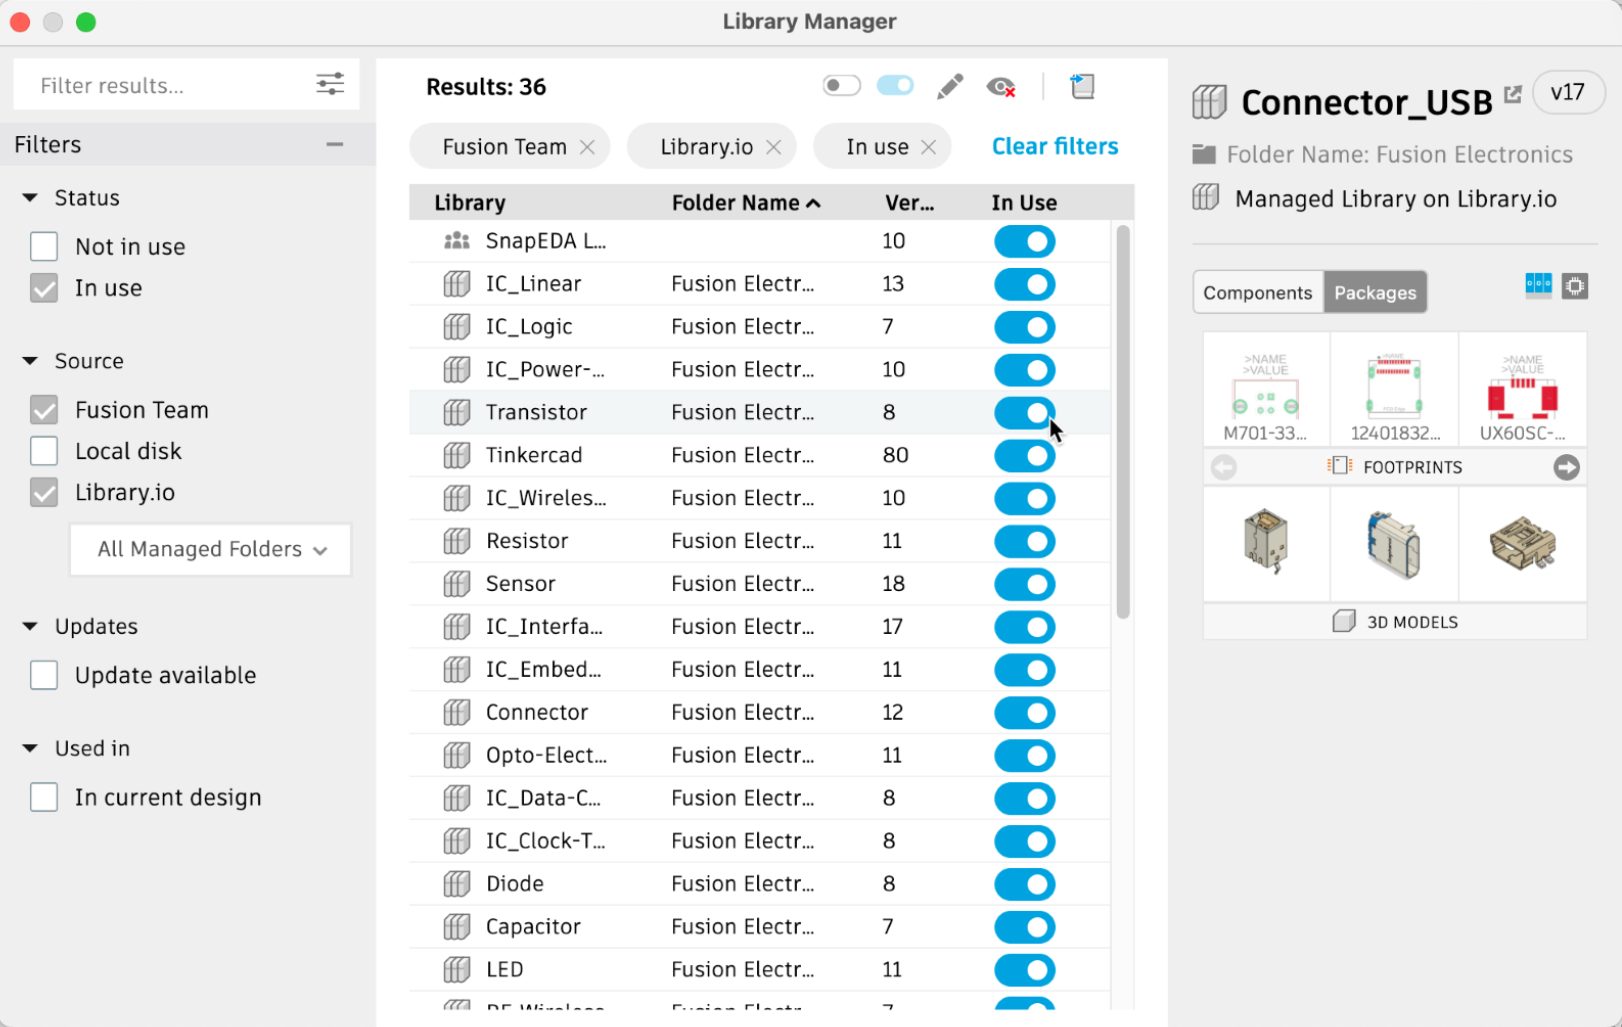
The Library Manager had been unwieldy, challenging to use, and not exactly intuitive –particularly for those of you who are coming from EAGLE but using only local Libraries. This new experience for enabling/disabling libraries streamlines this process, making things more evident, with fewer steps, and less guesswork. Whether your content was local, stored in the Autodesk Cloud, or was shared on Library.io – you asked us to make it obvious where and whom Libraries were coming from – and what they contained before you Installed them. Many of you asked to see the contents of Libraries like the Control Panel experience in EAGLE and to display the version, so you knew what you were selecting and where it came from, minus the clutter. Coupling this with filters to identify a Library’s origin, a more obvious update experience, more obvious In/Out of Use status, we have cleared the way to a more productive and enjoyable experience.
Learn more about Library Manager
PCB 3D Modeling Performance
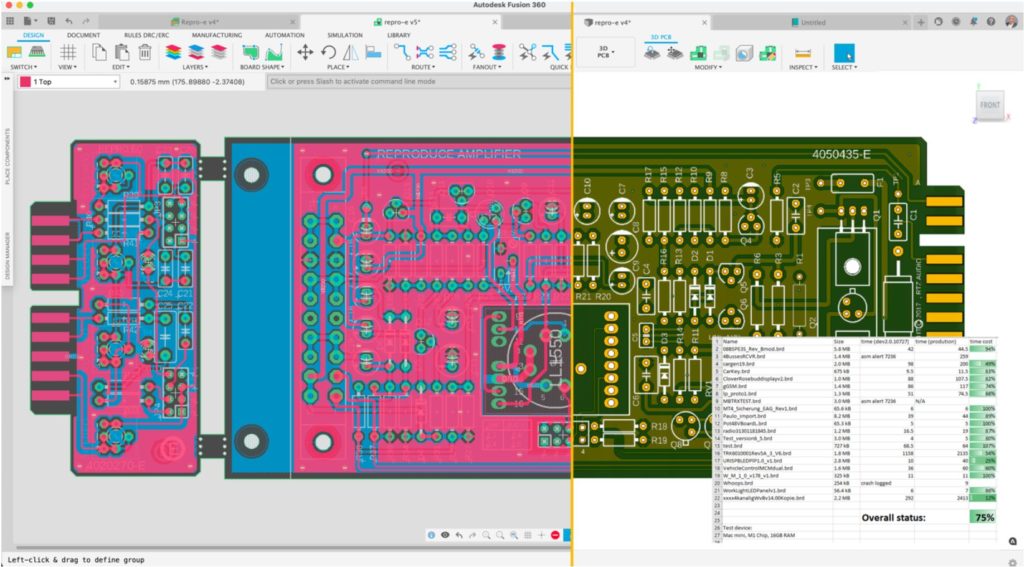
Our Electronics Design experience provides a bidirectional 2D & 3D PCB pipeline with the performance you’d expect from a viewer while maintaining the timeline integrity essential to modern Mechanical Design workflows. You told us that you’ve been experiencing performance problems around 3D PCB generation, specifically around designs with large numbers of stitching vias, cutouts, or other “cut” operations. As of this update, we are happy to report that we have vastly reduced the time to generate the 3D PCB model by 90% with a baseline average of 25% – paying special attention to boards with large holes or interior cutouts. This effort will vastly reduce your design time when working with PCBs with high drill and hole counts, and with more to come, you can expect even further improvements to your productivity.
Automatic EAGLE Library Access
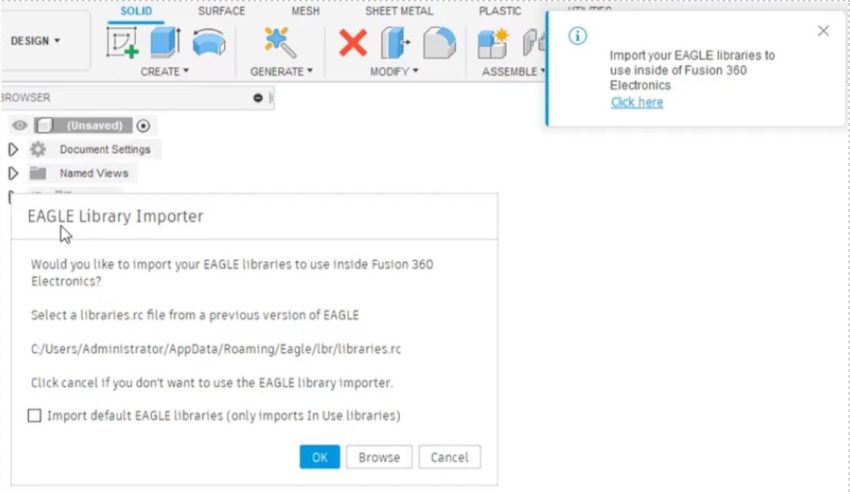
Excellent news for our Autodesk EAGLE users, migrating to Fusion Electronics: beginning with this release, on the first launch, you will be prompted to migrate your existing EAGLE libraries to Fusion 360, automatically importing your Parts and ensuring a smooth transition to Fusion 360. For those trying Fusion 360 but not ready to make it your primary tool, rest assured that importing your libraries to Fusion 360 does not limit your ability to use these same components in EAGLE until you are settled in and using Fusion Electronics more regularly.
Align Command Now Available in Electronics Design

We heard that some of you have been working on a large LED display or possibly a street sign that requires hundreds of LEDs, and you would like them to appear perfectly aligned on your Schematic. After a quick review, some components are just slightly off a few grid points. Fusion 360’s Align command is the perfect solution for this problem and can clean up your schematic with just a few clicks. However, we recognize that the Align command was not that discoverable, so we’ve added it to the primary toolbar. While we were at it, we decided to add Align to the Schematic Symbol and Footprint editor too.
Package Generator: Rectangle lead DIP sockets & Pad roundness for DFN Packages
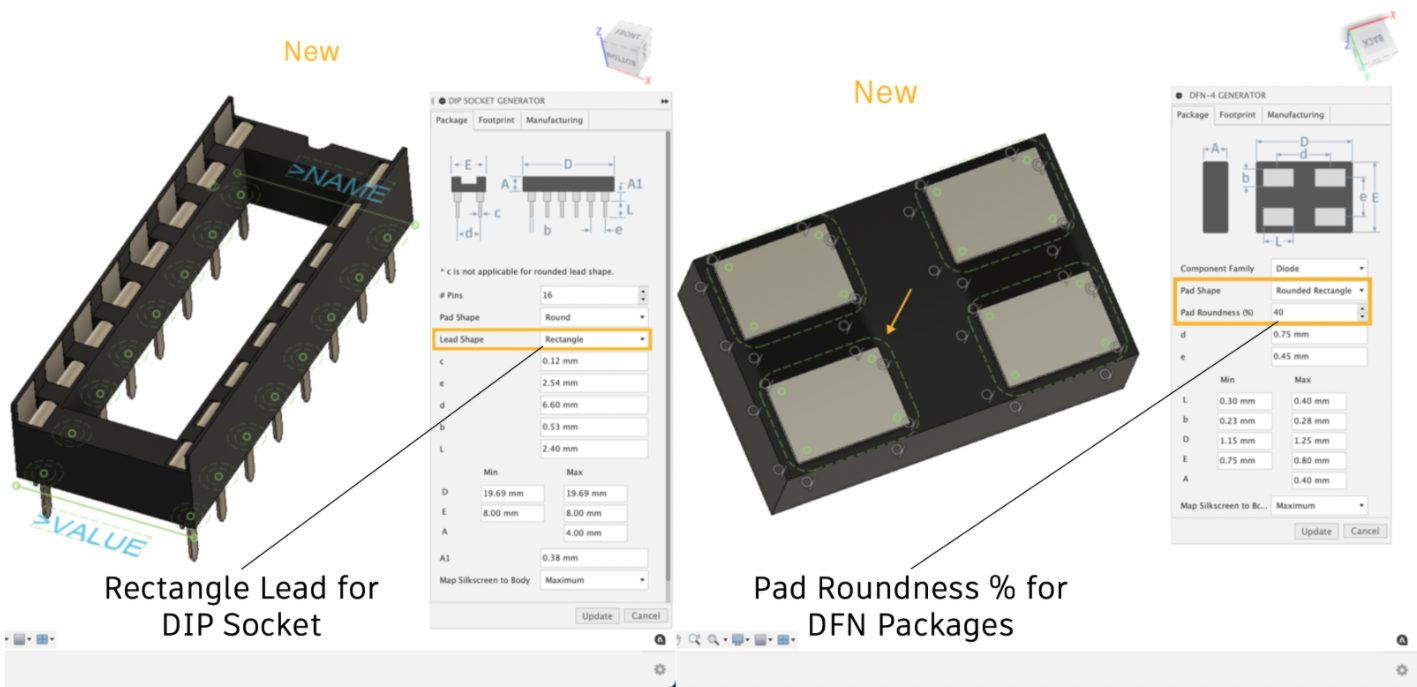
Sockets are a great way to ensure you build flexibility into your designs, future-proofing your PCB, and making it easier to change devices with changing circumstances. Exciting news: you no longer have to limit your search to round pads for programmable components susceptible to soldering heat. Expanding on Round-lead sockets, you will now find an option for Rectangle leads which use double-leaf contacts to hold IC pins in place under tension. These models are fully parametric, and the corresponding footprints are built to IPC specifications.
The Fusion 360 library editor includes an IPC-compliant Package Generator that provides several templates to generate footprint and 3D models of your component by simply entering the mechanical details of the part. We provide three Dual Flat No Leads (DFN) templates: 2, 3, and 4 SMD pads. We’ve now added a roundness factor to the footprint for this update. Since the DFN component has a shorter bond wire length, it provides higher electrical performance than leaded packages due to less inductance.
Manufacturing Documentation
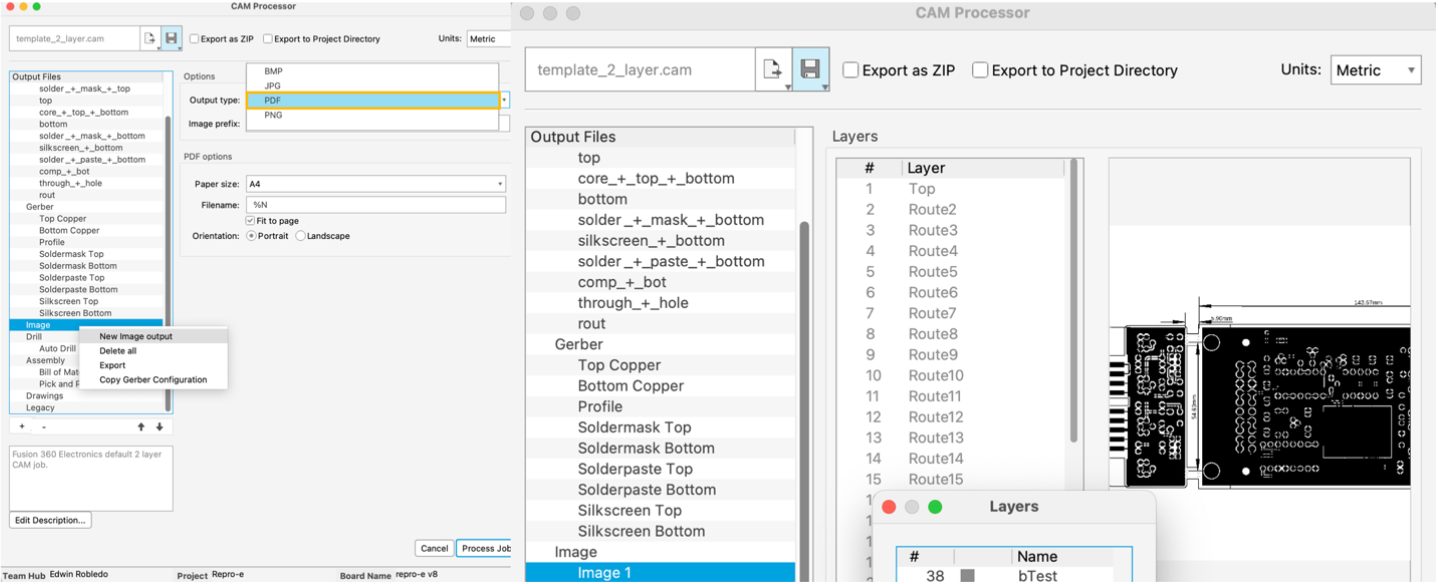
The final stage of your PCB design is generating the manufacturing files to get your design made. Equally important is creating your design documentation. The design documentation will not only have illustrations of your design but also includes instructions for manufacturing exported in a file format compatible with everyone to read. For this update, we have included PDF as one of the export formats in the image section of the CAM processor command. With the output defined, it is possible to select the layers that contain your manufacturing details. Exporting your manufacturing data will automatically include your design documentation. This method is more manageable than exporting a PDF directly from the design editor.
Add popular Tinkercad parts to Fusion 360 Electronics
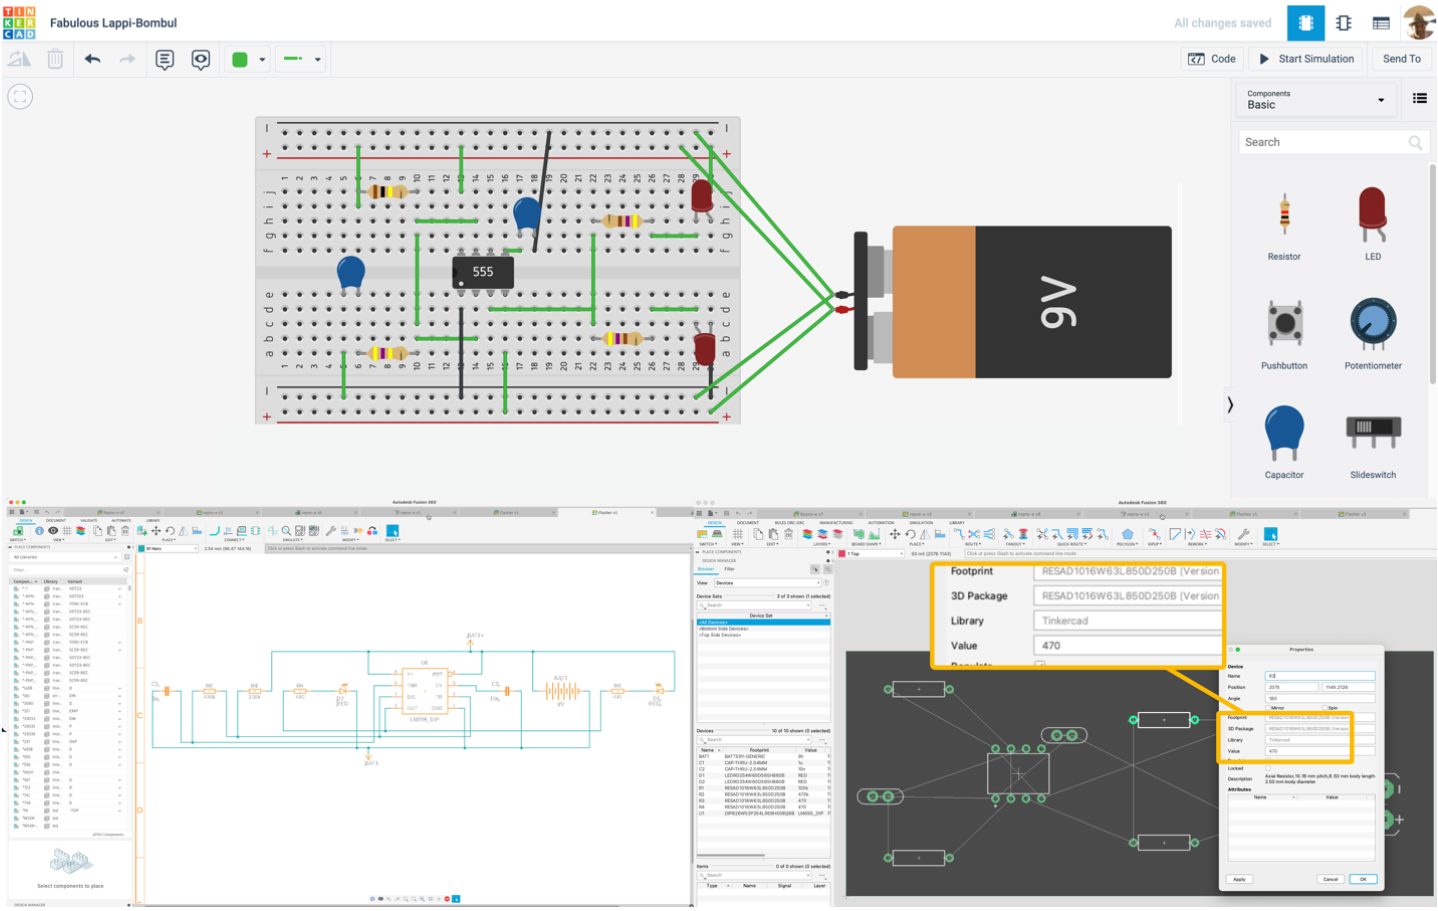
Tinkercad Circuits has been globally recognized as the easiest-to-use electronics and coding platform available. Access to Tinkercad Circuits is entirely free, and you will be able to breadboard your design and perform simulations. Earlier this year, we announced that your Tinkercad Circuit designs could be exported directly to Fusion 360 electronics. In this Fusion 360 update, we have expanded our libraries to include more of the components that will work between Fusion 360 electronics and Tinkercad.
Drawings
Easily document your hole specs with Hole Table
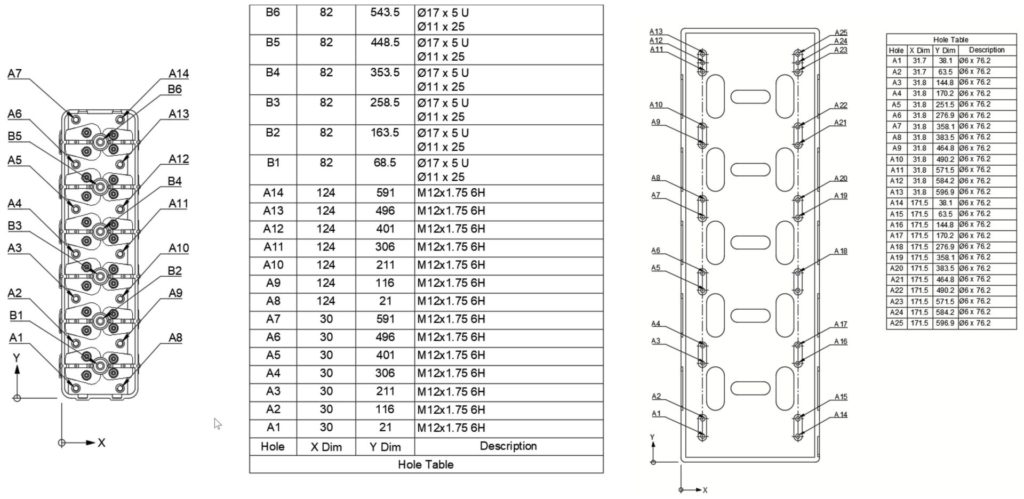
Good news! You are now able to easily create comprehensive hole tables with the new Hole Table tool, found inside the Drawings environment, Tables drop-down panel. Hole Table will follow the drawing standard you’ve selected and populate the appropriate dimensions and standard of annotation. You’ll also be able to use the origin with Ordinate Dimensions, and the table will update automatically if you’ve made changes to the origin.
Manage drawing revisions with better revision control and documentation tools
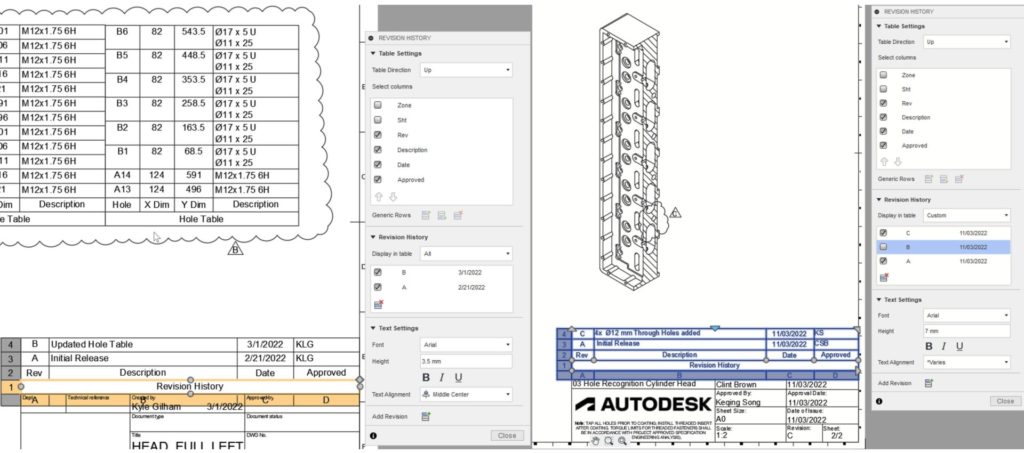
There are also a few new tools that enable you to better manage revisions and revision tables: Revision Marker, Revision Table, and Revision Cloud. All three of these tools can be found under the Table panel drop-down menu. You can now use these tools and call attention to specific changes in your drawing and update revisions based on those changes.
Learn more about Revision History Table
Learn more about Revision Marker
Learn more about Revision Cloud
Manufacture
Changes to the Fusion 360 Manufacture Workspace and Machining Extension
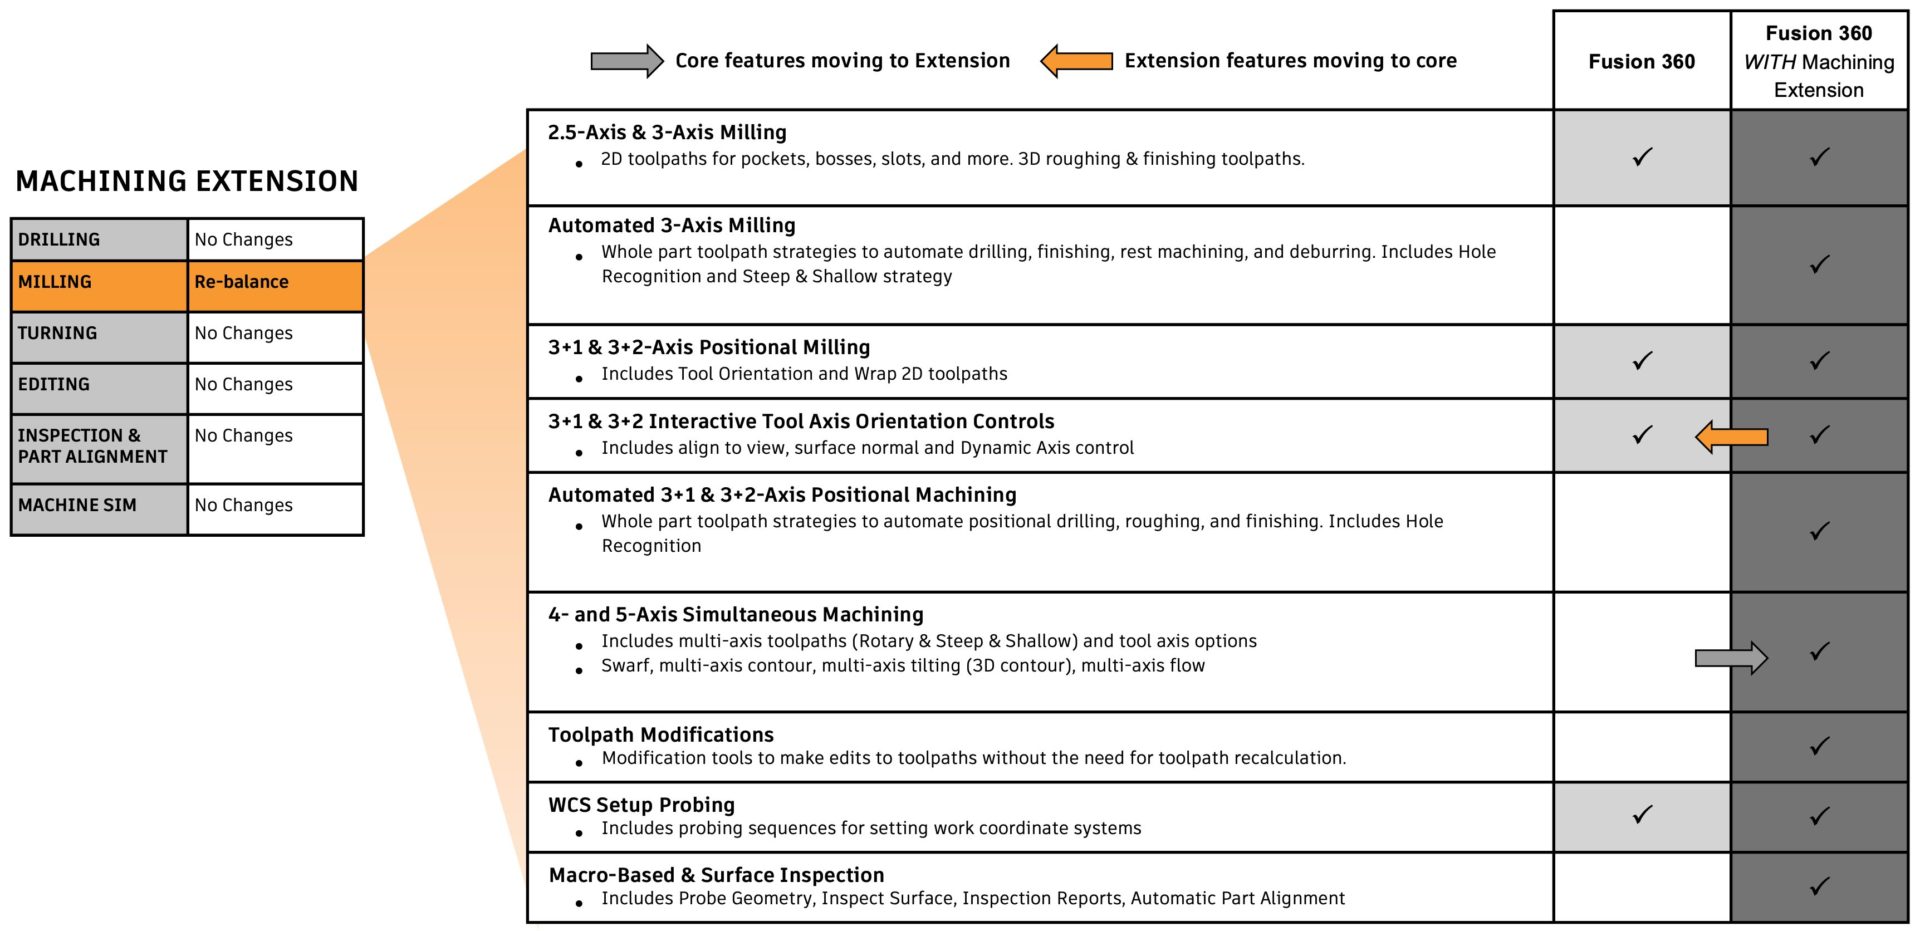
In this product update, we’ve rebalanced some functionality found in the core Manufacture Workspace as well as the Machining Extension. This rebalance helps us solidify the positioning of both offerings, what they include, and who they best serve.
Now in the Manufacture workspace, you’ll notice that capabilities like 3+1 and 3+2 interactive tool axis orientation controls (surface normal, align to view, and turn & tilt) have been made available to all subscribers (previously only available with the subscription of the Machining Extension). This positions Fusion 360 (without the Machining Extension) everything you need for robust & reliable 2, 2.5, and 3-axis machining.
The Fusion 360 Machining Extension will inherit 4-axis and 5-axis simultaneous machining capabilities from the core Manufacture Workspace. It will be the new home for Swarf, multi-axis Contour, and multi-axis Flow joining the ranks of Rotary and Steep & Shallow. Wrapped toolpaths using a rotary axis will remain available in the Manufacture workspace. This makes the Machining Extension a true multi-axis powerhouse for your advanced automation needs, at a price point that is much lower than other competitive CAM solutions (where a fully loaded 5-axis license can often cost more than $40,000)
We recently hosted a webinar where we dove deeper into the rationale behind this change, why we went with the decisions we made, and how we can help you continue to be successful with your business. If you want to learn more and get down to business with Al Whatmough himself, Check out the recording for details, as well as the FAQ.
If you need help, please do not hesitate to contact us at digitalmfg@autodesk.com.
Trim Toolpath gives you more control over the quality of your toolpaths
Trim Toolpath has graduated out-of-preview, and is now available in the Machining Extension.

Previously available to try as a preview feature, we took your feedback and have finalized the Trim Toolpath functionality and made it production ready as of this product update. It is currently included in the Machining Extension under the Modify drop-down panel. Within the tool, you have the option to select between 3 Trim Types: Polygon, Plane, and Boundary. You are also able to use the offset of a Plane or boundary, as well as more specific options pertaining to both Trim Types. This gives you more flexibility to associatively optimize toolpaths (captured in the history timeline), all within a consolidated UI.
Watch the tutorial
Learn more about Trim Toolpath
Control your toolpath entry with Move Entry Position
Move Entry Position has graduated out-of-preview, and is now available in the Machining Extension.
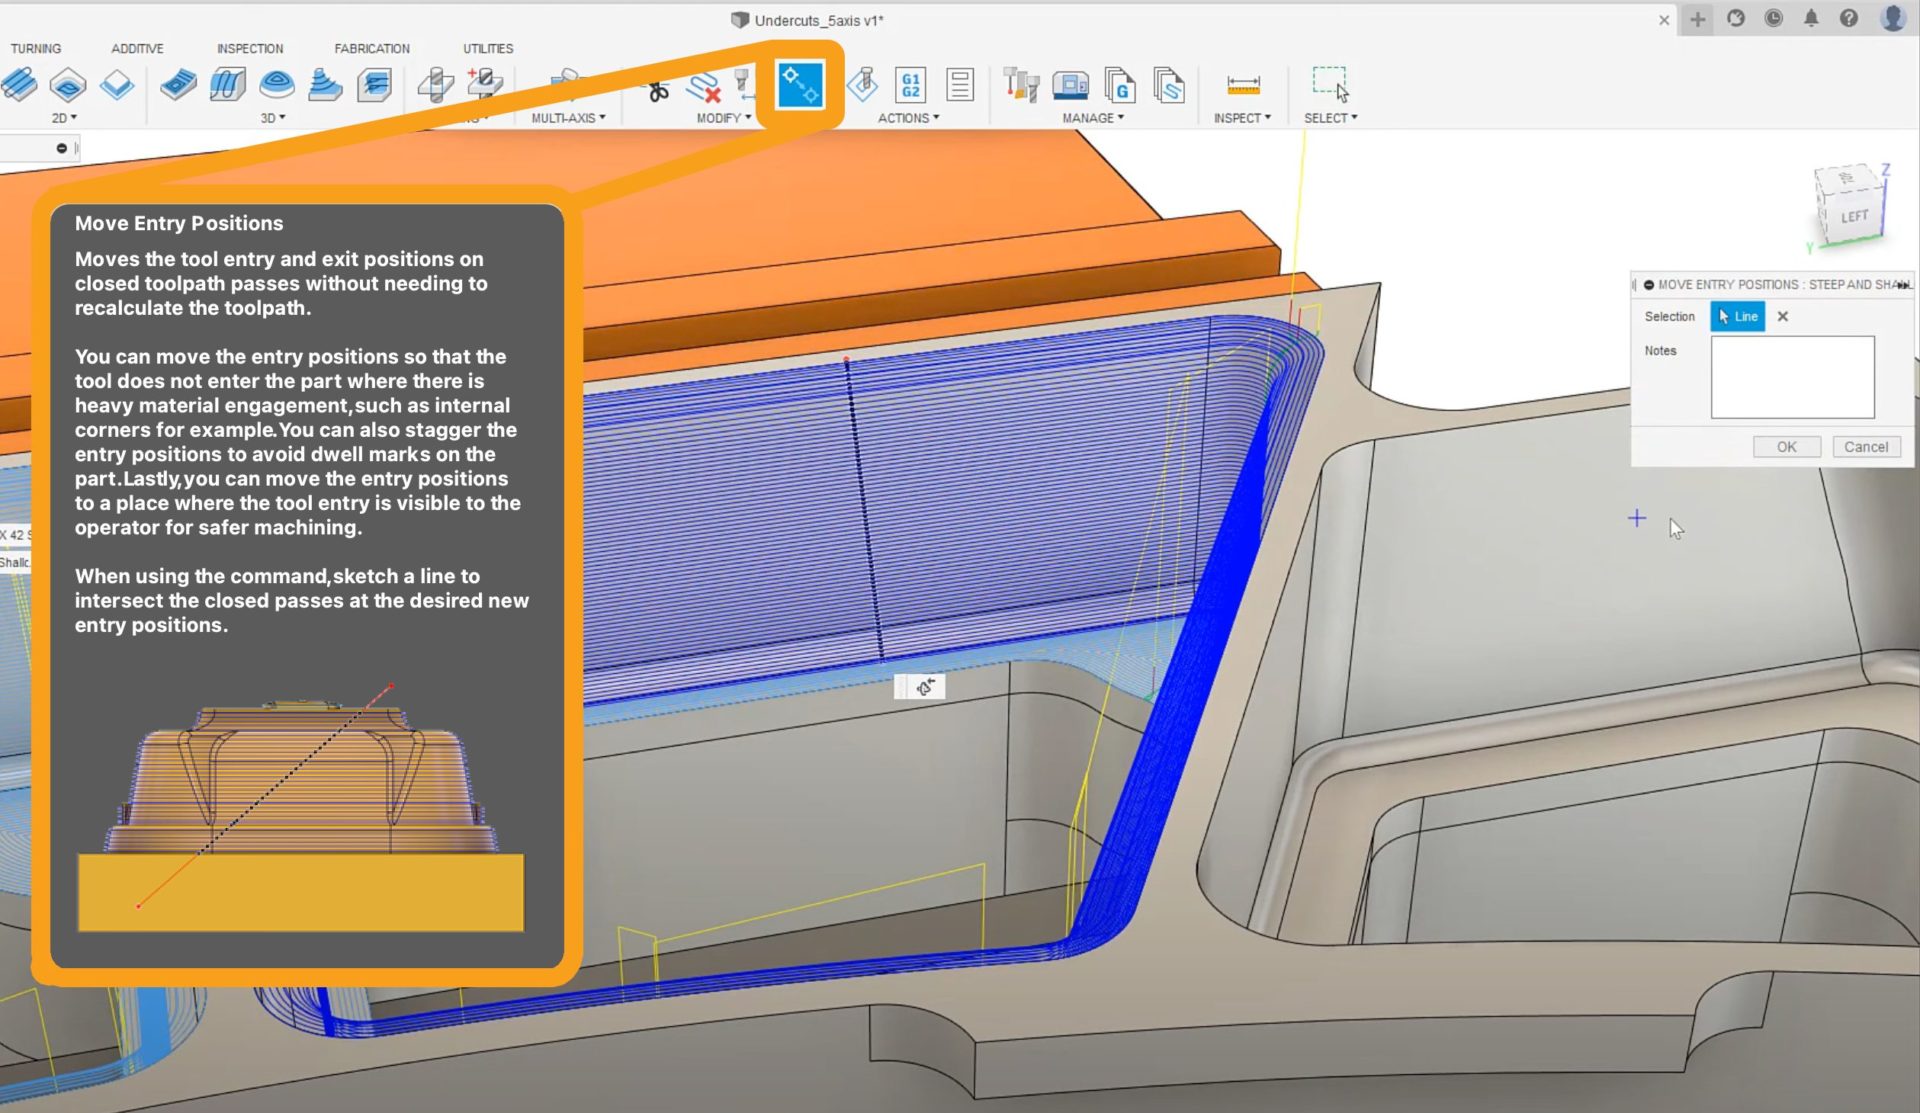
Joining the ranks of Trim in the Modify panel, another useful feature that is now officially part of the Machining Extension is the Move Entry Positions command. You’re now able to move the entry position of any toolpath with close passes. One of the main reasons why you would want to move your entry position is due to how some toolpaths leave small marks at the entry and exit positions. Moving the entry position to an area where it’s less important can benefit the overall finish of your part.
Watch the tutorial
Learn more about Move Entry Position Toolpath Modification
Nest multiple parts with Advanced Arrange
Advanced Arrange has graduated out-of-preview, and is now available in the Nesting & Fabrication Extension.
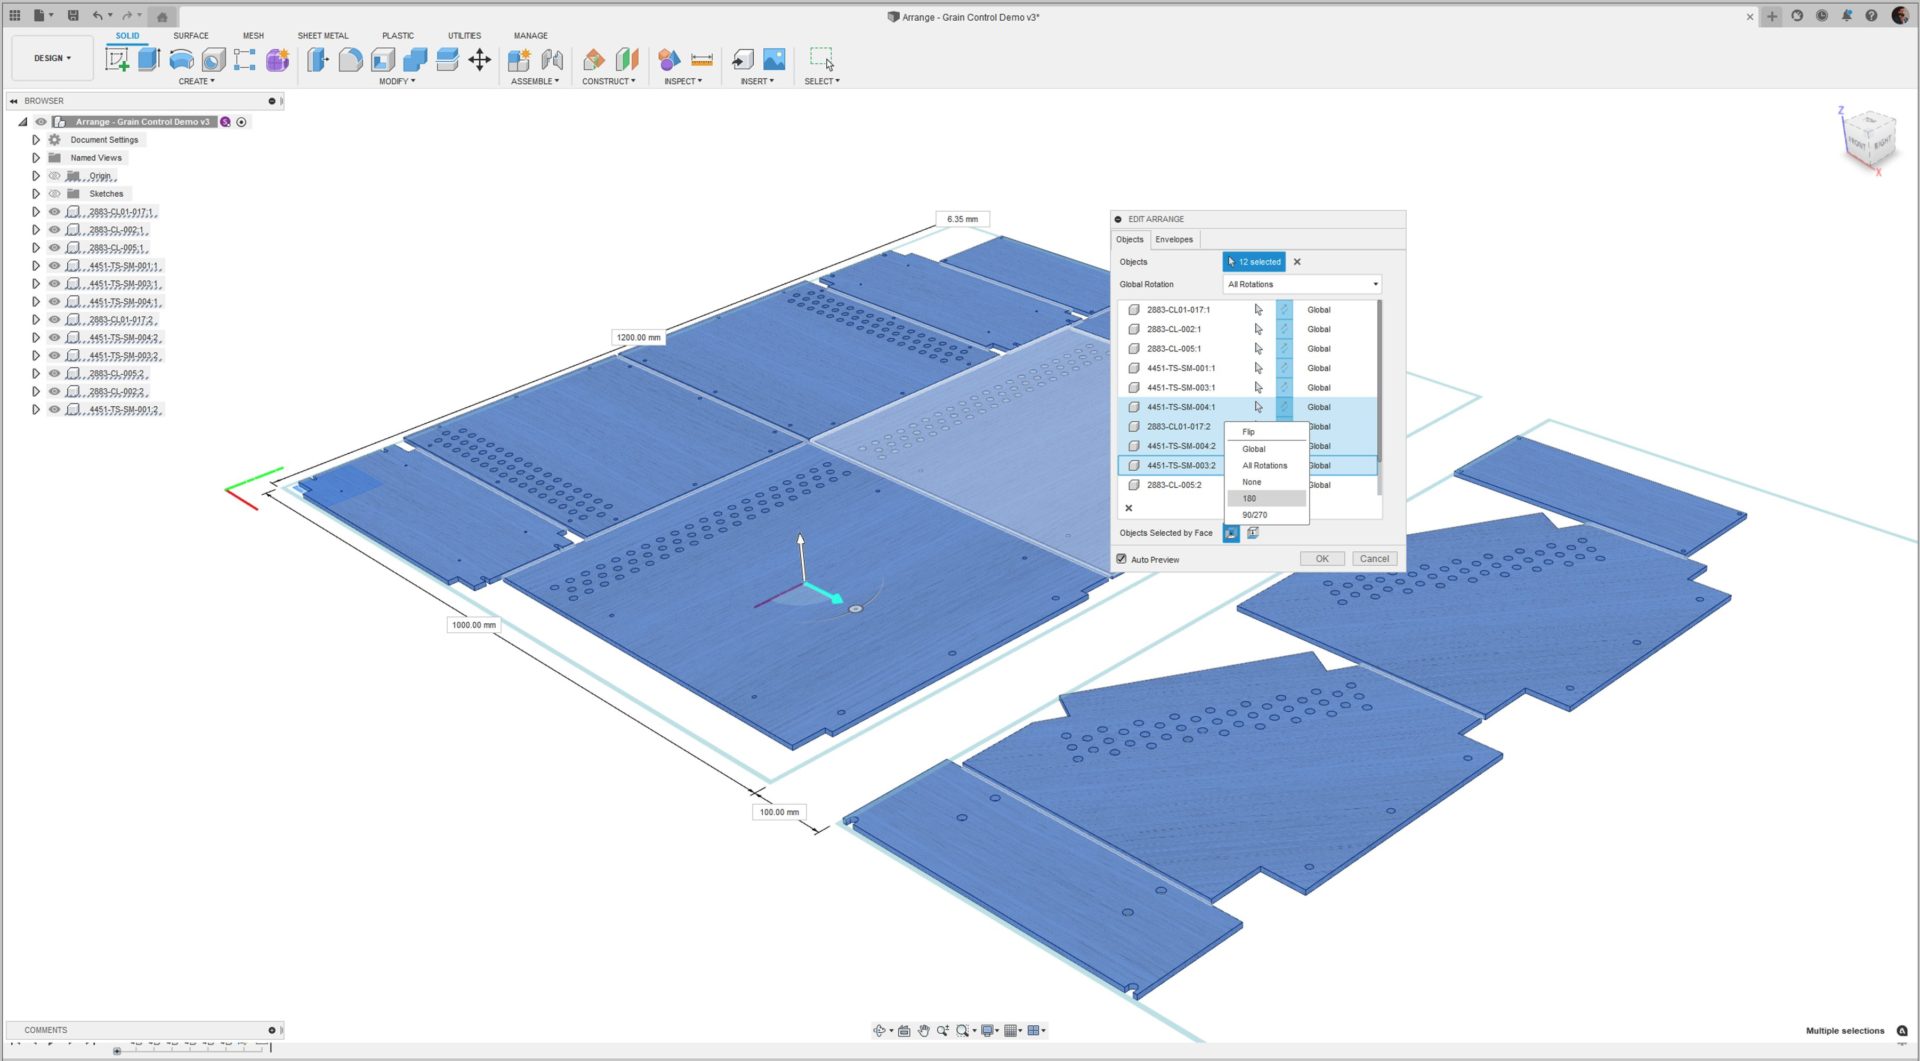
About a year ago, we introduced Advanced Arrange as a preview feature that was free to try. After gathering feedback from the community and continuously improving it, we’re glad to say that Advanced Arrange for the Nesting & Fabrication Extension is has graduated and is now available as production-ready functionality. You’re now able to create multi-sheet arrangement and rotate each part. The rotation control still lets you specify the initial part orientation plus allowed part rotations in 90-degree increments. Simply select the objects to arrange, then select an area to arrange on, and set the allowable rotation values for your objects as well as the grain control if applicable.
Learn more about Advanced Arrange
New self-paced learning for the Machining Extension
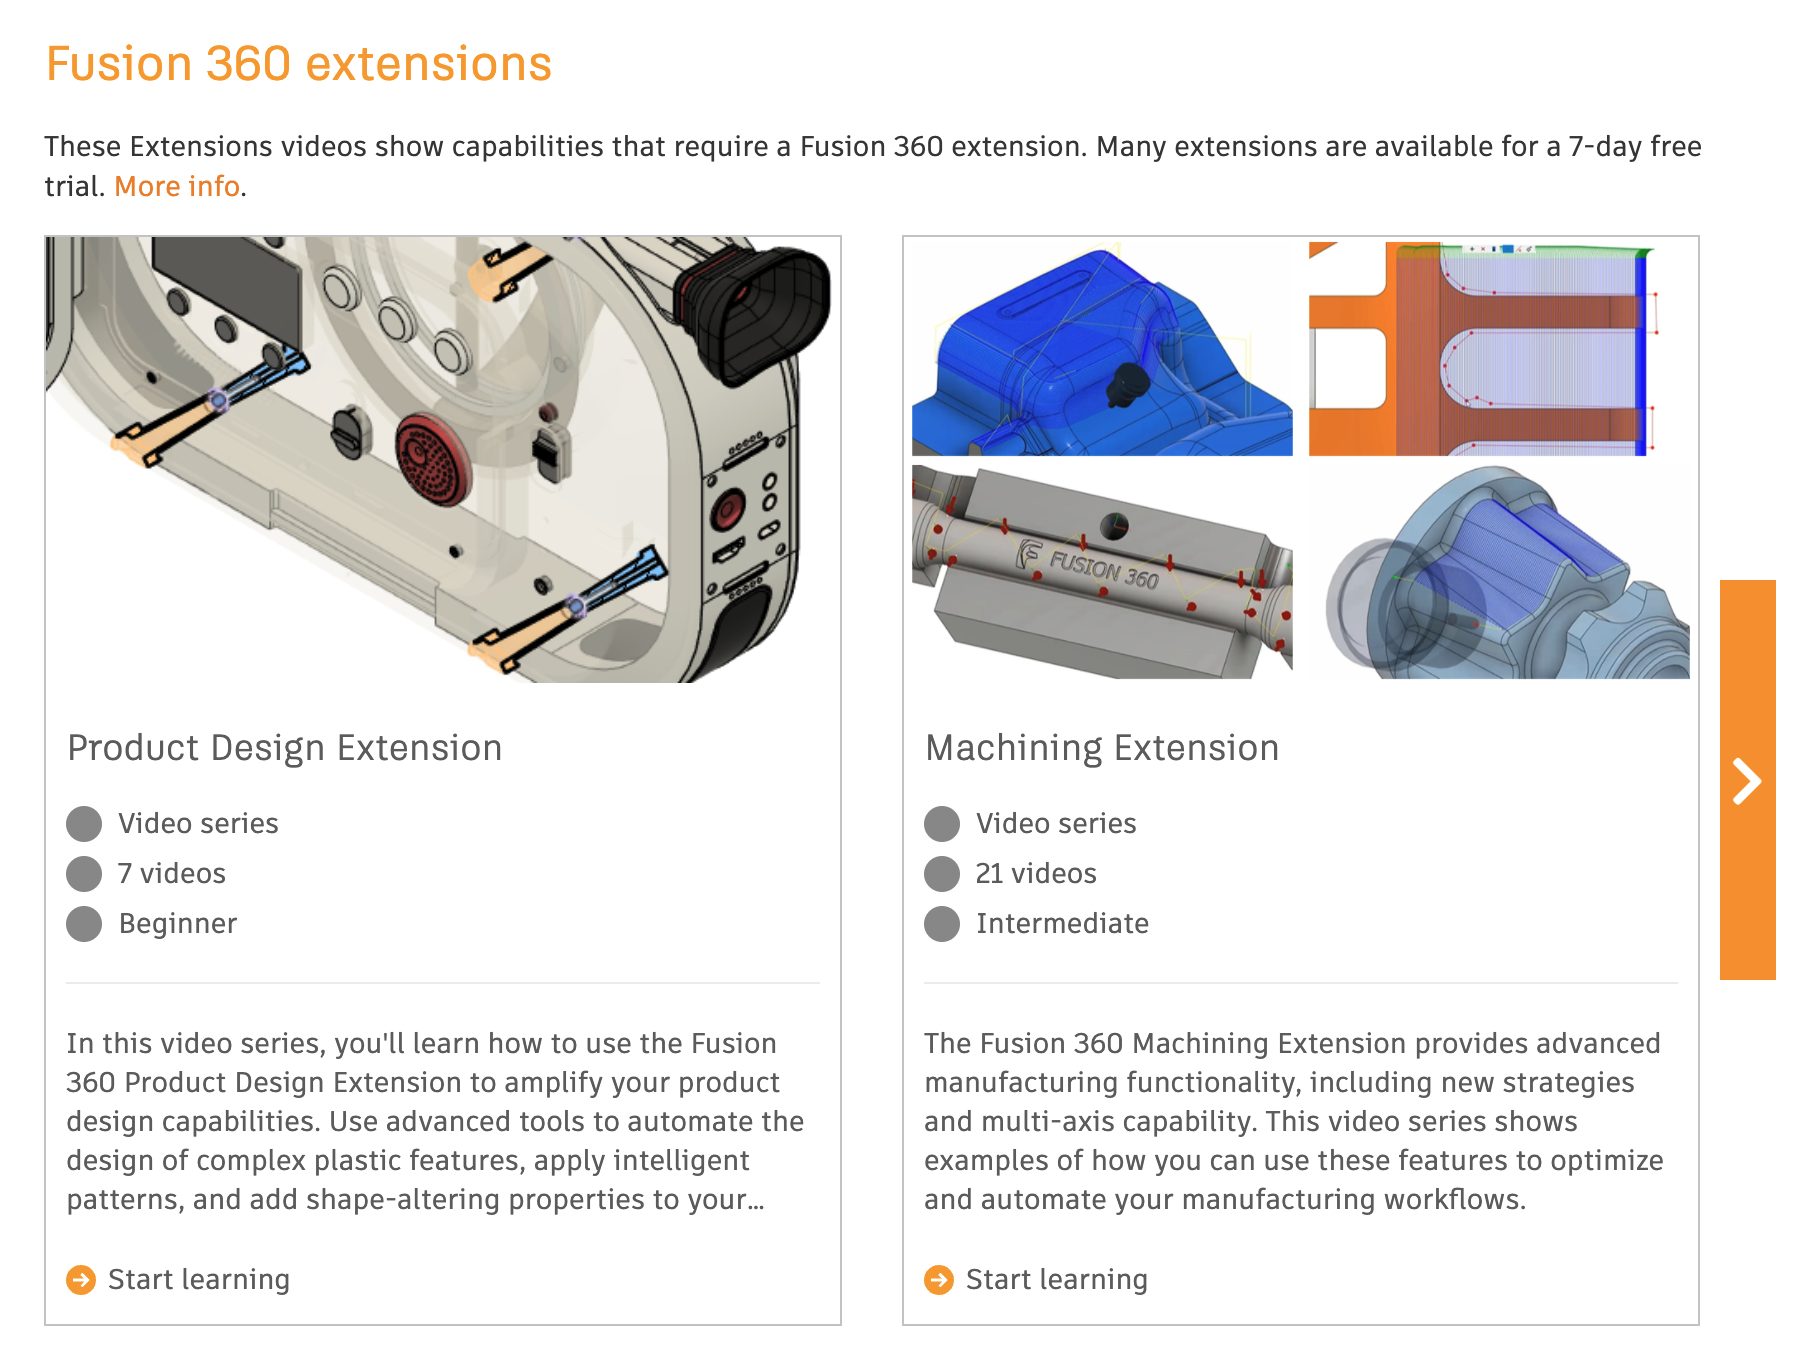
We’re continuing to expand the video resources available for Fusion 360’s Manufacturing capabilities with new videos in the Machining Extension video series. We’ve also added accompanying datasets so that you can follow along with the videos.
Additive
Notice: Fusion 360 no longer includes 3D printers in the installer
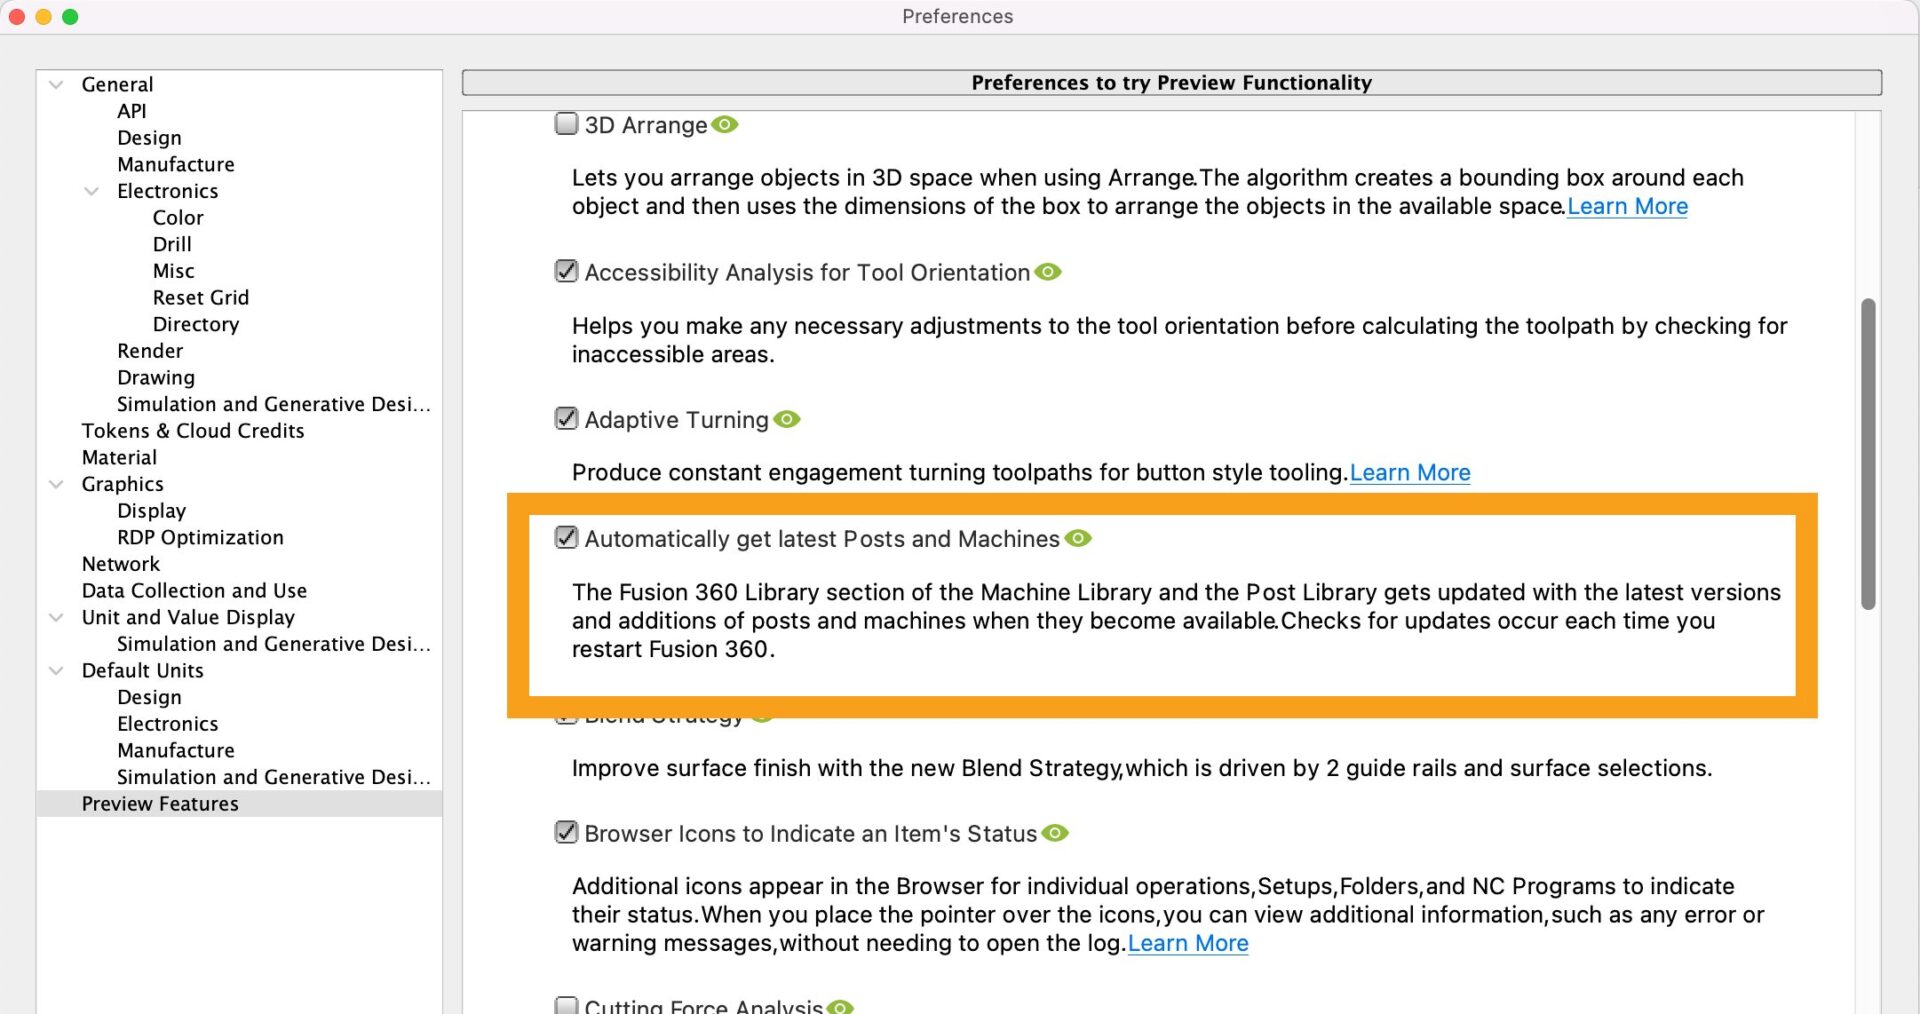
Don’t fret, if you just installed Fusion 360 (or took the latest update), you can to access the latest supported 3D printers from the following webpage (https://cam.autodesk.com/machineslist) and/or by enabling the “Automatically get latest posts and Machines” option within “Preferences” dialog, “Preview features” section.
Unified Print Settings Editor for all types of Additive Processes

As we continue to mature Fusion 360, one of our guiding principles is to maintain user experience consistency as you take your designs from concept to production. This update introduces a major UX overhaul in the Additive Print Settings Editor. First, we moved away from the tabbed experience and took advantage of the left side panel for easier navigation. Second, for FFF, you’re now not only able to edit general print settings, but you now also able to edit presets per body under the new Body Preset section. We’ll be uploading more videos showing you how to use the new Print Settings Editor soon, so keep an eye on our YouTube channel.
Learn more about working with print settings
Body Presets now available for FFF printing
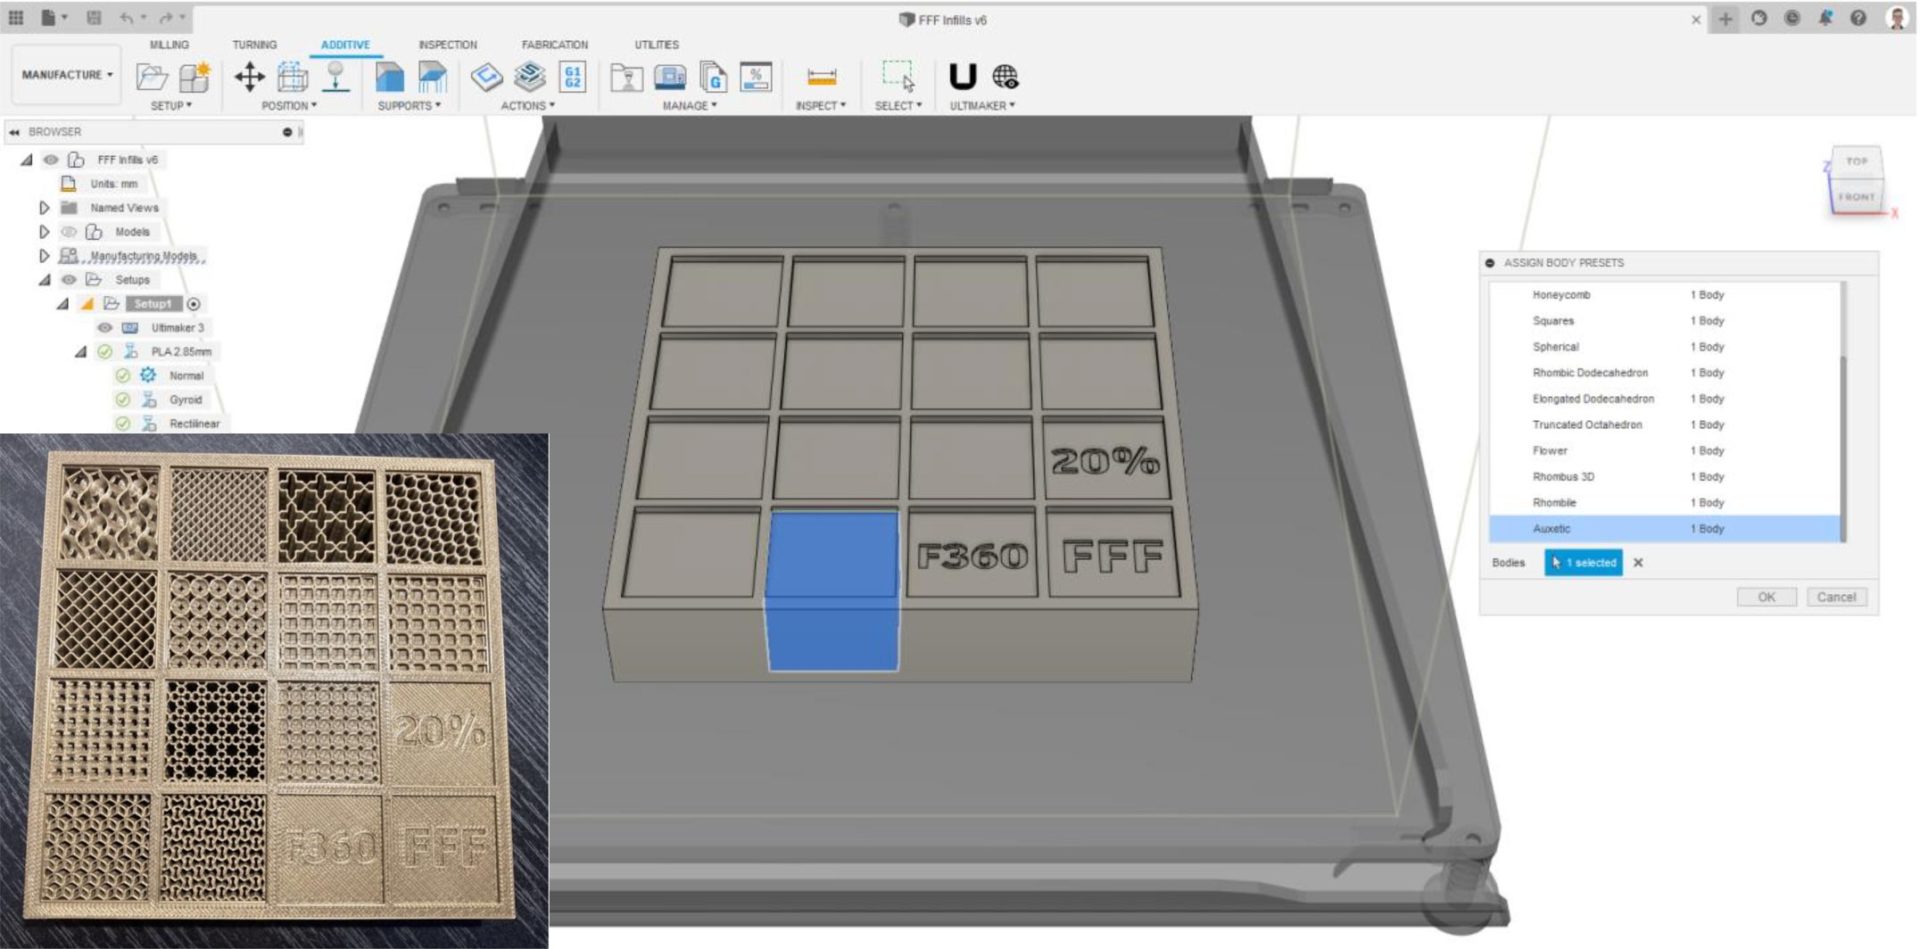
Body-specific print settings (AKA Body Presets) allows settings to be applied per body, meaning different bodies can have different body presets. Previously only available in the Additive Build Extension, Body Presets are now available for all FFF workflows. To assign them, simply right-click on the print setting in the setup. They are very useful in creating infills, as shown above. This design example is available in the Samples folder for you to print your own model of all the FFF infill patterns Fusion 360 has to offer.
Solid Bar and Solid Volume Support give you more flexibility

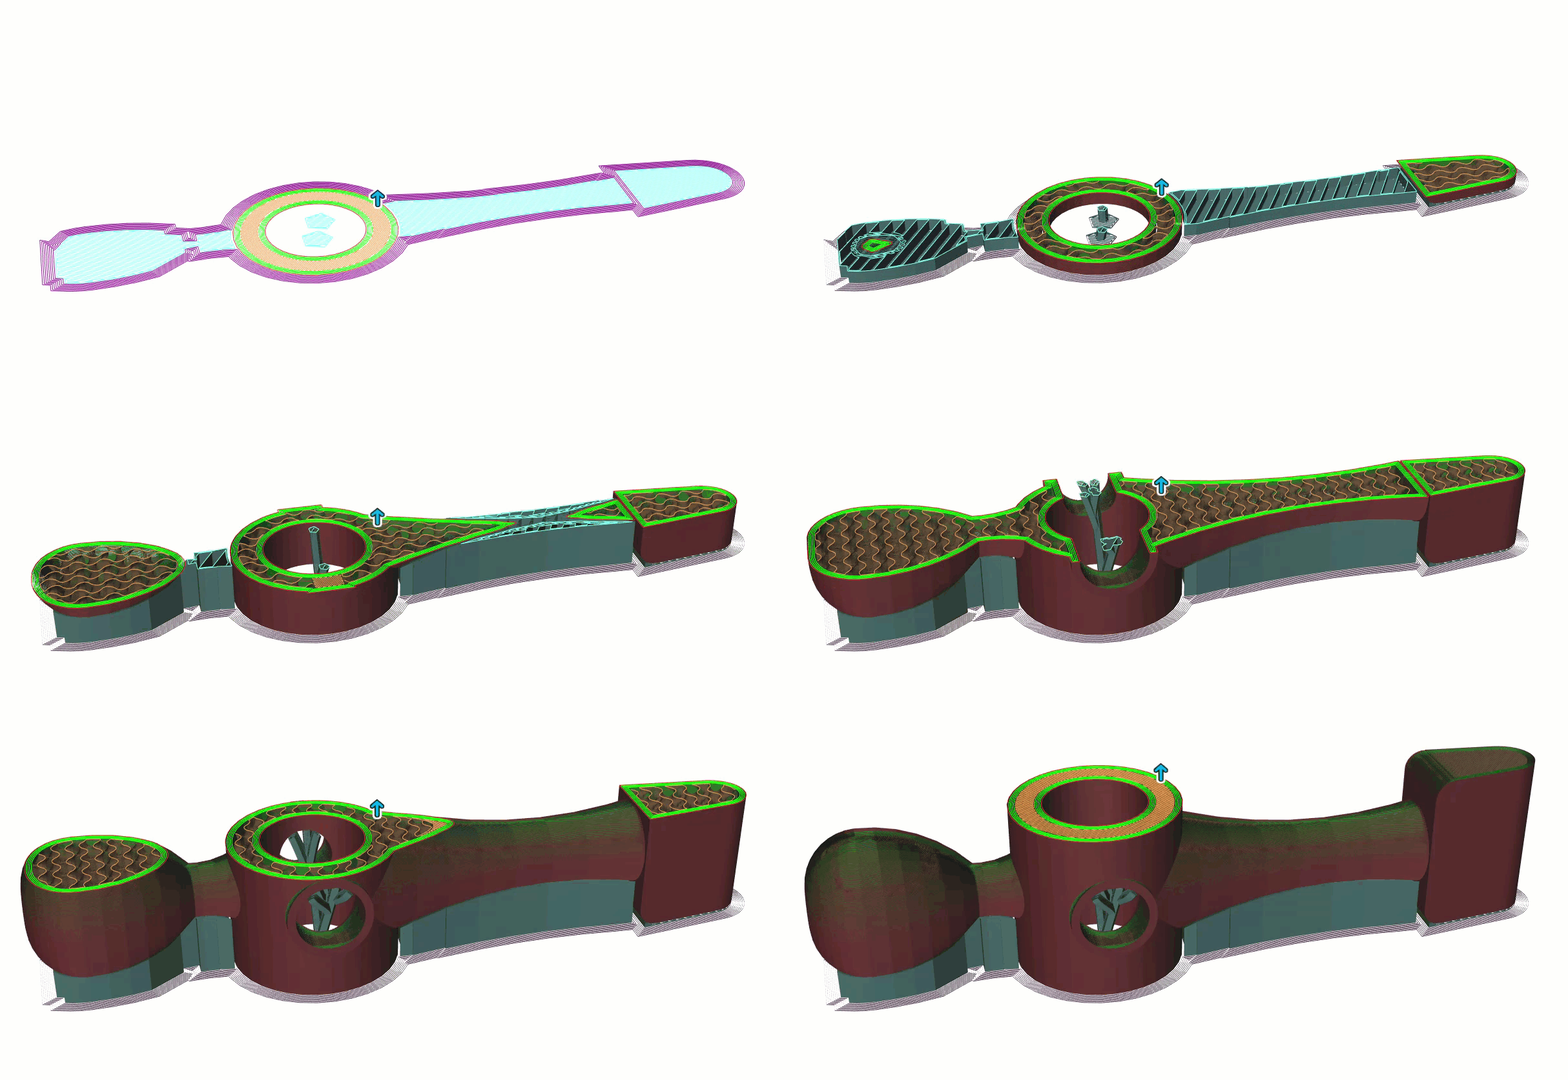
There are 2 new support options located in the Supports panel: Solid Bar and Solid Volume Support (you must have created a setup with an FFF machine for them to be visible). In most slicers, the support structure is generated on slicing, and the user has little control on the placement and structure itself. Fusion 360’s workflow offers you more freedom in both support placement and support structure; you now have the ability to use these on the same body as well as specify which particular face they even want each support structure to be generated at.
Solid volume support is best for supporting large overhanging areas, whereas solid bar support is ideal for bodies with small specific overhanging areas, as shown in the GIF above. To use bar supports, remember to set the “Number of support perimeters” to 1 in the support tab of the print settings.
Full SLA workflow now available

Good news! You can now prepare your models and print directly to SLA machines. Previously Fusion 360 sent the supported part to an external software for the print file to be generated, but now Fusion 360 can send parts directly to SLA machines to be printed. The SLA printers that Fusion dully supports are the Prusa SL1S Speed, SL1S, Anycubic Photon Mono.
Fusion 360 Additive now supports more SLS, SLA, and FFF Printers

Fusion 360 is now compatible with even more additive machines. Now when you’re working in the Additive tab to set up your prints, you’ll have the option to use the following machines in your Machine Library:
- SLS machines such as the EOS Formiga P110 and P396
- SLA machines such as the Prusa SL1S Speed, SL1S, Anycubic Photon Mono
- FFF machines such as the Arcelik PT1000, Dremel 3D20, 3D40, 3D45, eMotion Strateo 3D IDEX 420
New & Improved Post Processors

If you haven’t seen our recent forum post, we just dropped a bunch of new post processors, as well as improved a handful of existing ones. New milling post processors include ones for Ethereal Halo, Matsuura, and Promax. Head over to the forum thread to check out all the latest in more detail.
API & Add-ins
Notice: Embedded python interpreter has been upgraded to Python 3.9.7
As mentioned in this forum thread, Python apps delivered as .pyc files will be broken because .pyc files are tied to the version of Python used to create them. Add-ins compiled with the old version of Python (3.7) will not be compatible with the updated Python (3.9) and will fail to load. Note that this change does not affect any add-ins where the .py source code is available.
If your app does not distribute precompiled Python (.pyc), then you don’t have to do anything.
If you use Bommer, JoinerCAD, or other popular Add-ins, you may need to update the add-in from the app store. Check their respective app store page for more details.
If you are developing an add-in that you use personally or internally at your company, you can simply re-compile after you’ve successfully updated to this latest version of Fusion 360.
If you develop an app that is distributed directly to customers or is available on the Autodesk App Store, you will need to create a new version of your add-in for distribution. For additional information, please see this forum thread: https://forums.autodesk.com/t5/fusion-360-api-and-scripts/important-python-version-change-information/td-p/10929351
New add-in by Autodesk Fusion 360 x Sandvik Coromant

We’ve recently partnered up with Sandvik Coromant to give you a great add-in: The Sandvik Coromant CoroPlus Tool Library add-in for Autodesk® Fusion 360® simplifies CAM programming, to help you save time, reduce overall costs, and optimize machining performance. Download the free add-in from the Autodesk app-store then subscribe to the CoroPlus Tool Library to unlock the full functionality. The fully integrated Fusion 360 add-in recommends tool assemblies and machining parameters based on your chosen material, the machining operation, and even the capabilities of your CNC machine. Once selected, transfer the 3D tool assembly and optimized cutting parameters into Fusion 360 for more efficient CAM programming and safer machining outcomes.
Check our our blog post
Watch the tutorial
Download the add-in
Preview Features
NOTE: Preview Features are not fully complete and may have missing pieces that we are actively working on. We feel confident enough to have you try them, but we want to remind you that they are not 100% production ready. We are actively working on improving them until they are ready to graduate out-of-preview as production ready functionality.
New to try: Native Trackpad (macOS only)
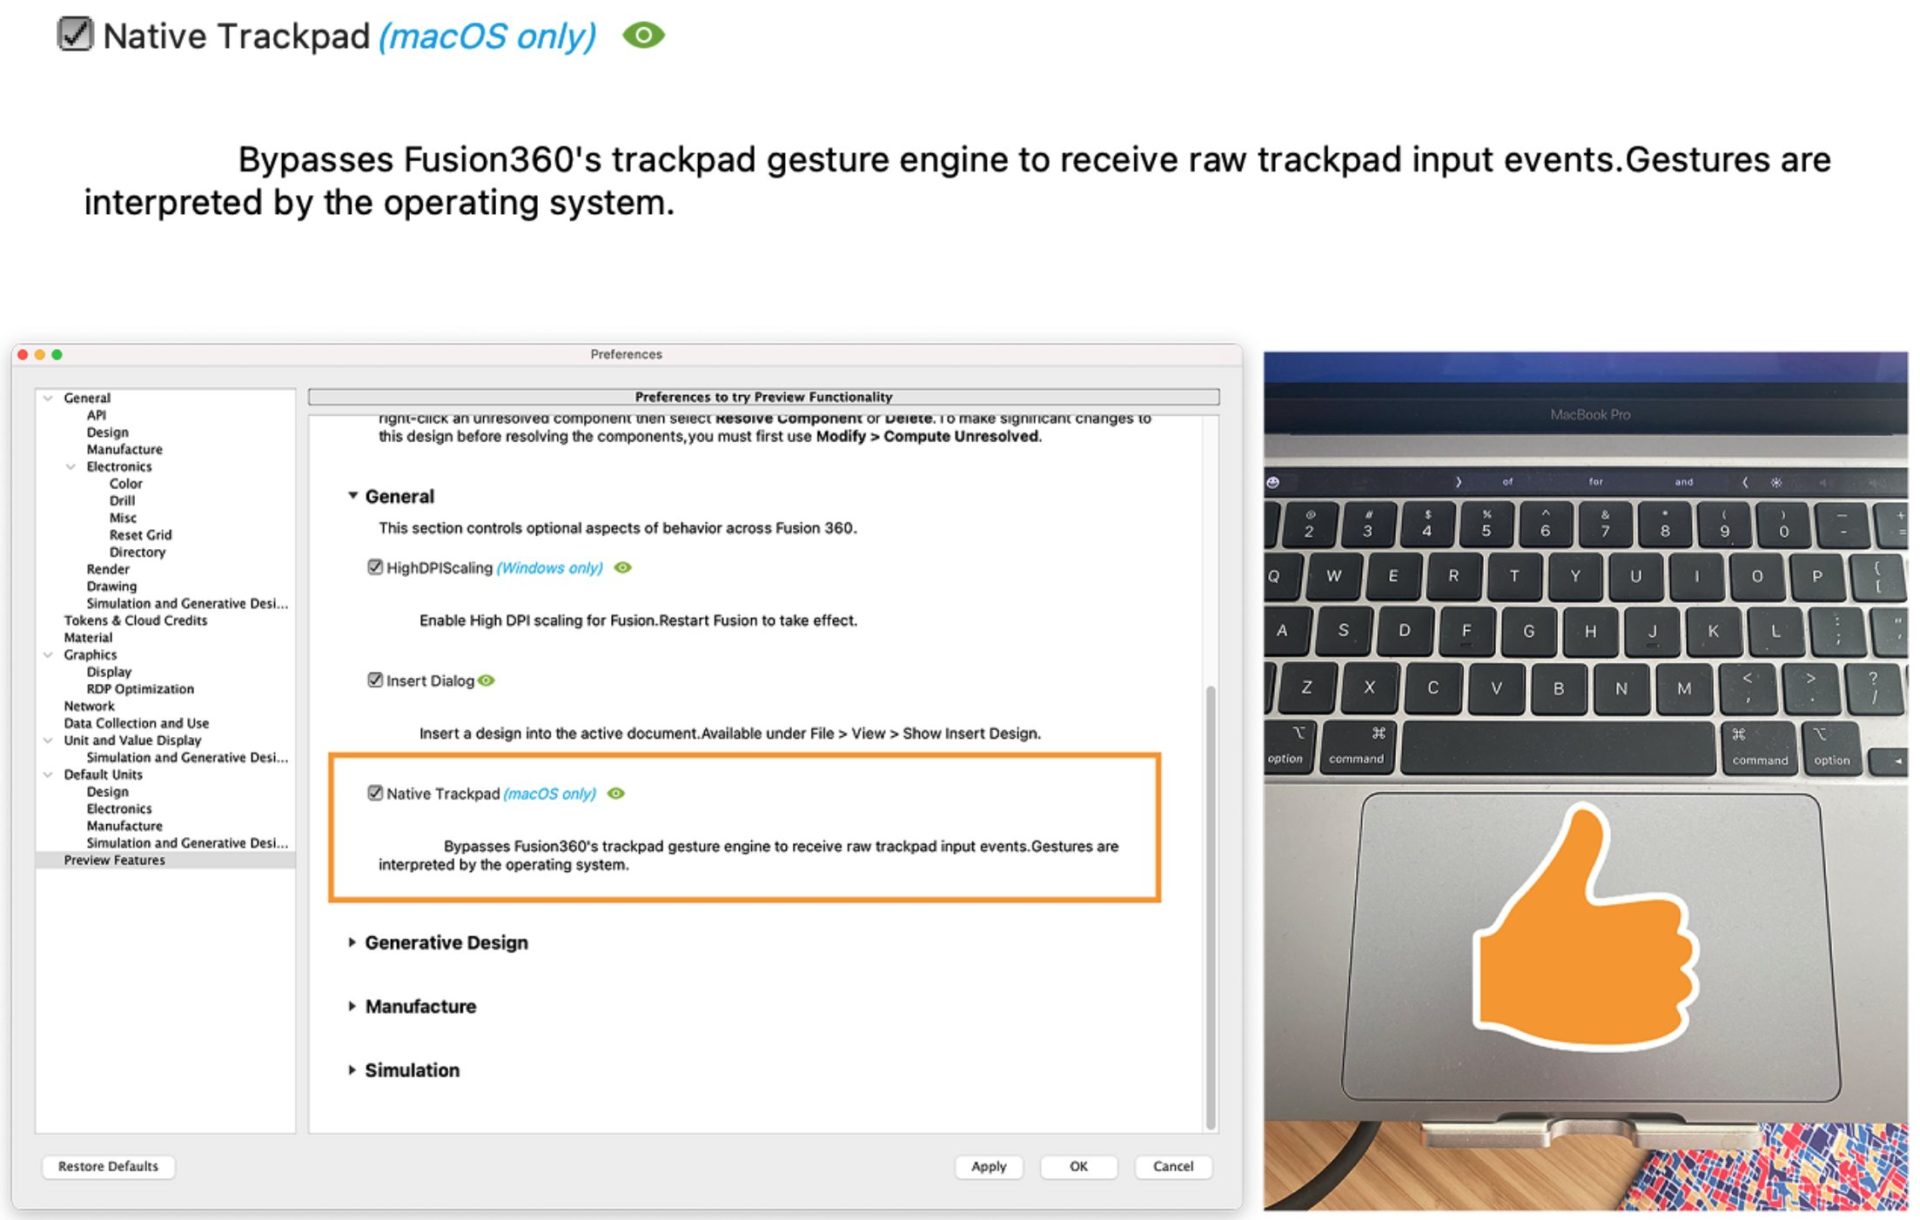
Many of you have reported issues while using Fusion 360 with the trackpad on your Macbook laptops. Some of these issues stemmed from Fusion 360’s own trackpad drivers experiencing instability. We’ve fixed this by making Fusion 360 send gesture events directly to your native macOS trackpad drivers. This fix is currently available to try as a preview in the Preview Features section of your preferences. Feel free to turn it on and let us know how it’s working for you.
New to try: 3D Arrange
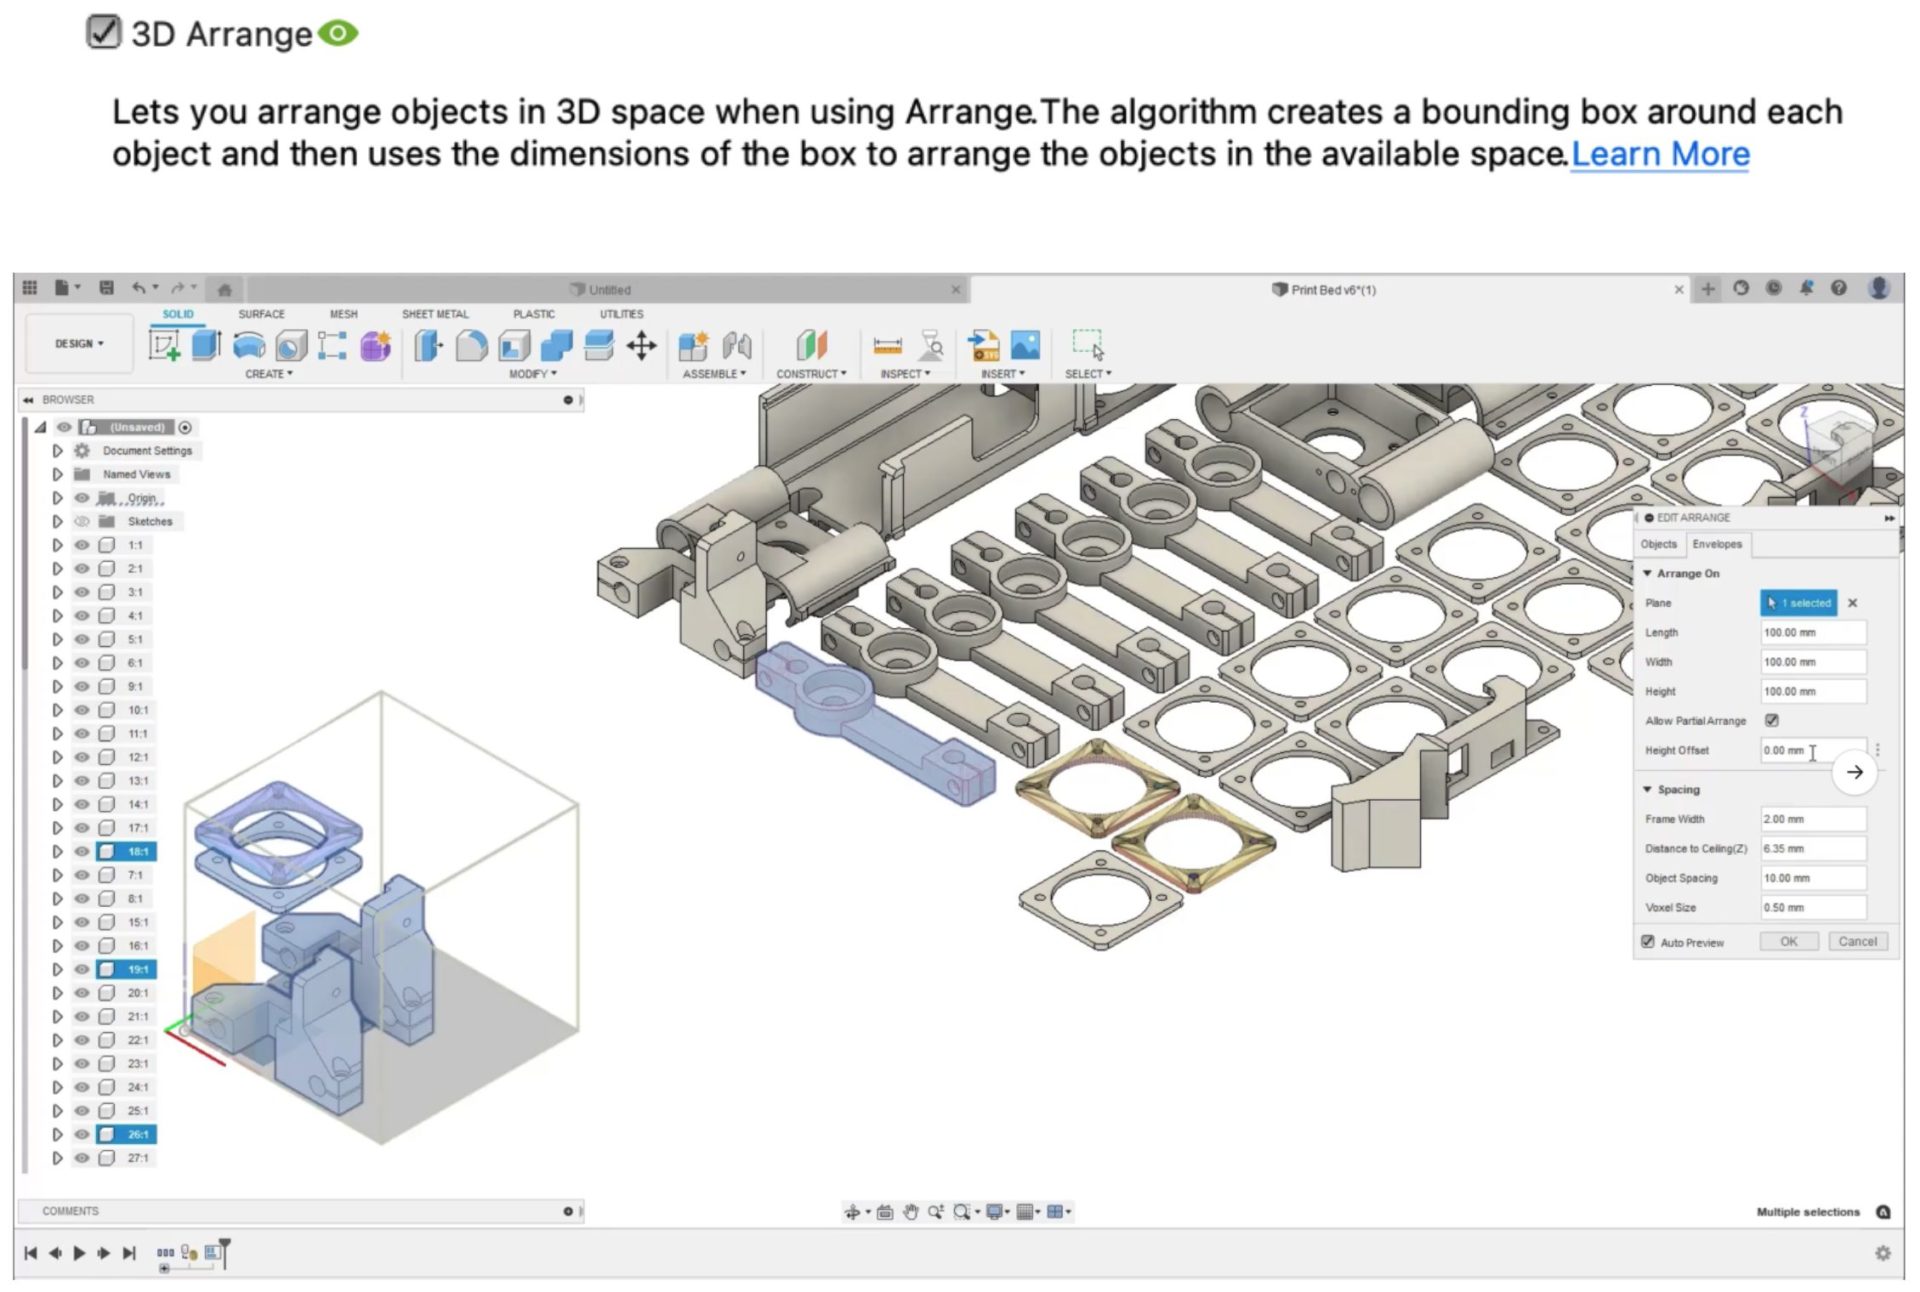
By turning on the 3D Arrange preview feature, you’ll be able to arrange parts in a 3D space within a bounding box, which conveniently sets you up for SLS additive manufacturing. After you’ve enabled the preview feature, you’ll notice the Solver Type drop-down menu in the Arrange tool will include a new 3D Arrange option, along with the existing 2D Arrange option. From there, you’re able to select a mix of objects that are solid as well as mesh based. Arranging them happens automatically as you work through the settings you want define within the command dialog. Once the parts are arranged, you can always go back and edit the arrangement, as well as the size of the bounding box to better fit your parts for manufacturing.
Improvements & Fixes
To learn more about other improvements that went into this update, our extended list of fixes to issues reported by you, as well as known issues, check out the related Known Issues, Improvements and Fixes forum thread below.
See improvements and fixes for this update
See past improvements and fixes threads
