Welcome to another Fusion 360 update where we deliver the latest and greatest so you can be more productive and get things done faster. This update includes some notable improvements in 2D drawings, modeling, rendering, CAM and our data management infrastructure. let’s walk through it together, shall we?
Now watch me WIP, watch me DM…DM
RememberWIP DM (Work-in-progress data management)? Boy we sure do, and we’ve been very busy at it, wrenching on the this significant upgrade to our cloud data management infrastructure, upgrading it, making sure that everything is bolted down and is connected properly. You will notice some things feel snappier and that’s good and all, but this will also make so much more possible.
Things might not look different as far as the new WIP DM, but this update represents an important internal milestone for us, and takes us another step towards enabling more powerful data management and collaboration workflows such as the much talked aboutbranching and merging experience we’ve been designing. We’ll definitely keep you in the loop as we start revealing the new capabilities these improvements make possible.
New Features added to 2D Drawings
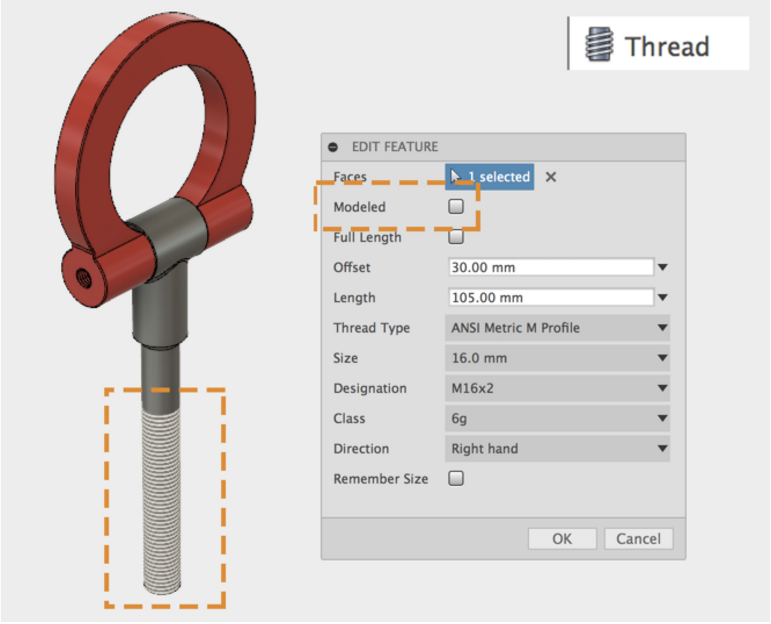
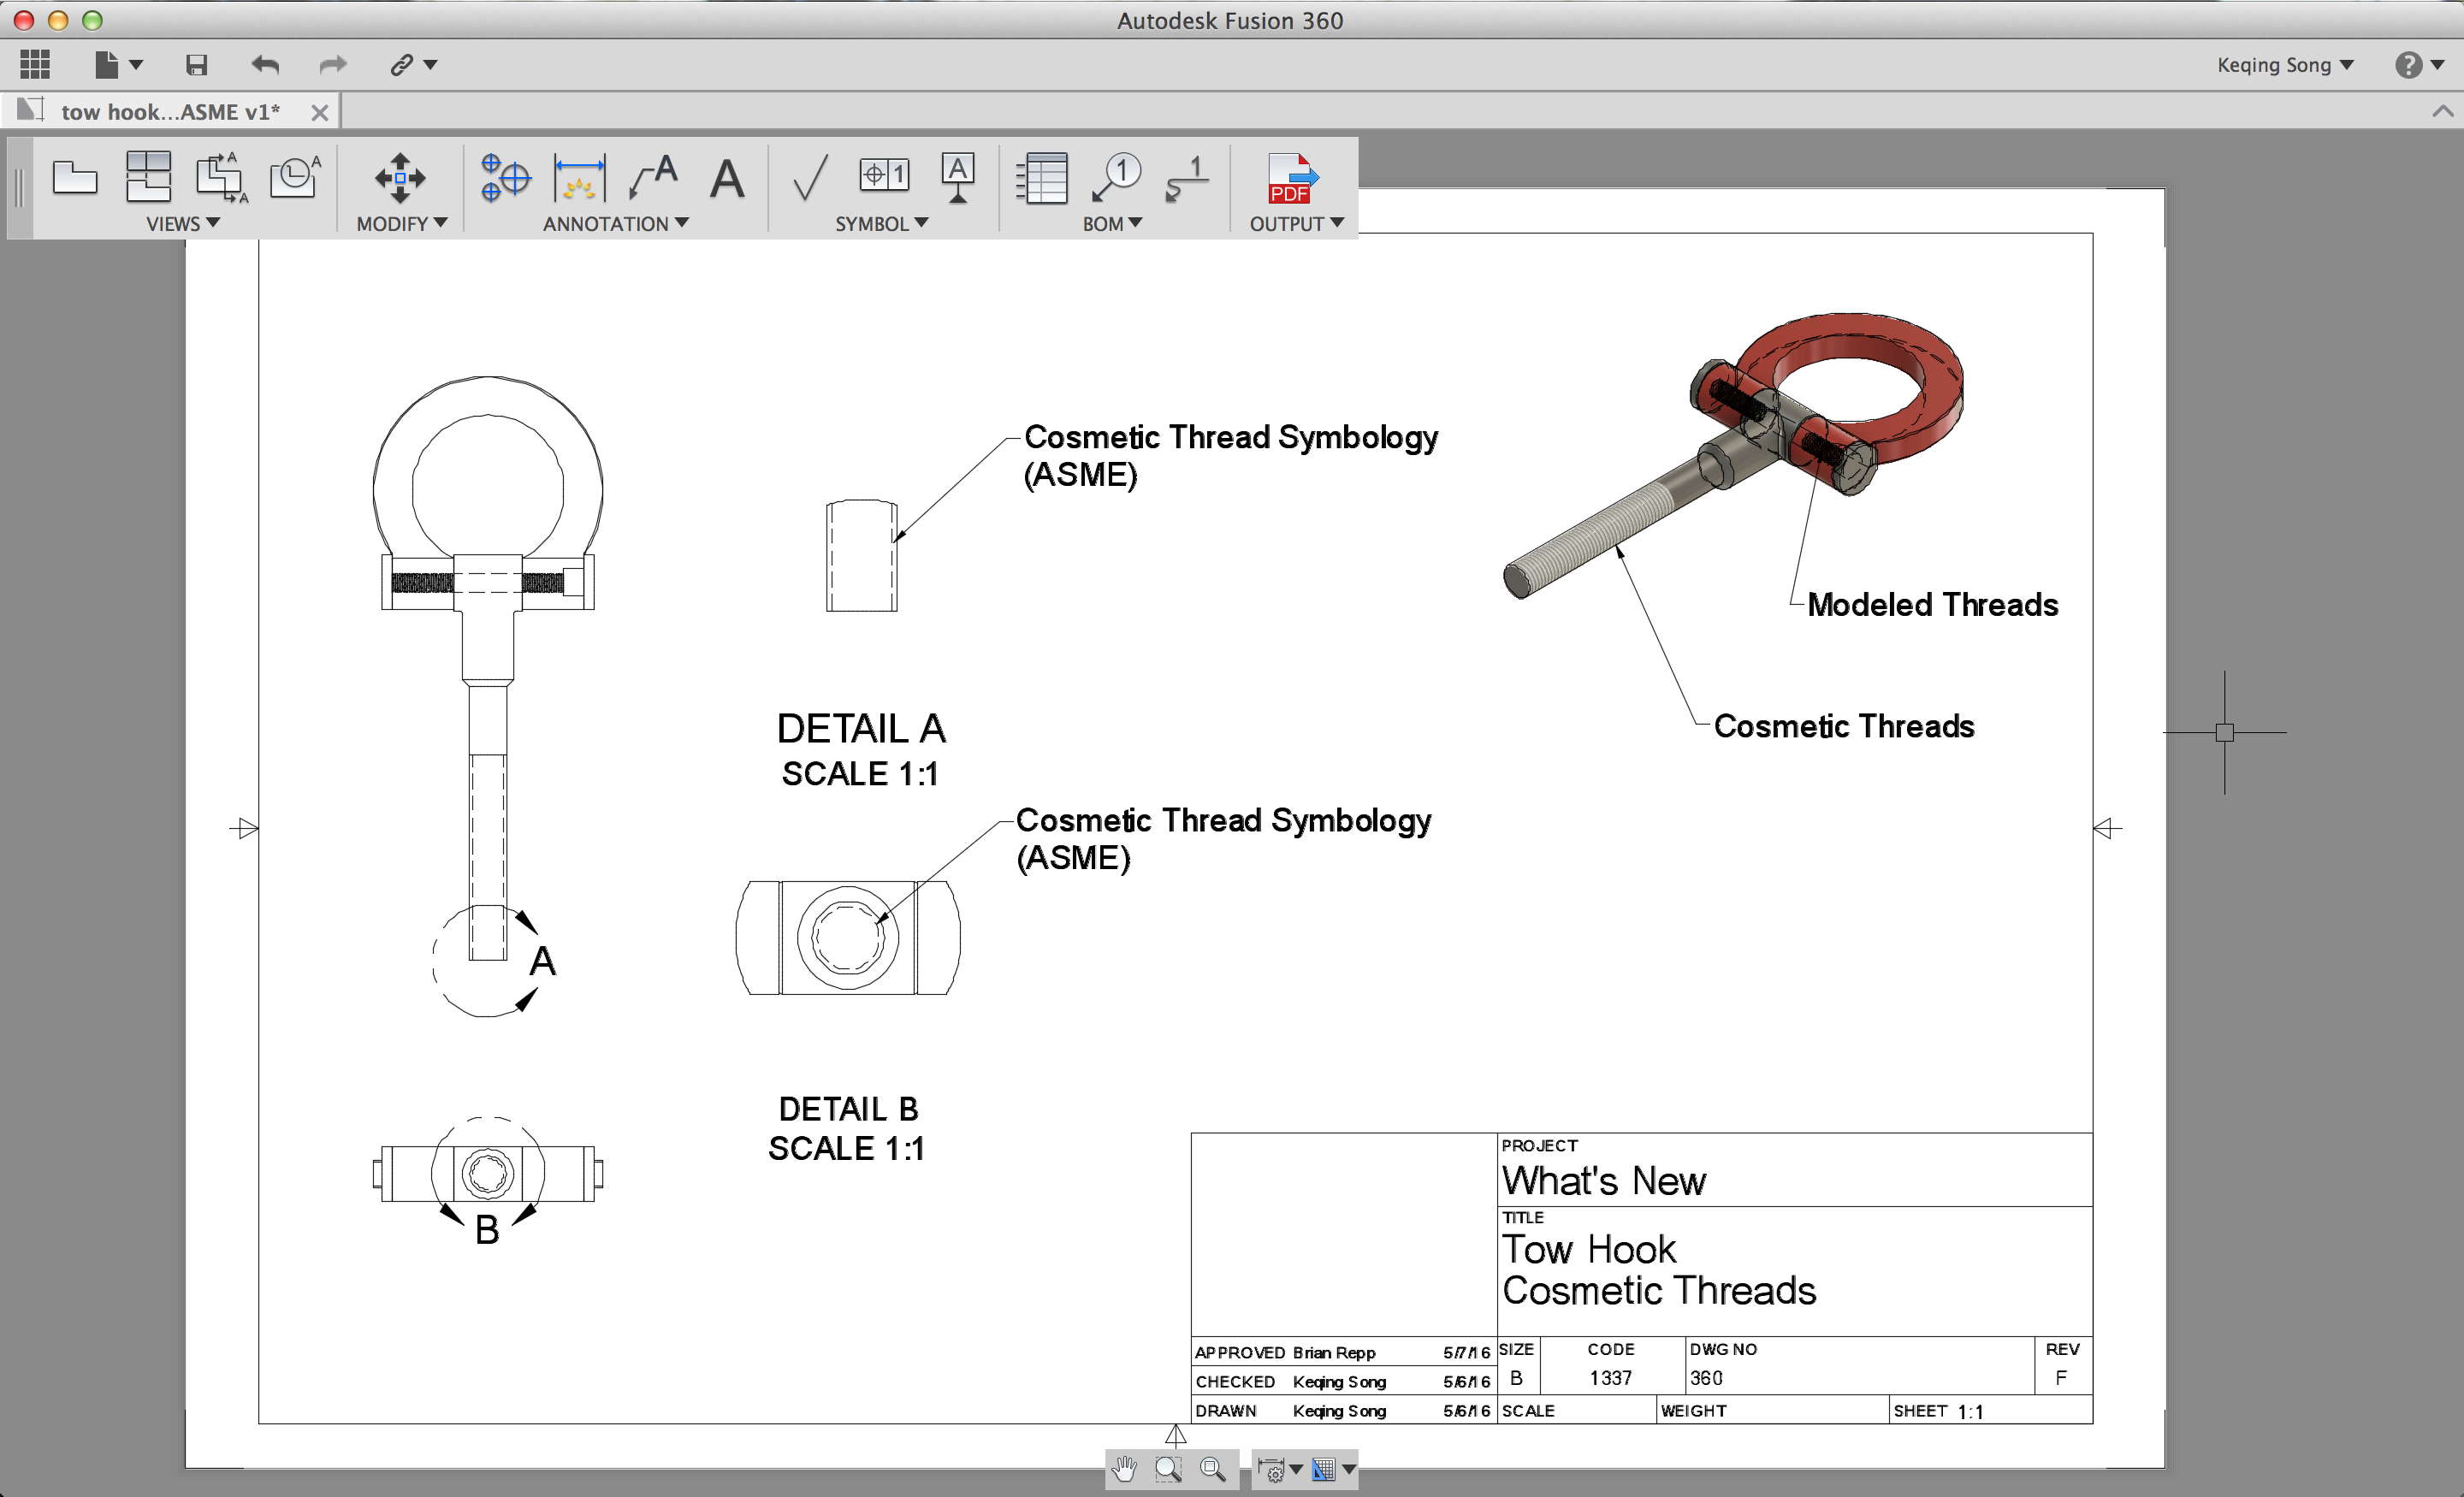
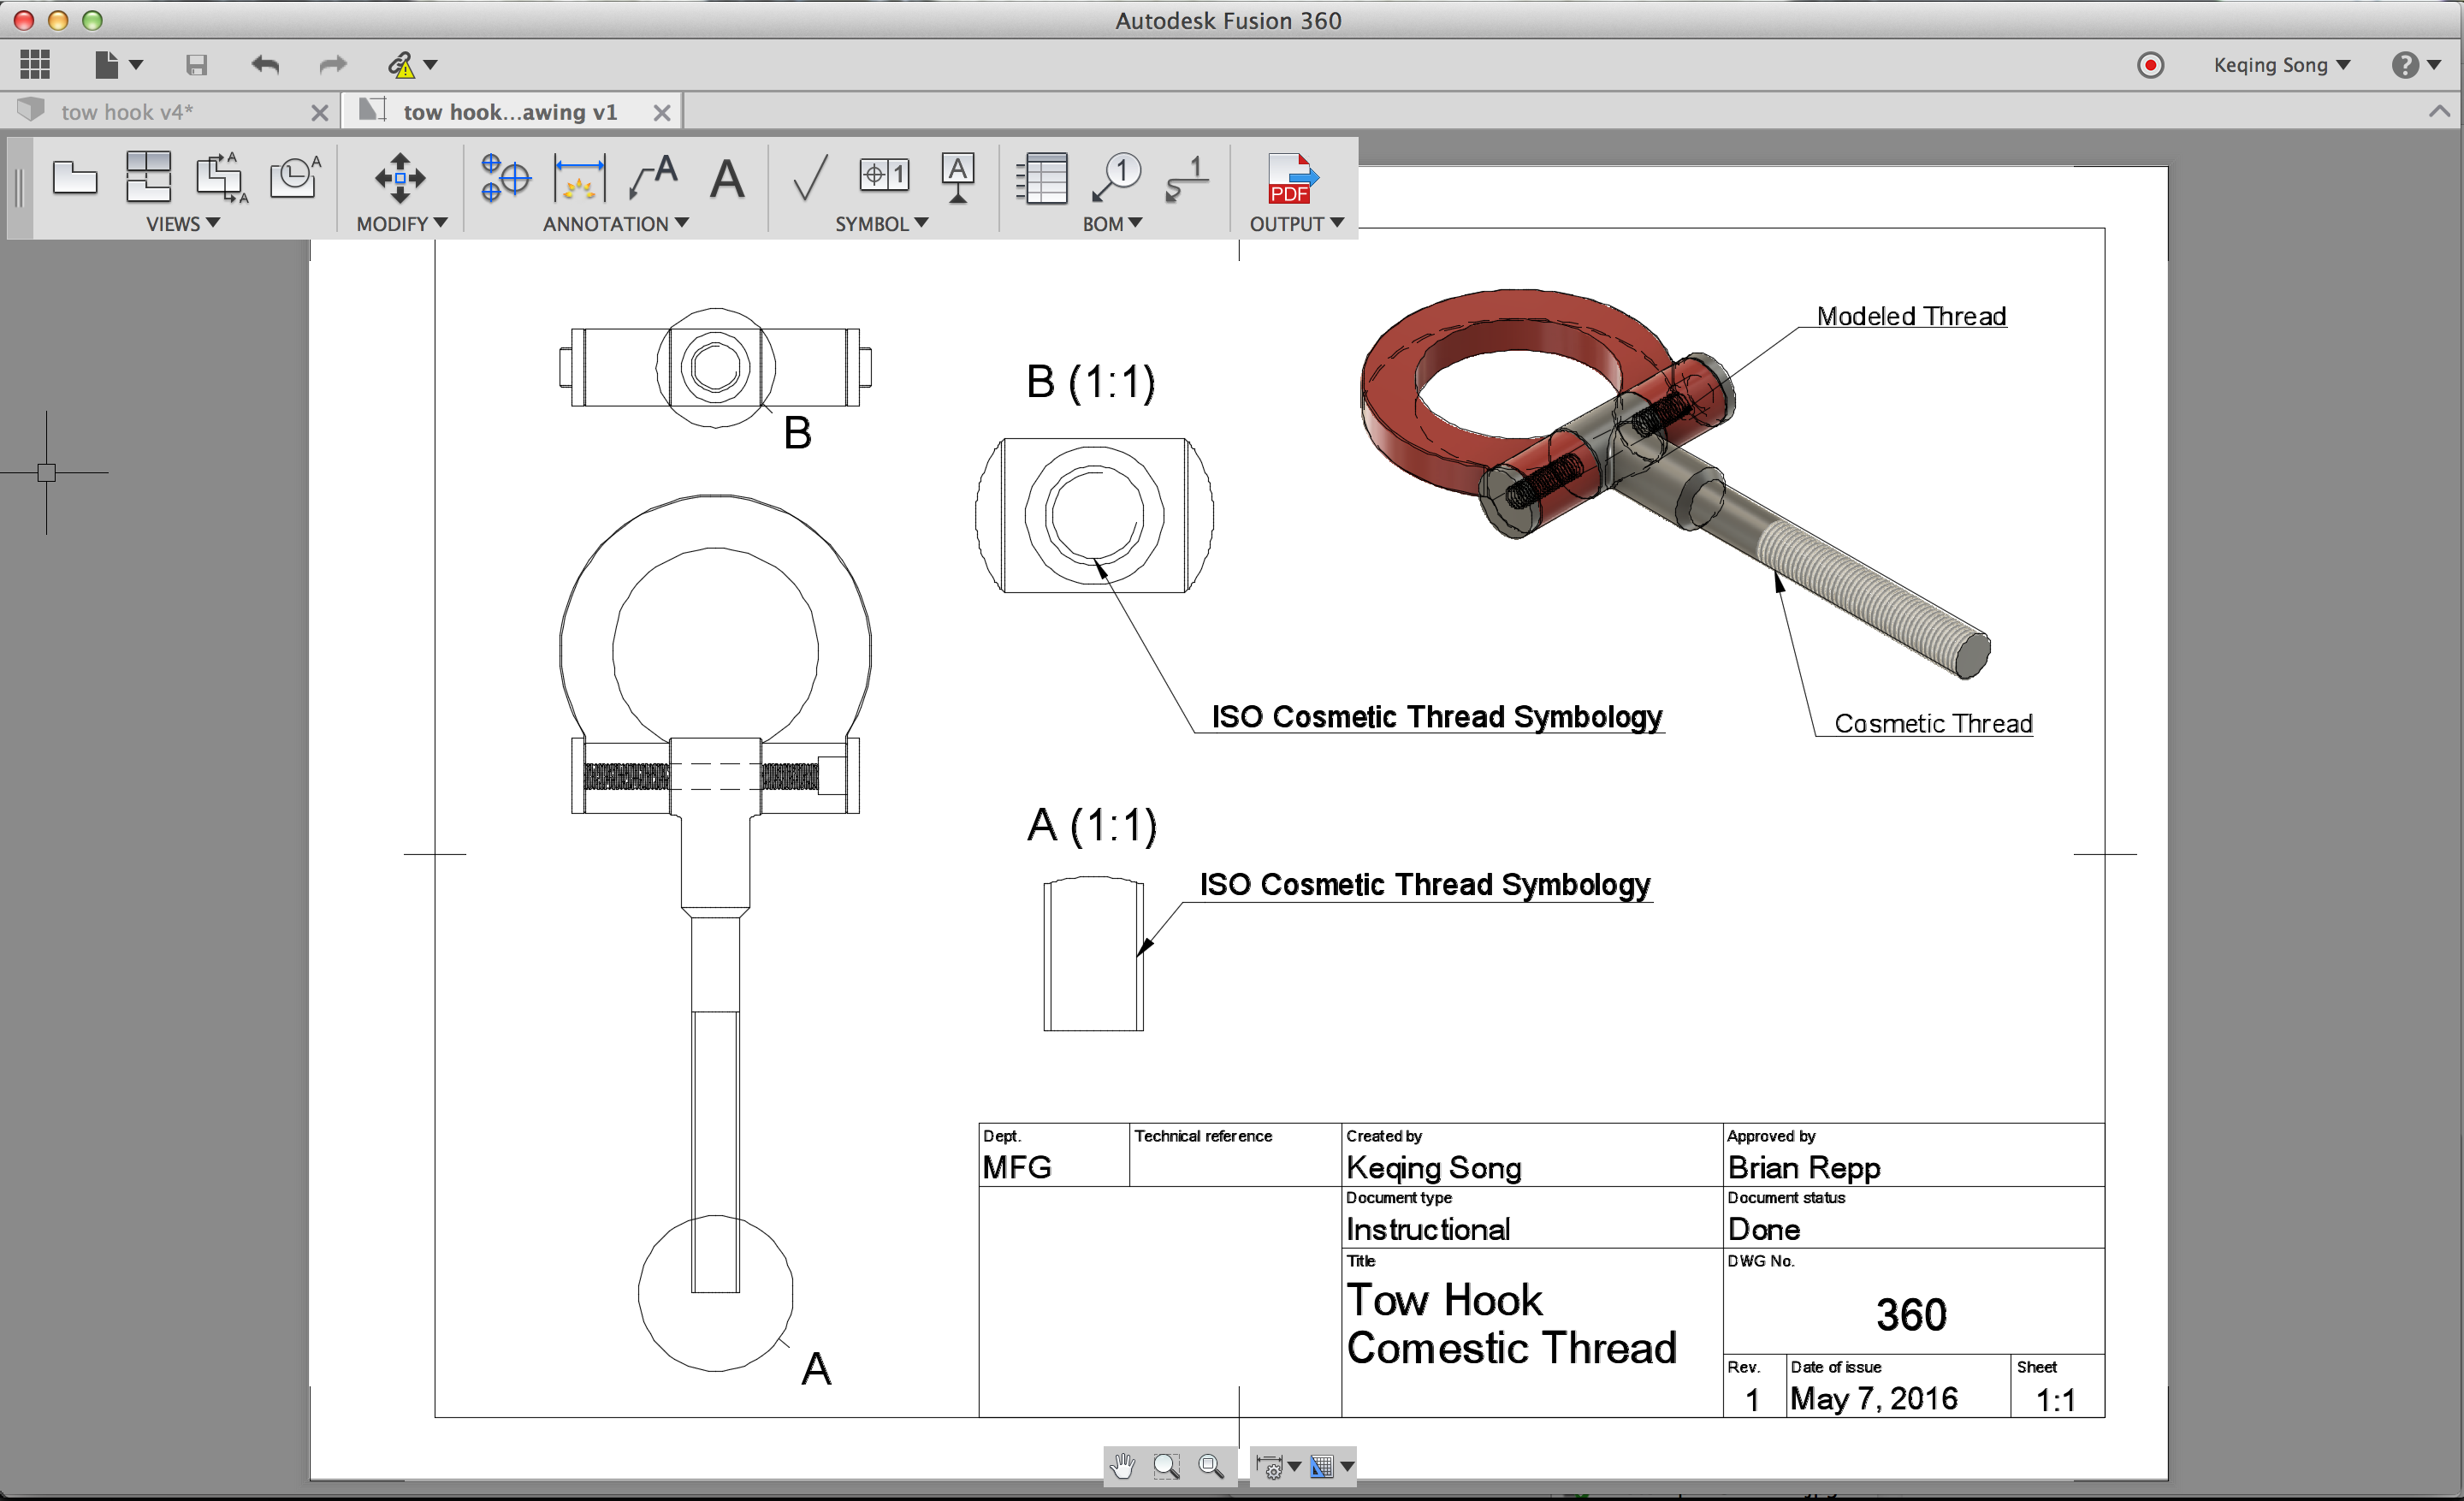
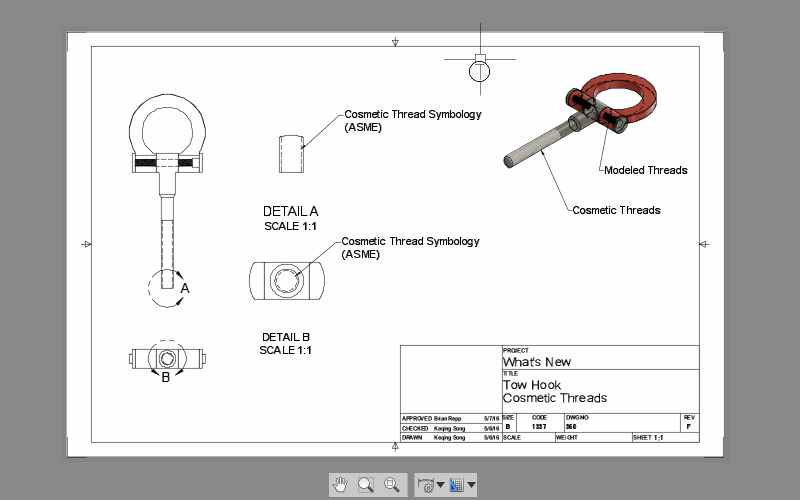
Support for Cosmetic Threads
2D drawings now supports threads (mentioned in this IdeaStation idea). If you have a design that has threads on some of its parts, you know that the Thread tool lets you toggle between cosmetic threads or modeled threads. Having modeled threads may look awesome, but it puts more of a load on your machine to compute, especially as your designs get more and more complex.
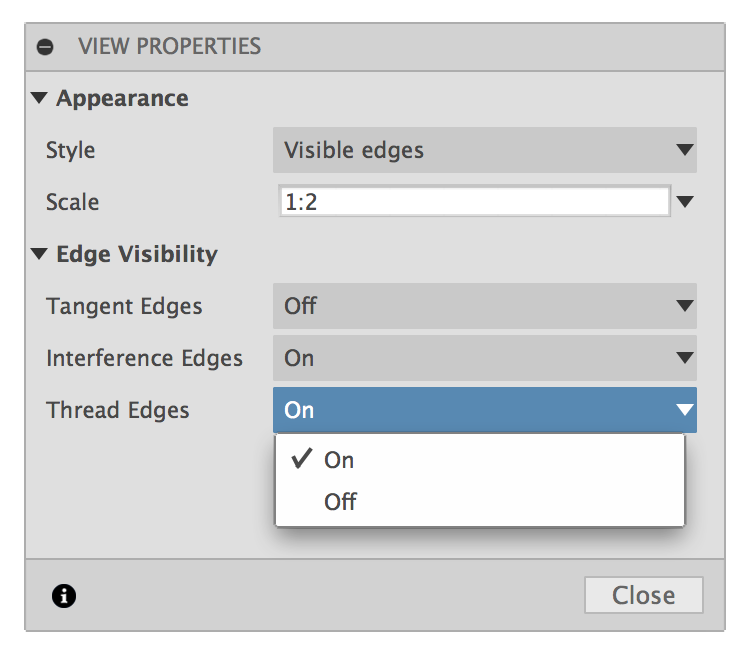
Now when you create a drawing of your design, you can have thread edges turned on or off in the View Properties dialog.
Having it on will display where your cosmetic threads are. Keep in mind that this is displayed differently in ASME and ISO standards. Here they are in a side-by-side comparison.
ASME – cosmetic threads are represented by the dashed lines.
ISO – cosmetic threads are represented by solid lines.
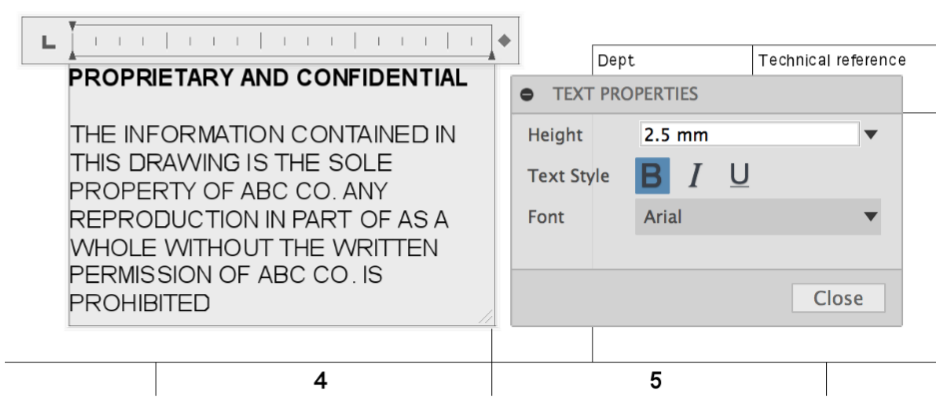
Text Property Editor
Previously when you wanted to annotate a specific area of a design, or call something out with a blurb, all you had was the ability to write text without any way to format it. Now you have some basic text editing capabilities such as text height, style, and a selection of fonts at your fingertips.
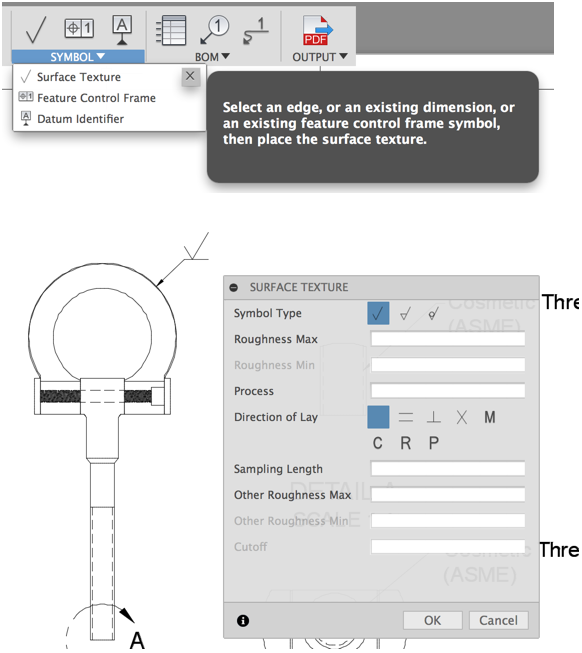
Surface Texture Symbol
It’s important to communicate in a drawing what kind of finish you want on your designs. As part of our efforts to provide more annotation tools, we now have Surface Texture under the Symbol drop down menu that lets you do just that. For those not familiar with Surface Texture and what each symbol type means, here is a useful surface finishes/textures Wiki page that should get you up-to-speed.
Border and Title Block Visibility
So what if you didn’t need a title block or border when you created a 2D drawing and just wanted them gone? Before you were able to delete them yet couldn’t get them back, but now you can turn them on and off by going to the Sheet Settings option at the bottom and checking whether you want to display them or not.
In addition to these features, we’ve also made a ton of fixes in the 2D drawings space. Here are some of the more notable ones:
There were some designs where you couldn’t export a drawing from the details page of A360. This has been fixed.
There were instances where if you made a change to your design, saved it, and went back to it’s associated drawing, you didn’t get prompted that the design is out-of-date/options to update. Now Fusion will let you know that your design is out-of-date.
Select and Get Simple Measurements
We love it when a plan comes together, and we’re happy to report that one of the highest voted ideas on the IdeaStation made it into this update. TMC.Engineeringsubmitted this IdeaStation idea around having simple measurements appear when you select something on your design, without needing to use the Measure tool explicitly. This idea accrued 124 votes, and we’re glad to see it become a permanent feature of the product. Way to go community!
Mirror, mirror on the wall…let me mirror components?
Another popular IdeaStation idea by KirillChepizhko and roambotics_scott (here and here) is now a reality; you now have the option to mirror components with the Mirror command! Simply pick the component you want to mirror, then select the plane you want to use as the mirror plane, and you’ve got mirrored components.
Autocomplete Parameters Now Available
Another IdeaStation idea submitted here by Helmi74 and here by CabbageCraig was around being able to type in a letter within sketch dimensions and have Fusion autocomplete the name for you if you have custom parameters set within your parameters dialog. Now you can. Hooray!
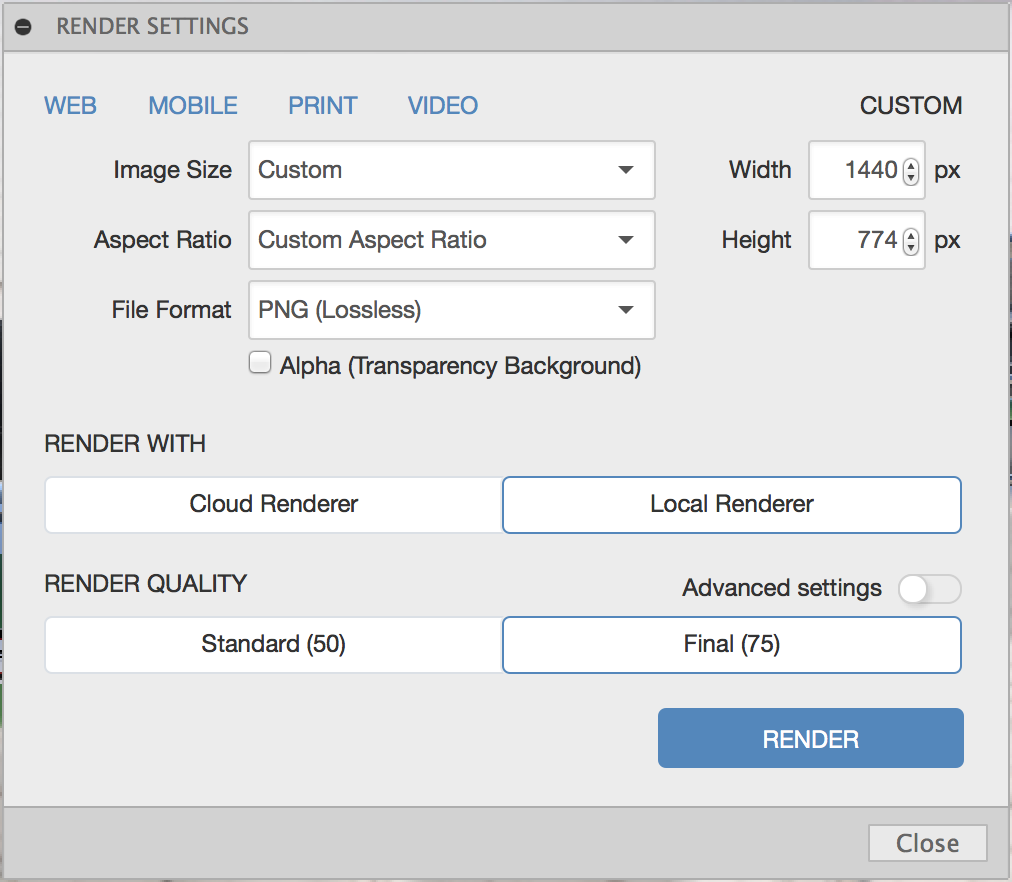
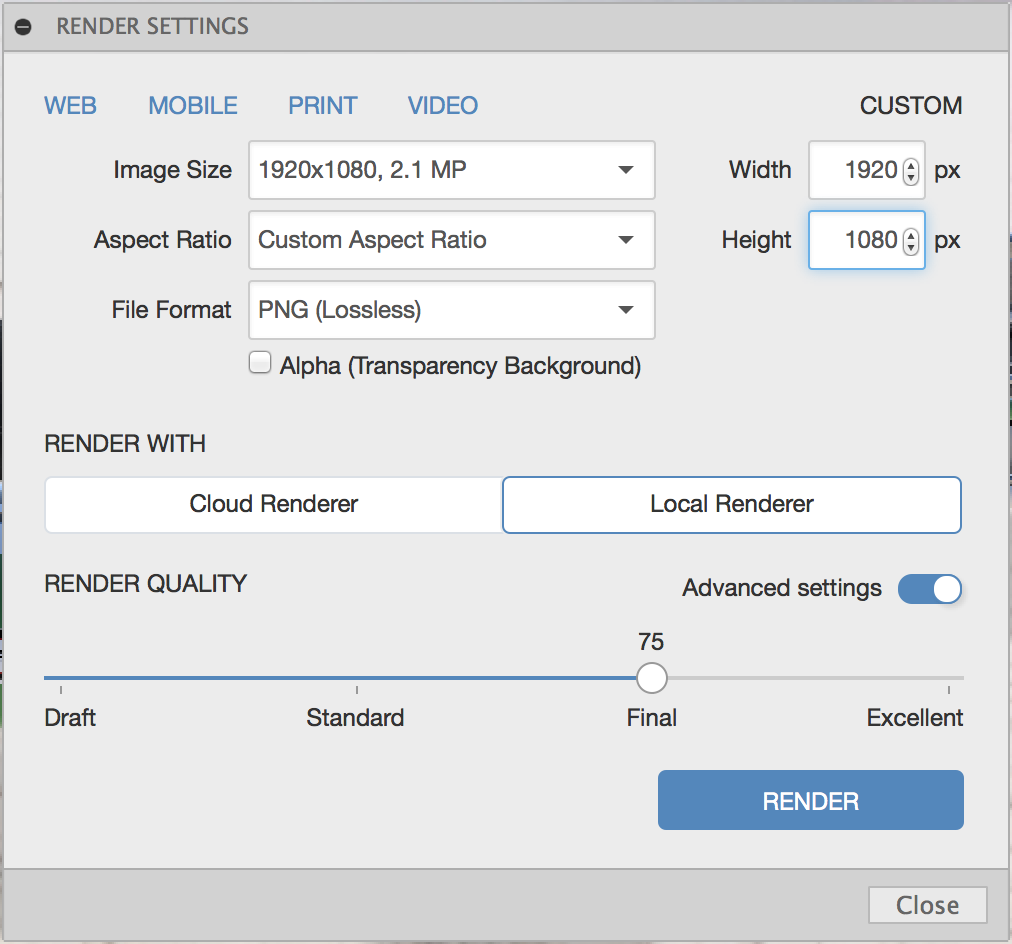
Local Background Rendering
Good news! StefanLazic, you’ll really appreciate this since you posted it in the IdeaStation. You now have the ability to use the same rendering workflow for local rendering, as you had for cloud rendering. This means you can render designs to a preset or custom size and resolution on your desktop in the background while you continue to work. Here’s how this works:
The rendering icons have been updated to show two ways to render:
In-canvas render will kick off the same real-time interactive rendering behavior as it was before.
Render lets you choose between background cloud rendering and local rendering.
When you change it to local rendering, turn on Advanced settings to reveal more options to adjust the quality of your render. You can also set a custom image size, with the max being 4000 x 4000 pixels at 72 pixels per inch.
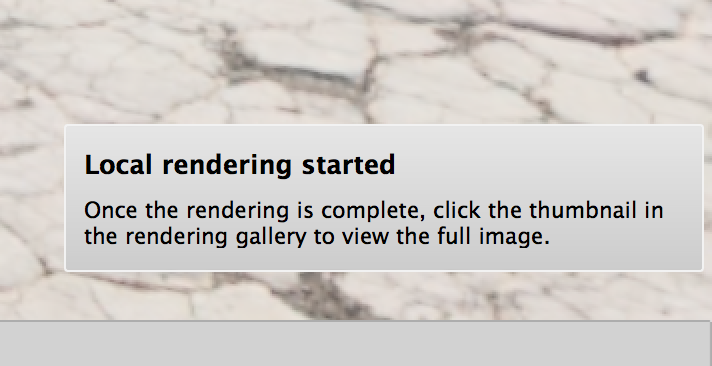
When you hit render, the software will do its magic and save the data for background local rendering. You’ll see a couple of notifications, and once it’s ready, it’ll begin to render. At this point, you can continue to work on your design.
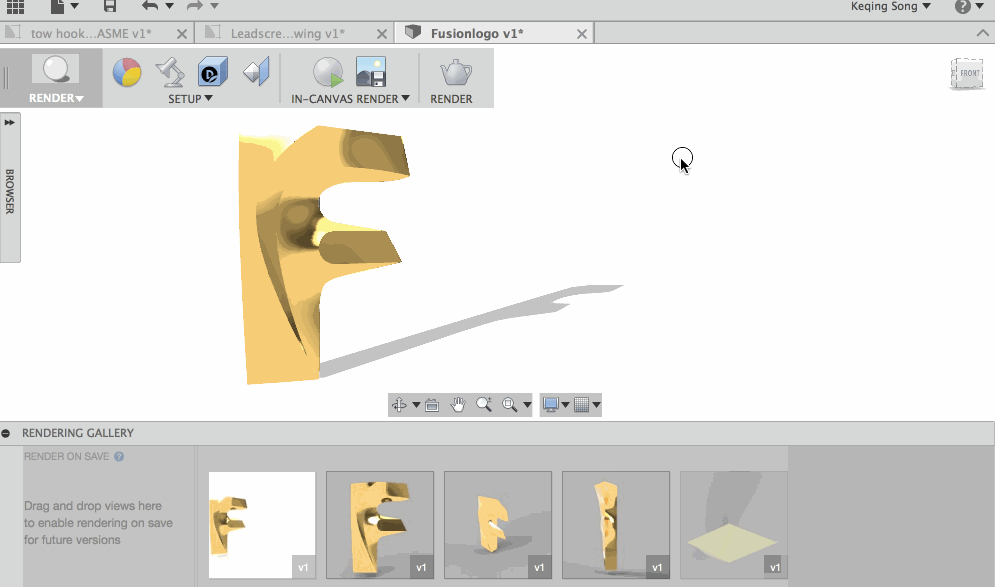
When the rendering is finished, it will appear in the Rendering Gallery where you can preview the render, re-render, or save it.
So we heard you want to rotate SVGs
There’s been a lot of talk (also as an IdeaStation idea) around how to better manipulate SVGs for making logos in Fusion, like rotate and resize. Previously I’ve posted a work-around of how to do it, but now when you import a SVG, you’ll get a preview of what it looks like and rotate it before you place the SVG. Better yet, we got rid of all those sketch points that come in so now when your SVG is placed, it looks nice and clean.
Graphic Improvements
We also improved our Depth of Field (DoF) feature where previously if you picked the area where you want your focus to be, you’d have to pick it again if you played around with your camera angles (pan, zoom, etc). Now Fusion will remember where you placed your point so that you no longer have to pick the area again after zooming in and out.
In terms of fixes, we found a memory leak issue where the amount of data to render would increase even though the design and rendering settings were unchanged. This is now fixed.
There was also a weird regression related to a graphics issue where if you applied a Zebra analysis on a T-Spline box, the blue highlight would turn into some sort of a mutated Chia pet. This is now fixed, and let’s never speak of it ever again.
Workflow Improvements
We’ve heard you say it wasn’t easy finding where/how to import data. Now when new users sign in for the first time, the data panel will open automatically to your first default project with a blurb about how to import existing data, pointing to the upload icon.
Speaking of data, we now support SolidWorks 2016, Inventor 2017, NX 10 and Catia V5-6R2015 files. Woohoo!
For some reason the share menu was missing from the Mac system menu bar. Now it’s back!
There was regression issue on Macs where you weren’t able to insert OBJs as a mesh in Fusion, and if you did, graphics performance became less than optimal. That’s now fixed.
There was another strange issue where Fusion would crash when you’re trying to exit the software. Talk about irony. This was largely happening on Mac machines running El Capitan. We’ve made a fix that should stop this from happening from now on.
We found a regression issue where if you wanted to download Meshmixer from the 3D print dialog, nothing would happen. Now it works as it should.
CAM improvements
Lonniecady posted the idea of adding model override to Turning operations in the CAM workspace. This will allow you to select sketch geometry on the geometry tab in Turning so that you have more control over what material to remove in each step.
We made fixes to our CAM kernel which fixed many other issues that have been reported in adaptive clearing, toolpath generation, as well as Spiral and turning ID grooving behaviors. One of these issues had to do with how the tool was only retracting to X0 instead of all the way to the defined retract plane when Resh Machining was on. Now it will go all the way to the Retract plane every time.
We also fixed some nasty reproducible crash issues around selecting an open contour in the 2D pocket command, selecting curves as geometry input, as well as copying, deleting, and pasting operations.
Tool library file extensions have been changed from mytoollibrary.json to a less devspeak extension: .tools. Having a unique extension will make it more easy to identify them from other file formats when you’re importing and exporting tool libraries.
Building out our API
We fixed a number of bugs in our API related to attributes and incorrect line breaks in our Python API definition so that it is more readable.
We’ve added the ability to create a new real BrepBody based on an input BrepBody which can be transient. This is possibly only valid in the context of a direct modeling document or a basefeature in a parametric document.
Some of the command related events (ValidateInputs and InputChanged) don’t provide an easy or intuitive way to get the associated CommandInputs object. @ekinsb and our API gurus have added a new “inputs” property to both of the related eventArgs classes. Winning.
We’ve also added a Test attribute for Fusion entities. The attribute includes:
ConstructionAxis, ConstructionPoint and ConstructionPlane
SketchDimensions and GeometricConstraints
JointOrigin, RigidGroup, AsBuildJoint and Joint classes
Meshbody class
Support attribute copy/paste
Product (asset) and Document classes
Component Behavior Fixes
Bluelife reported this component copy and paste issue where after a new component was pasted, he was not able to edit the new component’s parameters. We discovered that this was a regression bug, and now it’s fixed.
There was a bug where if you had referenced designs in your original design, mirrored the reference design, then created a new component, joined the new one with the mirrored, and THEN broke the link on the referenced design, the joint would disappear. The joint should remain, and now it does.
There were some crash issues related to breaking links and getting the latest of a cross-referenced design. We’re glad to report that these have now been fixed.
We’ve received crash reports on Fusion crashing when you were using the Move command or when you were creating a joint. Apparently it was related to the Parameters issue, and now it’s been resolved.
Sketching Improvements and Fixes
There are have been many reports around inserted DXFs having the wrong scale/units. Good news – you can now choose/override units when you insert a DXF
Now when you snap a sketch vertex to point outside the sketch environment, Fusion will show a coincident constraint icon.
You can now pre-select multiple sketch geometry and then add equal constraints on them in a single scoop.
Previously if you pre-selected sketch geometry and went into the Offset command, your pre-selections would not remain selected. Now they do.
Robduarte reported this sketch bug where after he created a rectangular pattern in a sketch and switched the Distance Type from Spacing to Extents, it screws up the whole thing. Now it should work as it should.
There was a weird bug where if you had symmetry constraints applied to the vertical end points of a line and then dragged the line, it wouldn’t remain symmetrical. Now it does.
There was crash issue where if you edited an existing sketch that was very complex, a circuit board for instance, Fusion would crash. We dug into this and found out that it was graphics related. Now this is fixed.
When you projected a point of a sketch onto another surface, Fusion would sometime end up crashing. It happened on a couple specific designs, and now it’s fixed.
Again, thanks for your continuous support! We love learning about what you guys are designing with the software, and constantly find ourselves with our jaws dropped after seeing what you guys are sharing. Massive kudos. Onward to the next update! Keqing and the Fusion team
Want to know what came before this update? Click here or the “Product Updates” category filter below.
Full-access Fusion Trial
Unlock all of Fusion's advanced features and functionality - free for 30 days.
By clicking subscribe, I agree to receive the Fusion newsletter and acknowledge the Autodesk Privacy Statement.
Success!
______
Cookie preferences
Your privacy is important to us and so is an optimal experience. To help us customize information and build applications, we collect data about your use of this site.
Learn more about the Third-Party Services we use in each category, and how we use the data we collect from you online.
Strictly necessary – required for our site to work and to provide services to you
Qualtrics
We use Qualtrics to let you give us feedback via surveys or online forms. You may be randomly selected to participate in a survey, or you can actively decide to give us feedback. We collect data to better understand what actions you took before filling out a survey. This helps us troubleshoot issues you may have experienced. Qualtrics Privacy Policy
Akamai mPulse
We use Akamai mPulse to collect data about your behavior on our sites. This may include pages you’ve visited, trials you’ve initiated, videos you’ve played, purchases you’ve made, your IP address or device ID, and your Autodesk ID. We use this data to measure our site performance and evaluate the ease of your online experience, so we can enhance our features. We also use advanced analytics methods to optimize your experience with email, customer support, and sales. Akamai mPulse Privacy Policy
Digital River
We use Digital River to collect data about your behavior on our sites. This may include pages you’ve visited, trials you’ve initiated, videos you’ve played, purchases you’ve made, your IP address or device ID, and your Autodesk ID. We use this data to measure our site performance and evaluate the ease of your online experience, so we can enhance our features. We also use advanced analytics methods to optimize your experience with email, customer support, and sales. Digital River Privacy Policy
Dynatrace
We use Dynatrace to collect data about your behavior on our sites. This may include pages you’ve visited, trials you’ve initiated, videos you’ve played, purchases you’ve made, your IP address or device ID, and your Autodesk ID. We use this data to measure our site performance and evaluate the ease of your online experience, so we can enhance our features. We also use advanced analytics methods to optimize your experience with email, customer support, and sales. Dynatrace Privacy Policy
Khoros
We use Khoros to collect data about your behavior on our sites. This may include pages you’ve visited, trials you’ve initiated, videos you’ve played, purchases you’ve made, your IP address or device ID, and your Autodesk ID. We use this data to measure our site performance and evaluate the ease of your online experience, so we can enhance our features. We also use advanced analytics methods to optimize your experience with email, customer support, and sales. Khoros Privacy Policy
Launch Darkly
We use Launch Darkly to collect data about your behavior on our sites. This may include pages you’ve visited, trials you’ve initiated, videos you’ve played, purchases you’ve made, your IP address or device ID, and your Autodesk ID. We use this data to measure our site performance and evaluate the ease of your online experience, so we can enhance our features. We also use advanced analytics methods to optimize your experience with email, customer support, and sales. Launch Darkly Privacy Policy
New Relic
We use New Relic to collect data about your behavior on our sites. This may include pages you’ve visited, trials you’ve initiated, videos you’ve played, purchases you’ve made, your IP address or device ID, and your Autodesk ID. We use this data to measure our site performance and evaluate the ease of your online experience, so we can enhance our features. We also use advanced analytics methods to optimize your experience with email, customer support, and sales. New Relic Privacy Policy
Salesforce Live Agent
We use Salesforce Live Agent to collect data about your behavior on our sites. This may include pages you’ve visited, trials you’ve initiated, videos you’ve played, purchases you’ve made, your IP address or device ID, and your Autodesk ID. We use this data to measure our site performance and evaluate the ease of your online experience, so we can enhance our features. We also use advanced analytics methods to optimize your experience with email, customer support, and sales. Salesforce Live Agent Privacy Policy
Wistia
We use Wistia to collect data about your behavior on our sites. This may include pages you’ve visited, trials you’ve initiated, videos you’ve played, purchases you’ve made, your IP address or device ID, and your Autodesk ID. We use this data to measure our site performance and evaluate the ease of your online experience, so we can enhance our features. We also use advanced analytics methods to optimize your experience with email, customer support, and sales. Wistia Privacy Policy
Tealium
We use Tealium to collect data about your behavior on our sites. This may include pages you’ve visited, trials you’ve initiated, videos you’ve played, purchases you’ve made, and your IP address or device ID. We use this data to measure our site performance and evaluate the ease of your online experience, so we can enhance our features. We also use advanced analytics methods to optimize your experience with email, customer support, and sales. Tealium Privacy Policy
Upsellit
We use Upsellit to collect data about your behavior on our sites. This may include pages you’ve visited, trials you’ve initiated, videos you’ve played, purchases you’ve made, and your IP address or device ID. We use this data to measure our site performance and evaluate the ease of your online experience, so we can enhance our features. We also use advanced analytics methods to optimize your experience with email, customer support, and sales. Upsellit Privacy Policy
CJ Affiliates
We use CJ Affiliates to collect data about your behavior on our sites. This may include pages you’ve visited, trials you’ve initiated, videos you’ve played, purchases you’ve made, and your IP address or device ID. We use this data to measure our site performance and evaluate the ease of your online experience, so we can enhance our features. We also use advanced analytics methods to optimize your experience with email, customer support, and sales. CJ Affiliates Privacy Policy
Commission Factory
We use Commission Factory to collect data about your behavior on our sites. This may include pages you’ve visited, trials you’ve initiated, videos you’ve played, purchases you’ve made, and your IP address or device ID. We use this data to measure our site performance and evaluate the ease of your online experience, so we can enhance our features. We also use advanced analytics methods to optimize your experience with email, customer support, and sales. Commission Factory Privacy Policy
Google Analytics (Strictly Necessary)
We use Google Analytics (Strictly Necessary) to collect data about your behavior on our sites. This may include pages you’ve visited, trials you’ve initiated, videos you’ve played, purchases you’ve made, your IP address or device ID, and your Autodesk ID. We use this data to measure our site performance and evaluate the ease of your online experience, so we can enhance our features. We also use advanced analytics methods to optimize your experience with email, customer support, and sales. Google Analytics (Strictly Necessary) Privacy Policy
Typepad Stats
We use Typepad Stats to collect data about your behaviour on our sites. This may include pages you’ve visited. We use this data to measure our site performance and evaluate the ease of your online experience, so we can enhance our platform to provide the most relevant content. This allows us to enhance your overall user experience. Typepad Stats Privacy Policy
Geo Targetly
We use Geo Targetly to direct website visitors to the most appropriate web page and/or serve tailored content based on their location. Geo Targetly uses the IP address of a website visitor to determine the approximate location of the visitor’s device. This helps ensure that the visitor views content in their (most likely) local language.Geo Targetly Privacy Policy
SpeedCurve
We use SpeedCurve to monitor and measure the performance of your website experience by measuring web page load times as well as the responsiveness of subsequent elements such as images, scripts, and text.SpeedCurve Privacy Policy
Qualified
Qualified is the Autodesk Live Chat agent platform. This platform provides services to allow our customers to communicate in real-time with Autodesk support. We may collect unique ID for specific browser sessions during a chat. Qualified Privacy Policy
Improve your experience – allows us to show you what is relevant to you
Google Optimize
We use Google Optimize to test new features on our sites and customize your experience of these features. To do this, we collect behavioral data while you’re on our sites. This data may include pages you’ve visited, trials you’ve initiated, videos you’ve played, purchases you’ve made, your IP address or device ID, your Autodesk ID, and others. You may experience a different version of our sites based on feature testing, or view personalized content based on your visitor attributes. Google Optimize Privacy Policy
ClickTale
We use ClickTale to better understand where you may encounter difficulties with our sites. We use session recording to help us see how you interact with our sites, including any elements on our pages. Your Personally Identifiable Information is masked and is not collected. ClickTale Privacy Policy
OneSignal
We use OneSignal to deploy digital advertising on sites supported by OneSignal. Ads are based on both OneSignal data and behavioral data that we collect while you’re on our sites. The data we collect may include pages you’ve visited, trials you’ve initiated, videos you’ve played, purchases you’ve made, and your IP address or device ID. This information may be combined with data that OneSignal has collected from you. We use the data that we provide to OneSignal to better customize your digital advertising experience and present you with more relevant ads. OneSignal Privacy Policy
Optimizely
We use Optimizely to test new features on our sites and customize your experience of these features. To do this, we collect behavioral data while you’re on our sites. This data may include pages you’ve visited, trials you’ve initiated, videos you’ve played, purchases you’ve made, your IP address or device ID, your Autodesk ID, and others. You may experience a different version of our sites based on feature testing, or view personalized content based on your visitor attributes. Optimizely Privacy Policy
Amplitude
We use Amplitude to test new features on our sites and customize your experience of these features. To do this, we collect behavioral data while you’re on our sites. This data may include pages you’ve visited, trials you’ve initiated, videos you’ve played, purchases you’ve made, your IP address or device ID, your Autodesk ID, and others. You may experience a different version of our sites based on feature testing, or view personalized content based on your visitor attributes. Amplitude Privacy Policy
Snowplow
We use Snowplow to collect data about your behavior on our sites. This may include pages you’ve visited, trials you’ve initiated, videos you’ve played, purchases you’ve made, your IP address or device ID, and your Autodesk ID. We use this data to measure our site performance and evaluate the ease of your online experience, so we can enhance our features. We also use advanced analytics methods to optimize your experience with email, customer support, and sales. Snowplow Privacy Policy
UserVoice
We use UserVoice to collect data about your behaviour on our sites. This may include pages you’ve visited. We use this data to measure our site performance and evaluate the ease of your online experience, so we can enhance our platform to provide the most relevant content. This allows us to enhance your overall user experience. UserVoice Privacy Policy
Clearbit
Clearbit allows real-time data enrichment to provide a personalized and relevant experience to our customers. The data we collect may include pages you’ve visited, trials you’ve initiated, videos you’ve played, purchases you’ve made, and your IP address or device ID.Clearbit Privacy Policy
YouTube
YouTube is a video sharing platform which allows users to view and share embedded videos on our websites. YouTube provides viewership metrics on video performance. YouTube Privacy Policy
Customize your advertising – permits us to offer targeted advertising to you
Adobe Analytics
We use Adobe Analytics to collect data about your behavior on our sites. This may include pages you’ve visited, trials you’ve initiated, videos you’ve played, purchases you’ve made, your IP address or device ID, and your Autodesk ID. We use this data to measure our site performance and evaluate the ease of your online experience, so we can enhance our features. We also use advanced analytics methods to optimize your experience with email, customer support, and sales. Adobe Analytics Privacy Policy
Google Analytics (Web Analytics)
We use Google Analytics (Web Analytics) to collect data about your behavior on our sites. This may include pages you’ve visited, trials you’ve initiated, videos you’ve played, purchases you’ve made, and your IP address or device ID. We use this data to measure our site performance and evaluate the ease of your online experience, so we can enhance our features. We also use advanced analytics methods to optimize your experience with email, customer support, and sales. Google Analytics (Web Analytics) Privacy Policy
AdWords
We use AdWords to deploy digital advertising on sites supported by AdWords. Ads are based on both AdWords data and behavioral data that we collect while you’re on our sites. The data we collect may include pages you’ve visited, trials you’ve initiated, videos you’ve played, purchases you’ve made, and your IP address or device ID. This information may be combined with data that AdWords has collected from you. We use the data that we provide to AdWords to better customize your digital advertising experience and present you with more relevant ads. AdWords Privacy Policy
Marketo
We use Marketo to send you more timely and relevant email content. To do this, we collect data about your online behavior and your interaction with the emails we send. Data collected may include pages you’ve visited, trials you’ve initiated, videos you’ve played, purchases you’ve made, your IP address or device ID, email open rates, links clicked, and others. We may combine this data with data collected from other sources to offer you improved sales or customer service experiences, as well as more relevant content based on advanced analytics processing. Marketo Privacy Policy
Doubleclick
We use Doubleclick to deploy digital advertising on sites supported by Doubleclick. Ads are based on both Doubleclick data and behavioral data that we collect while you’re on our sites. The data we collect may include pages you’ve visited, trials you’ve initiated, videos you’ve played, purchases you’ve made, and your IP address or device ID. This information may be combined with data that Doubleclick has collected from you. We use the data that we provide to Doubleclick to better customize your digital advertising experience and present you with more relevant ads. Doubleclick Privacy Policy
HubSpot
We use HubSpot to send you more timely and relevant email content. To do this, we collect data about your online behavior and your interaction with the emails we send. Data collected may include pages you’ve visited, trials you’ve initiated, videos you’ve played, purchases you’ve made, your IP address or device ID, email open rates, links clicked, and others. HubSpot Privacy Policy
Twitter
We use Twitter to deploy digital advertising on sites supported by Twitter. Ads are based on both Twitter data and behavioral data that we collect while you’re on our sites. The data we collect may include pages you’ve visited, trials you’ve initiated, videos you’ve played, purchases you’ve made, and your IP address or device ID. This information may be combined with data that Twitter has collected from you. We use the data that we provide to Twitter to better customize your digital advertising experience and present you with more relevant ads. Twitter Privacy Policy
Facebook
We use Facebook to deploy digital advertising on sites supported by Facebook. Ads are based on both Facebook data and behavioral data that we collect while you’re on our sites. The data we collect may include pages you’ve visited, trials you’ve initiated, videos you’ve played, purchases you’ve made, and your IP address or device ID. This information may be combined with data that Facebook has collected from you. We use the data that we provide to Facebook to better customize your digital advertising experience and present you with more relevant ads. Facebook Privacy Policy
LinkedIn
We use LinkedIn to deploy digital advertising on sites supported by LinkedIn. Ads are based on both LinkedIn data and behavioral data that we collect while you’re on our sites. The data we collect may include pages you’ve visited, trials you’ve initiated, videos you’ve played, purchases you’ve made, and your IP address or device ID. This information may be combined with data that LinkedIn has collected from you. We use the data that we provide to LinkedIn to better customize your digital advertising experience and present you with more relevant ads. LinkedIn Privacy Policy
Yahoo! Japan
We use Yahoo! Japan to deploy digital advertising on sites supported by Yahoo! Japan. Ads are based on both Yahoo! Japan data and behavioral data that we collect while you’re on our sites. The data we collect may include pages you’ve visited, trials you’ve initiated, videos you’ve played, purchases you’ve made, and your IP address or device ID. This information may be combined with data that Yahoo! Japan has collected from you. We use the data that we provide to Yahoo! Japan to better customize your digital advertising experience and present you with more relevant ads. Yahoo! Japan Privacy Policy
Naver
We use Naver to deploy digital advertising on sites supported by Naver. Ads are based on both Naver data and behavioral data that we collect while you’re on our sites. The data we collect may include pages you’ve visited, trials you’ve initiated, videos you’ve played, purchases you’ve made, and your IP address or device ID. This information may be combined with data that Naver has collected from you. We use the data that we provide to Naver to better customize your digital advertising experience and present you with more relevant ads. Naver Privacy Policy
Quantcast
We use Quantcast to deploy digital advertising on sites supported by Quantcast. Ads are based on both Quantcast data and behavioral data that we collect while you’re on our sites. The data we collect may include pages you’ve visited, trials you’ve initiated, videos you’ve played, purchases you’ve made, and your IP address or device ID. This information may be combined with data that Quantcast has collected from you. We use the data that we provide to Quantcast to better customize your digital advertising experience and present you with more relevant ads. Quantcast Privacy Policy
Call Tracking
We use Call Tracking to provide customized phone numbers for our campaigns. This gives you faster access to our agents and helps us more accurately evaluate our performance. We may collect data about your behavior on our sites based on the phone number provided. Call Tracking Privacy Policy
Wunderkind
We use Wunderkind to deploy digital advertising on sites supported by Wunderkind. Ads are based on both Wunderkind data and behavioral data that we collect while you’re on our sites. The data we collect may include pages you’ve visited, trials you’ve initiated, videos you’ve played, purchases you’ve made, and your IP address or device ID. This information may be combined with data that Wunderkind has collected from you. We use the data that we provide to Wunderkind to better customize your digital advertising experience and present you with more relevant ads. Wunderkind Privacy Policy
ADC Media
We use ADC Media to deploy digital advertising on sites supported by ADC Media. Ads are based on both ADC Media data and behavioral data that we collect while you’re on our sites. The data we collect may include pages you’ve visited, trials you’ve initiated, videos you’ve played, purchases you’ve made, and your IP address or device ID. This information may be combined with data that ADC Media has collected from you. We use the data that we provide to ADC Media to better customize your digital advertising experience and present you with more relevant ads. ADC Media Privacy Policy
AgrantSEM
We use AgrantSEM to deploy digital advertising on sites supported by AgrantSEM. Ads are based on both AgrantSEM data and behavioral data that we collect while you’re on our sites. The data we collect may include pages you’ve visited, trials you’ve initiated, videos you’ve played, purchases you’ve made, and your IP address or device ID. This information may be combined with data that AgrantSEM has collected from you. We use the data that we provide to AgrantSEM to better customize your digital advertising experience and present you with more relevant ads. AgrantSEM Privacy Policy
Bidtellect
We use Bidtellect to deploy digital advertising on sites supported by Bidtellect. Ads are based on both Bidtellect data and behavioral data that we collect while you’re on our sites. The data we collect may include pages you’ve visited, trials you’ve initiated, videos you’ve played, purchases you’ve made, and your IP address or device ID. This information may be combined with data that Bidtellect has collected from you. We use the data that we provide to Bidtellect to better customize your digital advertising experience and present you with more relevant ads. Bidtellect Privacy Policy
Bing
We use Bing to deploy digital advertising on sites supported by Bing. Ads are based on both Bing data and behavioral data that we collect while you’re on our sites. The data we collect may include pages you’ve visited, trials you’ve initiated, videos you’ve played, purchases you’ve made, and your IP address or device ID. This information may be combined with data that Bing has collected from you. We use the data that we provide to Bing to better customize your digital advertising experience and present you with more relevant ads. Bing Privacy Policy
G2Crowd
We use G2Crowd to deploy digital advertising on sites supported by G2Crowd. Ads are based on both G2Crowd data and behavioral data that we collect while you’re on our sites. The data we collect may include pages you’ve visited, trials you’ve initiated, videos you’ve played, purchases you’ve made, and your IP address or device ID. This information may be combined with data that G2Crowd has collected from you. We use the data that we provide to G2Crowd to better customize your digital advertising experience and present you with more relevant ads. G2Crowd Privacy Policy
NMPI Display
We use NMPI Display to deploy digital advertising on sites supported by NMPI Display. Ads are based on both NMPI Display data and behavioral data that we collect while you’re on our sites. The data we collect may include pages you’ve visited, trials you’ve initiated, videos you’ve played, purchases you’ve made, and your IP address or device ID. This information may be combined with data that NMPI Display has collected from you. We use the data that we provide to NMPI Display to better customize your digital advertising experience and present you with more relevant ads. NMPI Display Privacy Policy
VK
We use VK to deploy digital advertising on sites supported by VK. Ads are based on both VK data and behavioral data that we collect while you’re on our sites. The data we collect may include pages you’ve visited, trials you’ve initiated, videos you’ve played, purchases you’ve made, and your IP address or device ID. This information may be combined with data that VK has collected from you. We use the data that we provide to VK to better customize your digital advertising experience and present you with more relevant ads. VK Privacy Policy
Adobe Target
We use Adobe Target to test new features on our sites and customize your experience of these features. To do this, we collect behavioral data while you’re on our sites. This data may include pages you’ve visited, trials you’ve initiated, videos you’ve played, purchases you’ve made, your IP address or device ID, your Autodesk ID, and others. You may experience a different version of our sites based on feature testing, or view personalized content based on your visitor attributes. Adobe Target Privacy Policy
Google Analytics (Advertising)
We use Google Analytics (Advertising) to deploy digital advertising on sites supported by Google Analytics (Advertising). Ads are based on both Google Analytics (Advertising) data and behavioral data that we collect while you’re on our sites. The data we collect may include pages you’ve visited, trials you’ve initiated, videos you’ve played, purchases you’ve made, and your IP address or device ID. This information may be combined with data that Google Analytics (Advertising) has collected from you. We use the data that we provide to Google Analytics (Advertising) to better customize your digital advertising experience and present you with more relevant ads. Google Analytics (Advertising) Privacy Policy
Trendkite
We use Trendkite to deploy digital advertising on sites supported by Trendkite. Ads are based on both Trendkite data and behavioral data that we collect while you’re on our sites. The data we collect may include pages you’ve visited, trials you’ve initiated, videos you’ve played, purchases you’ve made, and your IP address or device ID. This information may be combined with data that Trendkite has collected from you. We use the data that we provide to Trendkite to better customize your digital advertising experience and present you with more relevant ads. Trendkite Privacy Policy
Hotjar
We use Hotjar to deploy digital advertising on sites supported by Hotjar. Ads are based on both Hotjar data and behavioral data that we collect while you’re on our sites. The data we collect may include pages you’ve visited, trials you’ve initiated, videos you’ve played, purchases you’ve made, and your IP address or device ID. This information may be combined with data that Hotjar has collected from you. We use the data that we provide to Hotjar to better customize your digital advertising experience and present you with more relevant ads. Hotjar Privacy Policy
6 Sense
We use 6 Sense to deploy digital advertising on sites supported by 6 Sense. Ads are based on both 6 Sense data and behavioral data that we collect while you’re on our sites. The data we collect may include pages you’ve visited, trials you’ve initiated, videos you’ve played, purchases you’ve made, and your IP address or device ID. This information may be combined with data that 6 Sense has collected from you. We use the data that we provide to 6 Sense to better customize your digital advertising experience and present you with more relevant ads. 6 Sense Privacy Policy
Terminus
We use Terminus to deploy digital advertising on sites supported by Terminus. Ads are based on both Terminus data and behavioral data that we collect while you’re on our sites. The data we collect may include pages you’ve visited, trials you’ve initiated, videos you’ve played, purchases you’ve made, and your IP address or device ID. This information may be combined with data that Terminus has collected from you. We use the data that we provide to Terminus to better customize your digital advertising experience and present you with more relevant ads. Terminus Privacy Policy
StackAdapt
We use StackAdapt to deploy digital advertising on sites supported by StackAdapt. Ads are based on both StackAdapt data and behavioral data that we collect while you’re on our sites. The data we collect may include pages you’ve visited, trials you’ve initiated, videos you’ve played, purchases you’ve made, and your IP address or device ID. This information may be combined with data that StackAdapt has collected from you. We use the data that we provide to StackAdapt to better customize your digital advertising experience and present you with more relevant ads. StackAdapt Privacy Policy
The Trade Desk
We use The Trade Desk to deploy digital advertising on sites supported by The Trade Desk. Ads are based on both The Trade Desk data and behavioral data that we collect while you’re on our sites. The data we collect may include pages you’ve visited, trials you’ve initiated, videos you’ve played, purchases you’ve made, and your IP address or device ID. This information may be combined with data that The Trade Desk has collected from you. We use the data that we provide to The Trade Desk to better customize your digital advertising experience and present you with more relevant ads. The Trade Desk Privacy Policy
RollWorks
We use RollWorks to deploy digital advertising on sites supported by RollWorks. Ads are based on both RollWorks data and behavioral data that we collect while you’re on our sites. The data we collect may include pages you’ve visited, trials you’ve initiated, videos you’ve played, purchases you’ve made, and your IP address or device ID. This information may be combined with data that RollWorks has collected from you. We use the data that we provide to RollWorks to better customize your digital advertising experience and present you with more relevant ads. RollWorks Privacy Policy
Are you sure you want a less customized experience?
We can access your data only if you select "yes" for the categories on the previous screen. This lets us tailor our marketing so that it's more relevant for you. You can change your settings at any time by visiting our privacy statement
Your experience. Your choice.
We care about your privacy. The data we collect helps us understand how you use our products, what information you might be interested in, and what we can improve to make your engagement with Autodesk more rewarding.
May we collect and use your data to tailor your experience?
Explore the benefits of a customized experience by managing your privacy settings for this site or visit our Privacy Statement to learn more about your options.