Learn about the Mazak Add-in for Fusion 360, including how to download it and use it alongside the Mazak Smooth Project Manager.
For more information about Mazak, visit their website.

We’ve been working closely with machine tool vendors around the world to create a more reliable and immersive experience to link what you do in Fusion 360 to your machine tool.
The Mazak Add-in for Fusion 360 allows you to automate what was previously a manual process of exporting the NC program, part/fixture/stock geometry, and tool/holder geometry from Fusion 360. This data is packaged in a format that can then be transferred into Mazak’s Smooth Project Manager software for use in the machine’s onboard program verification.
By verifying what we see in the digital workspace on the real machine without actually having to cut a part, we can:
- Minimize the risk of damage to the machine or part
- Identify any moves that exceed the machine limits
- Check for tooling errors
This reduces the time needed during setup for a skilled operator to prove out machining programs before they can be used for production.
With a live connection directly to the machine tool production and collaboration are increased as you can easily verify the machine usage status and the part program being run.
Adding the Mazak add-in to your current workflow provides many benefits, including:
- Shortened setup time
- Lead time reduction
- Increased safety
- Real-time production information
How to access the Mazak Add-in for Fusion 360
Start by downloading the Mazak Add-in from the Fusion 360 App Store. You can access the App Store from within Fusion 360 by going to the Utilities tab and choosing the Fusion 360 App Store. Type ‘Mazak’ in the search bar, then download and follow the on-screen instructions to install the app.
To verify installation, open the Scripts and Add-Ins page from the Add-ins drop-down. Click on the Add-Ins section, and you will see the Mazak app available. Select the app and check the Run-on start-up checkbox if you always want the add-in to be active when launching Fusion 360. Now click the Run button.
Note: The add-in is only visible when you’re in the Manufacturing environment. A pro tip for easier access in the future is to pin the icon to the toolbar.
How to use the Mazak Add-in for Fusion 360
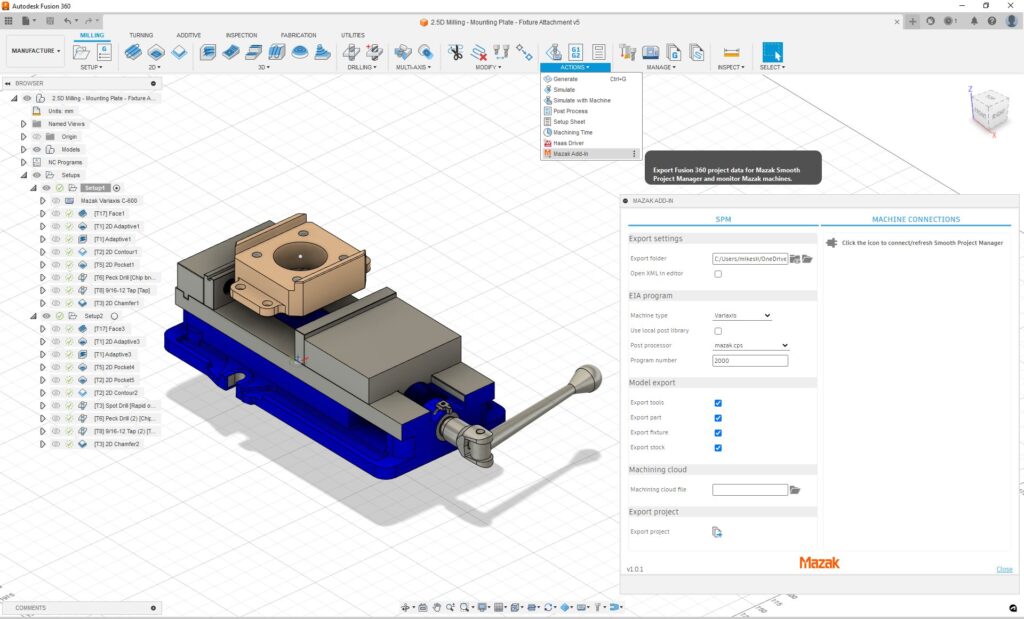
Start by opening the model you want to export to the Smooth Project Manager Control. Next, identify the model geometry and fixture geometries accordingly—this definition is crucial to making the export process accurate.

Now navigate to the Actions tab and select the Mazak add-in. Make sure you’re in the Smooth Project Manager or SPM tab of the add-in. Next, define an output folder location for the Fusion 360 data. A pro tip is to define a location on a cloud-based platform like Microsoft One Drive to ensure the data automatically backs up.
The machine type is defined by the Operation type you have within your setup. For milling, Variaxis and Machining Center are available. For turning Integrex Horizontal, vertical, and turning are available.
Next, select the relevant post processor for the machine controller. If you don’t have one, you can download a suitable Mazak post here. After specifying a suitable post processor, specify a suitable program number. At this point, you can specify which information to export from Fusion 360. This can involve the tooling, the model data, the fixture, or the stock model data.
Clicking the export button creates the NC program in the text editor of your choice and bundles the checked model elements into the output folder. In Fusion 360, a progress bar will show the status of the export, and an Export Complete dialog will pop up when the export is complete.
Establish a live connection to your machine
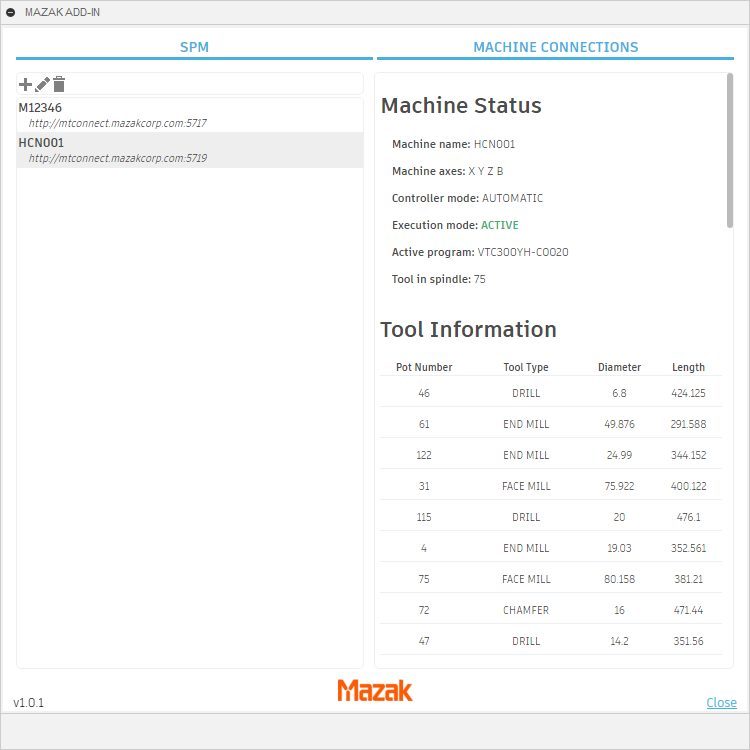
Next, we may want to establish a live connection to our Mazak machines. This connection uses the MTConnect protocols and can be used to check the current status of one or multiple machines.

To connect your machine, select the machine connection tab in the Mazak Add-in. Click the Plus button in the machines section and enter the network address of the machine you require. Upon entering the network address and clicking ok, you will notice that the machine becomes listed on the machine connections tab.
Selecting the machine will allow you to see the current status of that machine which includes whether a machine is actively running, as well as which program is currently being run on that machine and the tools in the tool changer. This is particularly useful for the CAM programmers to know what’s currently being manufactured and what tools are available on the machine.
Open the Mazak Smooth Project Manager
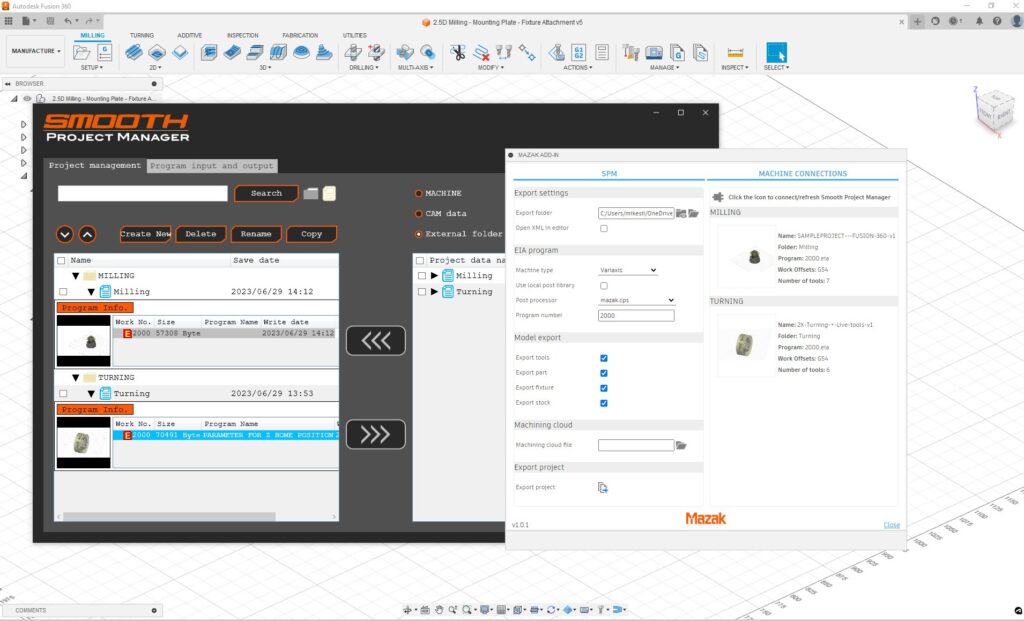
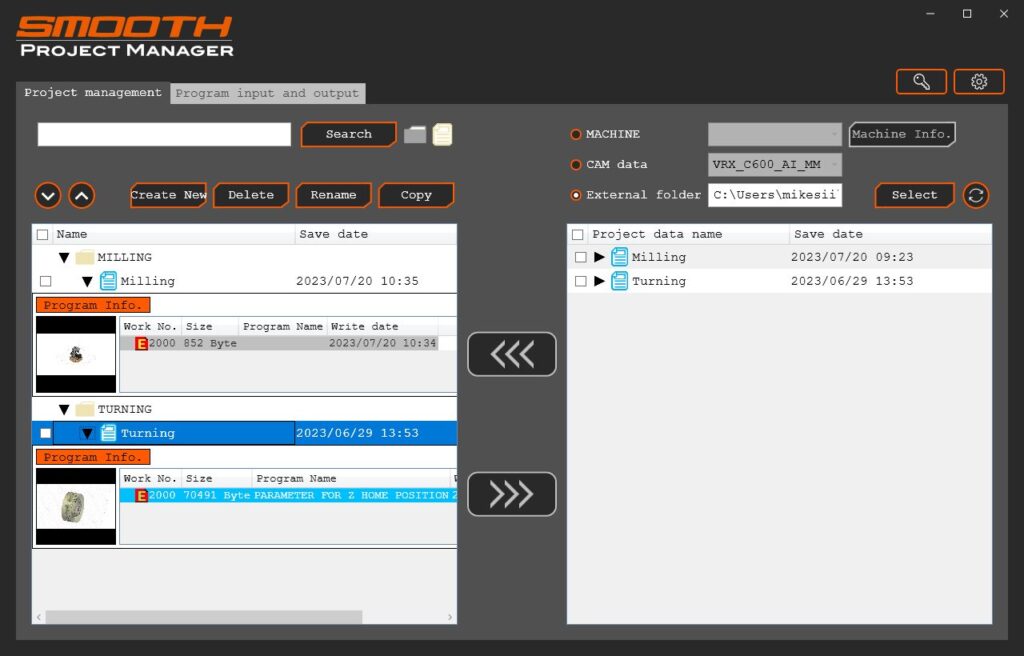
Now that we have all we need, we can open the Mazak Smooth Project Manager. First, select the external folder location of the exported data. You’ll then notice that the project info and the corresponding NC program are displayed.

To transfer this over to the Controller, click on the check box to select the project and click the triple chevron icon to initiate the transfer. You’ll be able to specify the folder location on the controller for the data to be copied. Once a location has been specified click on the OK button.
Ready to get started? Download the Mazak Add-in for Fusion 360 today.