[toc]
Data and Usability
🎁 New! New Design from File is now simply called Open
Previously in the File drop-down menu, there was an option called “New Design from File”. This allowed you to open CAD files from your computer in an unsaved document. It was a pretty straight-forward workflow, but only if you knew what it was and where to find it.
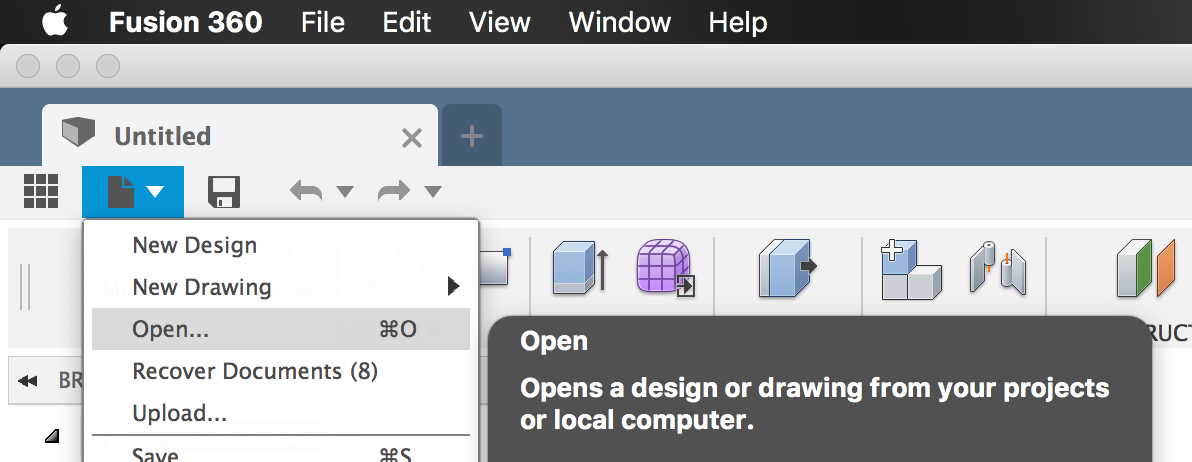
Now instead of “New Design from File”, it’s just called Open. Why? Because no one knew what “New Design from File” meant, and everyone knows what Open means.

With File > Open, you can not only open designs that exist on your local machine, but also open designs that are saved in your projects in the cloud. Unlike the previous experience where the types of files you can open were limited to a small list of file formats, the new Open workflow enables you to open all kinds of CAD files.
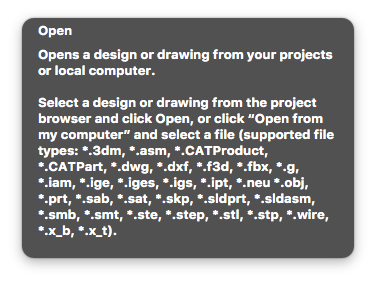
Some of these formats will open right away since the file format translators come with the Fusion 360 install, and some will require cloud translation in order for them to open. You can track the cloud translation progress via the Job Status dialog. Once the translation is complete, you can open it as an unsaved document.
The beauty of this whole thing is that now there is one consistent access point, while taking advantage of the cloud to to do heavy lifting. This is an evolving experience, so let us know what you think and we will continue to improve on it.
🎁 New! CTRL+4, 5, 6, 7, 8, 9 Hotkeys for Visual Styles
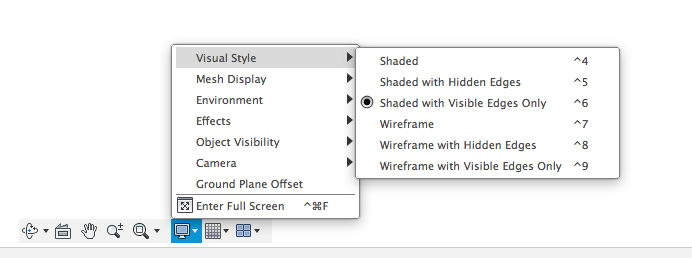
So you know how you asked us for Visual Style hot keys so you can quickly toggle between the different visual styles to better examine your design? Yeah, you’ve got em. Shaded through Wireframe with Visible Edges Only now have hotkeys assigned to them, Ctrl+4 through Ctrl+9.
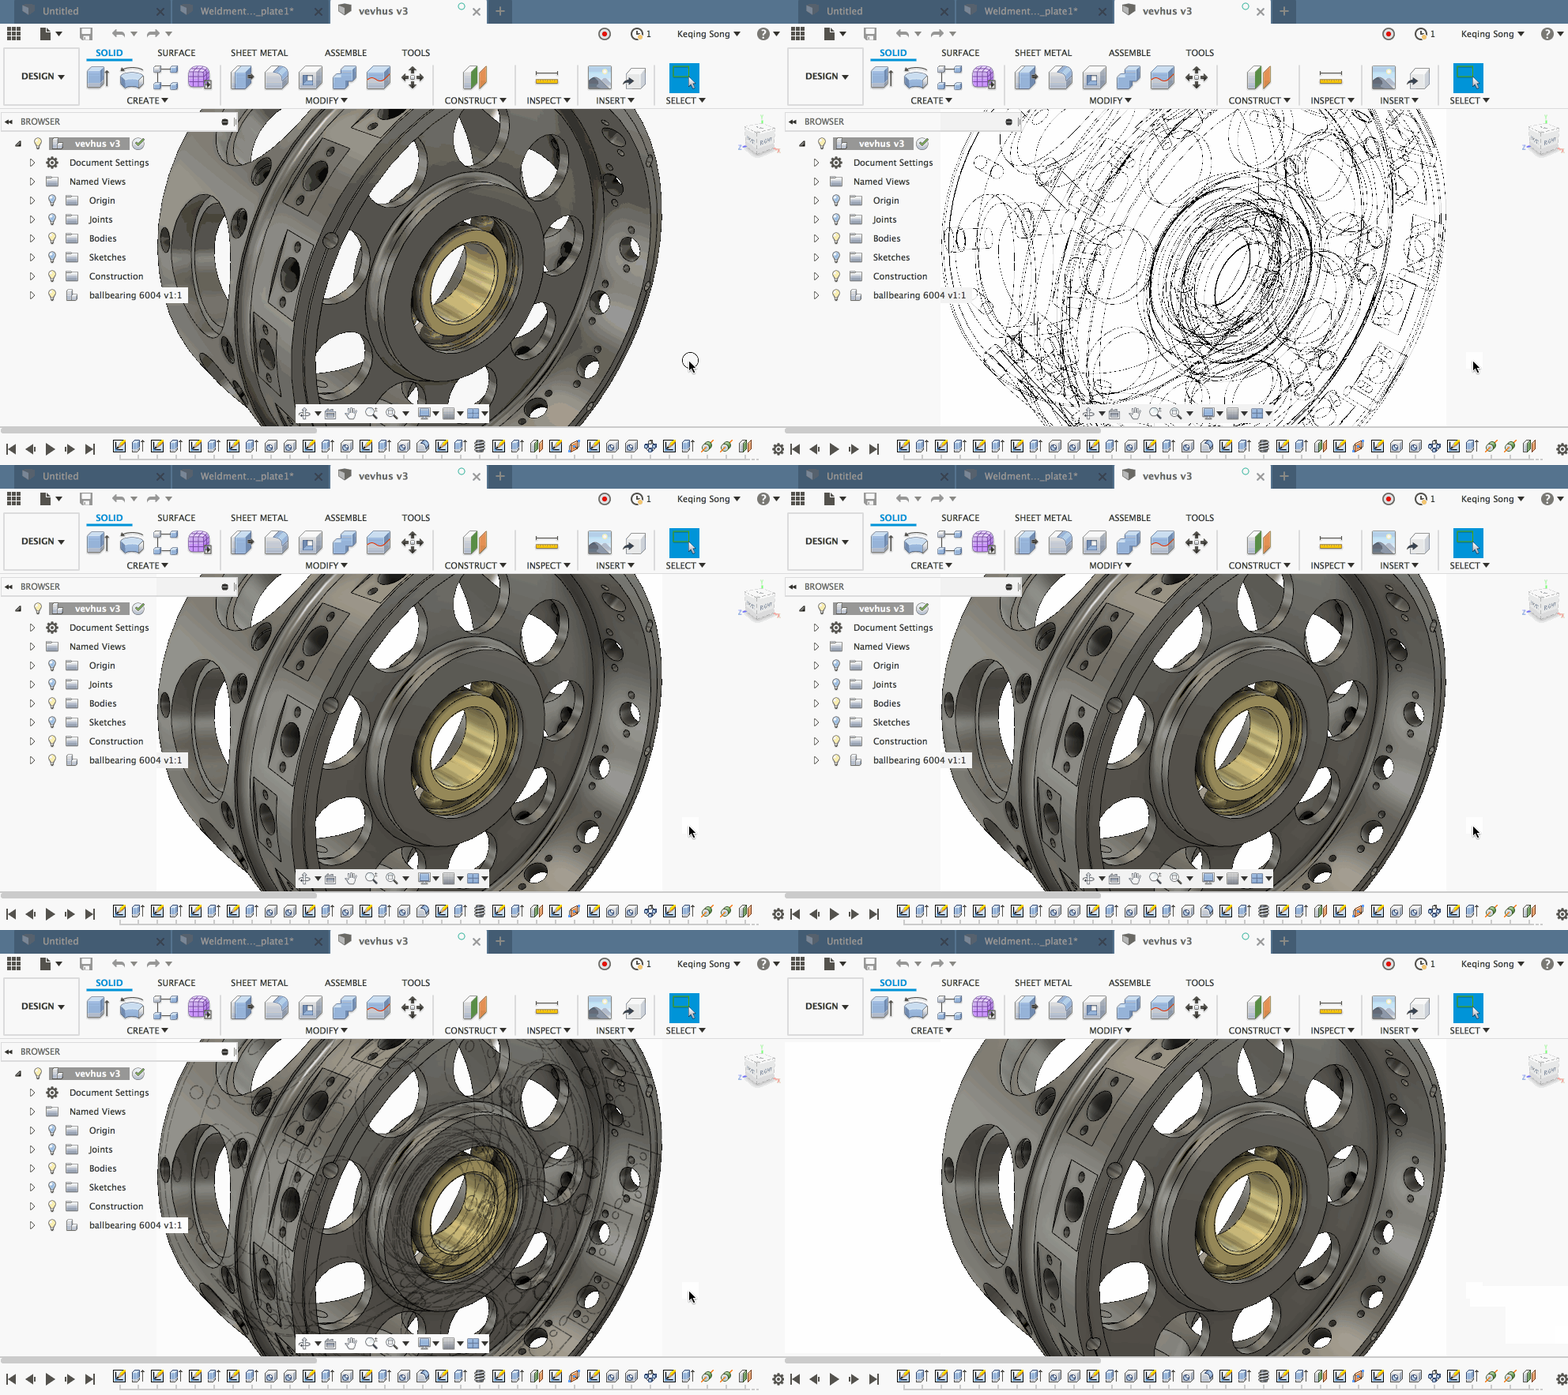
We chose these hotkeys since they feel like a nice extension from Ctrl+1, Ctrl+2, and Ctrl+3, currently assigned to Smooth, Control-frame, and Box mode in T-Spline.
Notable Fixes and Improvements:
- Issue with exporting a STEP file from the browser
Cad_munkie told us about an issue where he was getting an error message when exporting a sub-assembly from his browser tree into a STEP file. Turns out there was a bug that prevented him from doing this. This bug is now squashed. Thanks Cad_Munkie for the heads-up - If Fusion 360 detects you can’t sign in after launch, it’ll take you straight to Offline mode
We improved the experience of launching Fusion 360 and trying to sign into your account, unbeknownst to you that Fusion 360 is down due to an unexpected issue server-side. Previously it landed you in an invalid state. Now we will detect what’s happening and automatically switch you into offline mode, where you can continue working. - Better stability when working with cross-referenced designs in offline mode
We saw some instability that caused Fusion 360 to freeze when you’re working with cross-referenced designs in offline mode. Some pieces of code went astray but we found them and brought them back into the pack and now things should work fine. - Broken help URLs fixed
There some broken “Learn More” links in the info section of certain commands where they took you to a 404 error page. We updated a bunch of pages on the learning site, which may have affected some of the urls. These links are now fixed. - Localization issue fixed
We fixed a localization issue where if you changed your language preferences to German and restarted Fusion 360, the app got all grumpy and would crash. - Sticky selection issue is no longer sticky
Apparently you can get the UI into a state where the mouse selected everything it touched. This could quickly snowball out of control and would ultimately end your session with a crash. Sometimes Fusion 360 get so pumped about what selections that it bites off more than it can chew. This is now sorted.
Generative Design
👍 Improved! Additional Visibility Controls in Generative Design and Simulation Workspaces
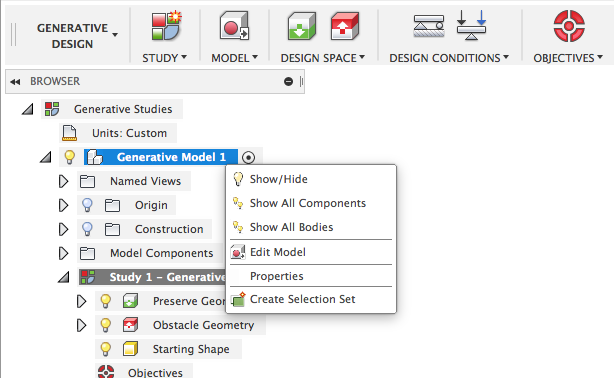
You told us that you needed the ability to hide and show parts of a model while you’re setting up your Generative Design study. It’s pretty common to toggle visibility back and forth between various pieces of geometry, so we added the Show All Components and Show All Bodies commands in the right-click menu, for when you right-click a study in the browser. You will now find these commands in the Generative Design and Edit Model workspaces, as well as the Simulation and Simplify workspaces.
👍 Improved! Physical Materials are Automatically Populated in Downloaded Outcomes
Generative Design is great at helping your exploring many possible solutions to a design problem. The type of material is big part choosing the right solution.
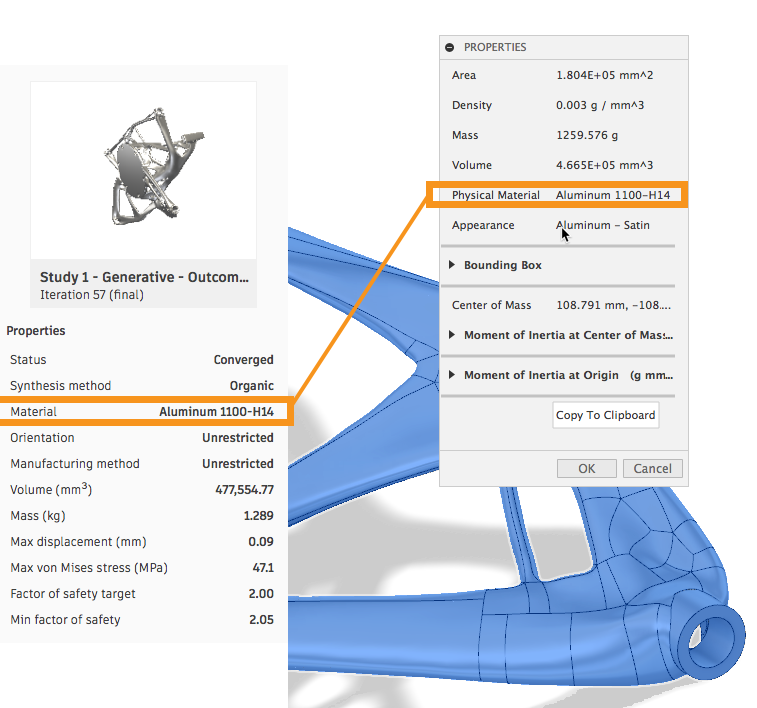
Now when you create your new Fusion design from an outcome, the material from that result is automatically assigned and can be identified in the Properties dialog as well as the Physical Materials dialog. One less step in the workflow, one more step in helping you get the most out of Generative Design.
👍 Improved! Press N for New Generative Design Study

Everyone is asking for hotkeys all over Fusion 360. The Generative Design workspace is no exception. You can now create a new Generative Design study with a simple click of the “N” key.
Notable Issues Fixed:
- Odd workspace switching between Simulation and Generative Design
There was a weird issue where if you clicked Cancel, rather than Create Study while you were on the Study Selector in the Simulation workspace, and Fusion 360 dropped you in the Generative Design workspace. This was totally wack, so we fixed it. Cancelling out of the Study Selector in Simulation workspace now takes you back to the Model workspace.
- Extra input controls for Force Loads
Some of you noticed that when defining a force load, there were a number of extra input boxes that showed up in the canvas. There should only be one input box, so we made it that way.
- STL outcomes were the wrong size
Apparently if you downloaded STL files of outcomes in millimeters, the conversion process was scaling the units incorrectly, making the file larger than expected. This is now fixed and STL outcomes are true to the units you set it to be.
Sketching
👍 Improved! Increased solver robustness
Our teams continue to focus on improving our sketch experience to be more stable, more predictable, and more speedy. We’ve made good progress on this front, and have improved the solver to be more robust this time around. This is high priority area for us, and we’ve got our best people working on it, so that your sketches can be rock-solid.
👍 Improved! Better pattern performance
We’ve boosted sketch performance, specifically around sketch patterning. Previously when you wanted to pattern sketch, we were actually creating the geometry based on how many instances are checked. Now we are giving you a preview of the geometry instead of creating them from the get-go. This should work better and faster for complex sketches you want to pattern moving forward.
Notable Fixes:
- Disappearing Sketch Palette and Sketch Grid issue fixed
Ctjacob2950 and pat.b_apellix both reported a disappearing Sketch palette issue, but one was related to moving sketch geometry and the was about dimensioning sketch geometry. There was another report about a disappearing Sketch grid issue. These mysteries have been solved, and we’ve fixed this issue in this update. No more disappearances from now on.
- Move command crash issue fixed
Mavigogun shared with us a scenario where if you wanted to move a sketch by dragging the manipulator of the Move Command in the Z direction, Fusion 360 got all hung up on it. We found the bug and crushed it. This now works as it should.
- Constraint Stability Improved
We all know how it feels when you’re trying to delete a constraint and Fusion 360 starts to behave erratically, and it’s even more frustrating when it crashes. We’ve been tackling issue quite awhile, and have made a dent in making deleting Sketch constraints more stable and predictable. We fixed a crash issue around deleting constraints, and will continue to make progress on improving this experience.
Modeling
🎁 New! Smooth tool

If your Generative Design output has some bumps/superfluous geometry that you’d like to get rid of, Fusion 360 now has a tool called Smooth that lets you do exactly that. You can find it in the Sculpt environment under the Modify drop-down menu.
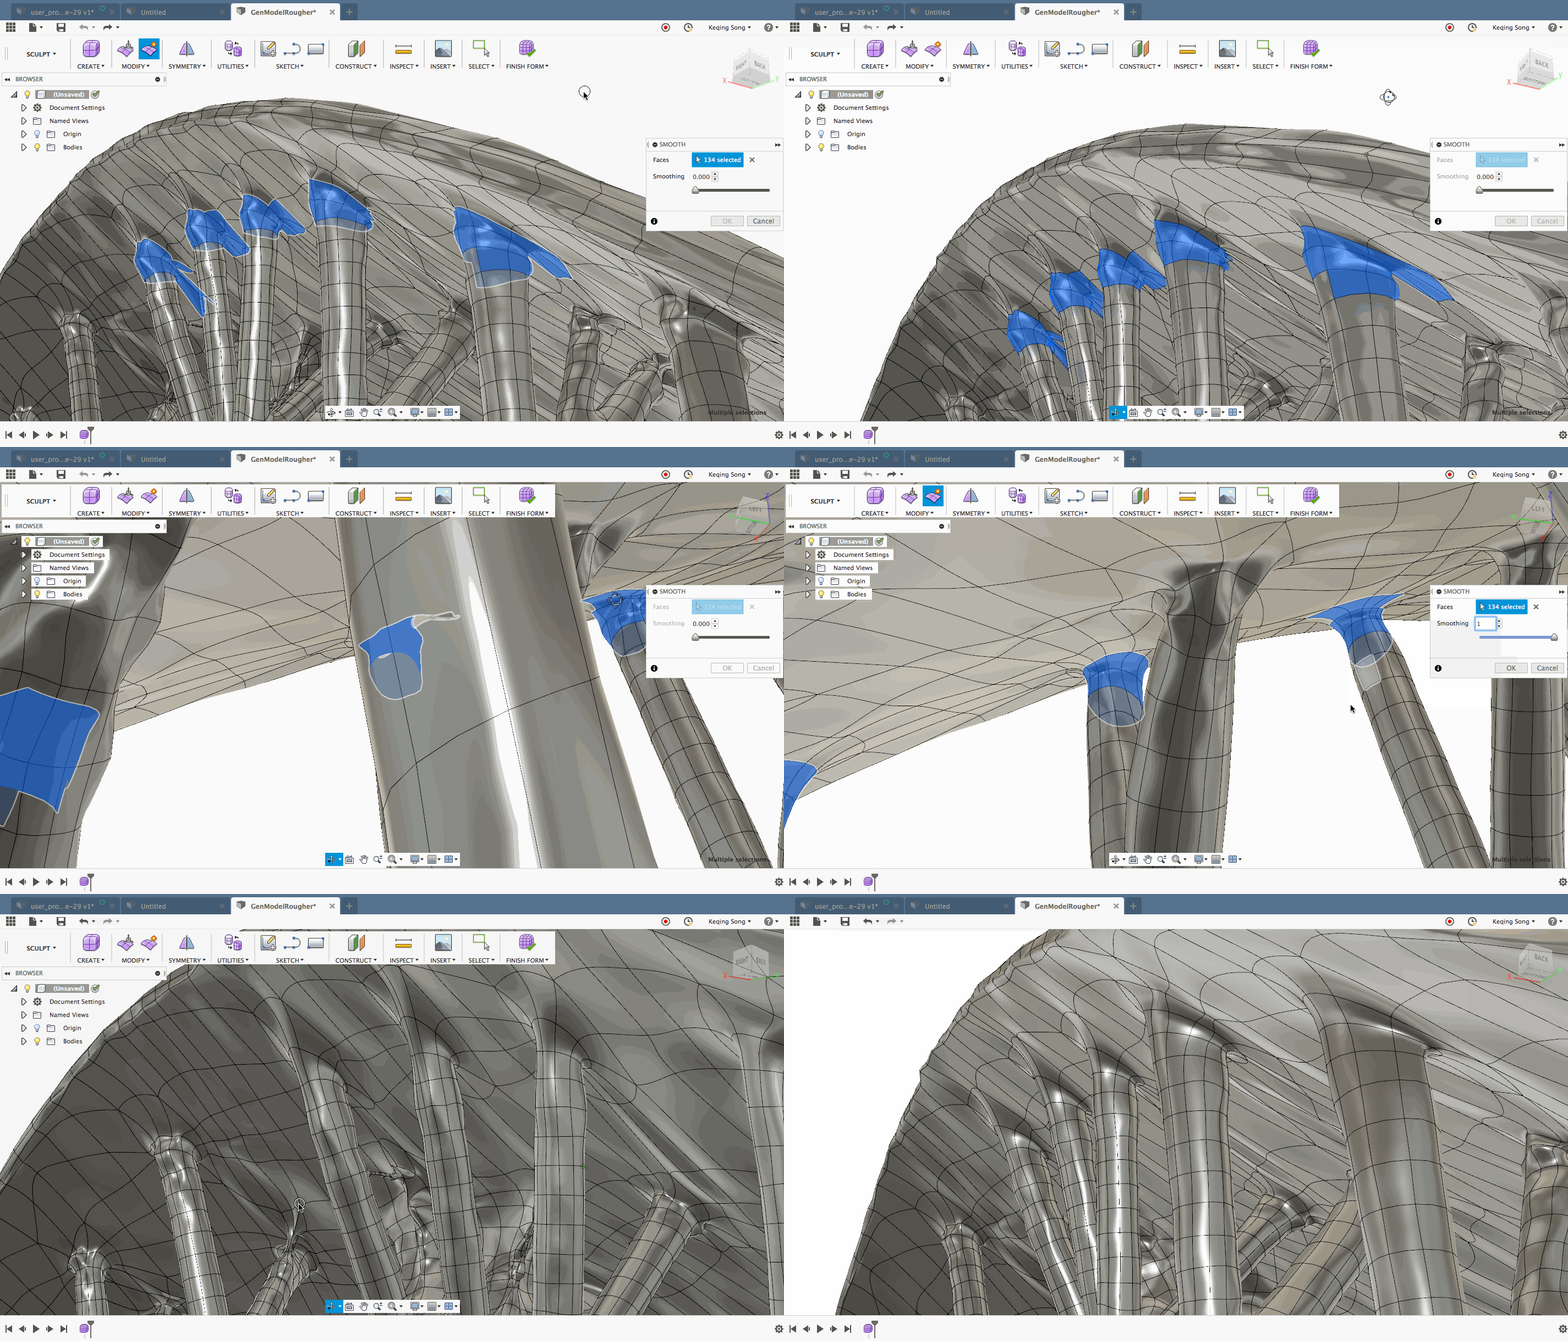
To be totally honest, we snuck this feature in the last update but didn’t make much noise about it. Since the last update, we’ve been busy at iterating and improving its performance, and have seen much better smoothing on all models – especially generatively created ones!
We also dropped some important modeling improvements.
👍 Improved! Fillet Command
Oh yeah. The good ol’ Fillet command. In the last update, we gave a facelift to our Fillet command by introducing a new table-based user experience, merging Rule Fillet into the Fillet feature, and by giving the ability to select Faces as inputs to standard Fillets. Turns out that by allowing Faces to be selected, we made it more difficult for you to utilize the handy-dandy ability to select obscured edges since the faces obscuring the edges would be prioritized first. Whoops, our bad.
Thanks to our Expert Elite Kevin Ellingson and others who have reached out regarding this issue, you can now switch over to Rule Fillet to apply fillets to entire faces, we removed the Face input for Fillet, and will be looking into how we can be smarter about Selection priorities in the future. If you’ve been using the new Face selection method in Fillet a lot and liked what it did, drop us a line because we want to hear about your experiences as well.
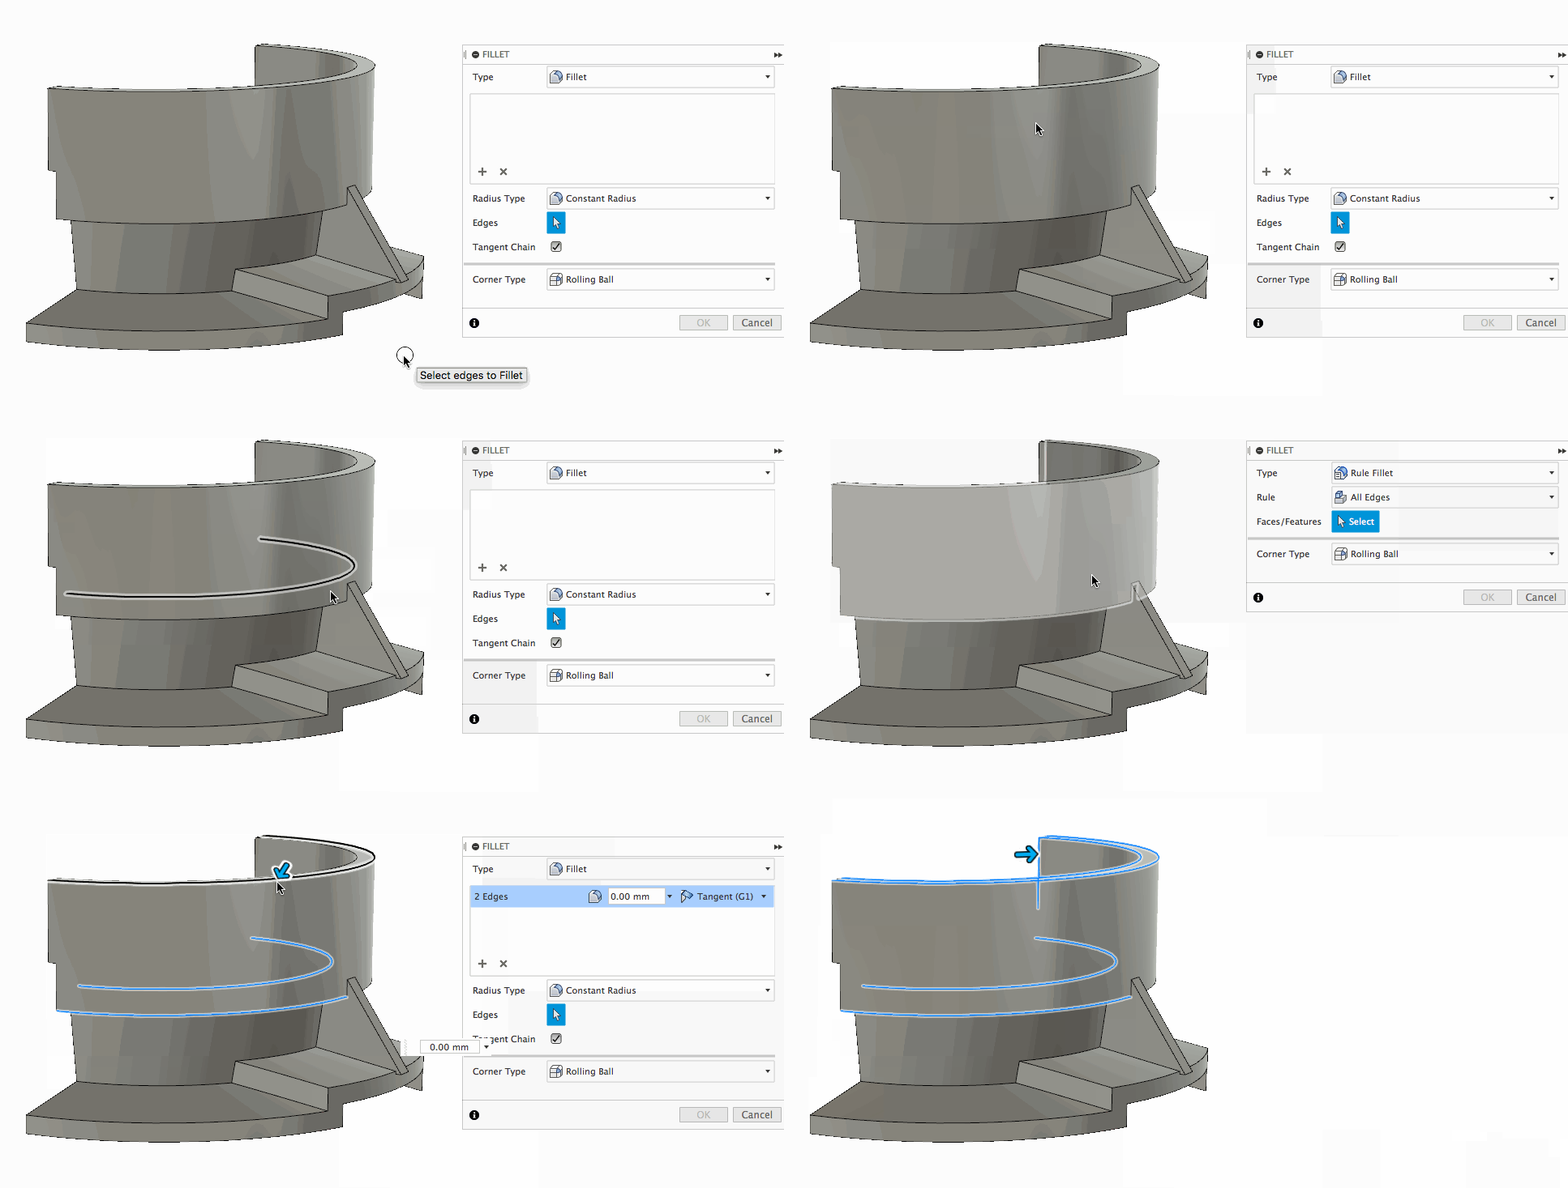
Also – in the process of the facelift, the Fillet option also disappeared from the right click context menu when you have model edges pre-selected. Don’t worry, we found it and returned it to it’s proper home.
👍 Improved! Construction Plane Parallel to Plane Through Point
Offset Plane is by far the most popular Construct tool. Previously, it used to only snap to geometry, which would auto-fill the distance to the selected vertex or edge for the command, but it wouldn’t maintain associativity if the position of that vertex or edge moved due to upstream changes. Now, the plane can maintain associativity by using a similar mechanism used in Extrude.
👍 Improved! Snap Offset Plane to Sketch Point
If you just wanted to snap to geometry, before you weren’t able to select sketch points as the snapping objects. That limitation is also gone and you can create associative planes with a variety of different reference inputs.
👍 Improved! Show/Unhide all Hidden Bodies
The struggle was real. Locating the exact body in a long list of bodies because to toggle visibility can quickly become a tedious task. We’ve made this task less frustrating because now you can simply right click any component and choose “Show All Bodies” and the visibility will instantly be turned on.
Pro tip – you can always Undo if the Body you were looking for isn’t in the first one you check.
👍 Improved! Extend Faces is now the default setting for Chain Faces
Have you ever tried to extrude something “To” an object, only to run into error as soon as you select the Reference? Yeah, we’ve been there too. That’s why now we automatically extend the reference faces which should help decrease any anxiety stemming from tedious errors.
👍 Improved! Origin planes now appear automatically when you invoke construction geometry
It’s always been useful that when you start a sketch, the Origin’s visibility automatically turns on so that you can select a global reference plane even if they were hidden before. We’ve now extended that functionality to every relevant command in the Construct dropdown menu so you can easily reference the global coordinate systems.
Other notable fixes
- Edit Form selection Space triad direction now rotates while you rotate the angle of your selection with the Angle Manipulator
- Sheet metal New Rule/Edit Rule dialog now commits entries with the Enter Key
- Loft measurements are now easier to see in Photo Booth environment
- Angle measurements are now more precise
2D Drawings
🎁 New! Reorder and hide/show parts list columns
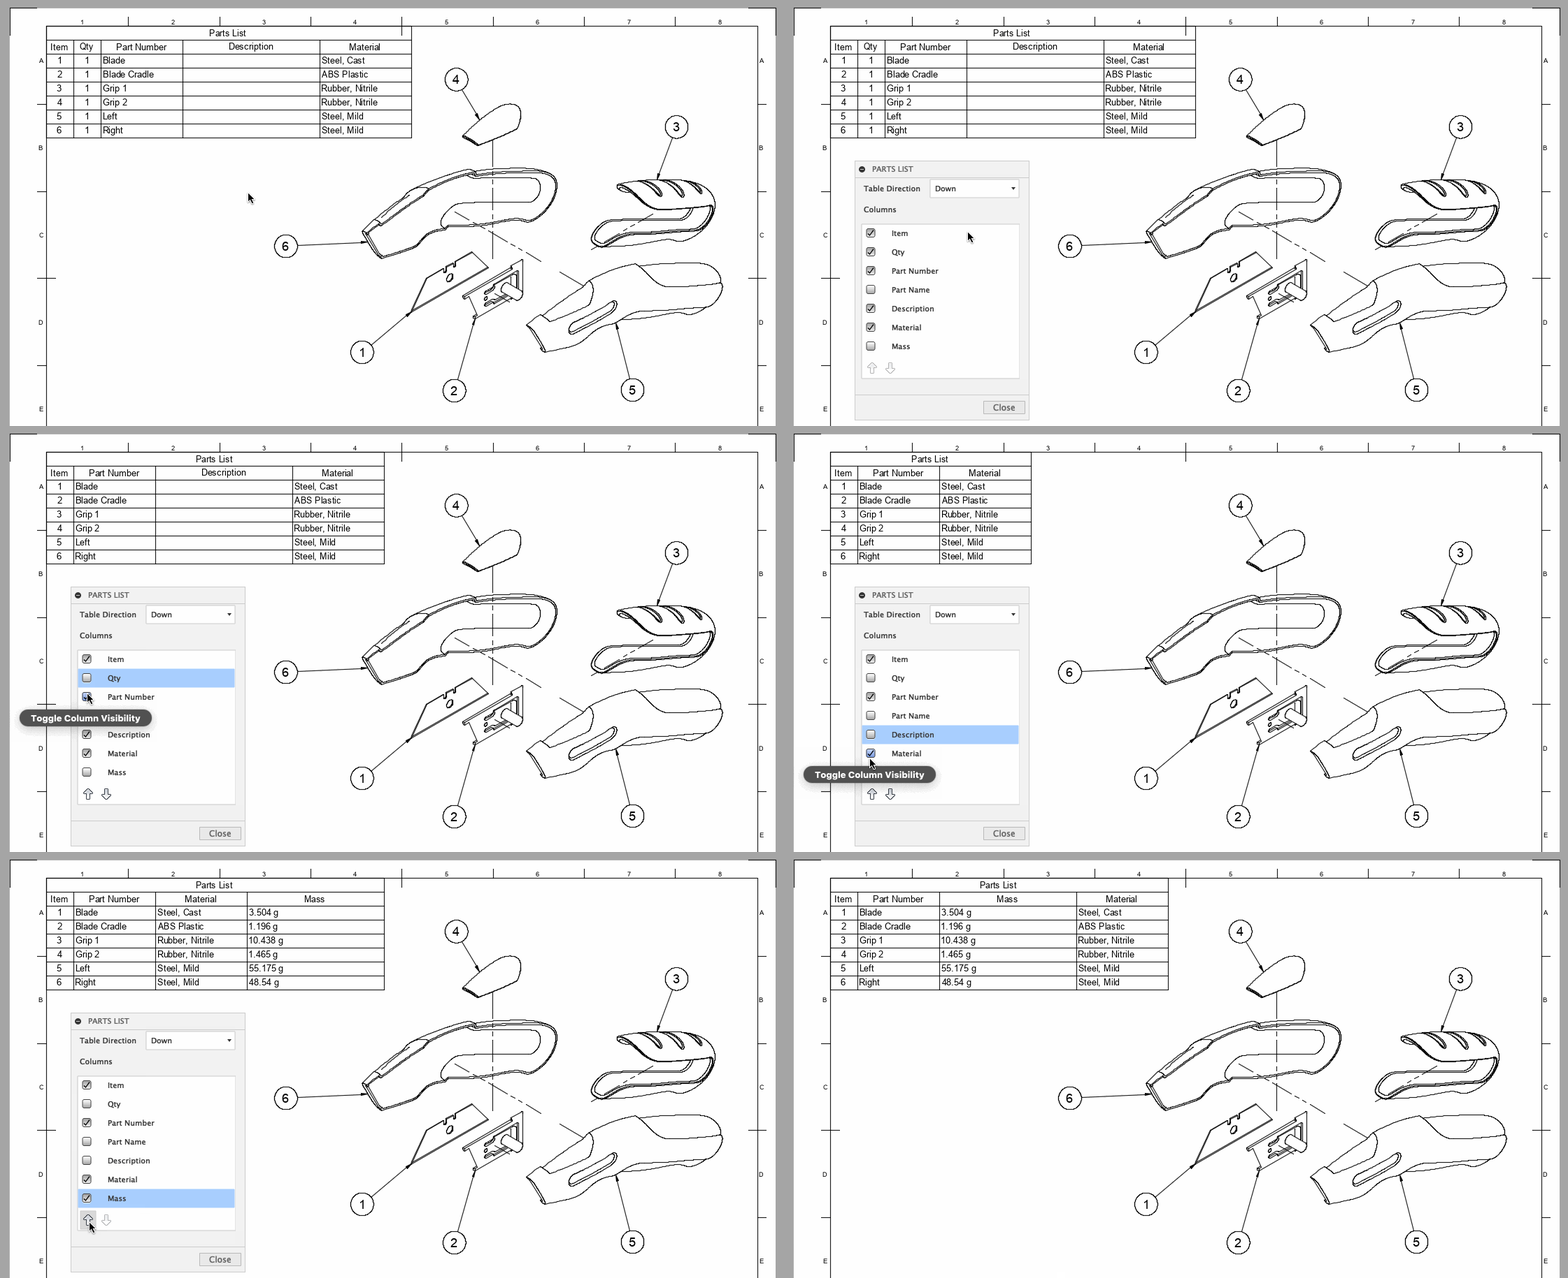
Now when you are creating parts lists in your 2D Drawing, you can re-order as well as show/hide various columns to fit what you want to convey. Double-clicking on the parts list will enable options to toggle visibility for Item, Quantity, Part Number, Part Name, Description, Material and Mass. Use to arrows to move then up or down the list, which will also reflect in the actually parts list.
CAM
🎁 New! Turning Custom Holders
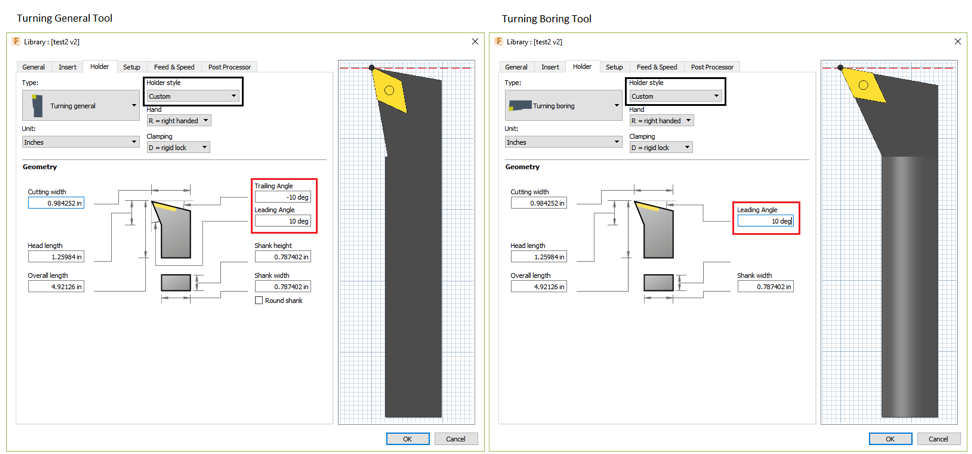
Previously, you could define a turning custom holder but the values in the “Trailing Angle” and “Leading Angle” fields for a general tool and the “Leading Angle” field for a boring tool did not persist after closing the Tools Library dialog. This issue has been fixed and users can now visualize the correctly modeled custom holder in the Tools library as well as during simulation and toolpath verification.
🎁 New! Turning Leads
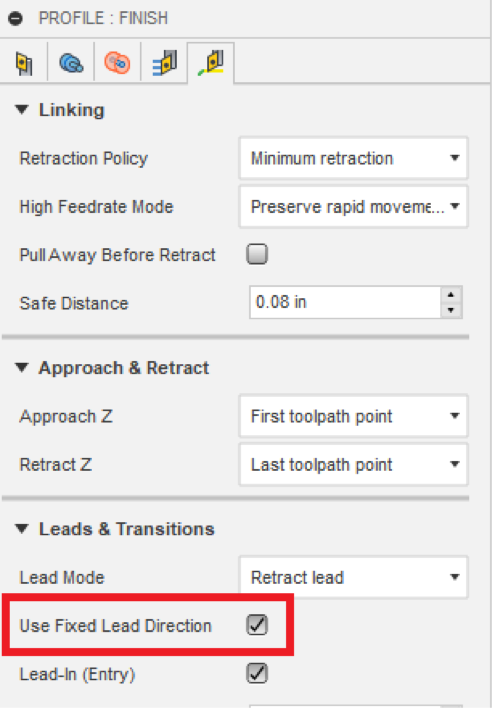
The parameter “Use Fixed Lead Direction” now controls how the Lead-In and Lead-Out angles affect the direction of the Lead-In and Lead-Out for Profile and Groove finishing.
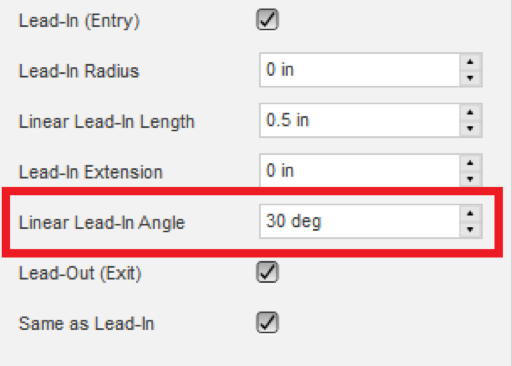
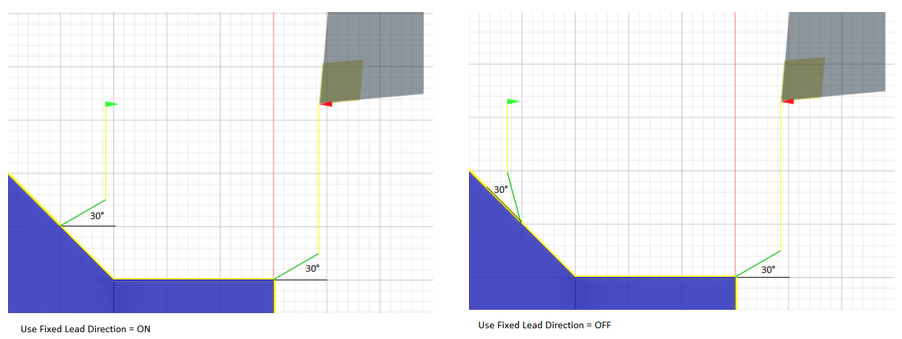
When this parameter is checked on, the lead angle denotes the angle of the lead with respect to the positive Z axis of the setup WCS. However, when this parameter is checked off, the lead angle now denotes the angle of the lead with respect to the direction of the toolpath.
*A couple of pro-tips*
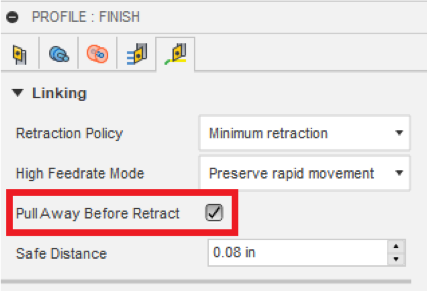
The parameter “Pull Away Before Retract” overrides the Lead-Out angle so it is recommended that this parameter be checked off to get predictable results in terms of lead angles.
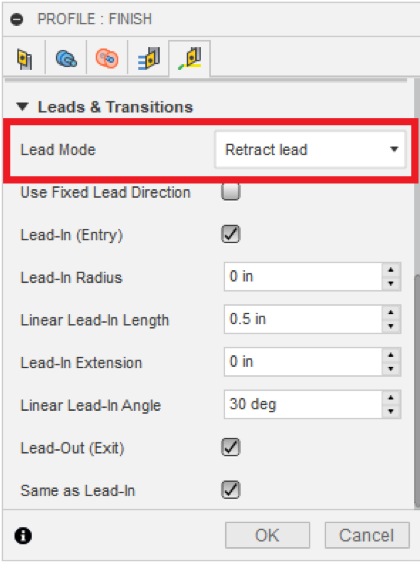
Fusion 360 always checks every single lead for gouges with the solid model as well as gouges with the remaining stock to calculate a safe toolpath. In case a lead is found to gouge, it is modified in a manner prescribed by the parameter “Lead Mode”. We recommend that the Profile or Groove finishing operation with the programmed leads be set as a rest machining operation following a roughing operation so that Fusion 360 is aware of material left behind by the previous roughing operation and able to disregard false gouges, thus leading to more predictable leads.
🎁 New! Facing During Profile Finishing
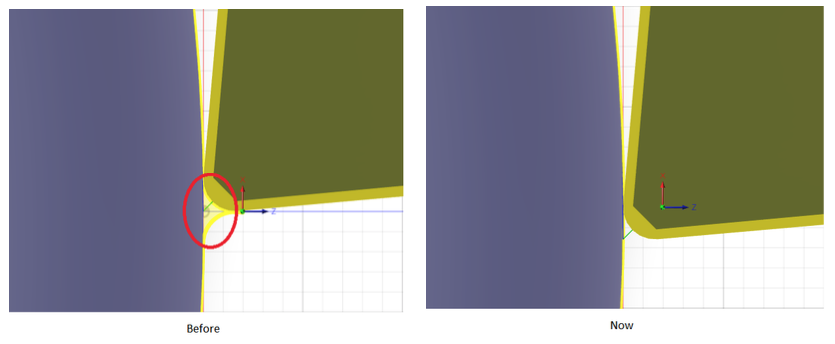
In previous versions when the Profile finishing operation contained a facing move in the beginning, there was an issue where the tool only machined down until the tip of the tool was tangential to the inner radius. This resulted in unfinished stock remaining on the finished part if the tool had a nose radius. To fix this issue, the facing portion of the toolpath was modified so that the tool would go under the inner radius by a distance equal to the tool nose radius.
In addition, a new parameter, “Distance to Cut Below Inner Radius” was added to the “Radii” tab. This parameter allows the tool to go a certain distance below the inner radius in addition to the tool nose radius to remove any micro nubs resulting from the facing portion of the Profile finishing operation.
🎁 New! Go below Inner Radius for Turning Profile Now Available
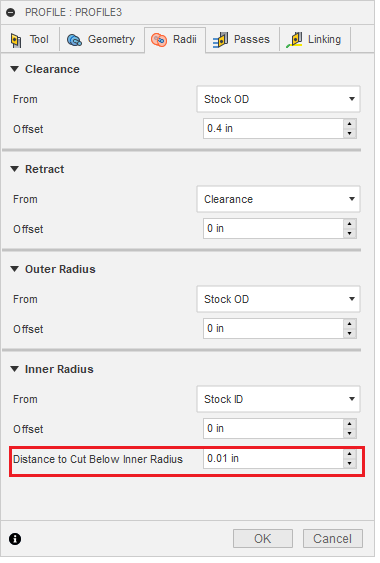
Based on your feedback, we added the ability for the tool to machine some distance below inner radius in order to get rid of un-machined nubs in Turning: Profile. This is similar to Facing and Parting that will allow the tool to go below the inner radius,
As Scott Moyse puts it: ” This enables you to finish the full part from the center on the front face, around the chamfer and the rest of the profile of the part in one hit. This is especially handy in harder materials like stainless steel, where it won’t leave any witness marks”.
🎁 New! View Orientation in Navigation toolbar

👍 Improved! Inside Strategies order for Turning is now correct
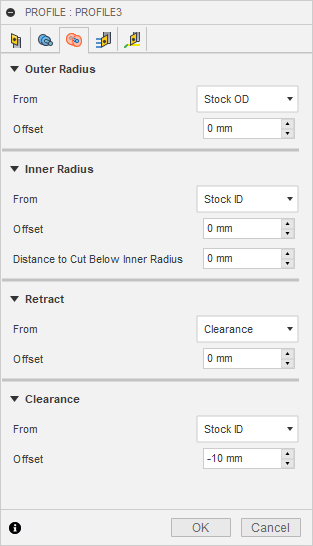
Apparently the order of radii fields in the radii tab for turning operations was showing Outer Radius, Inner Radius, Clearance and Retract. The correct order should have been Retract and then Clearance, so we made it that way.
👍 Improved! Unselect Contour functionality now supports Drilling, Bore, Circular, Threadmill toolpaths
When geometry has been deleted that was being used by an operation like 2D Contour, a red dash ghost line is shown where the missing contour used to be. This ghost contour can then be used to “ctrl+click” and unselect the missing contour. This ghost contour functionality was missing from Drilling, Circular, Boring, and Threadmill, but now it’s there.
API
Notable fixes:
- DeleteMe API now successfully deletes MeshBody.
- API now supports exporting a Mesh body as STL.
- Manfred.Steinbach reported an issue where property: referencedEntity() on SketchCurves was giving him errors. We nipped this one is the bud and now should be working fine.
- importToNewDocument method of the ImportManager now works as expected.
- VismantasKizelis told us about some wonkiness with the Appearances.addByCopy. Sometimes it worked fine, but other times it over-wrote appearances on top of each other and lost track of appearance names. We dug into this and got the API sorted out so there are no more funny business going on with your appearances.