JetForMe reported on the forum that the 2D bore operation he used on an existing setup caused Fusion 360 to suddenly stop working. We looked under the hood and made a few tweaks, now it’s running smoothly again.
November 12, 2019 Product Update – What’s New
V.2.0.6668
- Manufacture: We fixed an issue where selecting the face as pocket selection in a CAM workflow made Fusion 360 hang indefinitely.
- Manufacture: There was another case where undoing insert of an cross-referenced part in the Manufacture workspace made Fusion 360 unstable. Now it works as it should.
- STL export: We heard reports of our STL export translator not working properly. We tuned the engine and now it should export fine.
November 4, 2019 Product Update – What’s New
V.2.0.6658
- Manufacture: We fixed an issue where Fusion 360 locked up when you tried to save out a project containing manual / passthrough operations made in the Manufacture workspace.
- Manufacture: We got word that some of you were unable to post process certain specific posts. We dug into the code and found that user data parameters went missing. Now they are back and you should be good to go again.
- Simulation: When you created a load and selected more than one entity, a Force Per Entity checkbox appeared. If you unchecked this box and created the load, then edited it, the box would appear to be incorrectly checked. Checking it basically made it impossible for you to create a load that is distributed over multiple entities. Now it is unchecked as it should be.
- API/Analytics: There were some issues with how some of our in-product analytics were impacting the performance of certain add-ins. We’ve reverted the change for now and will make sure that they don’t impact performance in the future.
October 28, 2019 Product Update – What’s New
V.2.0.6613
[toc]
[icon name=”asterisk” class=”” unprefixed_class=””] Usability
Improved! File > Export notifications are now dismiss-able

Apparently we made our notifications a bit too persistent. When Fusion 360 completed a file > export job via cloud translation, it tells you that the file is ready and let’s you open the folder you exported your file to. What it doesn’t do is go away until you click on the destination link within that notification. Now there is an X for you to dismiss it, so you can continue working on the task at hand without interruption.
Improved! Upload dialog now shows which CAD formats are being translated
Now when you upload CAD data, the upload dialog will show a cube icon (same cube icon used in the document tab as well as Fusion 360 designs in data panel), which indicates that this particular file will be translated into a Fusion 360 design. Those without that icon will be uploaded as their original format.
Measure command labels are out of the way
Reported by alanwhereareyou, this issue was found in the Inspect > Measure tool where it made Fusion 360 place labels next to the measure points, almost always blocking the area that he wanted to select. We thought we squashed this bug, but it somehow came back from the dead. We made sure this dealt with once and for all.
Rendering Gallery no longer puts file extensions in the file name
We fixed a naming issue related to downloading renderings from your Rendering Gallery. Apparently the system made the render file extension as part of the file name itself, which is wrong. Now downloading renderings from the from the Rendering Gallery no longer puts file extensions as part of the name.
[icon name=”asterisk” class=”” unprefixed_class=””] Sketching & Modeling
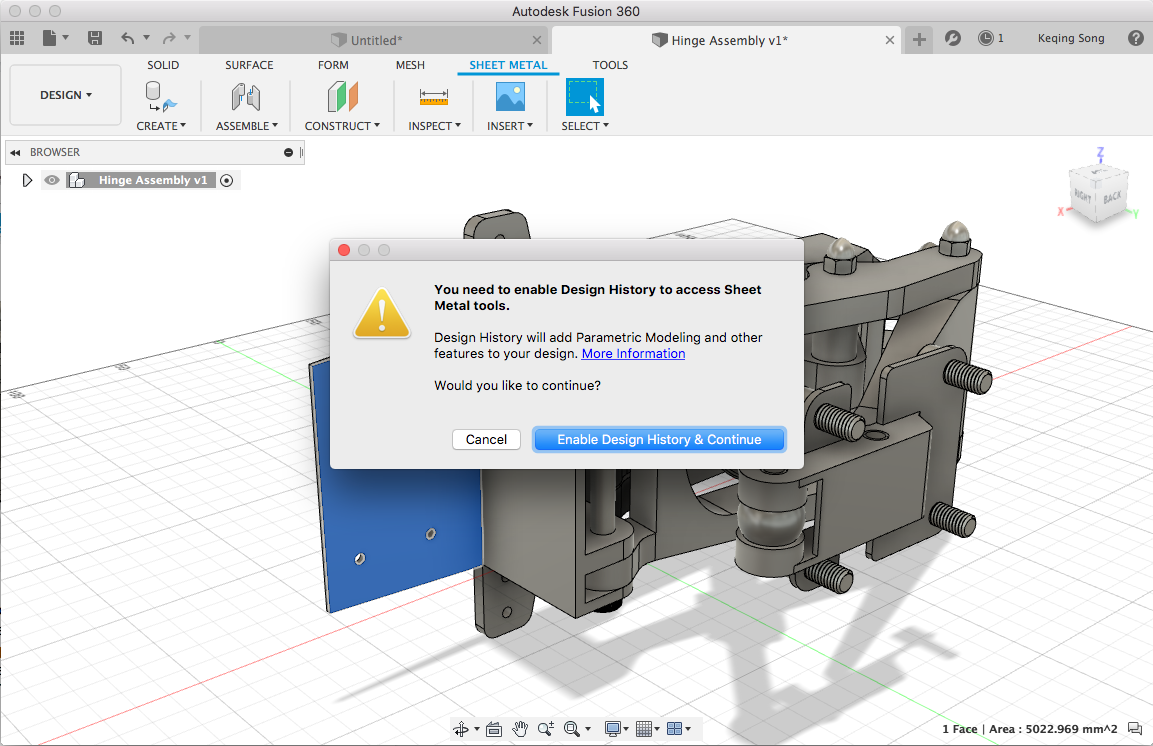
Improved! Convert to Sheet Metal now available in Direct Modeling

A couple updates ago we introduced the ability to convert an existing sheet metal CAD part into a Fusion 360 sheet metal part, but it was only accessible if you were working in parametric modeling (with history timeline turned on). Since opening 3rd party CAD data usually opens in the direct modeling side of Fusion 360, we’ve added a Sheet Metal tab along with the “Convert to Sheet Metal” command, so it’s more discoverable. The command still only works in parametric modeling, so Fusion 360 will enable the timeline and start the command for you if you want to convert your part.

Improved! Weird Joints issues fixed
We fixed a number of lingering joints issues in this update – here is a quick rundown:
- Joint direction no longer inverted when editing
Our good friend TrippyLighting found a joint issue where editing the joint of a part that he inserted into another design incorrectly flipped the direction of the joint movement. We got this sorted out. - Lower joint limit can be driven again
Kristof.ram told us about another wonky behavior way back where he wasn’t able to drive a joint to a lower limit that he had set. We made a few tweaks to the code and now it’s behaving as expected. - Joint Origin snap point no longer disappear
Kinsleymark reported that when he tried to go back in the timeline and fix a broken Joint Origin the snap points typically appears when you hovered over the model (while in the Joint command) never appeared, which made it impossible to place the new Joint Origin. Now the snap points appear swiftly without any issues.
Create Sheet Metal Component is now on by default when creating sheet metal parts
The option to create a sheet metal component got accidentally un-checked when you created a new sheet metal component from scratch. Now it’s checked by default again.
Lines are no longer missing in Exported DXFs
When you created a flat pattern from a sheet metal design, exported it to a DXF file with the option “Convert Splines to Polylines” enabled, and then opened the exported DXF in another CAD software, some of the lines from the original design went missing. Apparently something (literally) got lost in translation. We made sure that the translators are now doing their due diligence and are not loosing anything in the translation process.
Symmetry icon in Circular Pattern is now correct
Ezekiel12 spotted that the icon used for Symmetric direction in the Circular Pattern was incorrectly using the “Two Sides” icon. Now it’s using the correct one. Thanks for the catch!
Camera now returns back to previous view when you come out of Sketch mode
We heard some talk about the camera view not reverting back to original position after you were done with you sketch and went straight into a modeling command (without explicitly clicking on Finish Sketch).
[icon name=”asterisk” class=”” unprefixed_class=””] Generative Design
New! Generative Design Workspace now available for new Personal and Startup Entitlements
Recently we announced updates to our free Personal and Startup license offerings. To go along with these changes, we are expanding access to the Generative Design workspace. All of you who migrate to the new entitlement types will now have access to the Generative Design workspace. Huzzah!


When you are ready to get started, here are some helpful resources you should check out first. We’ve been told that these videos and tutorials really speed things up for you.

Out of all the content we have out there, this is the best place to learn how to use Fusion 360, and for Generative, we have a 35 lessons that will help you understand the basics to mastering the tools.

In addition to structured lessons, we’ve also hosted a number of live webinars where we walk you through everything from getting started to pro-tips on setting up your studies.
Autodesk Generative Design for Manufacturing Specialization – Coursera

Lastly, if you really need to develop and cement your skills as a generative design expert, check out our specialization offered through Coursera.
If you still need more help getting up and running or identifying that first project, send us an email and we will be glad to help.
New! Outcome Cost Estimation
Our partnership with aPriori to provide cost insights for generative design outcomes is finally here. By defining an annual production volume as part of the Manufacturing process definition, you will now get insights to the anticipated part cost for all new studies when using generative design. In Explore, you will now see new filters for Estimated Manufacturing Cost allowing you to conduct more thoughtful trade off analyses when evaluating cost, performance, material and manufacturing methods of various outcomes.


We’d love to better understand how you will find this helpful, and how we can improve this experience. If this is something you’re interested in, give a try, and let us know about how you’re using/your feedback in our feedback hub post.
You can also help us improve this experience by filling out this brief survey – Take the Survey Now.
New! 2 Axis Cutting Out-of-preview and in Production

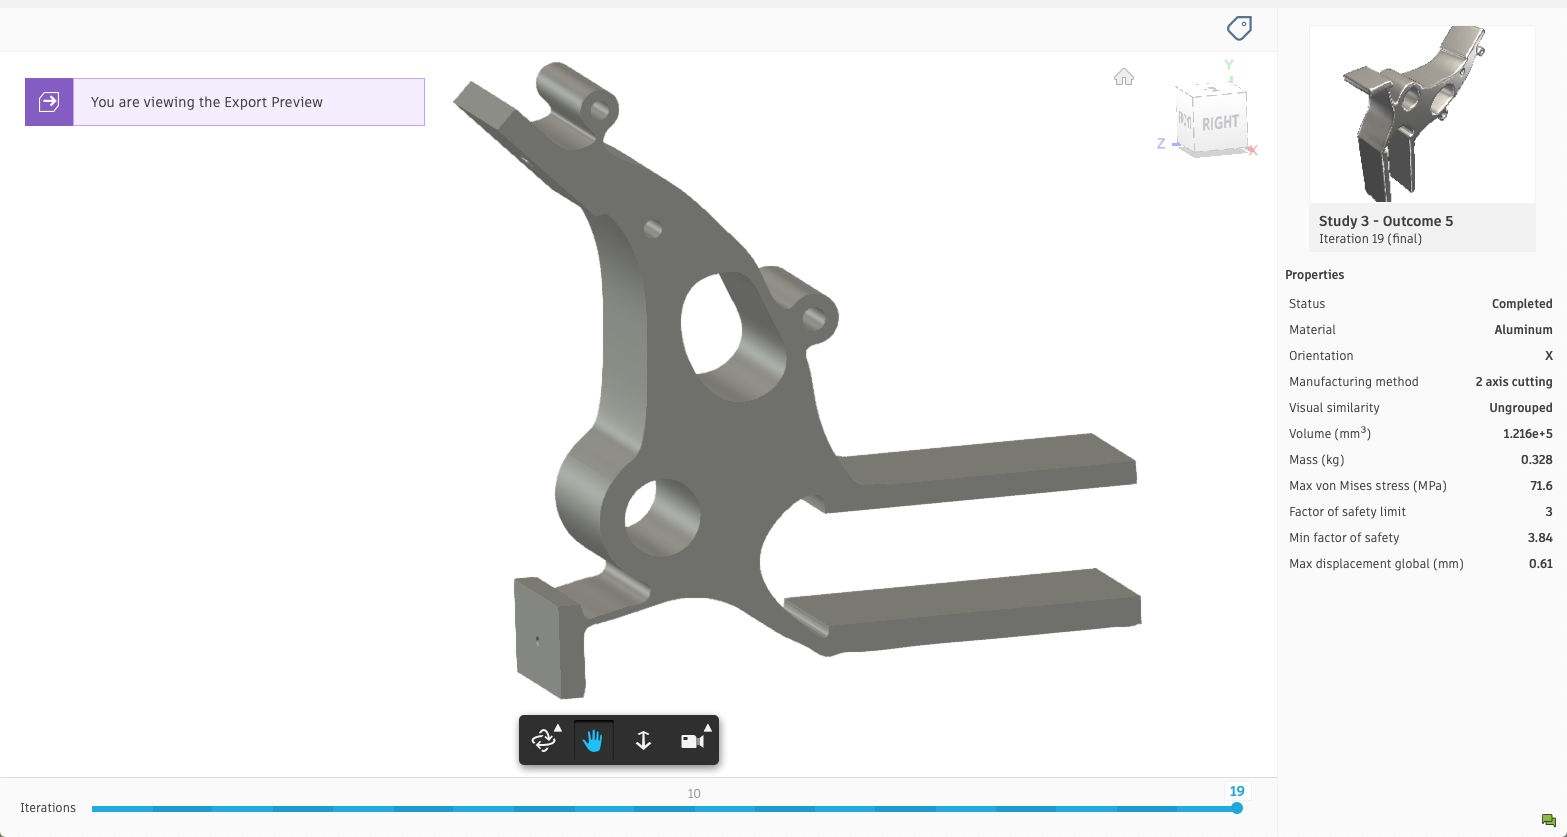
We have been making a number of improvements to 2-axis cutting and it is now ready for primetime. To start, you will see improved generation of internal holes or voids in the outcomes. Next, we have further refined the guidance in our pre-checks to help you ensure your setup will produce the best possible outcomes. 2-axis cutting is ready and waiting to help bring generative design to your water, laser and plasma production strategies.
New! 2.5 Axis Milling Out-of-preview and in Production

The 2.5 axis milling constraint preview released back in August was a major milestone to bringing generative design to a more practical and accessible method of manufacturing. We have since been working to refine this solution even further and will be taking it out of preview. In this update you will now be able to define a minimum tool diameter, that will help ensure the manufacturability of your design. Further, we have improved pocket generation and layer alignment. To go along with all of these improvements to generating high quality outcomes, we have also built in pre-checks to make it as easy as possible to get exciting designs, that are near ready to manufacture. We can’t wait to see the parts designed with 2.5 axis milling constraints.

Fixed – Flip Direction Control for Loads
We found a problem where the flip direction option in our Load dialogs wasn’t actually flipping the direction of the load. Now it’s fixed and doing just what we would expect.
[icon name=”asterisk” class=”” unprefixed_class=””] Manufacture
New! Multiple Depths for Engrave

PeteDregz and others have requested the ability to engrave in multiple depths. We’re glad to tell you that it’s now available! Now you can specify the maximum step-level between z levels for taking multiple depth cuts. This will make engraving with Fusion 360 even more productive.
New! Visibility and Views Synchronization for Setups
We’ve heard that many of you are frustrated by the difficulty of toggling the visibility of bodies and components on and off when programming between different setups. To help with this, we are introducing the option to “Sync visibility with active setup.” When you turn on this feature (by clicking the checkbox in the bottom navigation bar,) you’ll see only the relevant bodies and components for that setup. This visibility will update automatically as you activate different setups so that you only see what is relevant to you in that context.

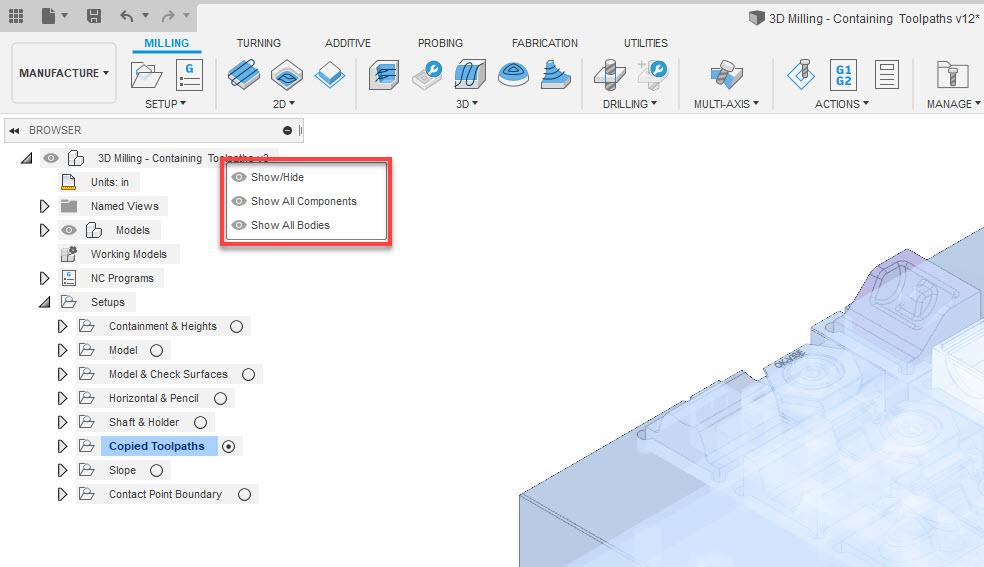
We’ve also added the visibility context menu found in the Design work space to Manufacture, so that visibility of bodies and components outside of the setup can be turned back on quickly.

When Visibility Syncing is turned on, the “Sync view with active setup’ option lets you choose to have your orientation and zoom factor for each setup update based on the WCS for the active setup. This nice little trick can save you some time spent panning and zooming – we’re working on letting you tie Named Views to your setups as an extension to this in the future!
Note: Due to how Fusion 360 handles bodies and components, visibility changes in the Manufacture workspace carry over to the Design space. To get around this, you can right-click in the browser & use the “Show All…” context menu to turn the visibility back on as needed.
Improved! Turning Face Feed Control

It is now possible to fine tune the feedrate for Turning Face operations. As the turning tool approaches zero spindle surface speed, to avoid issues with insert chipping it needs to slow down while facing off the nub at X = 0. The parameter “Use Reduced Feedrate” was added to achieve this. Once the tool reaches X = “Reduced Facing Radius” the feedrate of the turning tool is now set to the specified “Reduced Feed”.
Boring Bars for Turning Chamfer Operations
Turning chamfer operations now support turning boring bars as valid tools for the operation.
Turning Profile Roughing Canned Cycle Improvements
- In the September 2019 update profile roughing canned cycles were only supported when X Finish Allowance was equal to the Z Finish Allowance. The October release removes this deficiency and canned cycles are now supported for any value of X and Z Finish Allowances.
- Bug Fixes:
o Fixed an issue with G72 canned cycles were an additional point was incorrectly added to the end of the canned cycle profile if it terminated at a vertical edge on the model contour.
o Fixed an issue with both G71 and G72 canned cycles used to face off the front of the part failing to generate correctly.
Improved! Selection Sets in Manufacture

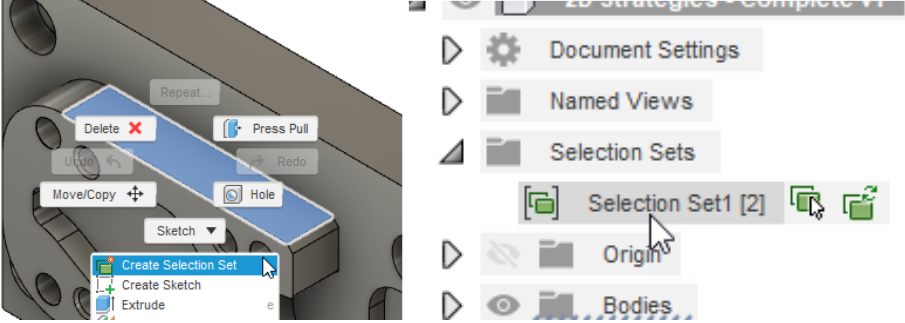
We’ve brought over Selection Sets into the Manufacture workspace, providing a mechanism for reusing selections of multiple objects. Just like in the Design workspace, if you want to speed up the process of selection several different components but don’t want to keep re-selecting them one by one, creating a selection set can save you some time. This may be particularly useful for those of you working creating Additive Manufacturing setups (available in the Manufacturing Extension), to facilitate the orientation and positioning of components on your build plate. Note: There’s a known issue where you cannot delete a Selection Set once created – we’re working on fixing this.
Improved! Touch and Avoid for Steep and Shallow (Extension)
We’re bringing more control to the Steep and Shallow toolpath (available as part of the Manufacturing Extension). This time, we’ve added the option to specify touch or avoid surfaces in order to contain the toolpath, accessible in the operation dialog.

Improved! Multiple Holes: Probe Geometry (Extension)
We’ve also made some improvements to the Probe Geometry feature, available as part of the Manufacturing Extension. Specifically, we’ve made it possible to probe multiple holes in one operation. Previously, a separate operation needed to be created for each hole, so this improvement should speed your processes up quite a bit. Now, you’ll be able to select these holes either manually, or check the ‘Same Diameter’ option.
Improved! Profile Roughing and Finishing Strategy
A number of fixes were implemented to stabilize and improve the new turning profile roughing and finishing strategies released in the September 2019 update.
Cutting depth transition moves for profile roughing with direction set to “Both Ways” were improved by eliminating the unnecessary 45 degree retract.

Fixed an issue with turning profile roughing operations with cycle set to “Vertical Passes” where the tool was not leaving the material through a distance equal to X clearance.
Fixed an issue for both turning profile roughing and finishing operations where the “Grooving” parameter was not working as expected.
Fixed an issue for certain turning profile roughing and finishing operations where a valid tool was failing at generating a toolpath.
Fixed an issue where certain turning profile roughing toolpaths going past the back of the solid model were incorrectly taking a deeper first cut.
Fixed an issue where certain turning profile roughing operations were generating an incorrect toolpath if the outer radius of the operation coincided with the outer radius of the model being machined.
Fixed an issue with certain “in control” compensation type turning profile finishing toolpaths where there was an extra incorrect point in the partline NC code output.
Fixed an issue with certain turning profile roughing operations where a toolpath move was being assigned a feedrate that could not be controlled through the user interface.
Fixed Missing Checkbox for Point Selection in Probing
@swegrzynowicz let us know that point selection was missing for angle probing after the last release – oops! This option should be back now.
[icon name=”asterisk” class=”” unprefixed_class=””] Personal License
Recently we announced updates to our free Personal and Startup license offerings. Those of you who subscribed under these license times, rest assured, they will remain free to use for you for as long as you qualify. This update does introduce some updated behaviors in-product to how Personal licenses interact with other license types, notably known as Basic Access.
Basic Access applies when you are working with someone who has a Personal license, or if you have a Personal License and are working with someone else with a Personal License or different license type, Designs opened under Basic Access will be read-only with limited options to save, export, and share with others. Compare license types here: https://knowledge.autodesk.com/support/fusion-360/learn-explore/caas/sfdcarticles/sfdcarticles/Fusion-360-Free-License-Changes.html
As a Personal License User with Basic Access
If you have a Personal license and are invited to someone else’s Team hub, designs in that team will be read-only. This is limited due to the license type you have selected. Once you switch back to your team hub (via the Switch Team option under your name), you will have regular access to your designs.
As a Startup, Student, or Commercial user with Basic Access
If you have been invited to a team that is owned by a Personal license user, designs in that team will be read-only. Once you switch back to your team hub (via the Switch Team option under your name), you will have regular access to your designs.
FAQs:
- I have a Personal license and am working on my own designs, will I have regular access or Basic Access?
You can fully open, edit, and save your own designs that you’ve created in your own Team (that you are an admin of). - I was invited to a team in my company and I decided to get a Personal License. Why do I have Basic Access?
You have Basic Access because the team you joined is owned by someone else. As a Personal license user, you will have Basic Access for the duration of time while you are working in a team owned by someone else. If you want regular access, you’ll have to create your own team or changes license types. - Can I still create my own team if I joined a team already?
Yes, if you joined a team, you can still create your own team by going to your name in the top right corner > Join Team > and check the create your own team option in the dialog. - How do I know if I own the team that I’m in?
Go to your name > Switch Team > and verify that the team that is checked is the one you’ve created. - I haven’t migrated to a Team – why do I only have Basic Access in some of the designs I open from the data panel?
If you haven’t migrated to a Team site yet, you will still see projects you’ve been invited to. Since those projects are owned by someone else, as a Personal license user, you will have Basic Access to the designs within those projects. Vice versa, other license types will have Basic Access if they opened a design that belongs to a Personal license user. - I’m a Startup/Student/Commercial user and I see that I have Basic Access. Why?
This may be because:
You opened a design that belongs to a Personal License user
Or you switched to a team that is owned by a Personal License user
That’s it for the product update – stay tuned for the next one!