
Hello, Product Design & Manufacturing Collection users. Welcome to the Fusion 360 blog. There are a ton of reasons to use the collection and Fusion 360 just happens to be a big one! That said, I’m sure you’re wondering…how do I get started?
So here we go! Check out this step-by-step guide on how to get started with Fusion 360.
Step 1: Go get Fusion 360
First of all, you need to download, install, and log into Fusion 360. If you’re the Contract Manager for your Autodesk Account or an individual user, then you can download right away.
Simply go log into your Accounts page. Navigate to Product & Services » All Products & Services on the left-hand side and find Fusion 360. Click the Download Now icon.
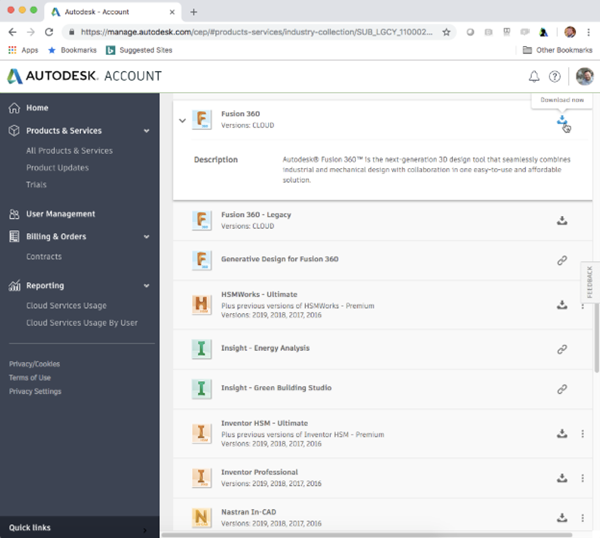
Once you’ve downloaded and installed, launch Fusion 360 by simply logging in using the same account information as your PDMC credentials.

Having trouble? Watch this informative video.
Step 2: Desktop Connector
Once Fusion 360 is up and running, we need to start sharing files. For this, you’ll need to install Autodesk Desktop connector. Desktop Connector is a desktop service that integrates a cloud data source with your desktop folder and file structure for easy file management. It is the integral piece to link your locally saved Inventor files to the cloud-based Fusion 360 files.
You can also manage files stored on the cloud through this connected drive, just as you would any other folder on your machine. Changes made in the connected drive are automatically uploaded to the data source.
Let’s setup Desktop Connector on your machine now.
Installing the Desktop Connector
- Download the latest version of Desktop Connector for your platform.
- Open the downloaded package and follow the instructions.
- When the installation finishes, set up your connected drives.
Desktop Connector Drives
- Right-click on the Desktop Connector icon
 and select Sign In.
 - Enter with your same credentials and click Sign In.
A specific connected drive is created for each data source associated with your Autodesk credentials. You’ll notice for any Fusion 360 data, an associated “folder” is connected on your drive marked with an icon ![]() and any hubs are marked with an
and any hubs are marked with an ![]() icon.
icon.
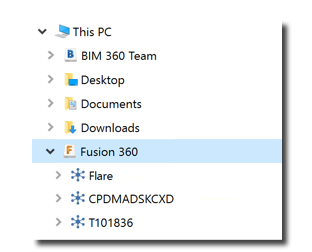
4. Now you can start managing the same files in both locations.
Step 3: Welcome to AnyCAD
The way in which Fusion 360 and Inventor connect through AnyCAD is quite unique. Fusion 360 uses cloud-based storage, and the design data primarily resides in cloud-based repositories. The workflow below uses Autodesk Desktop Connector to bridge the gap between the two programs.
AnyCAD allows you to take models from other CAD software, not just Inventor, in their original format and use them directly in your Fusion 360 designs. AnyCAD keeps your CAD data associations, so changes made to the original designs in their native applications are automatically updated in Fusion 360.
**Important: In order to use the AnyCAD functionality, there are several requirements:
- You have to be signed up for Autodesk Fusion Team. Click here to learn how to do so.
- You have to be a part of a Team Hub. Contact our technical support if you need assistance to create a Team Hub.
- Desktop Connector has been properly installed. See above.
Supported AnyCAD formats
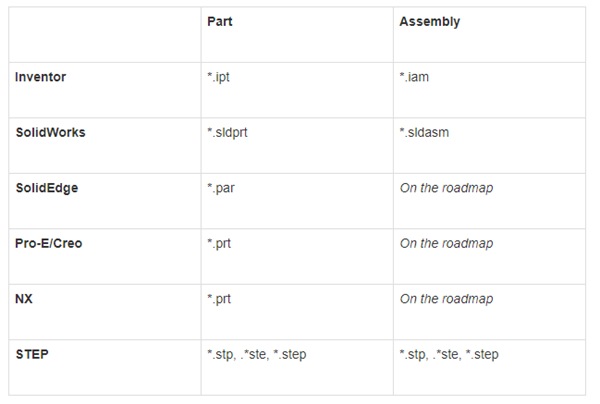
The AnyCAD Workflow
- Make sure you are logged in to your Fusion Team hub.
- Click on your name in the top right corner, then select Switch Team to switch your personal hub to the team hub.

- Upload your Inventor files via Desktop Connector. Your files are automatically updated in the Data Panel to reflect the files in Fusion Team
- Always click Refresh
 to make sure your data is fully synchronized. Note that Fusion 360 shows the type of data you have available, .ipt file in this case:
 Assembly files are shown in the data panel as a composite file instead of a single top-assembly file with several distributed sub-assemblies and part files.
 - Locate the desired file in the Data Panel, open the file in a new document, or insert it to your existing design.
Opening Files
Open your Inventor file by double-clicking on the item in the data panel, or right-click the item and select Open.
If the original part file is updated, the Out-of-date icon ![]() in the toolbar and in the timeline indicates that the referenced model is out of date. If needed, right-click in the timeline to get the latest version of the part.
in the toolbar and in the timeline indicates that the referenced model is out of date. If needed, right-click in the timeline to get the latest version of the part.
Using Your Files in an Existing Design
You can also insert the AnyCAD files into an existing design as external references.
Locate the desired AnyCAD file in the data panel, right-click and select Insert into Current Design. The AnyCAD file is then inserted into your current Fusion 360 design, the corresponding nodes are added into the browser, just like external references.
If the original part file is updated, the Out-of-date ![]() icon in the browser indicates that the referenced model is out of date. If needed, right-click to get the latest version of the part. For assemblies, right-click on the roof top assembly to get latest.
icon in the browser indicates that the referenced model is out of date. If needed, right-click to get the latest version of the part. For assemblies, right-click on the roof top assembly to get latest.
Capabilities of AnyCAD files
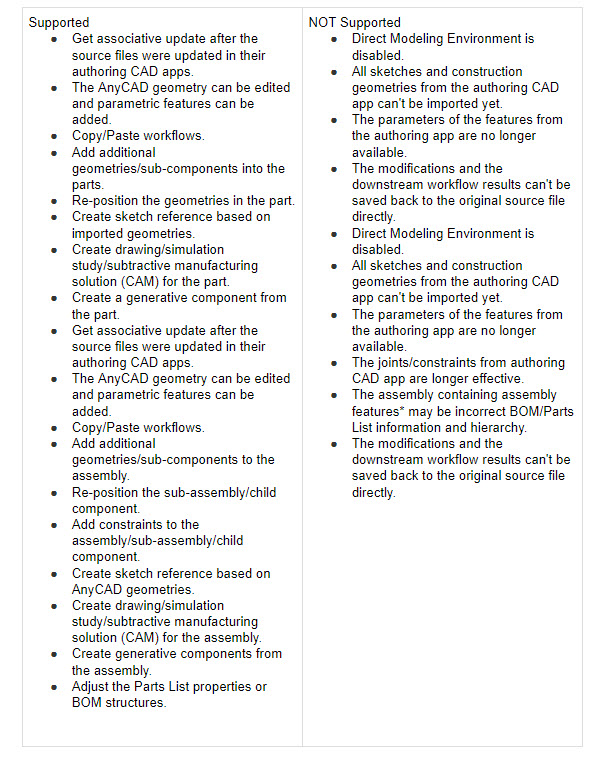
When inserting an Inventor part or assembly, these AnyCAD files are treated as External References, the geometries cannot be edited directly. However, when opening an AnyCAD part or assembly, its geometries and structures can be edited. You need to save the opened file as a separate Fusion 360 design to keep these changes. The table below shows what you can do to AnyCAD files in open workflow:
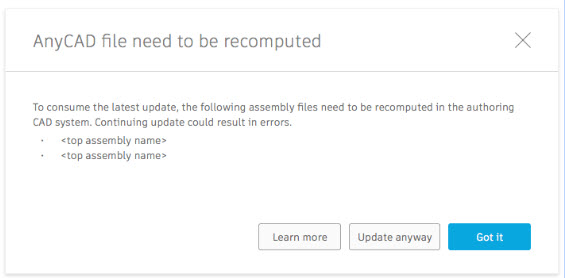
Why do I need to update the assembly file in the authoring CAD system?
When you see the following dialog, it means the assemblies need to be updated in the authoring CAD software to make sure that Fusion 360 can process the data correctly.
How to update AnyCAD assembly in the authoring CAD software
To help Fusion 360 process the latest changes of AnyCAD assemblies, follow the instructions below to update your model in the authoring CAD software.
Inventor
If you open and edit the Inventor .IPT file only, open the corresponding top assembly .IAM file after saving all the changes to the part file. You may see the pop-up dialog below:
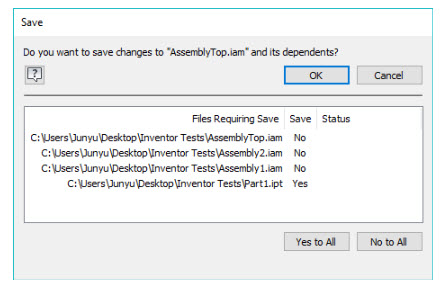
Choose Yes to update the assembly, and save the assembly file after updating.
If you open the assembly file and edit the part file in-place, save the changes after you finish editing and choose the option Yes to All and click OK to update the assembly. Inventor then saves the changes to the .IPT file and all necessary parent assembly .IAM files.
SolidWorks
If you open and edit the .SLDPRT file only, after saving changes to the .SLDPRT file, open the top assembly file and you may see a warning message to check whether you want to rebuild the document or not. Choose Rebuild to process the changes of the part files.
After you see the latest part changes were properly rebuilt in the assembly, click the save button. In this scenario, SolidWorks may ask you how to deal with the referenced files (include parts and sub-assemblies) in this assembly. Choose all files in the list and click Save all.
Thank you for following along, this is just the beginning of the automation. Stay tuned for more on generative design in Fusion 360.