Elevate your design and manufacturing processes with Autodesk Fusion
While designing in Fusion 360, designs will become filled with sub-assemblies and external referenced designs. For organizational purposes, each one of these components (internal and external) will have its own origin folder, joints folder, etc. I’ll admit, when designing, I do not pay attention to the visibility of these objects. At a certain point (usually after reopening my design), I’ll notice that for some reason I have every joint visible, either due to shear laziness or I was in the zone and didn’t notice.
There are several workflows to turn off the visibility of these objects in order to clean up the graphics area. Watch this video to see different workflows on how to hide the visibility of different objects:
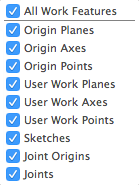
The most efficient route to hide different objects is through the display settings (bottom toolbar in Fusion 360). Deselecting the checkbox next to the object, hides that object’s visibility throughout the entire design. This is a fast approach to hide the selected object; however, if even one needs to be visible, this workflow will not work. This will control the visibility of the following objects:

A second approach uses selection filters. Selection filters enable a user to select a certain entity quickly with different selection tools (box, lasso, paint, etc.). First, select “Select All” to turn everything off (counter intuitive, I know). Then select the filter. Here is a list of the different selection filters available:

Selection filters have huge potential to aide in the design process. Use these filters anywhere where you need to select a lot of one object. My favorite place to use selection filters is while applying appearances to faces. Instead of accidentally selecting edges or vertexes while applying appearances to faces, enable the “Body Faces” filter.