& Construction

Integrated BIM tools, including Revit, AutoCAD, and Civil 3D
& Manufacturing

Professional CAD/CAM tools built on Inventor and AutoCAD
5 min read
Welcome back to our SPICE Simulation Series, Part 5! We’ve completed our full tour of the new SPICE features in Autodesk EAGLE 8.4. But wait, you might be asking, how can I simulate all of my existing designs? There’s still more to learn. In this blog, we’ll be looking at how to convert a current schematic into one that’s SPICE compatible.
We’ve got another example project lined up made specifically for converting a non-SPICE schematic. Let’s open this now. Look for the convert project folder within the Projects » ngspice directory in your Autodesk EAGLE control Panel. Open spiceconvert.sch.
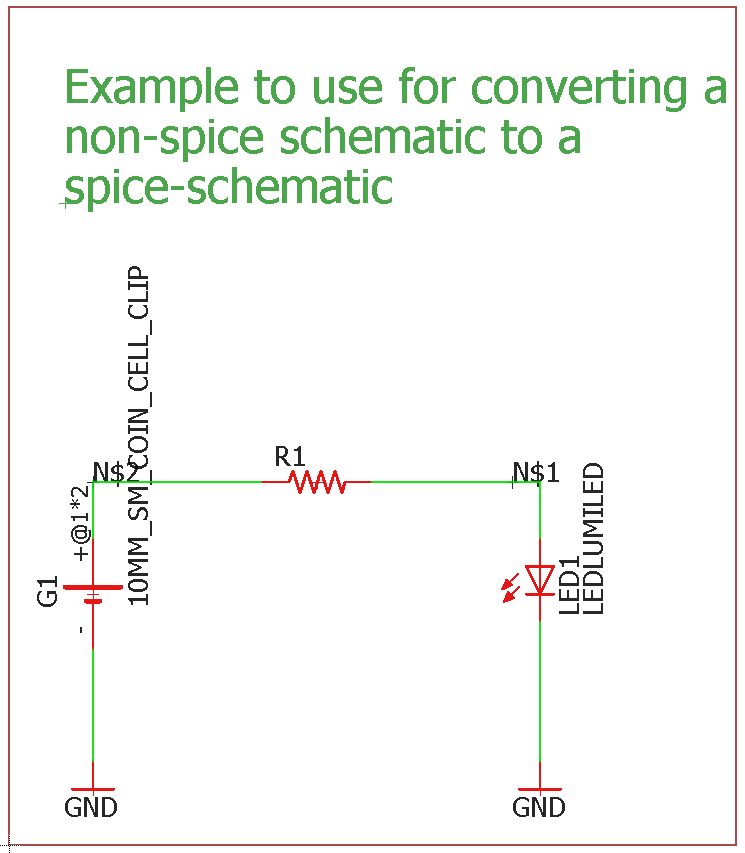
This is a simple circuit, but it serves our purpose well. None of the parts on this schematic are SPICE compatible at the moment. If you click the Simulate button at the top of your interface EAGLE will remind you about this:

Before opening the Simulation dialog, EAGLE will always confirm that all of your parts are linked to SPICE Models. If they’re not then you won’t be able to simulate. To convert your schematic a process of part mapping is required.
We’re now going to walk through how to map all of the symbols on this schematic to SPICE models. To begin, we need to select all of the symbols using the Group command. Select the Group icon on the left-hand side of your interface, then click and drag a selection box around all of the parts.
Next, you’ll right-click on any of the highlighted parts and select Add Model. You’ll first get a dialog asking if you want to convert all parts with GND in their name to spice ground node 0. This is important. In SPICE you always need to have a node 0 in your netlist. This signifies ground and is used in all of your simulation calculations.

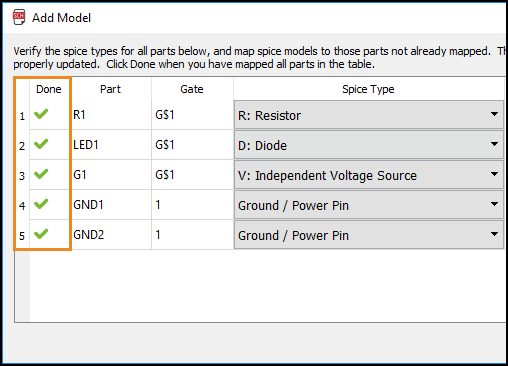
To make our lives easier EAGLE does all the work of converting your GND parts to node 0, so just select the Yes button to continue. You should now be looking at the Add Model dialog as shown below:
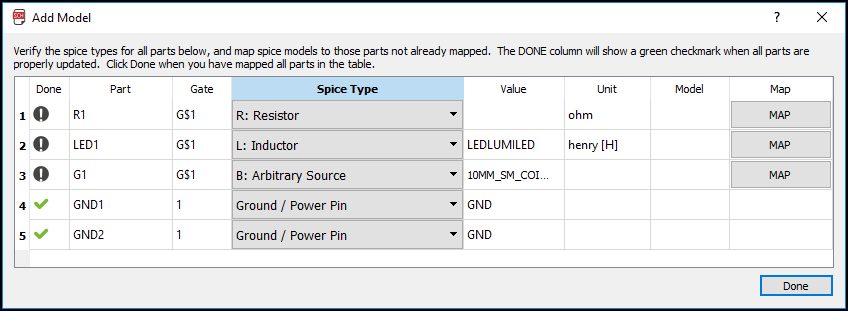
Take a look at the Done column, and you can see two green checkmarks for GND1 and GND2. These are the existing ground symbols that EAGLE automatically converted to node 0 for us. There’s nothing more that needs to be done for these two, so let’s focus on the remaining parts we need to map: R1, LED1, and G1.
To start, we need to make sure the proper Spice Type is selected. EAGLE will automatically assign a Spice Type for all the symbols in your schematic, but you always need to double check them for accuracy. Here we can see that the resistor already has a Spice Type of R: Resistor.

Let’s now select the Map button to continue.

Now we’re at the Map to Model dialog. Select the Load Model tab, and you’ll see a model type of Intrinsic Device/No Model listed. What does this mean? This is the default SPICE model type for all simple parts that don’t require a specific model or subcircuit, like our resistor. Other simple passive components like capacitors will also use this intrinsic model type. We can leave the default model type as is for our resistor and then select the Map Pins tab to continue.

Here we can see two pins that need to be mapped to model inputs. For a resistor, it doesn’t matter how you link the pins to the model inputs since there are no polarity concerns. You’ll notice that EAGLE has already done this work for us, so all we need to do is select OK to continue.
Boom, one part down, two to go. One quick thing to note, when you map one passive component like a resistor or capacitor, all other components of the same type that use the same symbol inherit the same mapping.
This can come in handy when you’re working with larger schematics with a ton of passive components. You’ll likely use the same symbol for all of your resistors, so if you map one, then you map them all in one go. This is a great time saver.
Next up we have our LED. EAGLE looked at the name prefix of this device and saw an L, which in SPICE stands for an inductor. Clearly this isn’t right, so for LED1 we need to change the Spice Type to D: Diode, and then select the Map button.

The Map to Model dialog will open, and you’ll notice that the Model Type is set to Model Card. Model Cards are used for intrinsic devices that require models, such as diodes, BJTs, FETs, etc. These parts all need SPICE models to be attached but are not considered subcircuits.
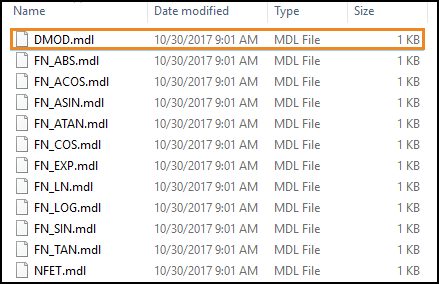
In this case, we don’t need to go searching the web for a diode model. The Models directory in EAGLE already has what we need. Select the Load Model button, and then navigate to the Models folder in your EAGLE application directory. In this folder, you’ll want to select the DMOD.mdl file.
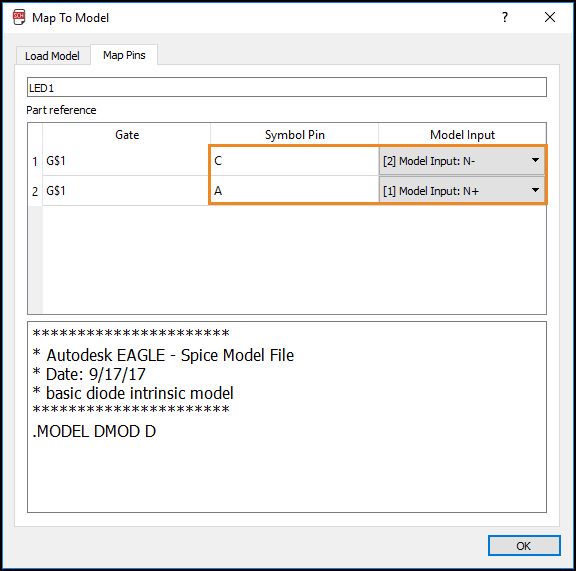
Now that the model is loaded select the OK button to continue mapping pins to inputs. Here we have C (cathode), which is a negative symbol pin, and A (anode), which is positive. We’ll map Symbol Pin C to Model Input: N-, and Symbol Pin A to Model Input: N+. Once those are set, select the OK button to finish the mapping.
The final part is G1, which is a battery. For the Spice Type, we’ll select V: Independent Voltage Source and then select the Map button.

In the Map to Model dialog, we just need to map the positive and negative pins to their respective inputs, that’s easy work. Select OK when you’re done.

If you were following along with us, you should now have all green checkmarks listed in the Done column in the Add Model dialog. Go ahead and select the Done button to close this window.
If you click the Simulate icon at the top of your interface, you’ll be greeted with the Simulation dialog, ready to start analyzing!
Here we’ve taken a schematic that was non-SPICE compatible and made it simulation ready in just a few simple steps. All it took was a quick process of part mapping. For more practice be sure to try out this workflow on your designs! You can also experiment with the TI Launchpad example design in the EAGLE Projects directory. This circuit has some more advanced components that will put your part mapping skills to the test.
Ready to make your designs SPICE compatible? Try Autodesk EAGLE 8.4 for free today!
By clicking subscribe, I agree to receive the Fusion newsletter and acknowledge the Autodesk Privacy Statement.
Success!
May we collect and use your data?
Learn more about the Third Party Services we use and our Privacy Statement.May we collect and use your data to tailor your experience?
Explore the benefits of a customized experience by managing your privacy settings for this site or visit our Privacy Statement to learn more about your options.