What is the Manufacturing Extension?
Before I take a deep dive into the details that make Steep and Shallow more than just a one-size-fits-all toolpath for lazy machinists, I want to quickly cover what the Fusion 360 Manufacturing Extension actually is. The Manufacturing Extension adds deeper functionality for those of us who need it. It currently includes access to Additive Manufacturing, Hole Recognition, Surface Inspection and Geometry Probing, and Steep and Shallow. Basically, drilling automation, in-process inspection, and robust finishing strategies. You can enable, meaning subscribe to, the Manufacturing Extension directly within Fusion 360. Read more about the Manufacturing Extension here.
If you subscribe to the Manufacturing Extension, make a bunch of operations using those strategies, and then decide not to resubscribe, you can still view and post the operations you made. You just can’t edit them. The goal of the Manufacturing Extension is to give you flexibility to only access functionality you need, when you need it. There’s no high upfront cost, no downloads, no additional serial numbers or dongles. This way, the base price of Fusion 360 stays low for those who don’t always need this deeper and more complex capability while still keeping us in business–and giving you the option to post out legacy programs.
Ok, cool. What is Steep and Shallow?
Steep and Shallow is the 3D finishing toolpath included in the Manufacturing Extension. At a high level, it can machine full parts with complex surface geometry in a single toolpath. It has dedicated parameters for both the steep and shallow areas of the part contained in a single operation. I’m guessing it’s clear how it got its name!
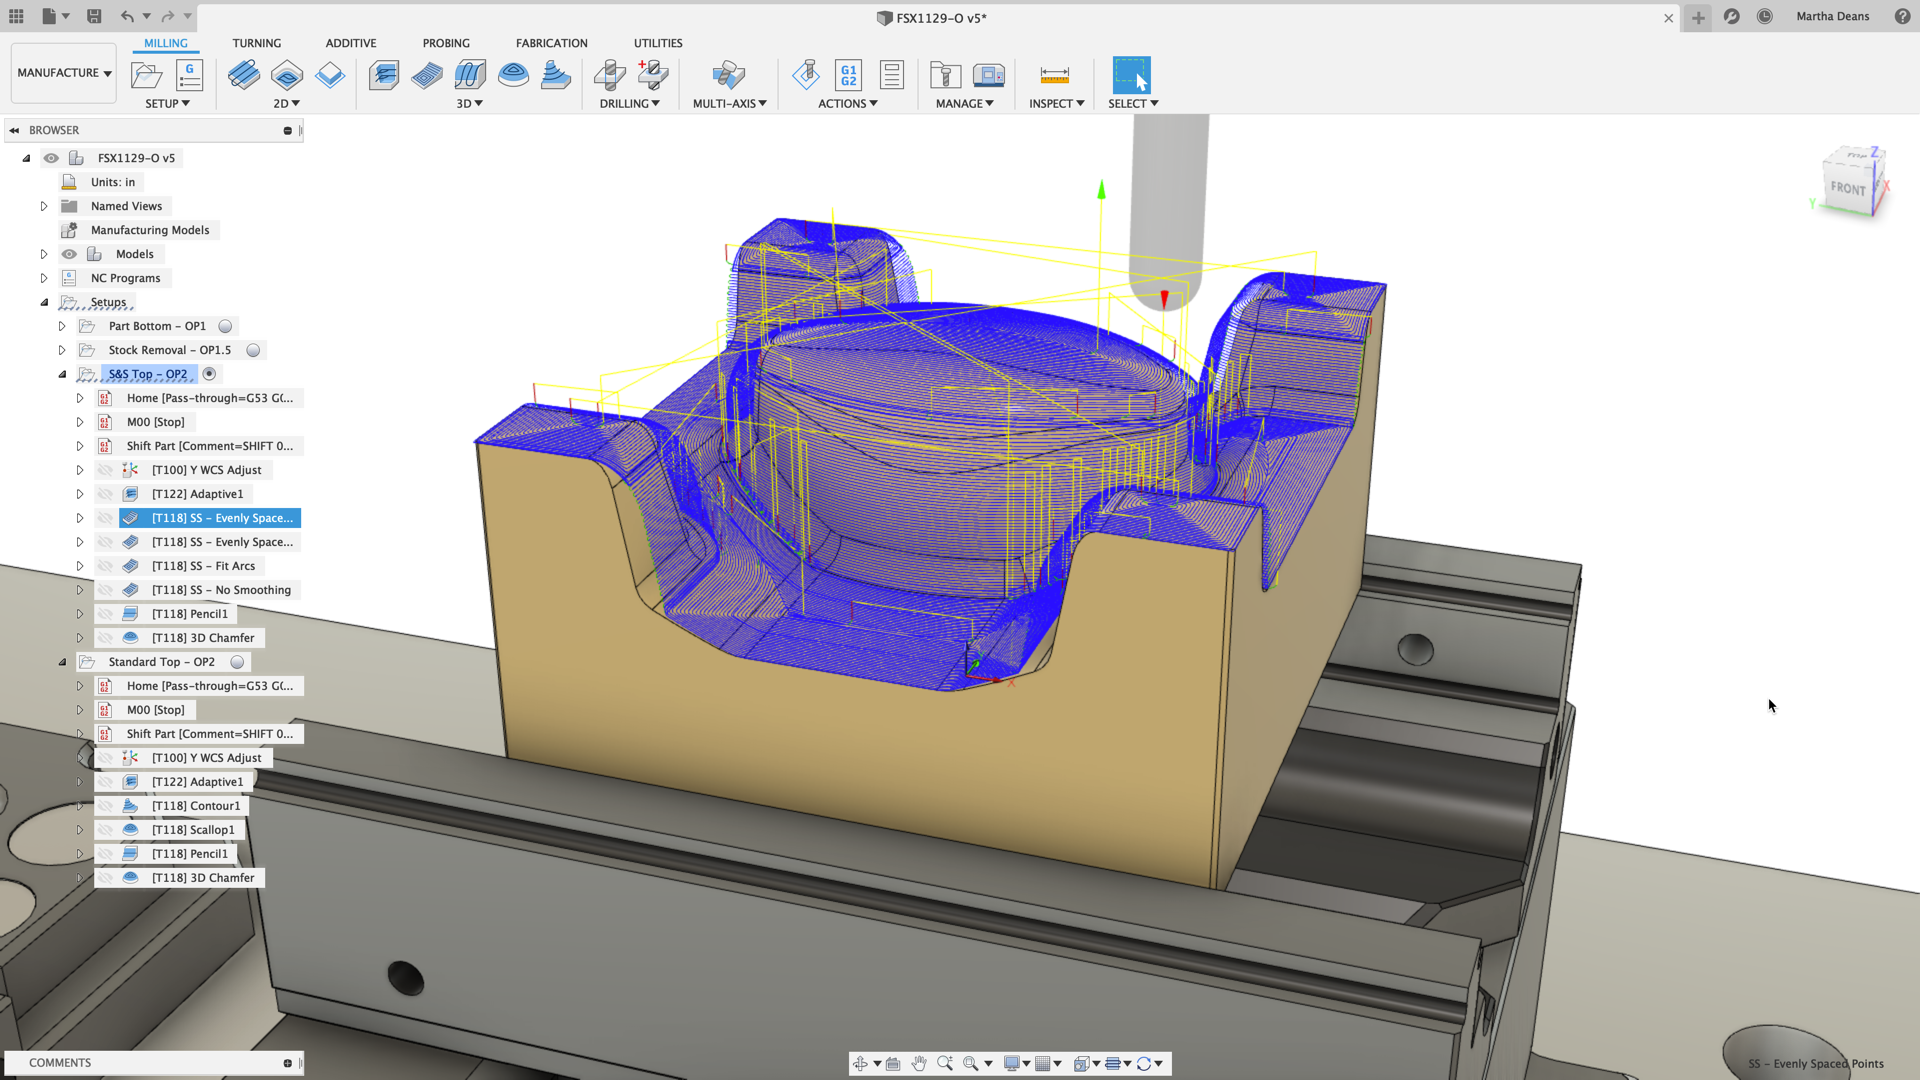
From just this high-level view, including Steep and Shallow in the Manufacturing Extension doesn’t make much sense. It seems like combining Scallop and Contour strategies would lead to the same result, right? That’s what I thought at first. But, as Tim Paul likes to say, the devil is in the details. And wow, does Steep and Shallow have a lot of details!
To take a closer look, I machined 4 identical parts on the Haas VF2SS we have at the San Francisco Technology Center at Pier 9. I’ll compare some of the little details and see if Steep and Shallow is really worth using.
Threshold Angle & Overlap Distance
Let’s start towards the top of the Steep and Shallow Passes Tab. The Threshold Angle parameter makes it easy to ensure that the steep and shallow strategies cover the appropriate ares of the part. This is the “cutoff angle” for where the strategy switches from steep to shallow. So, if I enter 30 degrees, anything shallower will have the shallow passes strategy applies. Anything steeper will have the steep passes strategy applied. The Overlap Distance parameter specifies a distance to blend the strategies to reduce the appearance of any seams in the final product.
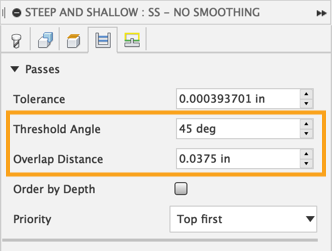
If you’re using a combination of Scallop or Parallel and Contour, you can still get the toolpaths to cover most of the part by using the Slope containment available in most 3D finishing strategies. 0 degrees is flat and 90 degrees is vertical, relative to the Z-axis. So, to achieve the same result as a 45 degree Threshold Angle, you would use a Slope containment of 0 degrees to 45 degrees in the Scallop or Parallel and a containment of 45 to 90 degrees in the Contour. But, this doesn’t factor in any overlap.
Does Overlap Distance Really Matter?
Now, depending on who you ask and what kind of parts you’re making, the importance of the overlap varies. Some say it’s not needed and just wastes precious cycle time. Some say it’s very necessary to blend the transition surfaces for a uniform surface finish. The important thing here is that Steep and Shallow has an actual parameter you can use to control the overlap distance exactly. If you do need overlap, a good starting value is to set the Overlap Distance equal to 2 times the stepover and adjust from there.
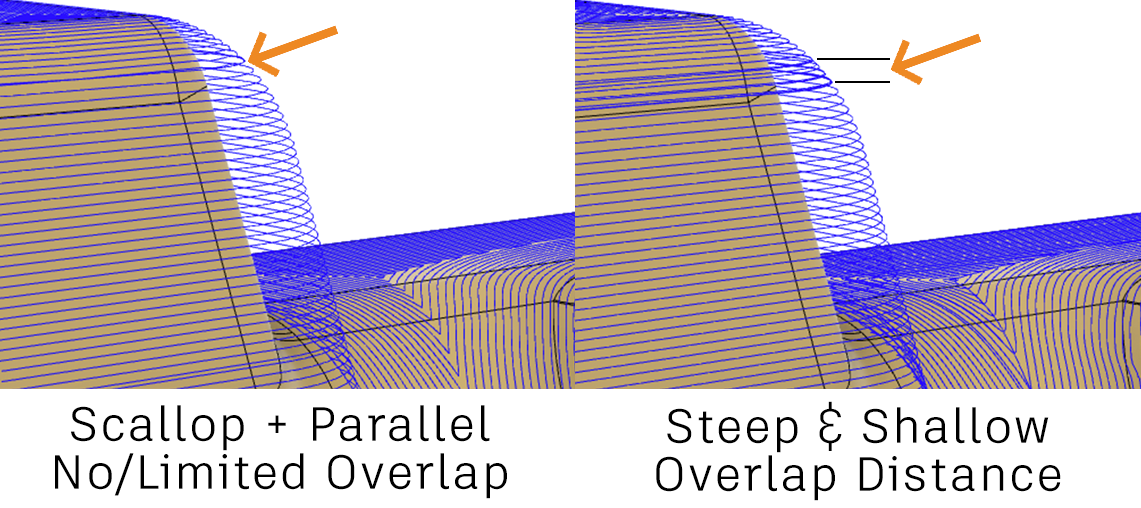
In order to get the separate strategies to overlap, you’ll need to make sure the slope containments overlap as well. In this case, I set the Scallop maximum angle to 45.5 degrees and the Contour minimum angle to 44.5 degrees. So, the toolpaths should overlap slightly by about 1 degree. However, I don’t know what that is in linear distance. The advantage to Steep and Shallow is that I know exactly how much they’ll overlap, while for the separate strategies it’s a bit of a guess and check game.
Hijacking Steep and Shallow
Now, there is something important that the Threshold Angle of Steep and Shallow allows. You can essentially force it to cover the entire part in either the steep or shallow passes by setting the Threshold Angle to 0.1 degrees or 89.9 degrees, respectively. Combine this with Slope limits, and you can use Steep and Shallow to create optimized Scallop, Parallel, Contour, or Ramp toolpaths. This could be especially useful for those with 5-axis machines who can use Tool Orientation to tilt the tool so it’s cutting off the tip while maintaining the same cutting motion. Alternatively, you can turn Steep and Shallow into a better version of Scallop or Parallel based on the benefits I’m about to cover.
Continuous Passes for Scallop
Moving down the dialog box, there are several options in the shallow passes section specific to Scallop. In this case, for this part geometry, Scallop made more sense than Parallel so it’s what I’ll focus on. The Continuous checkbox makes the Scallop into a continuous spiral rather than distinct offset passes that require transition moves. This can help reduce marks on the part as the tool remains constantly engaged in the material. Constant engagement reduces changes in tool deflection that lead to marks on the part where the tool deflects when starting to engage or straightens when disengaging.
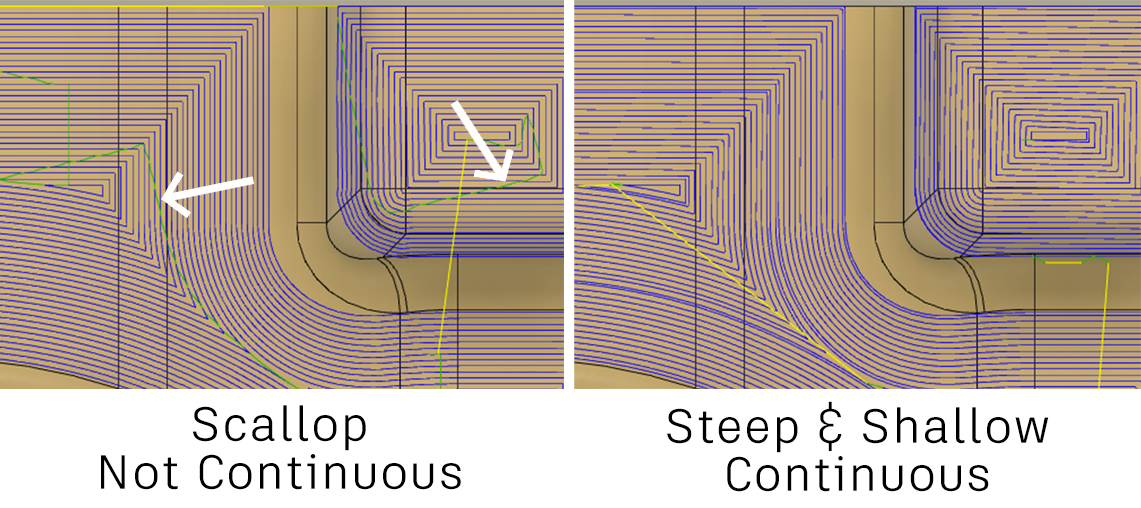
Continuous Passes also helps the machine move more smoothly. Typically there will be a different feedrate for Lead-In/Out moves and Cutting moves defined for the tool and inherited by the operation. There are a lot of factors that go into making the most optimal machine motion that are outside the scope of this blog but maintaining a constant feedrate can definitely help. This means the machine doesn’t need to accelerate and decelerate as often, which can make tool deflection issues even worse.
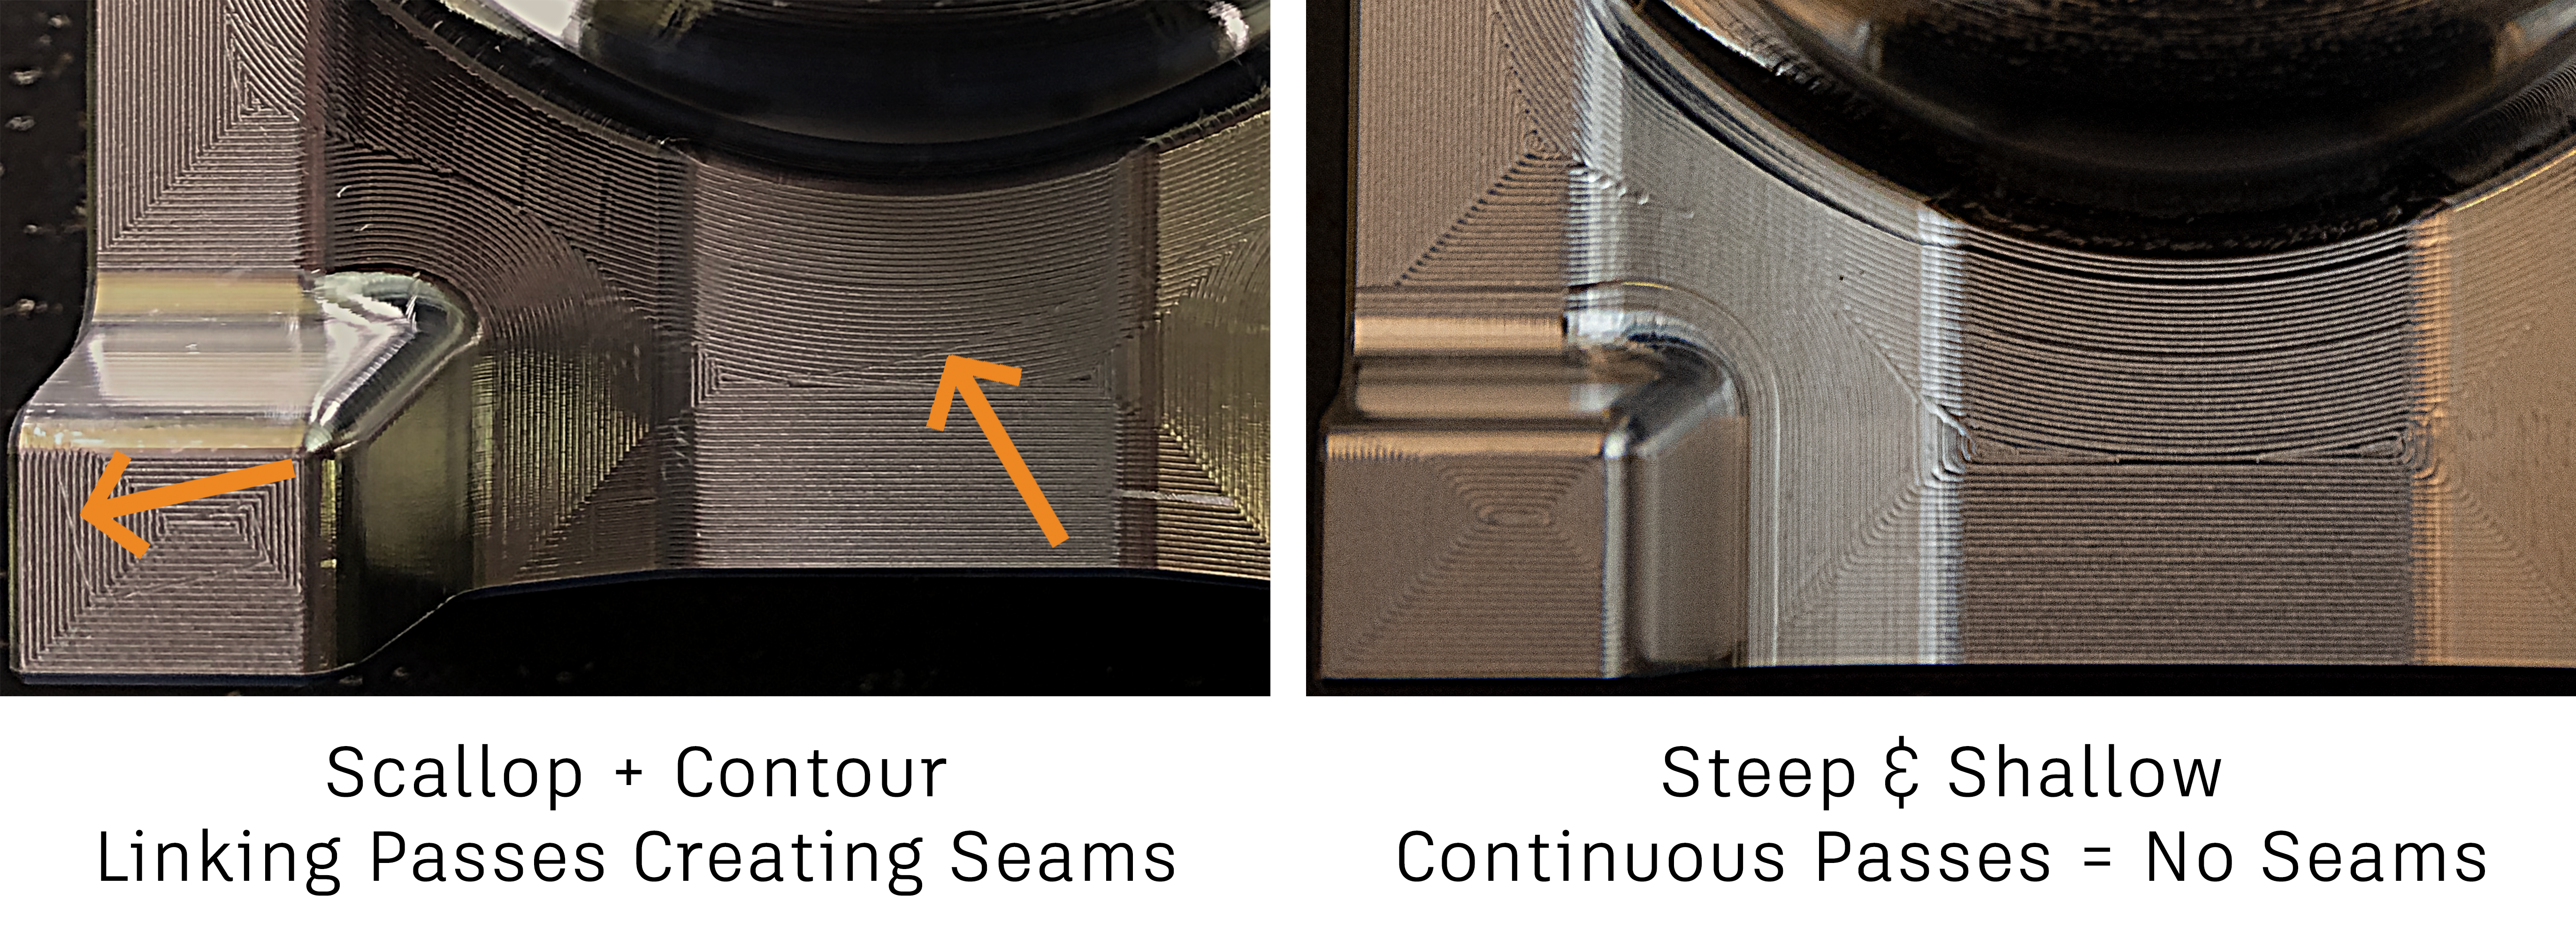
Creating continuous passes is not currently available in the Scallop toolpath in Fusion 360. So while you could use Steep and Shallow to create an improved Scallop, you can’t replicate this with a basic Scallop.
Smooth Offsets for Scallop
Up next, there are two options that help smooth out machine motion while also reducing variation in surface finish.
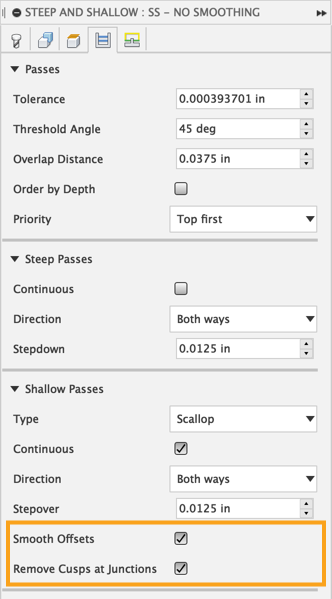
Scallop toolpaths have a tendency to “collapse” in as the passes continue to offset towards the center of the part. This can lead to sharp corners in the toolpath. These sharp corners mean the tool and machine have to essentially turn on a dime, leading to high acceleration and deceleration in at least one axis of travel. Like I mentioned above, this leads to problems with tool deflection, which can lead to marks left on the part. To combat this, Steep and Shallow has a Smooth Offsets option that rounds those sharp corners to help smooth out machine motion.
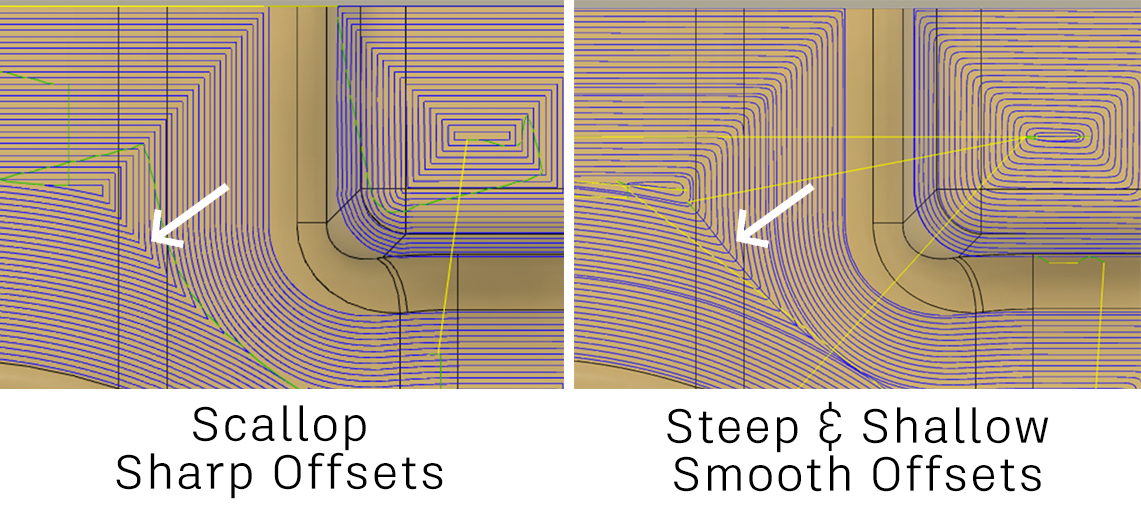
Unfortunately, even Smooth Offsets isn’t a silver bullet. The internal corners still have an issue: there’s a greater distance between each internal corner than the programmed stepover. This can lead to a higher cusp along the internal corners. Luckily, Steep and Shallow has yet another option to solve exactly this problem! Remove Cusps at Junctions adds a pass along the internal corners where the distance is greater than the stepover, helping smooth out that high cusp and resulting in a more uniform surface finish.
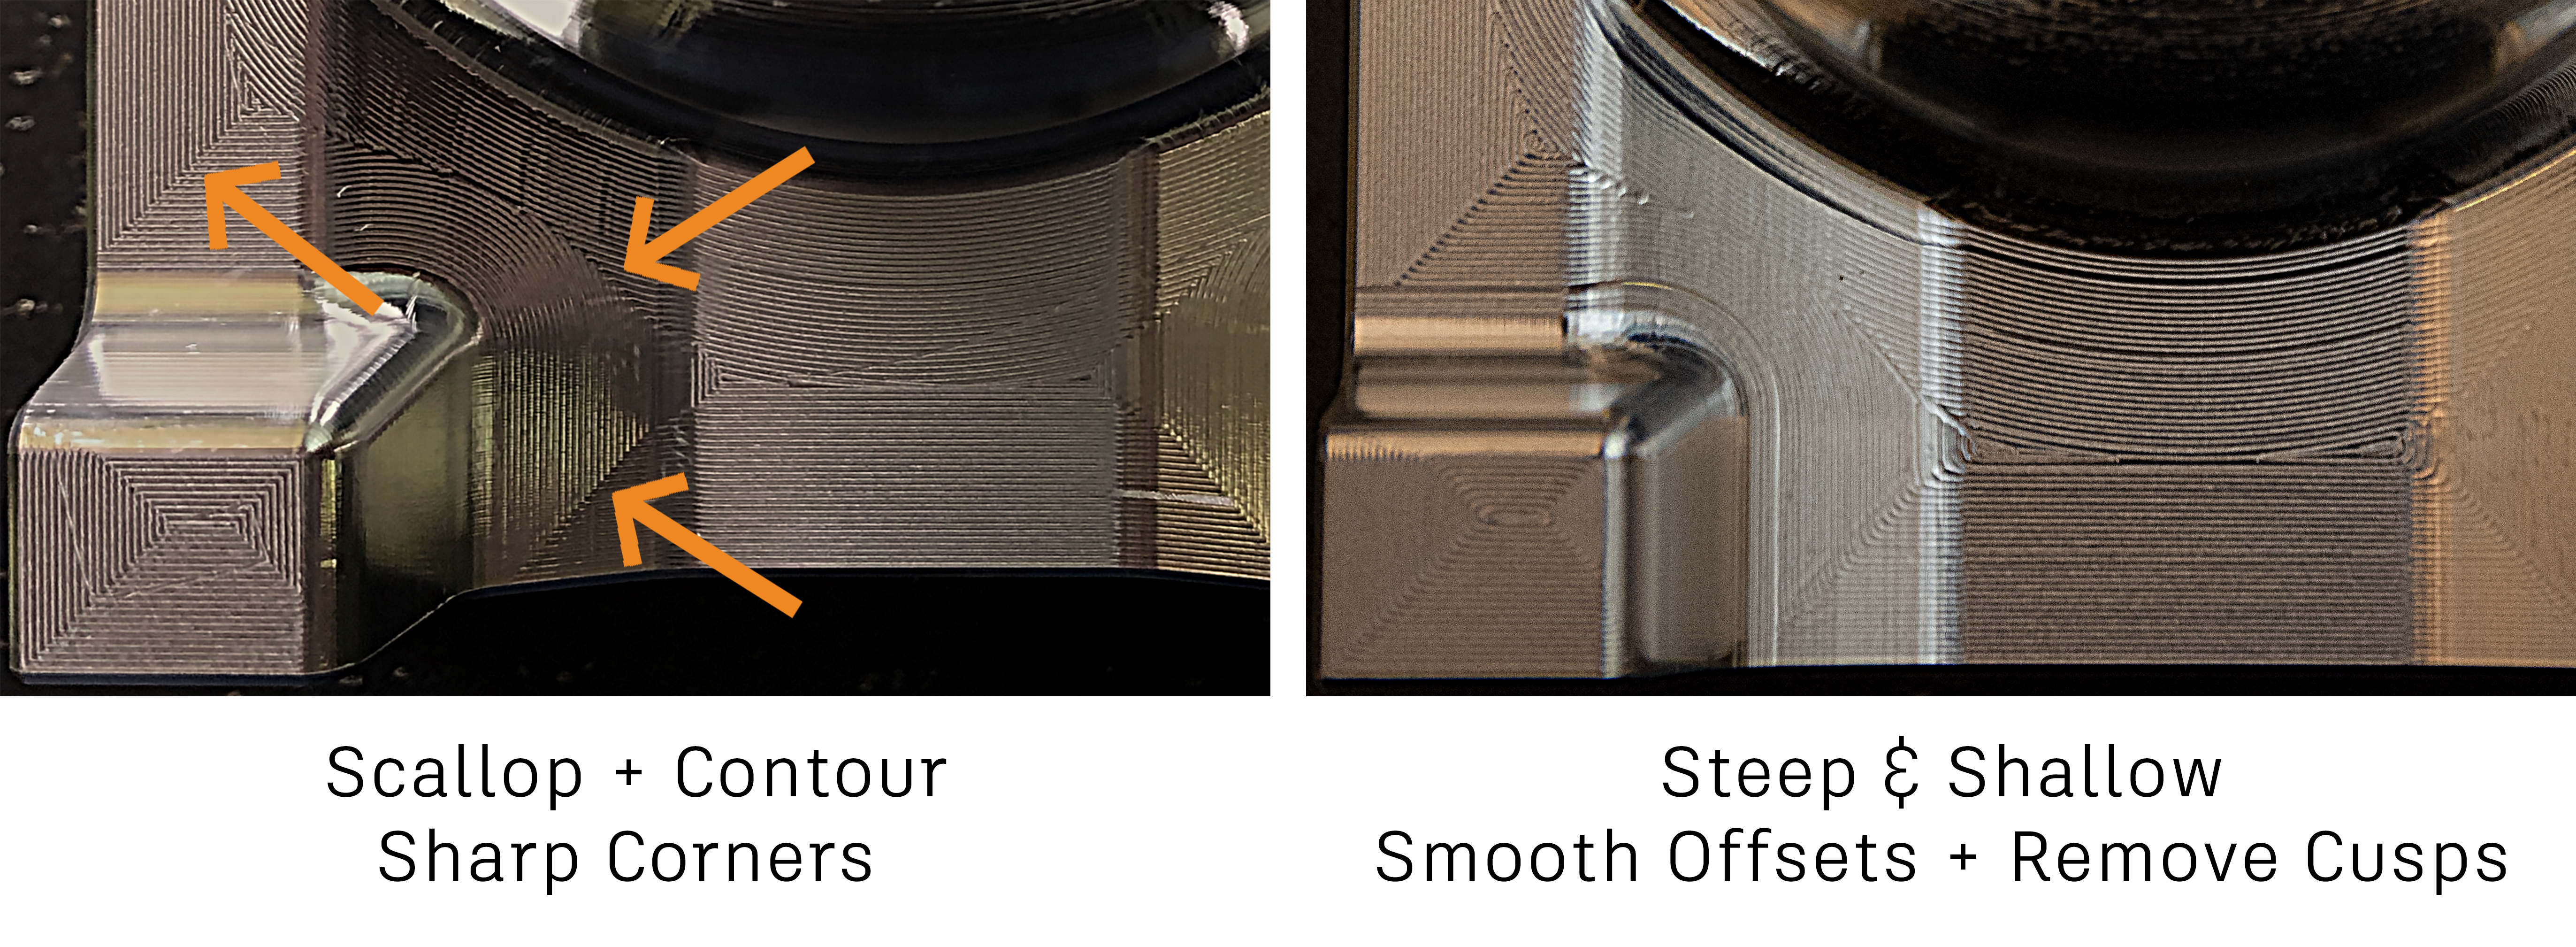
Yet again, these options are only found in Steep and Shallow, so while you can use Steep and Shallow to create a Scallop with these options, you can’t replicate this using the standard Scallop toolpath.
Evenly Spaced Smoothing
I definitely saved the best for last, and it’s the new smoothing option available in Steep and Shallow. Fit Lines and Arcs does essentially what the smoothing option in the rest of Fusion 360 does – approximates lines and arcs to reduce the overall number of points in the toolpath. Tim does a great job of explaining in more detail here. This option is great for older machines where too many points can lead to data starving. Data starving means the machine tool stops and waits for the next line of code to process. This can lead to jerky and problematic machine motion. While large and complex toolpaths can cause problems on old controls with less processing power, newer controls with modern processors are less likely to run into this issue.
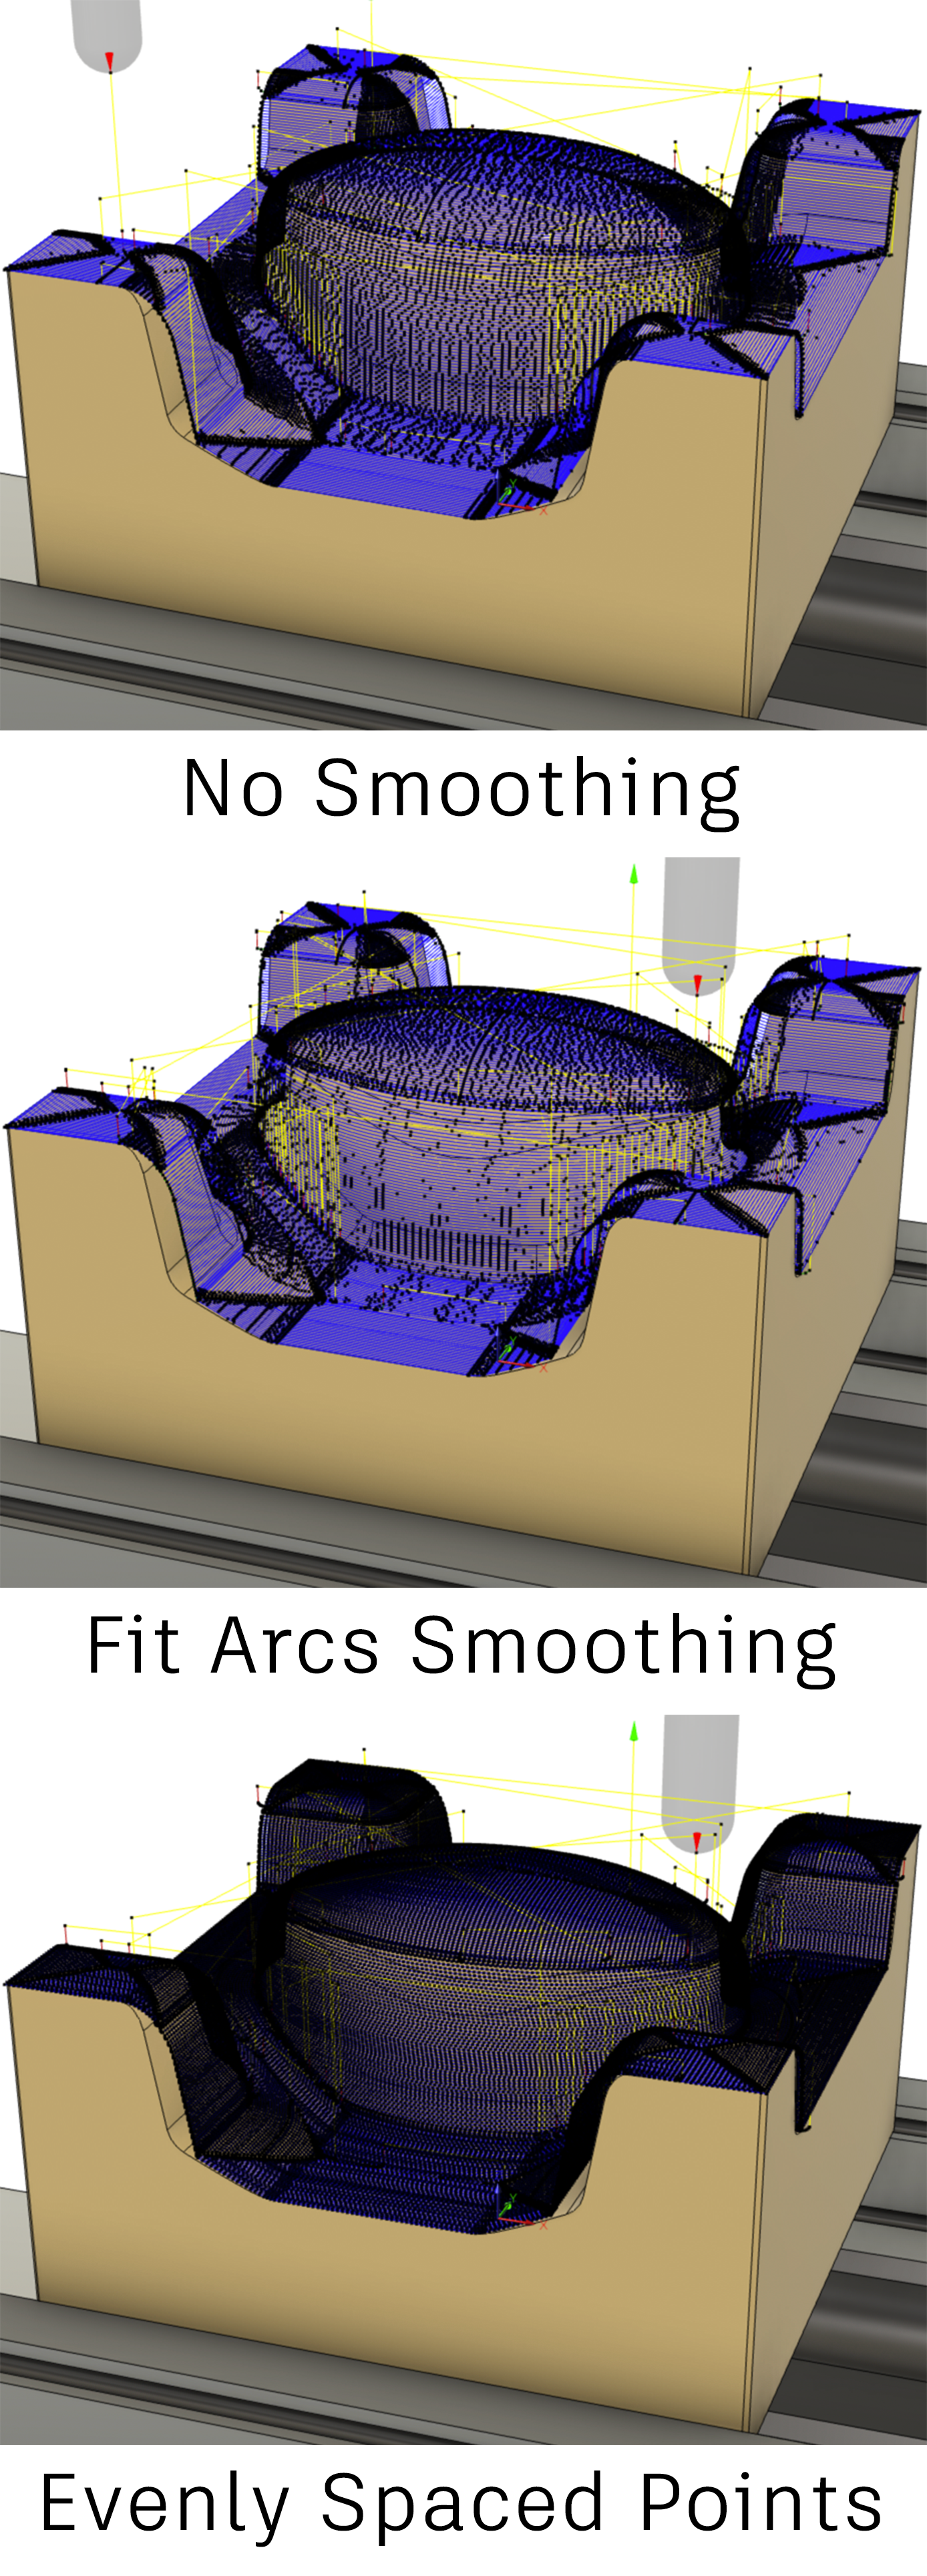
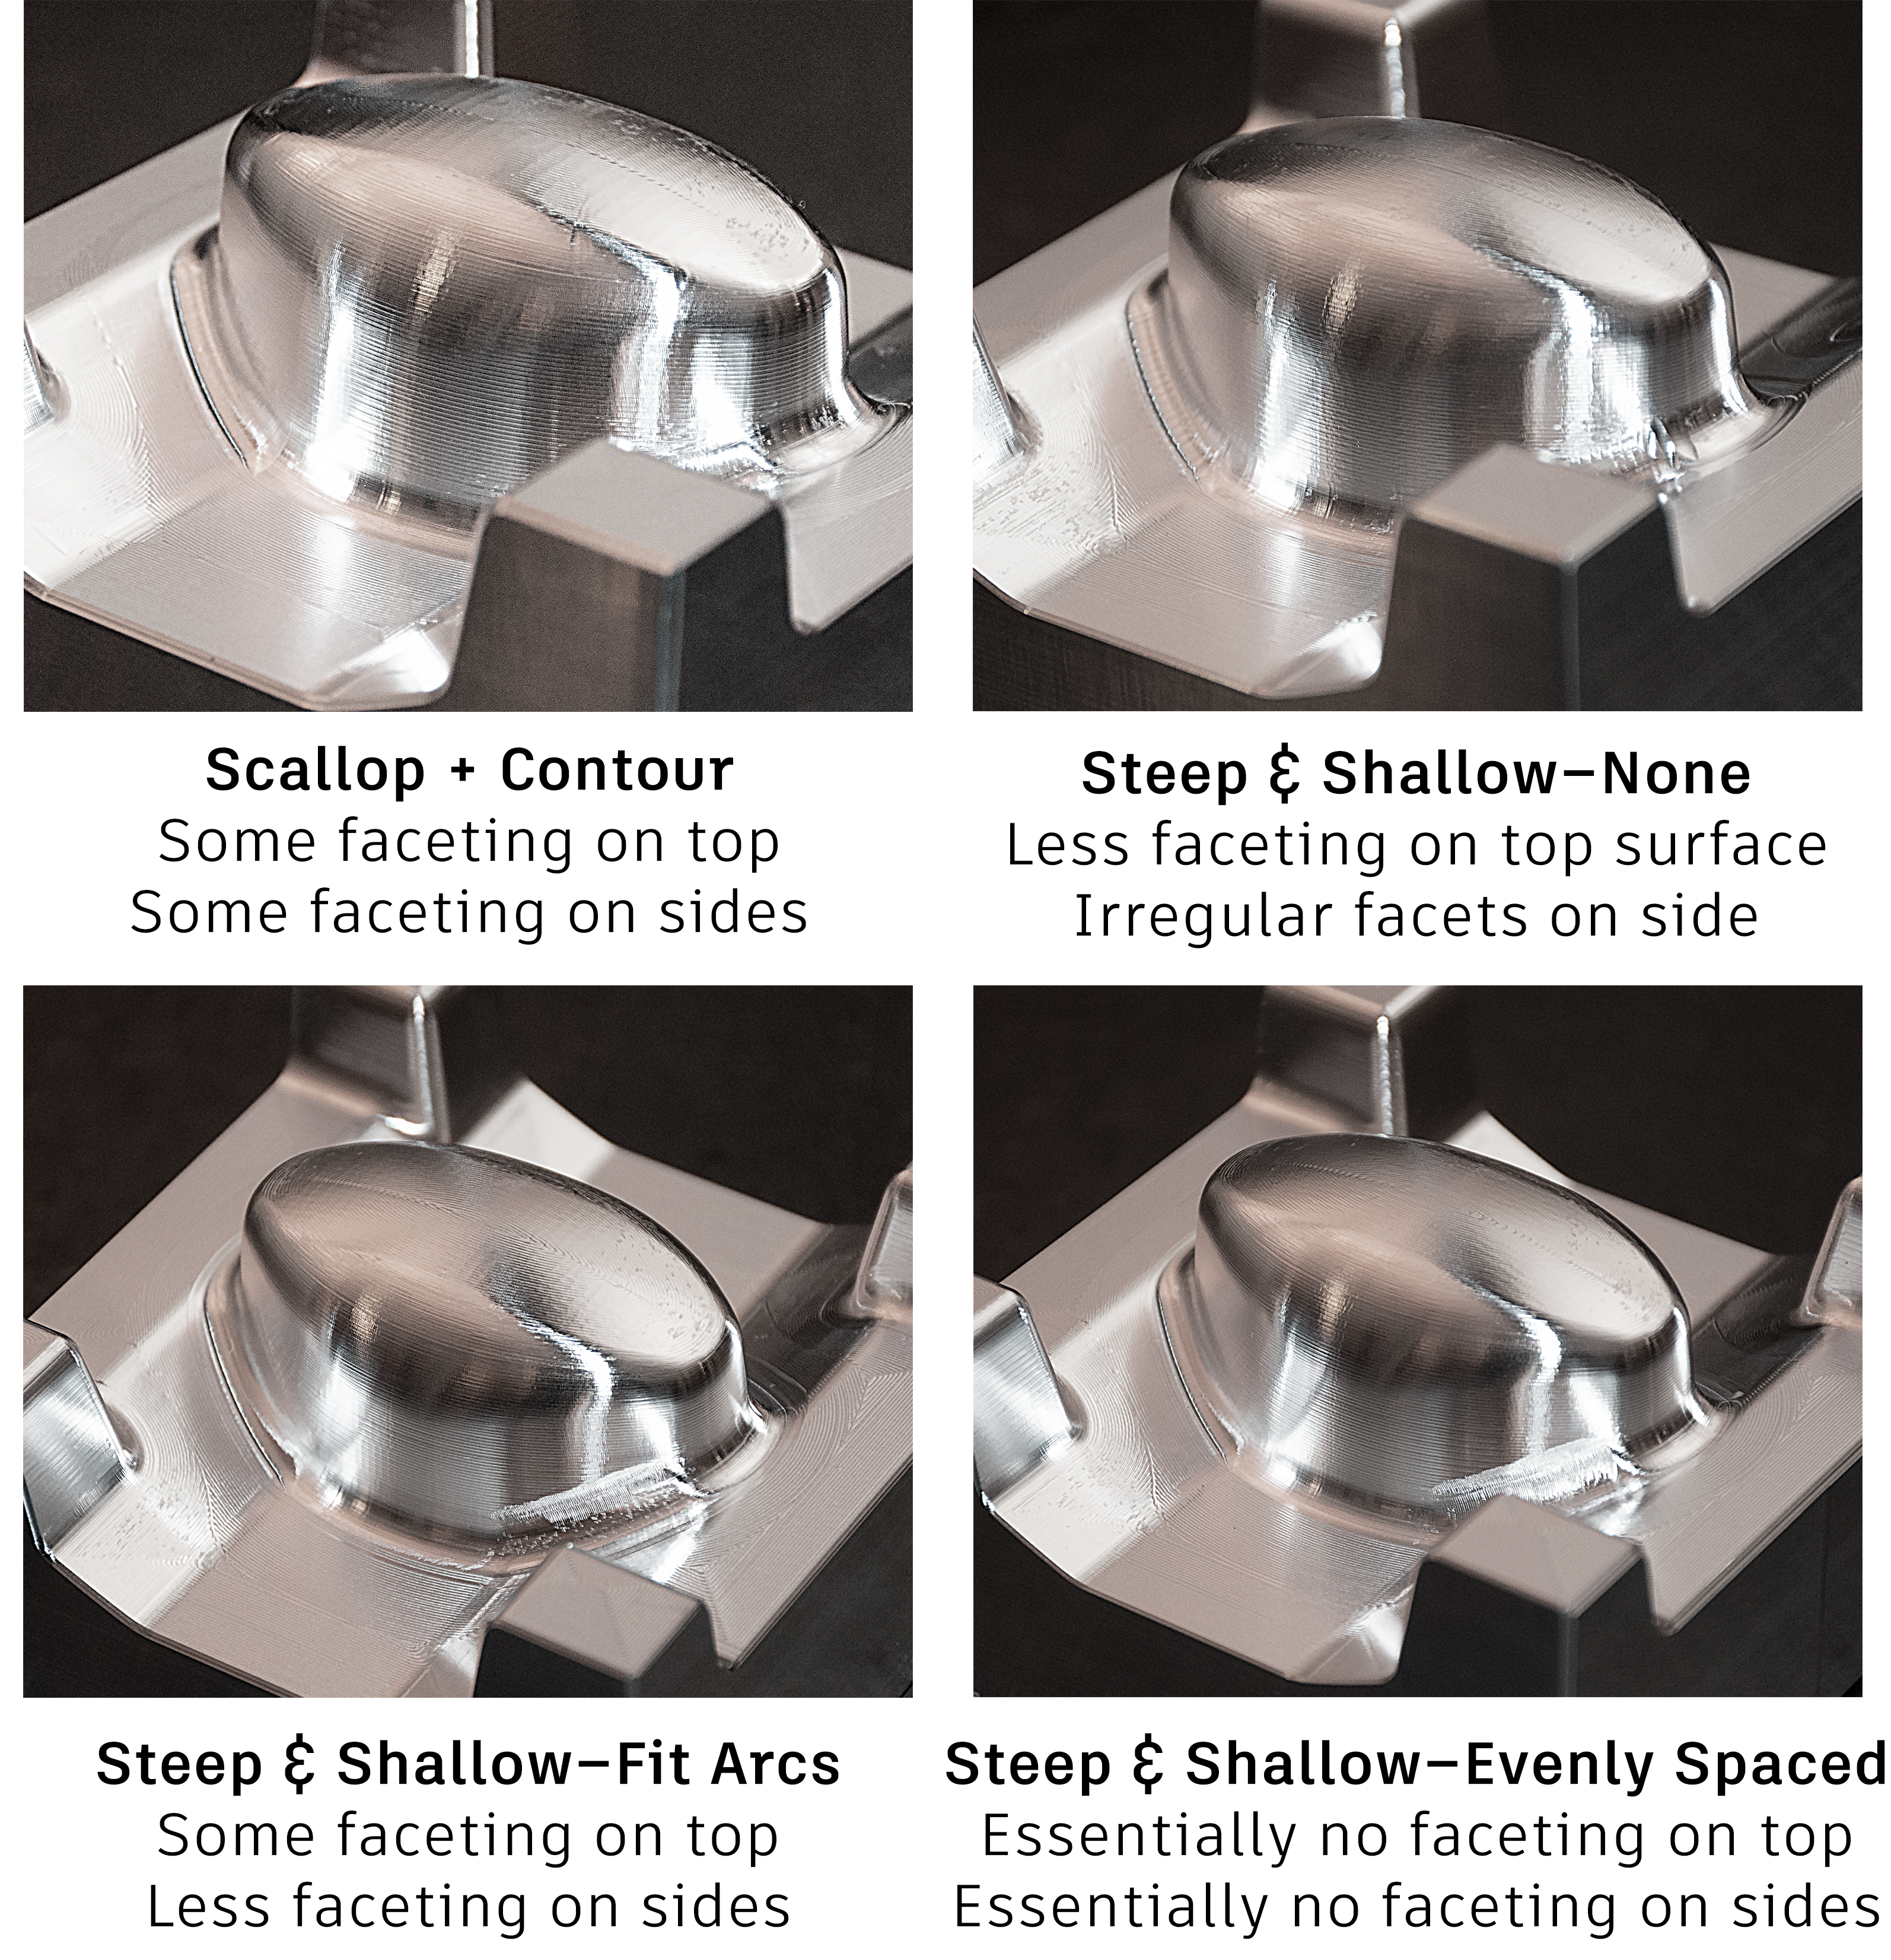
For newer machines, processing data is no longer an issue. Now, it’s actually more beneficial to add points to keep the distance between the points as even as possible. This keeps the toolpath points closer to the original surface, keeping a tighter overall tolerance as well as smoothing out the machine motion between the points. I tried out all three smoothing options, and the part results are below. Unfortunately, the results don’t show up as well through photo as they do in person. However, there’s clearly a significant improvement in surface quality. You can even see how the irregular point distribution in the toolpath leads directly to faceting or inconsistencies on the finished part.
What does it all mean?
So, should you use Steep and Shallow? I think the conclusion, as conclusions often are, is that there’s no perfect answer. From a technical perspective, it offers functionality that’s simply not available by combining other toolpaths. Continuous passes, Smooth Offsets, and Evenly Spaced Points all offer clear advantages when considering how your machine will move and the resulting surface finish. So if you’re machining parts with tight surface tolerances that require a non-trivial amount of hand finishing, these improvements might be well worth exploring. If you’re bead blasting post-machining, maybe a toolpath template that uses Scallop and Contour is plenty good enough.
From a business perspective, Steep and Shallow does come with an additional cost. Reducing downstream finishing operations might be enough to offset the subscription cost all on its own. Plus, the Manufacturing Extension comes with other functionality as well–stay tuned for a similar look into how the in-process inspection functionality can significantly improve process reliability.
Personally, I think the best part of the Manufacturing Extension is that you don’t really have to “choose” the way you used to have to choose which modules or which tier of software to buy. If you try it out and decide that it’s not right for your process, simply don’t renew your subscription! Plus you can still access any toolpaths you did create.
If you do decide to take the Manufacturing Extension for a spin, please let us know how it goes! Tag us on social (@adskFusion360), comment here, or better yet create a post on the Fusion 360 Manufacture Forum.