Solution:
The 3ds Max Rendering > Render Setup menu enables computer graphics (CG) artists to create and output separate Render Element images from their Scanline renderings. These elements, such as Diffuse color, Reflections, Self-illumination/Emission, Shadows, Specular, Z-depth and so forth, enable artists to create complex composites in programs such as Adobe Photoshop and After Effects,
Autodesk Flame, Blackmagic Fusion, The Foundry's Nuke and others. By breaking out these elements into separate image layers, artists can enhance the look of their base CG renders to add effects such as specular "bloom," glowing self-illuminated windows, deeper shadows and so on.
With the adoption of Arnold as the default production renderer for 3ds Max, the legacy Render Elements workflow has been supplanted by
Arnold AOVs, or Arbitrary Output Variables. These allow CG artists to separate out many different elements of their renderings, as either separate images, or as layers embedded into 16- and 32-bit .EXR files.
To use this workflow in Adobe After Effects or Photoshop, do the following:
Add EXR plug-ins to After Effects and Photoshop
To use Arnold AOVs embedded in .EXR files and break them out as separate elements within Adobe After Effects:
- Go to the ProEXR website and download their free plugins for Adobe After Effects. (If desired, install the ProEXR plugin for Photoshop, or download and install the free Photoshop Exr-IO plugin as an alternative.)
- Follow the instructions included with the ProEXR plugins to install them.
Remove legacy Render Elements from existing image output settings
If loading older 3ds Max scenes containing Scanline-based Render Elements which are "embedded" in .EXR render files, for example, these elements must be removed before rendering with Arnold and outputting AOVs. If not, the legacy Render Elements may overwrite the Arnold AOV layers in the .EXR files and cause them to appear empty when compositing. (If creating a new 3ds Max scene to render with Arnold, skip this and proceed to the next section,
"Set up Arnold AOVs for rendering.")
Here's how to check for and delete them:
- After loading a legacy scene file, go to the Rendering > Render Setup > Common tab, then click on the Files button to open the Render Output File menu.
- Refresh the file type (in this case, .EXR), and click on the Setup button. The image configuration menu will appear.
- If the image output contains any Render Elements or G-Buffer Channel elements, use Control-Click to select them and delete all of them. (See the following image as an example.)
- When finished, click on OK to close this menu.
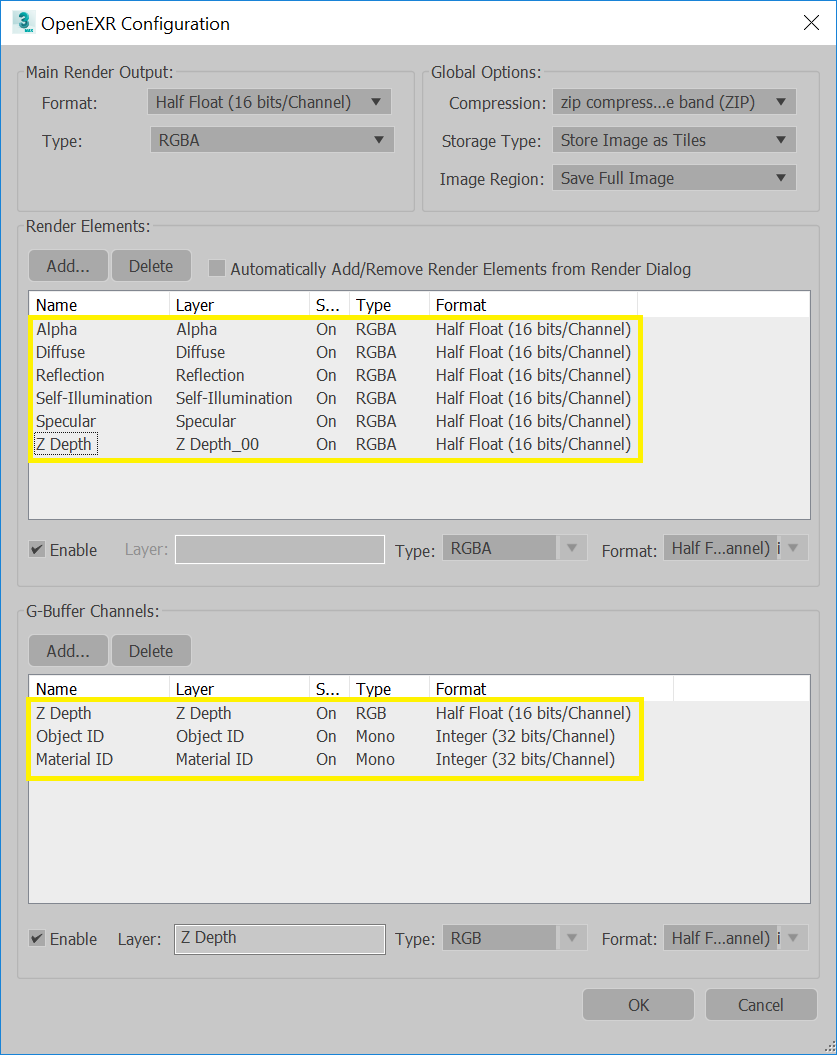
If legacy Render Elements are present, delete all before rendering AOVs with Arnold.
Set up Arnold AOVs for Rendering
The 3ds Max to Arnold User Guide offers a detailed look at how to use the new AOV Manager to add AOVs to rendered output. For more information,
see the 3ds Max AOVs page here.
For additional help in setting up Arnold AOVs, including the proper workflow for adding Cryptomattes, see the troubleshooting article:
Cannot render Arnold Cryptomatte AOVs in 3ds Max.
AOV's are saved by default in the default 3ds Max project at C:\Users\<YourUserName>\Documents\3ds Max <Version>. It is recommended to set a project to automatically write the AOV files to the desired location. See information about setting a project in 3ds Max:
Projects in 3ds Max .
Working with Arnold Z-Depth AOVs
Note: If Arnold Z-Depth AOV layers appear pure white or pure black, please see Built-in ZDepth AOV in Arnold shows solid white in the Arnold render view or Arnold Z (ZDepth) AOV renders black when saved as an EXR from 3ds Max.
Set up Arnold image file output in the 3ds Max Rendering > Render Setup Menu
Although the examples in this article suggest using 16-bit, half-floating point .EXR files for compositing, Arnold allows for other file types to be used for AOV output, as noted in the following list.
For information on the image files supported for AOVs,
see this article.
Note: legacy 3ds Max .RPF and .RLA files are not supported for Arnold AOV output, and are not recommended for modern compositing workflows.
Organize AOV file output using the token function in the AOV manager
When rendering multiple AOV files from multiple cameras with the Batch rendering function, AOV’s may be overwritten. Use the token function in the AOV manager to add the camera name or other attributes to each AOV file output path. See AOV’s (go to Output Path Tokens at the end of the page).

Import the Arnold renders into After Effects
- When the 3ds Max Arnold renders are finished, open Adobe After Effects.
- Set the File > Project Settings to 16-bit, Linear Workspace, then load the .EXR image(s).
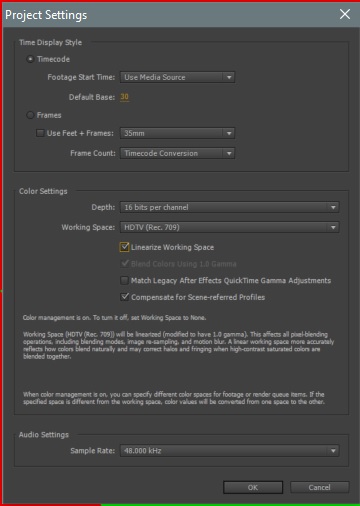
Adobe After Effects 16-bit half-float project settings for .EXR files and linear workflow.
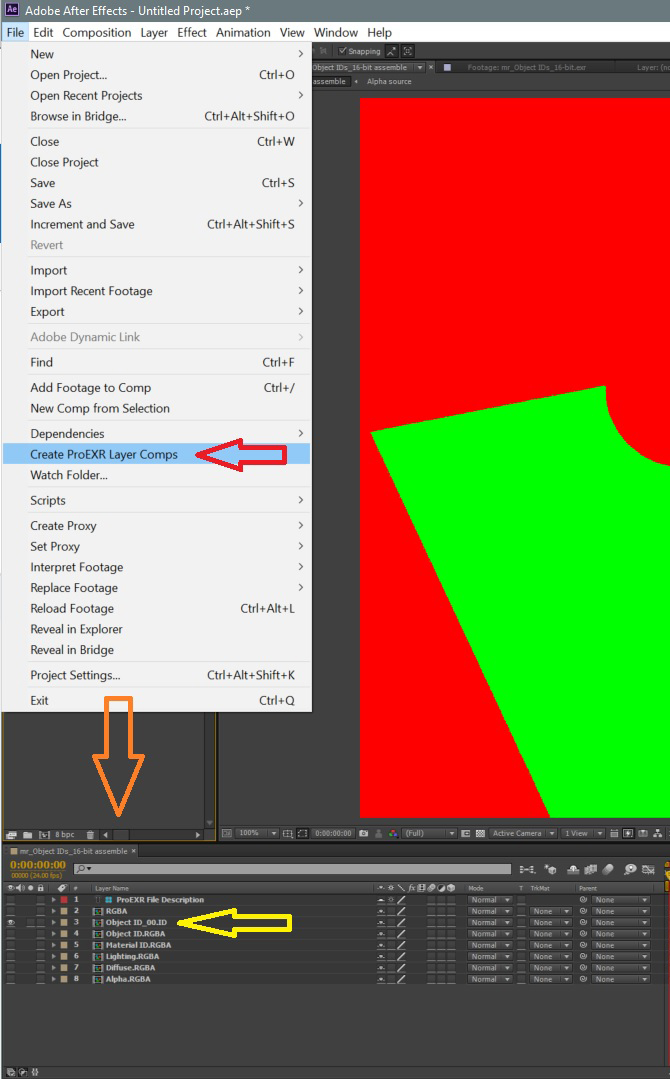
- After loading the image(s), click on the image sequence, then pick File > Create ProEXR Layer Comps. This should create a comp with multiple layers, broken out from the elements embedded in the .EXR file. (Again, see the instructions in the ProEXR documentation for more on this.)
ProEXR Plugin workflow using .EXR files in Adobe After Effects
You can now use the contents of these AOV comps to assemble the final composite, and add filters or other effects as necessary to each AOV layer to produce the desired look.
Working with AOVs in Adobe Photoshop
- After installing the ProEXR or EXR-IO plugins for Photoshop, browse to the rendered .EXR image and open it.
- The image should load with each AOV appearing as a separate layer, ready for adjustment.