
This is part three of Working with CAD, which includes: Export to CAD
Part one includes: Linking CAD files to Revit
Part two includes: Building a new project using a CAD background
Export to CAD
You can export views and sheets from Revit to multiple CAD formats that can then be used in programs such as AutoCAD. In Revit 2023, you can export geometry to about a dozen filetypes, including DWG, DGN, DXF, IFC, OBJ, and SAT. You can export individual views and sheets or multiple views and sheets.
Exercise files:
Open the ExportingFiles [2023].rvt exercise file.
Estimated time to complete topic:
15 minutes
Topic steps:
12
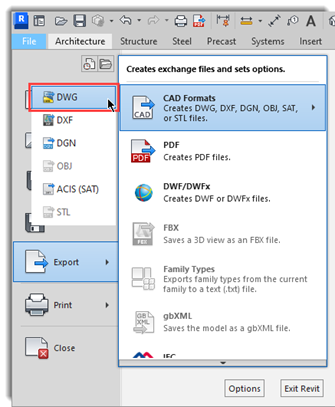
1. To export to a CAD format, click the File tab and select Export then CAD Formats. There are multiple options here: DWG, DXF, MicroStation DGN, or ACIS (SAT). Click DWG.
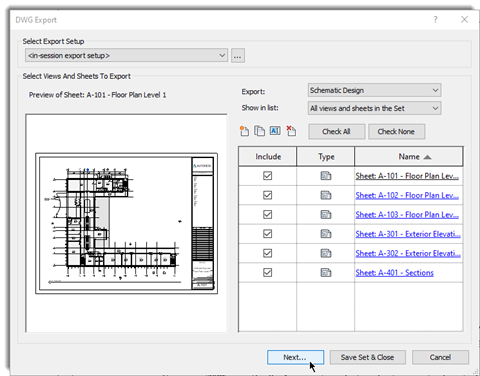
2. When you do, a DWG Export dialog opens. In the Select Export Setup dropdown, select an export setup from the list. Any export setup that was previously created will be listed. If none were previously set up, leave the in-session export setup option selected.

3. In the Export dropdown, the default selection is <current view/sheet only>. You can expand the dropdown and choose <in session view/sheet set> as well as any custom sheet sets that have already been defined. You should create a set if you plan on exporting the same views or sheets more than once. Then when you have a set, you can choose it from the Export: dropdown. Select Schematic Design.

4. Next, expand the Show in list dropdown and choose which views and sheets you want to see. Select Sheets in the Set.

5. When you do, the list includes all the sheets previously defined as part of the selected sheet set. You can deselect the corresponding checkbox if you do not want to include a particular sheet in the .dwg file.
6. At this point, you are ready to export the sheets. If you click Save Set & Close, any sets you created will be saved, but no files will be exported. To export the files, click Next.
7. Once you do, the Export CAD Formats - Save to Target Folder dialog opens.
8. Navigate to the desired folder where you want to save the files.
9. When you name the CAD files, it is essentially a prefix. The sheet name will follow the File name/prefix you specify.
10. When Export views on sheets and links as external references is selected, you create external references. Deselecting this option would put the title block in the same file as the building model. Deselect Export views on sheets and links as external references.
11. In the Naming dropdown, select Automatic – Long (Specify prefix).

12. To begin the export, click OK. Revit begins exporting the selected sheets, which could take a while, depending on the number of sheets.

Additional resources:
As you build your Revit model, you may need to import CAD details to help build your design and construction documentation. However, this workflow should be determined by your company’s BIM standards and processes. Follow the link below to learn more about an AutoCAD to Revit hybrid workflow.
Import a Drafting View From Another CAD Program
Ready for more? Head back to the AEC Collection Quick Start Guide for Architects


